This workshop will show you how to
- Import and use external library (M2MQTT and XCharts) and C# scripts
- Create and customise a dynamic dashboard using uGUI
- Visualise real-time data using MQTT feeds
- Working with JSON data
To complete this workshop you will need
Additional resources
This section shows how to set up an MQTT client in Unity, using a modified version of the M2MQTT .Net library.
In Unity Hub create a New Project using the AR Mobile (Core) template and give it a logical name. Switch platform to Android from Build Profiles.
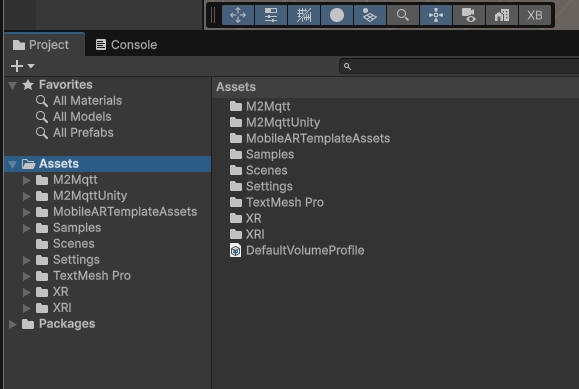
Download the modified M2MQTT library and copy the folders M2Mqtt and M2MqttUnity, located in the Assets folder inside M2MqttUnity-Master inside the Assets folder of your Unity project.
Open the example scene named M2MqttUnity_Test from the folder M2MqttUnity -> Examples -> Scenes
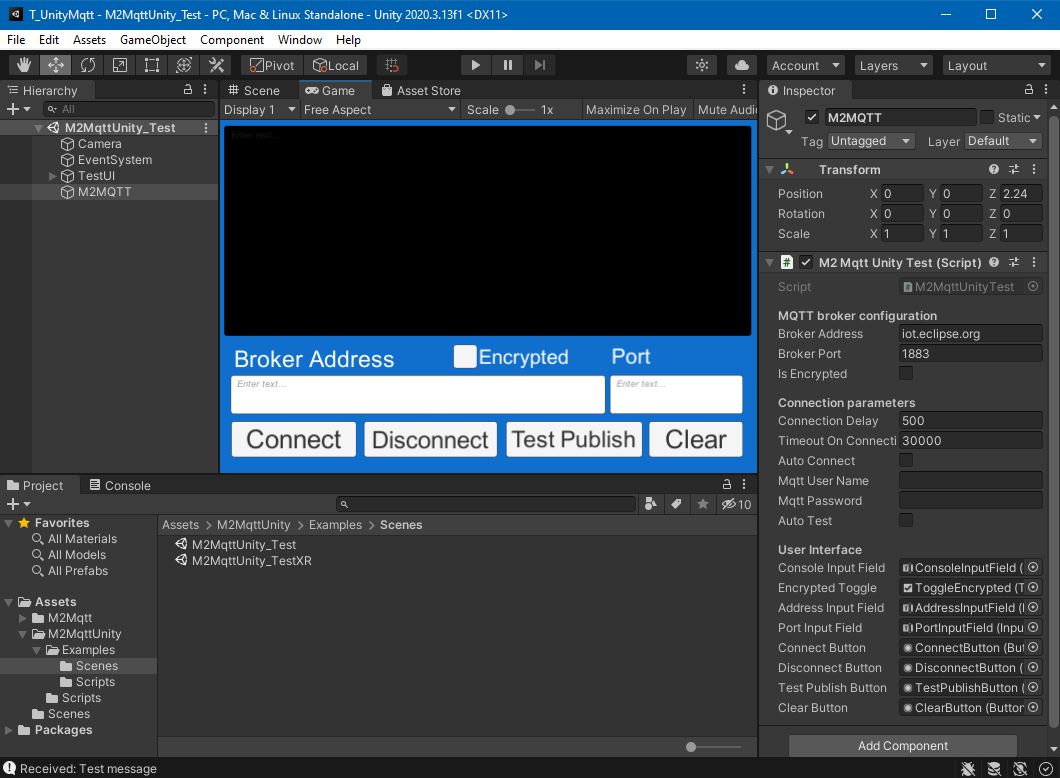
Press Play to test the library and, in the Game tab, press Connect to establish a connection with the default broker iot.eclipse.org using the port 1883.
In this case, the connection has failed, there could be various reasons for this e.g. the MQTT broker is offline
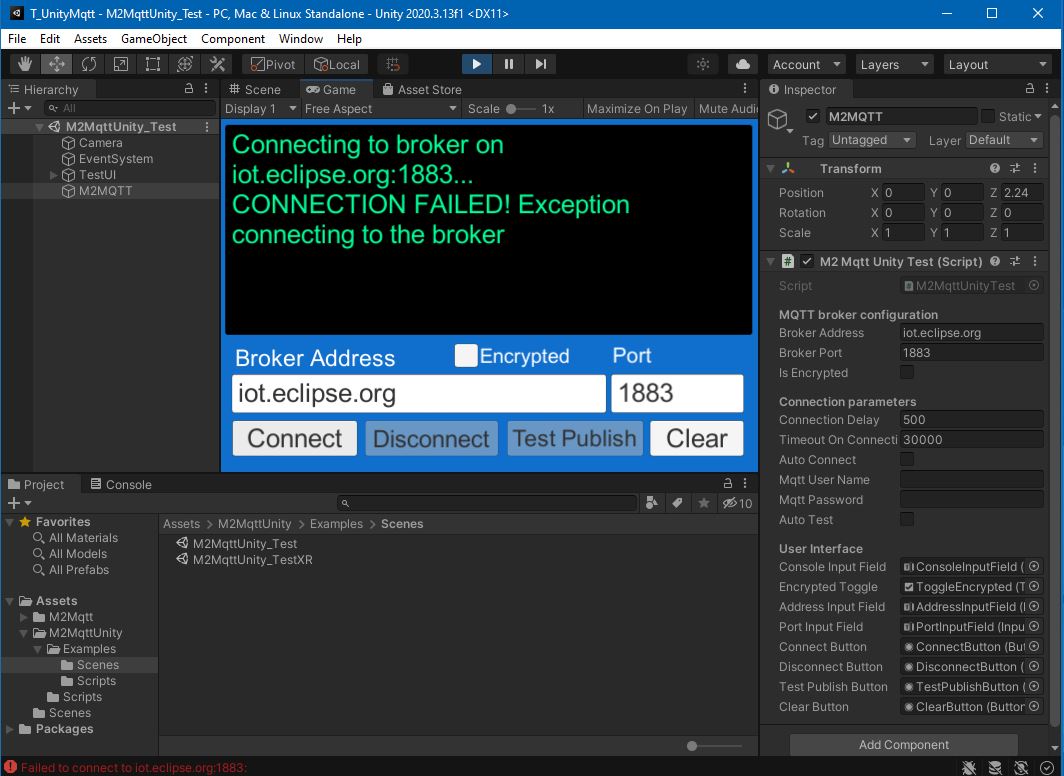
Without stopping Unity, we can change the MQTT Broker address to test.mosquitto.org, press again Connect and, once connected, press Test Publish to check if the library is able to send and receive any message

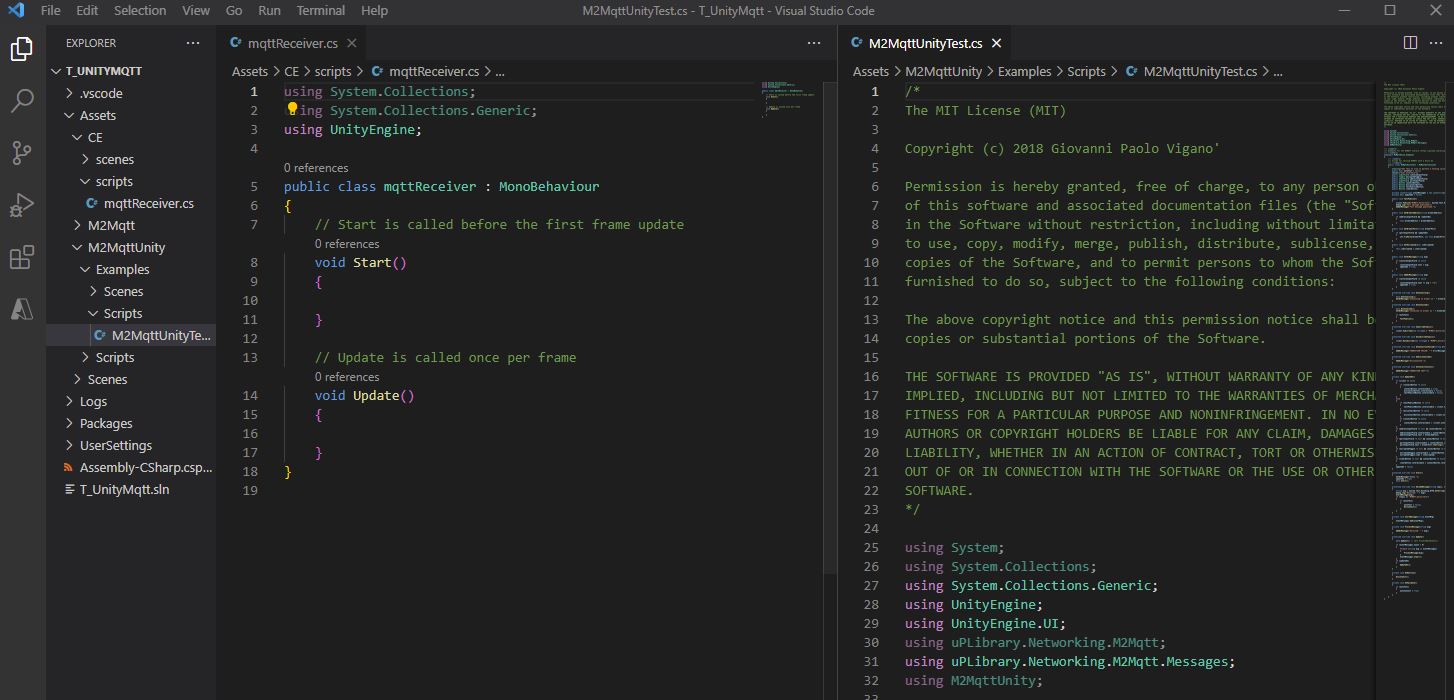
By inspecting the scene, we can see that the only script used to set up the MQTT Client is M2MqttUnityTest.cs, attached to the M2MQTT GameObject in the scene, however, this script is linked with other classes of the main folder M2Mqtt.
We need to write two custom scripts based on the original M2MqttUnityTest.cs used in the example scene.
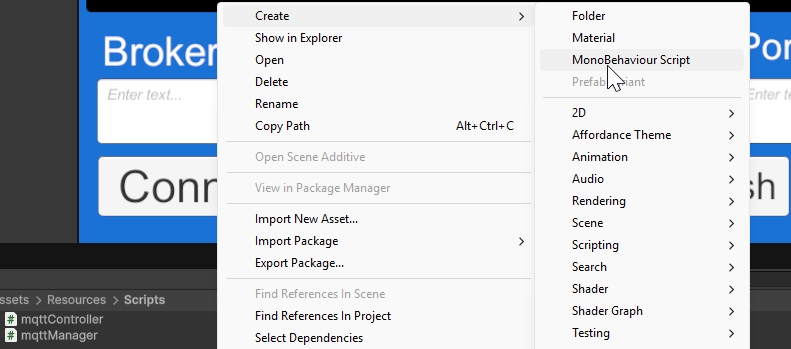
Create a new folder in Assets (e.g. Assets\Resources\Scripts) and create two new MonoBehaviour Script named:
mqttManager(no need to add the extension .cs)mqttController(no need to add the extension .cs)
Open the mqttManager.cs in VSCode, remove the existing content
using System.Collections;
using System.Collections.Generic;
using UnityEngine;

public class mqttManager : MonoBehaviour
{
    // Start is called before the first frame update
    void Start()
    {

    }
    // Update is called once per frame
    void Update()
    {

    }
}
And paste the script from the GitHub Gist
How the mqttManager works:
- the first part of text is the licence, it tell us what we can and cannot do with the code and the Author of the code itself;
- the
usingstatements allows us to import theM2MqttUnity, the twouPLibraryandUnityEnginenamespaces, to access the methods and functions from those scripts;
using System.Collections.Generic;
using UnityEngine;
using M2MqttUnity;
using uPLibrary.Networking.M2Mqtt.Messages;
- the
mqttObjclass is used to store the message and topic received by the MQTT broker and send it to the controller - the public class
mqttManagerneeds to derive from the main classM2MqttUnityClient(that is part of the above importedusing M2MqttUnity) instead of the standardMonoBehaviour;
//the mqttObj is use to store the message received and topic subscribed, so we can select the right object from the controller
//C# Property GET/SET and event listener is used to reduce Update overhead in the controlled objects
public class mqttObj{
private string m_msg;
public string msg
{
get{return m_msg;}
set{
if (m_msg == value) return;
m_msg = value;
}
}
private string m_topic;
public string topic
{
get
{
return m_topic;
}
set
{
if (m_topic == value) return;
m_topic = value;
}
}
}
public class mqttManager : M2MqttUnityClient
{
[Header("MQTT topics")]
[Tooltip("Set the topic to subscribe. !!!ATTENTION!!! multi-level wildcard # subscribes to all topics")]
//public string topicSubscribe = "#"; // topic to subscribe. !!! The multi-level wildcard # is used to subscribe to all the topics. Attention i if #, subscribe to all topics. Attention if MQTT is on data plan
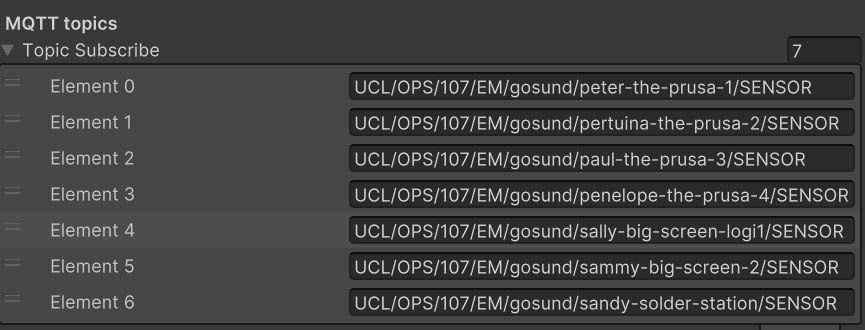
public List<string> topicSubscribe = new List<string>(); //list of topics to subscribe
[Tooltip("Set the topic to publish (optional)")]
public string topicPublish = ""; // topic to publish
public string messagePublish = ""; // message to publish
[Tooltip("Set this to true to perform a testing cycle automatically on startup")]
public bool autoTest = false;
//new mqttObj is created to store message received and topic subscribed
mqttObj mqttObject = new mqttObj();
public event OnMessageArrivedDelegate OnMessageArrived;
public delegate void OnMessageArrivedDelegate(mqttObj mqttObject);
//using C# Property GET/SET and event listener to expose the connection status
private bool m_isConnected;
public bool isConnected
{
get
{
return m_isConnected;
}
set
{
if (m_isConnected == value) return;
m_isConnected = value;
if (OnConnectionSucceeded != null)
{
OnConnectionSucceeded(isConnected);
}
}
}
public event OnConnectionSucceededDelegate OnConnectionSucceeded;
public delegate void OnConnectionSucceededDelegate(bool isConnected);
// a list to store the mqttObj received
private List<mqttObj> eventMessages = new List<mqttObj>();
These are all the variable that we need. The public class mqttObj and the public bool variable isConnected use the C# properties GET/SET. Instead of using an Update function or a Coroutine, by using these properties it is possible to create a more efficient event system.
the following functions, after the variables, and within the public class mqttManager derive from the original M2MqttUnityTest.cs and they have been already modified to make them more suitable for our need
public void Publish()
    {
        client.Publish(topicPublish, System.Text.Encoding.UTF8.GetBytes(messagePublish), MqttMsgBase.QOS_LEVEL_EXACTLY_ONCE, false);
        Debug.Log("Test message published");
    }
    public void SetEncrypted(bool isEncrypted)
    {
        this.isEncrypted = isEncrypted;
    }

    protected override void OnConnecting()
    {
        base.OnConnecting();
    }

    protected override void OnConnected()
    {
        base.OnConnected();
        isConnected = true;

        if (autoTest)
        {
            Publish();
        }
    }

    protected override void OnConnectionFailed(string errorMessage)
    {
        Debug.Log("CONNECTION FAILED! " + errorMessage);
    }

    protected override void OnDisconnected()
    {
        Debug.Log("Disconnected.");
        isConnected = false;
    }

    protected override void OnConnectionLost()
    {
        Debug.Log("CONNECTION LOST!");
    }

    protected override void SubscribeTopics()
    {
        foreach (string item in topicSubscribe) //subscribe to all the topics of the Public List topicSubscribe, not most efficient way (e.g. JSON object works better), but it might be useful in certain circumstances
        {
         client.Subscribe(new string[] { item }, new byte[] { MqttMsgBase.QOS_LEVEL_EXACTLY_ONCE });
        }
    }

    protected override void UnsubscribeTopics()
    {
        foreach (string item in topicSubscribe)
        {
            client.Unsubscribe(new string[] { item });
        }
    }

    protected override void Start()
    {
        base.Start();
    }

    protected override void DecodeMessage(string topicReceived, byte[] message)
    {
        //The message is decoded and stored into the mqttObj (defined at the lines 40-63)

        mqttObject.msg = System.Text.Encoding.UTF8.GetString(message);
        mqttObject.topic=topicReceived;

        Debug.Log("Received: " + mqttObject.msg + "from topic: " + mqttObject.topic);

        StoreMessage(mqttObject);

        if(OnMessageArrived !=null){
        OnMessageArrived(mqttObject);
        }
    }

    private void StoreMessage(mqttObj eventMsg)
    {
        if (eventMessages.Count > 50)
        {
            eventMessages.Clear();
        }
        eventMessages.Add(eventMsg);
    }

    protected override void Update()
    {
        base.Update(); // call ProcessMqttEvents()

    }

    private void OnDestroy()
    {
        Disconnect();
    }

    private void OnValidate()
    {
        if (autoTest)
        {
            autoConnect = true;
        }
    }//End of the Class
From the original scripts, all the references and functions based on the UI panel have been removed.
The message is received and decoded by the function DecodeMessage() that is used also to store a copy of the received message and topic. The Debug.Log function is used to print the received message and topic in the console, it can be commented out in production.
We can now save the script and go back to the Unity Editor.
Create a new empty scene, and add a new empty GameObject in the Hierarchy window named MQTT_Manager and add the script mqttManager.cs using Add component or dragging the script on the GameObject.
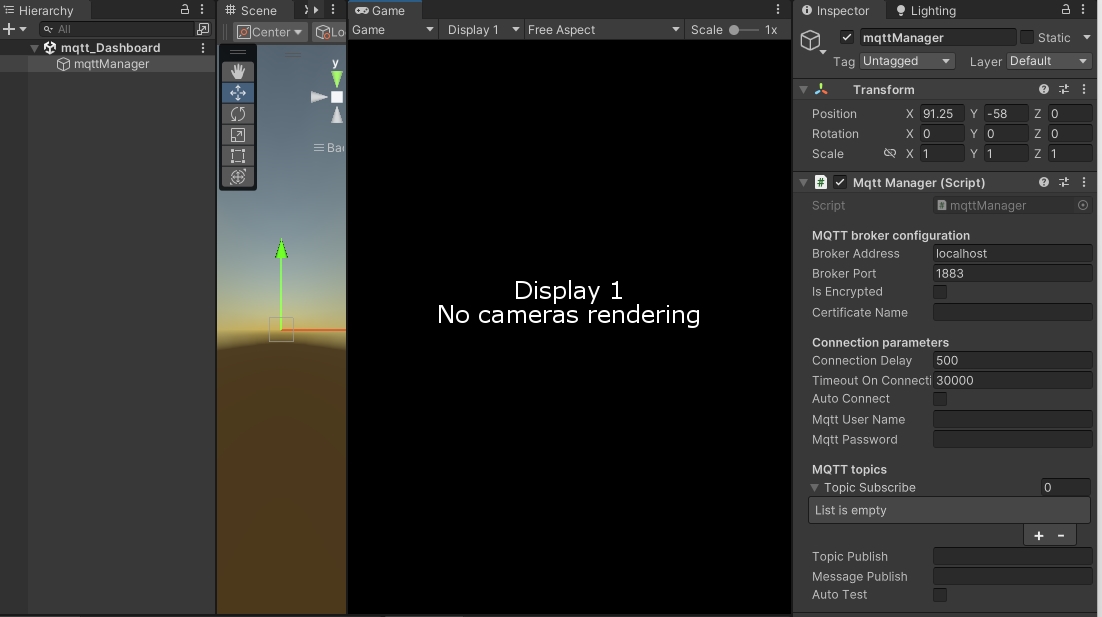
With the MQTT_Manager still selected, in the Inspector window fill the Broker Address, Broker Port and some Topic Subscribe and enable the Auto Connect checkbox.
Press Play to control, in the Unity console the status of the connection, the received messages and the subscribed topic.
Press Stop to exit the Game Mode.
To identify the MQTT_Manager in the scene from other scripts, we have to set its Tag from the Inspector window (default value is Untagged). Select the Tag dropdown and select Add Tag... (e.g. energy). Select again the GameObject set the Tag just created.
The mqttController.cs script can be customised to control any GameObject in the scene. As the data is currently display just in the console window, we are going to visualise it in the scene using a TextMeshPro (TMP) GameObject.
- right-click in the
Hierarchy windowand--> 3D Object --> Text-TextMeshPro, or from the top menuGameObject --> 3D Object --> Text-TextMeshPro
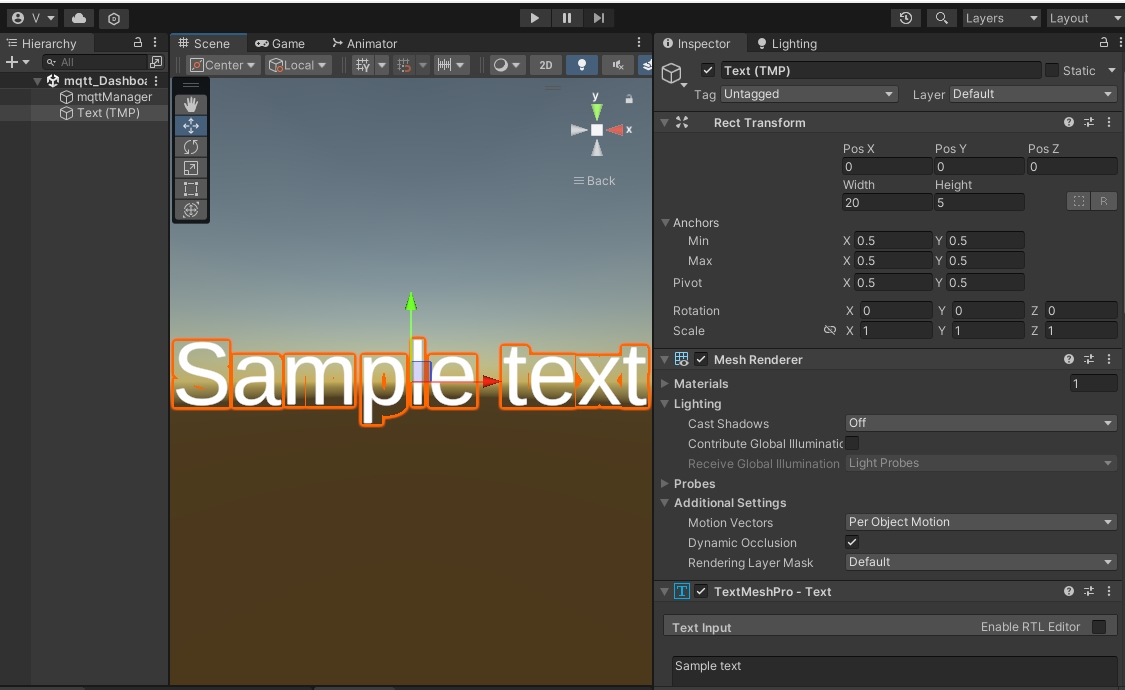
- with the
TextMeshProGameObject selected, in theInspector windowchange any text parameters if needed - add the
mqttController.csscript to theTextMeshProGameObject selected - open the
mqttController.csscript in VSCode to add:using TMProstatement- and the reference to the text field in the
OnMessageArrivedHandlerfunction
using System.Collections;
using System.Collections.Generic;
using UnityEngine;
using TMPro;

public class mqttController : MonoBehaviour
{
    public string nameController = "Controller 1";
    public string tag_mqttManager = "";
    public mqttManager _eventSender;

    void Start()
    {
        if (GameObject.FindGameObjectsWithTag(tag_mqttManager).Length > 0)
        {
            _eventSender = GameObject.FindGameObjectsWithTag(tag_mqttManager)[0].gameObject.GetComponent<mqttManager>();
        }
        else
        {
            Debug.LogError("At least one GameObject with mqttManager component and Tag == tag_mqttManager needs to be provided");
        }
        _eventSender.OnMessageArrived += OnMessageArrivedHandler;
    }

    private void OnMessageArrivedHandler(mqttObj mqttObject) //the mqttObj is defined in the mqttManager.cs
    {
        //We need to check the topic of the message to know where to use it
        // if (mqttObject.topic.Contains("Entire topic or part of it"))
        // {
            this.GetComponent<TextMeshPro>().text = mqttObject.msg;
            Debug.Log("Message, from Topic " + mqttObject.topic + " is = " + mqttObject.msg);
        // }
    }
}
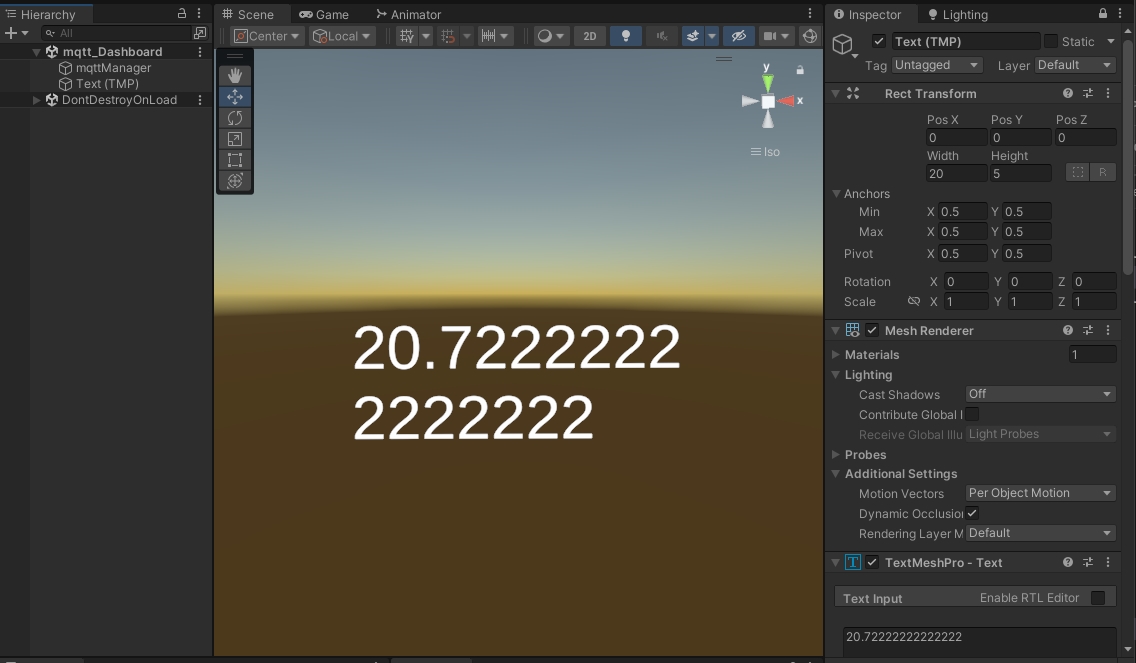
The variable tag_mqttManager need to be set in the Inspector window. It must match the tag of one of the GameObjects in the scene that has the mqttManager script attached. In this example, the GameObject MQTT_Manager has tag mqttManager.
The variable _eventSender is automatically assigned based on the Tag and is used to establish a connection between the manager and the controller. Whenever the MQTT Client receives a message, it triggers an event that is detected by this controller script.
This setup allows for flexibility in managing MQTT communication: It is possible to create multiple instances of mqttManager if you need to connect to multiple MQTT Brokers, and you can also connect multiple controllers to a specific mqttManager for handling the received messages.
The Start function is used to select the right manager, based on its Tag, and to subscribe to the OnMessageArrived event defined in the mqttManager.
When the message is received by the mqttManager, mqttController check if the topic is the right one and updates the text field of the TextMeshPro GameObject.
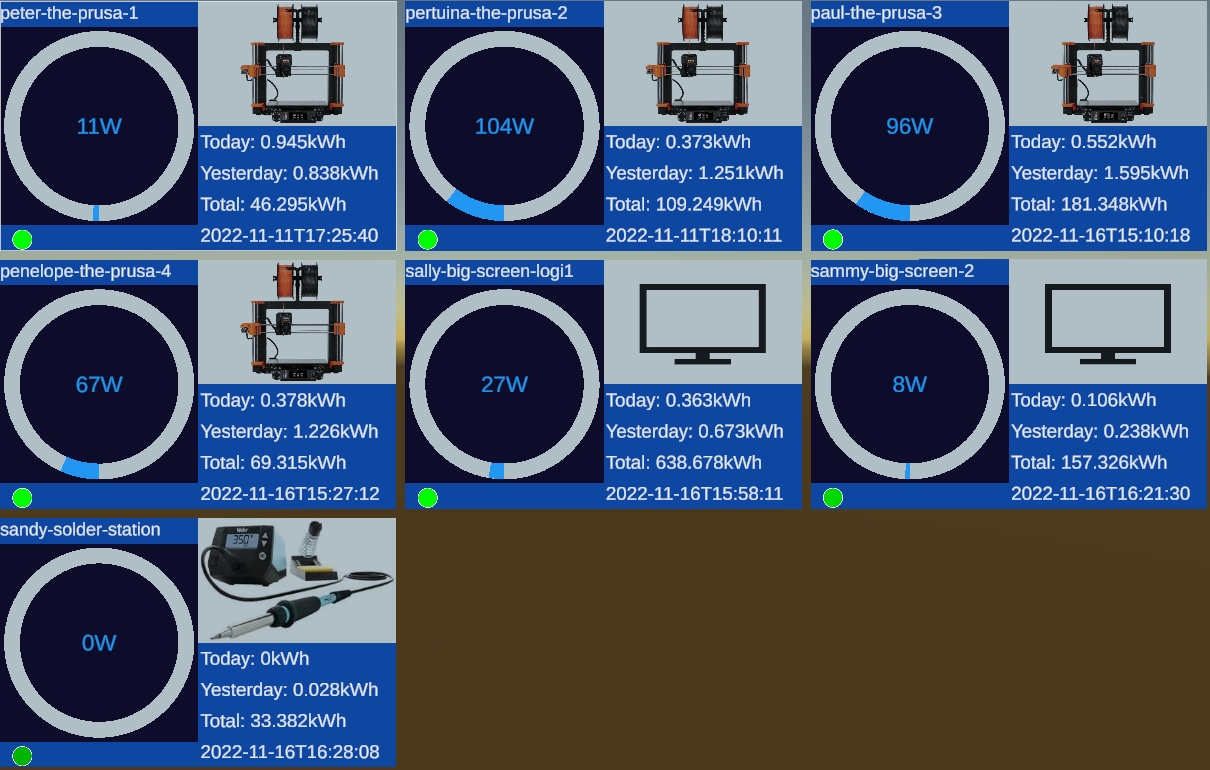
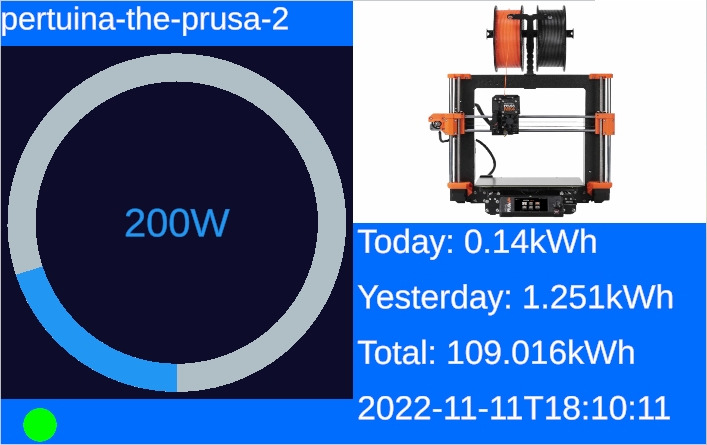
We are going to create a dynamic dashboard for a series of Gosund energy monitors we are using in our lab. Each sensor will have a card displaying historical data, real-time data, and an image of the device. The dashboard will be responsive and adaptable to additional sensors that might be added in the future.
TextMeshPro is a powerful add-on that can be used to create effective Graphic User Interfaces (GUI) in combination with the Unity uGUI system.
A GUI in Unity can use two main Render Mode:
- Screen Space: the UI overlays the camera view
- World Space: the UI is an actual object spatially located in the digital environment
The first mode is generally used to create input menus, mini-maps, pop-ups and splash screens or to develop entire 2D applications. The World Space mode is used to create digital screens, as well as buttons and other interactable elements that are blended with the digital environment, as we are going to see in this example.
Designing dashboards and charts in Unity can be very challenging without dedicated add-ons. XCharts is a community plugin that takes away the most complex coding part leaving the user a flexible tool to design and customise different chart types with ease. Most of the charts are part of the package delivered with an MIT licence.
Download and install the Unity XCharts 3.14 package
The charts can be added directly to the UI, as part of the Screen Space or as a 3D object in the World Space.
UI structure
The GUI in Unity is based on a series of components that needs to be created and used in a specific order. The first element is the main parent of the GUI, the Canvas. The Canvas is used to control the Render mode used for the GUI, as well as the position and dimensions of the entire GUI.
The Canvas is an empty GameObject that contains the various components (children) of the GUI. The children by default inherit Canvas properties, but it is possible to override them if needed on an object-by-object basis.
The GUI elements can be passive and used to display information (e.g. text, images) or they can be interactive (e.g. buttons, slider) to control GameObjects in the scene using an EventSystem.
- create a new
UI -> Canvasand name it MQTT_Dashboard (and EventSystem GameObject will be created automatically) - select the MQTT_Dashboard and in the
Inspector windowchange- CanvasRender mode from ScreenSpace to World Space
- Rect Transform
- width= 89 - height= 56
- position
PosX: 0; PosY: 0; PosZ: 0; rotation0 0 0
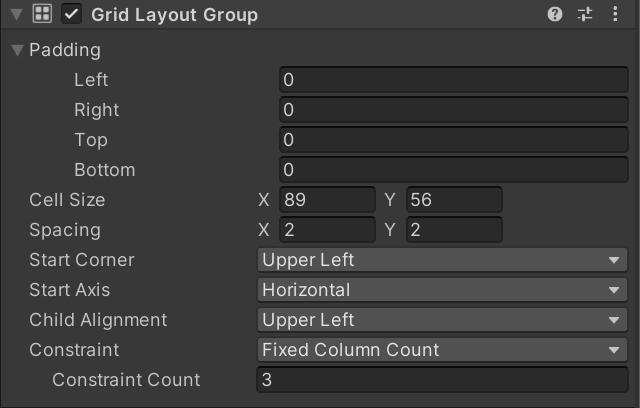
- add the component
Grid Layout Groupchange:- Cell Size
X: 89; Y: 56 - Spacing
X: 2; Y: 2 - Constraint
Fixed Column CountwithCount=3(we will need this later)
- Cell Size
- create a new
UI -> Panelas child of the MQTT_DashboardCanvas - in the
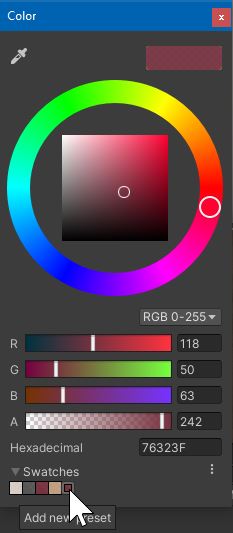
Inspector windowchange the colour of the panel and remove the default Source Image
The next step is to add the TextMeshPro GameObjects for the description texts and the placeholder texts, the latter will be dynamically updated by the MQTT_Manager.
Device Title
- create a new
UI -> Text - TextMeshProas a child of the Panel GameObject and name itdeviceName - in the
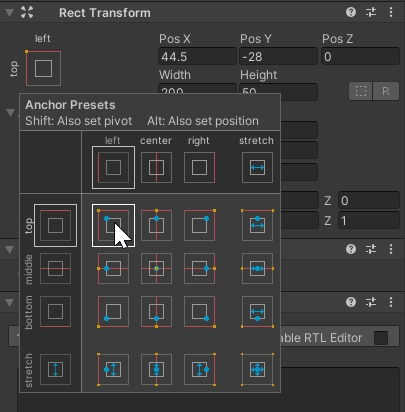
Inspector windowchange- Anchor Presets from
middle centertotop leftpressing also Shift during the selection to change the Pivot as well. Pos X= 0andPos Y= 0width=81,height=5andFont Size= 4.- Change also the
Textfrom New Text to Device Name. Have a look at the other parameters of the TextMeshPro Component (i.e. alignments; colours; font style...) to familiarise yourself with the various properties
- Anchor Presets from
Text Box
- create a new empty GameObject named TextBox and add it as a child of the Panel GameObject
- Anchor Presets from
middle centertobottom rightpressing also Shift during the selection to change the Pivot as well. Pos X= 0.5andPos Y= 0.width= 44.5andheight= 28- add a component Vertical Layout Group and change the Child Alignment to
Upper Left
- Anchor Presets from
- create 4
UI -> Text - TextMeshProand name them:Today,Yesterday,Total,Sinceas children of the just created GameObject (i.e. TextBox),- Change their
width= 44.5,height= 5andFont Size = 4.2. - Also change the
Textfrom New Text to their individual names
- Change their
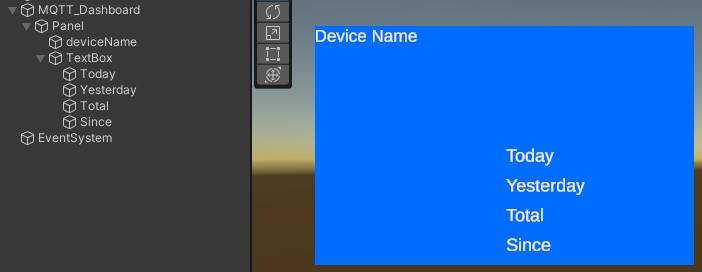
Image Box
- Create a new
UI -> Imageas child of the Panel- Anchor Presets from
middle centertoright toppressing also Shift during the selection to change the Pivot as well. Pos X= 0andPos Y= 0width= 44.5andheight= 28
- Anchor Presets from
- The Image Box will be used to display an image of the device monitored. The image can be imported as
jpgorpngbut need to be transformed in sprite. This can be done directly in Unity by selecting the image and, in theInspector window, change: - Texture Type from
DefaulttoSprite (2D and UI) - Sprite Mode from
MultipletoSingle
Toggle
The elements of the UI inputs can be activated automatically using scripting. In this case, a toggle is used to show the user if the connection with MQTT is established and if a message has arrived.
- To the Panel add a
UI -> Toggle - expand the Toggle GameObject and remove the
LabelGameObject - expand also the Background GameObject and select the Checkmark GameObject
- In the inspector change the source image in
Button - Circular BGand the colour tored. width = 4.2andheight= 4.2
- In the inspector change the source image in
- Select the
Backgroundand change bothwidthandheightto4.5andPos X= 0andPos Y= 0. - Select the
Toggleand change the Anchor Presets frommiddle centertoleft bottompressing also Shift during the selection to change the Pivot as well.Pos X= 5andPos Y= 2.5.width= 0andheight= 0
Chart
Finally we can add the chart, it will be a Ring chart used to display the real time data of the power consumtion.
- Add a
UI -> XChart -> Ring Chart -> Ringto the Panel- Change the Anchor Presets from
middle centertoleft middlepressing also Shift during the selection to change the Pivot as well.Pos X= 0andPos Y= 0width= 44.5andheight= 44.5
- in the
Inspector windowchange the following settings for the XChartTheme -> Shared ThemeDarkBackgrounduncheckedTitleunchecked- in
Serie 0: RingCenter0.5 0.5Radius0.4 0.48Round capunchecked
- Item Style
Color2196F3 andAlpha(A)255Backgound ColorB0BEC5 andAlpha(A)255
- Label
Formatter{d:f0}W
- Text Style
*Font Size = 10 - Data
- SerieData 0
0 1000 data1
- SerieData 0
- Change the Anchor Presets from
The final GameObject should have this structure
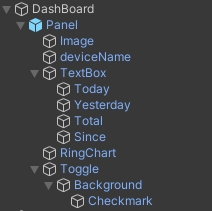
Chart manager
To dynamically change the data of the chart and update the content of the text GameObjects, we can customise the mqttController (it is of course possible to create a new script).
In C# the deserialization of a JSON response requires a class representation (the structure of the JSON itself, generally defined by the owner of the MQTT Broker). The easiest way to convert a JSON in C# classes is to use an online tool such as https://json2csharp.com/
- copy the text of the JSON response (for example using an external tool such as MQTT Explorer)
- paste the JSON response in https://json2csharp.com/ and Copy To Clipboard the result.
using System;
using System.Collections.Generic;
using UnityEngine;
using XCharts.Runtime;
using TMPro;
using UnityEngine.UI;
using System.Collections;

public class mqttController : MonoBehaviour
{
    [Tooltip("Optional name for the controller")]
    public string nameController = "Controller 1";
    public string tag_mqttManager = ""; //to be set on the Inspector panel. It must match one of the mqttManager.cs GameObject
    [Header("   Case Sensitive!!")]
    [Tooltip("the topic to subscribe must contain this value. !!Case Sensitive!! ")]
    public string topicSubscribed = ""; //the topic to subscribe, it need to match a topic from the mqttManager
    private float pointerValue = 0.0f;
    [Space]
    [Space]

    public RingChart ringChart;
    public mqttManager _eventSender;
    public TextMeshProUGUI deviceName;
    public TextMeshProUGUI todayEnergy;
    public TextMeshProUGUI yesterdayEnergy;
    public TextMeshProUGUI totalEnergy;
    public TextMeshProUGUI since;
    public Image toggle;
    public Color color1 = new Color(0, 1, 0); // Bright Green
    public Color color2 = new Color(0, 0.5f, 0); // Darker Green
    public float blinkDuration = 1.0f; // Duration of one blink cycle
    public int blinkCount = 3; // Number of blinks


    void Awake()
    {
        if (GameObject.FindGameObjectsWithTag(tag_mqttManager).Length > 0)
        {
            _eventSender = GameObject.FindGameObjectsWithTag(tag_mqttManager)[0].gameObject.GetComponent<mqttManager>();
            if (!_eventSender.isConnected)
            {
                _eventSender.Connect(); //Connect tha Manager when the object is spawned
            }
        }
        else
        {
            Debug.LogError("At least one GameObject with mqttManager component and Tag == tag_mqttManager needs to be provided");
        }
    }

    void OnEnable()
    {
        _eventSender.OnMessageArrived += OnMessageArrivedHandler;

    }

    private void OnDisable()
    {
        _eventSender.OnMessageArrived -= OnMessageArrivedHandler;
    }

    private void OnMessageArrivedHandler(mqttObj mqttObject) //the mqttObj is defined in the mqttManager.cs
    {
        //https://github.com/XCharts-Team/XCharts/blob/master/Documentation~/en/configuration.md#labelstyle
        ringChart.series[0].label.formatter = "{c:f0}W";

        //We need to check the topic of the message to know where to use it
        if (mqttObject.topic.Contains(topicSubscribed))
        {
            StartCoroutine(Blink());
            var response = JsonUtility.FromJson<tasmotaSensor.Root>(mqttObject.msg);
            List<double> values = new List<double>
            {
                response.ENERGY.Power,
                1000

            };
            ringChart.UpdateData(0, 0, values);

            todayEnergy.text = "Today: " + response.ENERGY.Today.ToString() + "kWh";
            yesterdayEnergy.text = "Yesterday: " + response.ENERGY.Yesterday.ToString() + "kWh";
            totalEnergy.text = "Total: " + response.ENERGY.Total.ToString() + "kWh";

            since.text = response.ENERGY.TotalStartTime;

            Debug.Log("Event Fired. The message, from Object " + nameController + " is = " + pointerValue);
        }
    }

    IEnumerator Blink()
    {
        for (int i = 0; i < blinkCount; i++)
        {
            // Lerp from color1 to color2
            float elapsedTime = 0f;
            while (elapsedTime < blinkDuration)
            {
                toggle.color = Color.Lerp(color1, color2, elapsedTime / blinkDuration);
                elapsedTime += Time.deltaTime;
                yield return null;
            }

            // Lerp from color2 to color1
            elapsedTime = 0f;
            while (elapsedTime < blinkDuration)
            {
                toggle.color = Color.Lerp(color2, color1, elapsedTime / blinkDuration);
                elapsedTime += Time.deltaTime;
                yield return null;
            }
        }
    }

}

// Root myDeserializedClass = JsonConvert.DeserializeObject<Root>(myJsonResponse);
[Serializable]
public class tasmotaSensor
{
    [Serializable]
    public class ENERGY
    {
        public string TotalStartTime;
        public double Total;
        public double Yesterday;
        public double Today;
        public int Period;
        public int Power;
        public int ApparentPower;
        public int ReactivePower;
        public double Factor;
        public int Voltage;
        public double Current;
    }
    [Serializable]
    public class Root
    {
        public DateTime Time;
        public ENERGY ENERGY;
    }
}
Save the script and apply it to the Panel GameObject as new Component.
Fill the public fields with the correspondent GameObjects:
- Tag of the
mqttManagerpreviously created; - the energy topic subscribed;
- the
Toggle -> Checkmark; - and each of the
TextGameObjects included thedeviceName. - the
RingChartGameObject
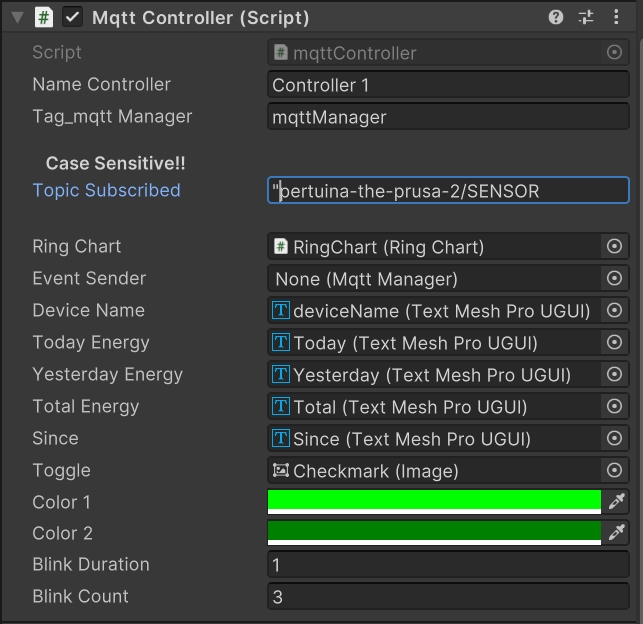
Finally, before run the app, add to the mqttManager the topic to subscribe (one should match the one in the mqttcontroller component).
The created Panel can be transformed into a Prefab and instantiated parametrically. This allows us to reuse the UI as part of a more complex dashboard.
For doing this, drag the Panel Gameobject (not the parent canvas Dashboard) from the Hierarchy window to a folder of the Project window.
We can now delete the Panel from the scene.
Next, we need to add a new MonoBehaviour script that use the Panel prefab as a template and it is going to be attached the MQTT_Dashboard Canvas, the one that contained the Panel GameObject (now deleted) and the Grid Layout Group component.
using System.Collections;
using UnityEngine;
using TMPro;
using System.Collections.Generic;
using UnityEngine.UI;

public class cardCreator : MonoBehaviour
{
    public mqttManager _eventSender;
    public GameObject cardData; //The single panel of the UI
    public Transform Dashboard; // The Parent GameObject where the Cards will be appended
    public string tag_mqttManager = ""; //to be set on the Inspector panel. It must match one of the mqttManager.cs GameObject

    public List<TaggedImage> taggedImages; // alist of images and tags, as defined by the public class at the end of this script


    void Awake()
    {
        if (GameObject.FindGameObjectsWithTag(tag_mqttManager).Length > 0)
        {
            _eventSender = GameObject.FindGameObjectsWithTag(tag_mqttManager)[0].gameObject.GetComponent<mqttManager>();
        }
        else
        {
            Debug.LogError("At least one GameObject with mqttManager component and Tag == tag_mqttManager needs to be provided");
        }

    }

    void Start()
    {
        StartCoroutine(ProcessObjects()); //To avoid any delay, the card are created using a coroutine
    }

    IEnumerator ProcessObjects()
    {
        foreach (string item in _eventSender.topicSubscribe) //A new card is created for each of the topic subscribed by the mqttManager
        {
            GameObject newCard = Instantiate(cardData); //The prefab of the Card is created
            newCard.GetComponent<mqttController>().topicSubscribed = item; //the topic is set to retrieve only a specific message

            newCard.transform.SetParent(Dashboard, false); //the card is added to the Manager

            //Name of the device is defined by the topic and it is the 5th position
            string[] parts = item.Split('/');
            string result = parts[5]; // "pertuina-the-prusa-2"
            newCard.transform.Find("deviceName").GetComponent<TextMeshProUGUI>().text = result;


            var match = taggedImages.Find(t => result.Contains(t.tag)); //if the name of the topic contains one of the tag of the list, continue and use that image for the GameObject Image
            if (match != null)
            {
                newCard.transform.Find("Image").GetComponent<UnityEngine.UI.Image>().sprite = match.sprite;
            }

            // Wait for the first successful connection before continuing
            yield return new WaitUntil(() => _eventSender.isConnected);
            // Continue with the rest of the loop
        }
    }


}


//Create a class that link an image with a tag
[System.Serializable]
public class TaggedImage
{
    public string tag;
    public Sprite sprite;
}
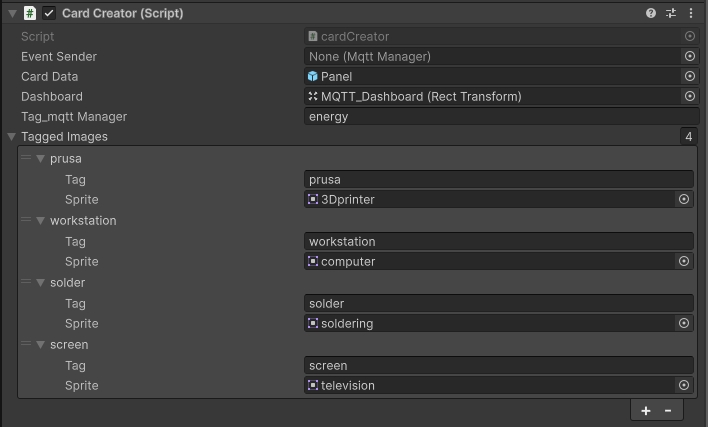
In the Inspector window we need to set:
- the tag of the
mqttManager, as the script will clone the cards/Panelconsidering the numbers of topics subscribed by themqttManager.
- The card data is the prefab of the
Paneljust created (from theAssets). - The Dashboard is going to be itself e.g.
MQTT_Dashboard - Finally, for each image, set a tag that need to be part of the topic subscribed (e.g.
prusa)
The Grid Layout Group component that we added to the root Canvas Dashboard automatically distributes the cards into three columns.
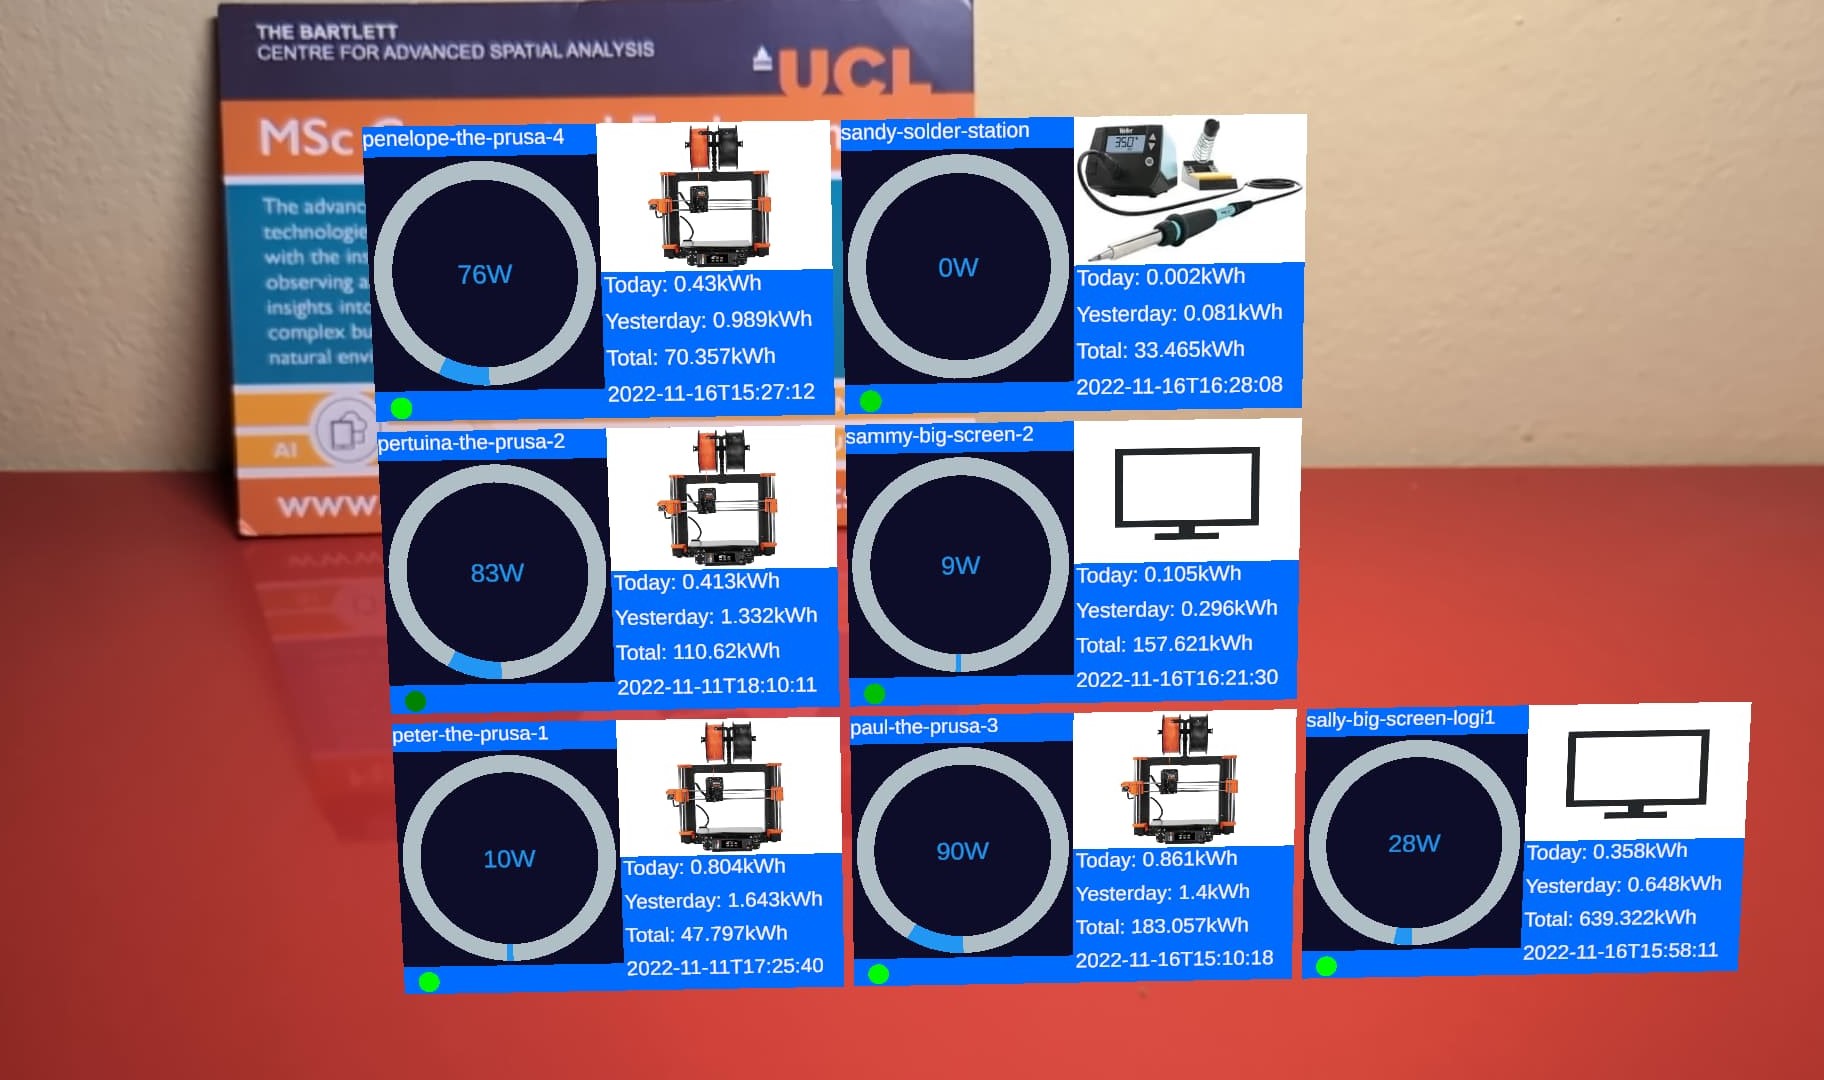
We can test if everything is working, and then create a second Prefab of the MQTT Dashboard itself so that it can be instantiated in Augmented Reality using anchor planes or image triggers (as from Workshop 2).