This workshop will show you how to:
- Use ARFoundation Framework for ground and image recognition
- Add interactivity to the AR experience
- Add lightmapping for Prefab and shadows components
- Create and deploy to a mobile device (iOS/Android)
- [Optional] Renovate the Gallery using REST API
To complete this workshop you will need:
- Unity 6000.0 LTS
- VS Code
- Connected Environments Postcard Image Front
- Connected Environments Postcard Image Reverse
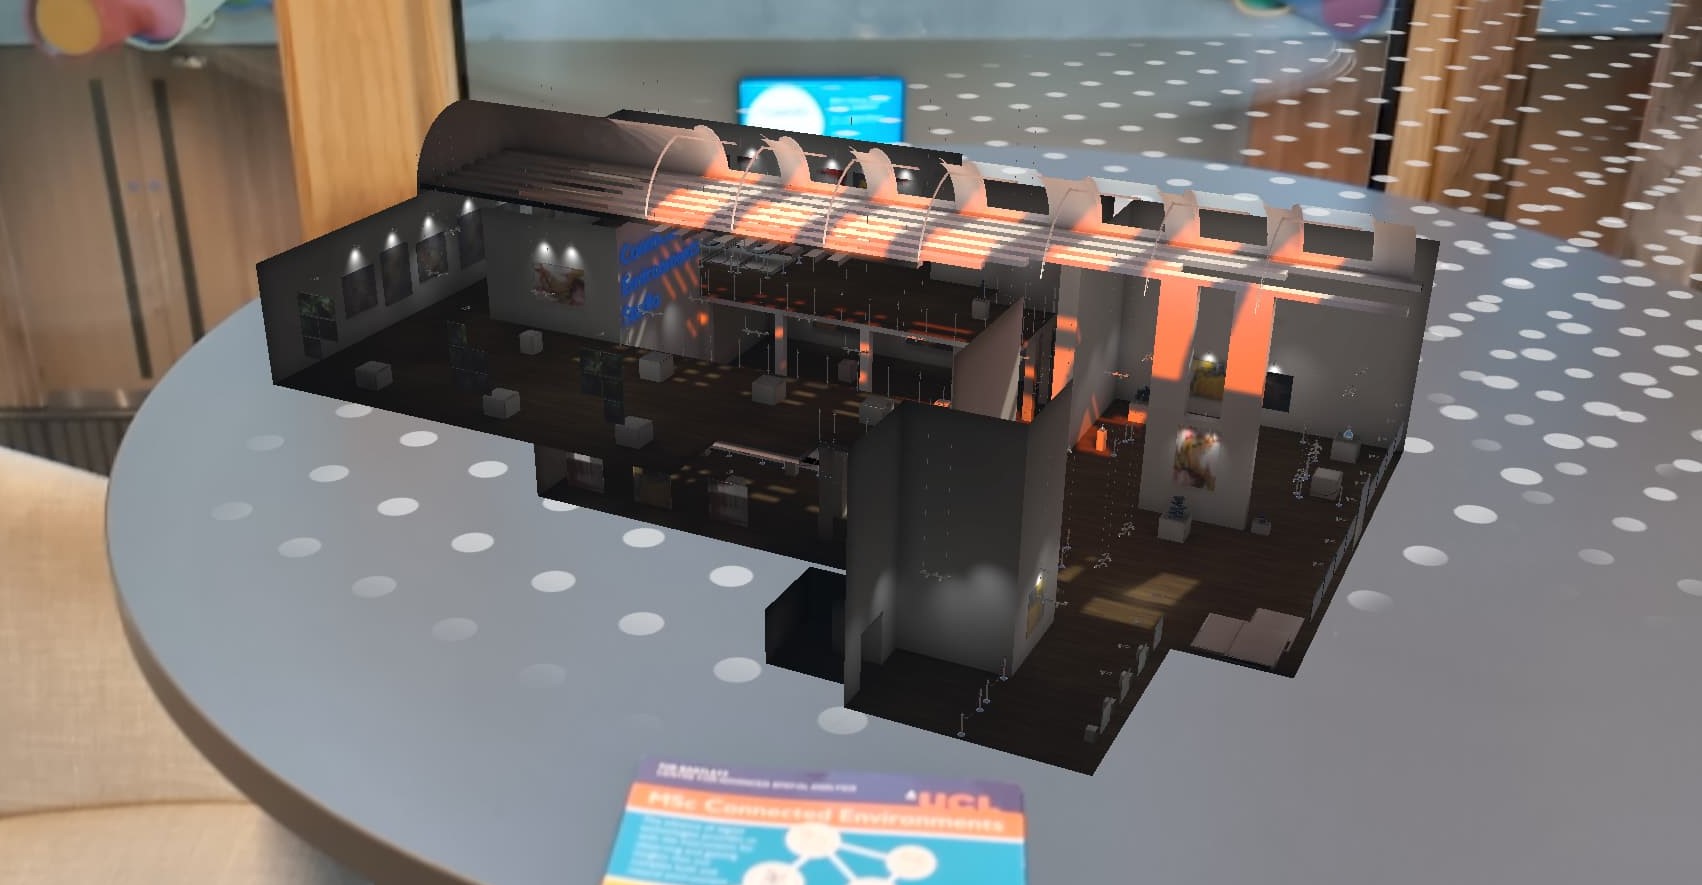
- 3D model to visualise in AR
- CE Studio model, based on Gallery Showroom Environment
- any other Sketchfab Models
- iOS or Android Mobile Device (for iOS deployment, XCode and Apple Developer Account are needed)
Languages used:
- C#
Additional resources
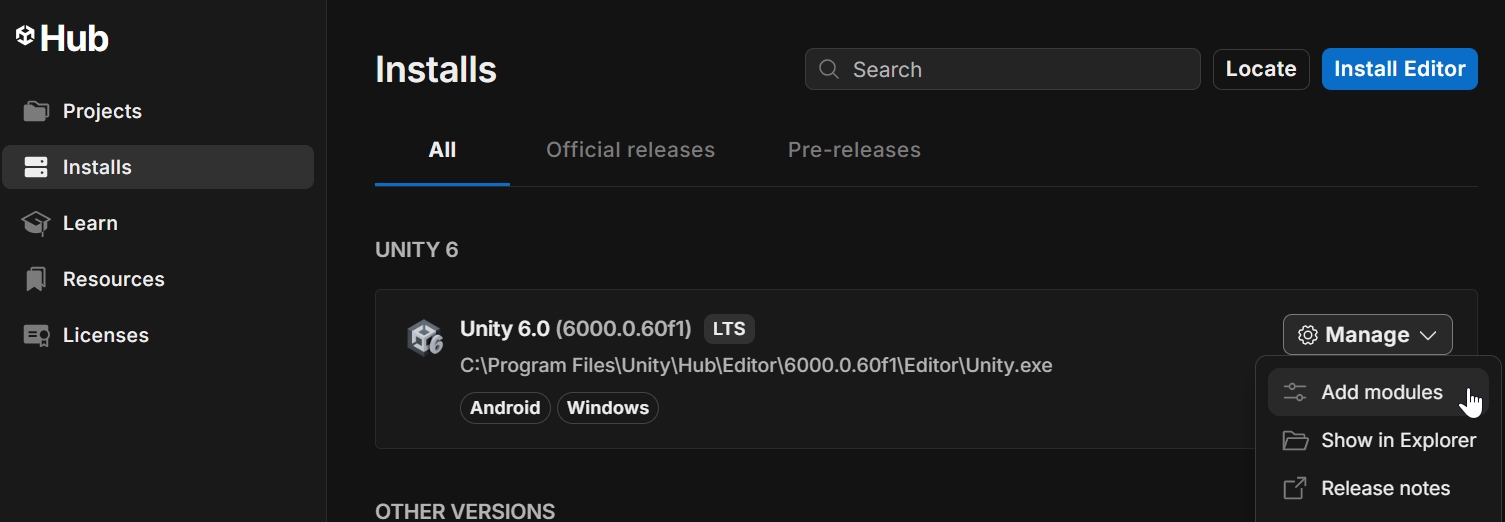
Ensure you have the required modules installed into your Unity setup, in particular the mobile platform Android (or iOS).
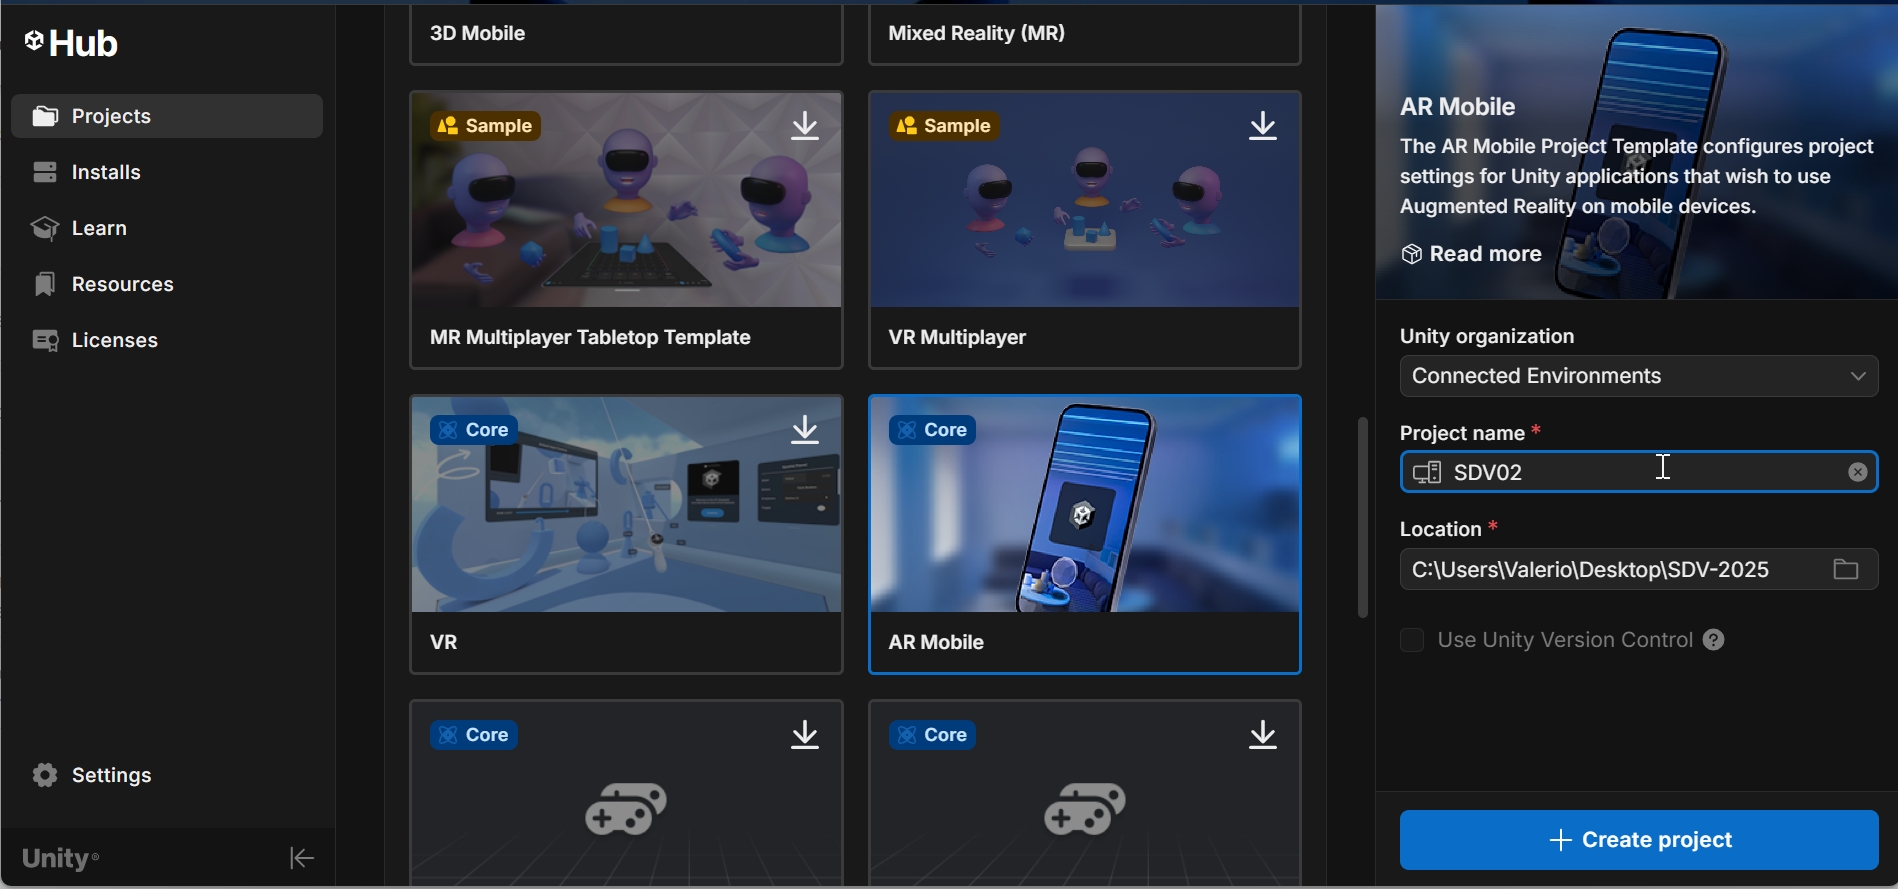
In Unity Hub create a New Project using the AR Mobile (Core) template (download it if not already avaiable) and give it a logical name.
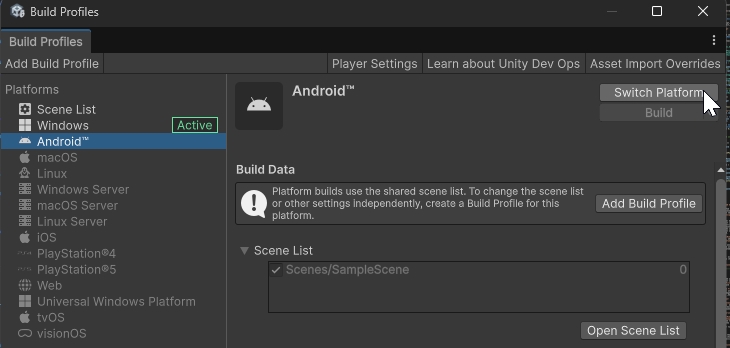
The first step is to switch the platform to the one we are intended to use, iOS or Android, from File -> Build Profiles.
Select Player Settings... from the Build Profiles windows and provide:
- Company Name
- Product Name
- Version
Depending on the chosen platform, there are some additional settings that need to be made:
Android
In the Other Settings section set the following parameters:
- Color Space: Linear
- Auto Graphics API: unchecked
- Graphics APIs: only OpenGLES3
- Override Default Package Name: unchecked
- Minimum API Level: Android 11.0
- Scripting backend: IL2CPP
- Target Architectures: ARM64 (uncheck ARMv7)
Icon and Splash screen can be added as well.
iOS
In the Other Settings section set the following parameters:
- Color Space: Linear
- Override Default Package Name: unchecked
- Signing Team ID: your Apple Developer ID
- Automatically Sign: checked
- Camera Usage Description: AR Camera permission
- Target Device: iPhone+iPad
- Target minimum iOS Version: 12
Icon and Splash screen can be added as well.
Finally, from Project Settings -> XR Plug-in Management select the Plug-in Provider for the selected platform (ARCore for Android, ARKit for iOS)

The open scene named Sample Scene in the Hierarchy window already contains the needed GameObjects to run an AR application. For the purpose of this workshop, we are going to create a new scene from scratch.
Before creating the new scene, we need to control that the Input System used by Unity is correct. from Edit -> Project Settings select Player and in Other Settings -> Configuration -> Active Input Handling select Input System Package (New).
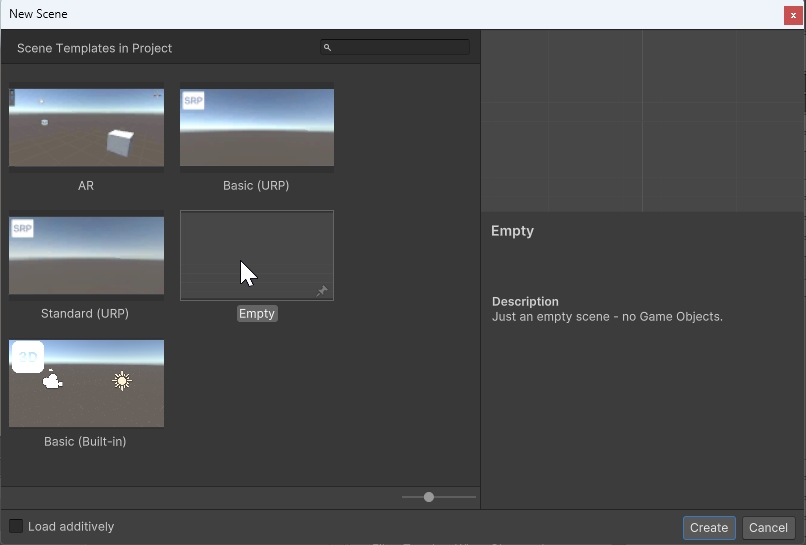
Create a new File -> New Scene -> Empty
and add in the Hierarchy panel the essential ARFoundation objects:
- right click
XR -> XR Origin (Mobile AR), this GameObject contains theCamera OffsetandMain Camera - right click
XR -> AR Session - right click
Light -> Directional Lightand rename itSunand in theInspectorwindow selectShadow Type_Soft Shadow`
Select the XR Origin (Mobile AR) GameObject and in the Inspector Window add the components (if not already there):
Anchor ManagerAR Plane ManagerAR Raycast Manager
Add also the AR Feathered Plane Prefab to the AR Plane Manager component (the Prefab is located in Assets -> Samples -> XR Interaction Toolkit -> x.x.x -> Ar Starter Assets -> Prefabs).
Ensure that the Main Camera GameObject, located inside the XR Origin (Mobile AR) -> Camera Offset GameObject in the Hierarchy window, has the Tag MainCamera in the Inspector window, and not Untagged.
Save the scene using File -> Save As in the location of the other Scenes in the Assets.
If we build and deploy the app (follow the steps from 8 Building/Deploying the Scene) the App will create digital anchors on the surfaces that the camera is looking at. In the next step we will add some touch interactions.

Using a custom C# script it is possible to control the behaviour of the touch control (touch to add an object and hold to drag to move the object on the AR surface).
Right click in Assets -> Reources and select Create -> MonoBehaviour Script name it tapToPlace
Copy and paste the following to replace the entire default script
using System.Collections.Generic;
using UnityEngine;
using UnityEngine.XR.ARFoundation;
using UnityEngine.XR.ARSubsystems;
using UnityEngine.InputSystem;


[RequireComponent(typeof(ARRaycastManager))]
public class tapToPlace : MonoBehaviour
{
    public GameObject gameObjectToInstantiate; //the Prefab GameObject to instantiate in the AR environment. To be added in the inspector window
    private GameObject spawnedObject; //the Prefab Instantiate in the scene. Used internally by the script
    private ARRaycastManager _arRaycastManager; //part of the XROrigin

    static List<ARRaycastHit> hits = new List<ARRaycastHit>();
    public float timeThreshold = 0.5f; //User need to tap and hold the finger for at least 0.5 sec to create the content
    public bool isTouching = false;

    //Event design to fire when content is created
    public delegate void ContentVisibleDelegate();
    public event ContentVisibleDelegate _contentVisibleEvent;

    private void Awake()
    {
        _arRaycastManager = GetComponent<ARRaycastManager>();
    }

    public bool TryGetTouchPosition(out Vector2 touchPosition)
    {
        Debug.Log("Hello");
        if (Touchscreen.current.primaryTouch.press.isPressed)
        {
            isTouching = true;
            touchPosition = Touchscreen.current.primaryTouch.position.ReadValue();
            return true;
        }
        touchPosition = default;
        isTouching = false;
        timeThreshold = 0;
        return false;
    }

    // Update is called once per frame
    void Update()
    {
        if (isTouching == true)
        {
            timeThreshold -= Time.deltaTime;
        }

        if (!TryGetTouchPosition(out Vector2 touchPosition))
            return;

        if (_arRaycastManager.Raycast(touchPosition, hits, trackableTypes: TrackableType.PlaneWithinPolygon))
        {
            var hitPose = hits[0].pose;

            if (timeThreshold < 0)
            {
                if (spawnedObject == null)
                {
                    spawnedObject = Instantiate(gameObjectToInstantiate, hitPose.position, hitPose.rotation);
                    _contentVisibleEvent(); //fire the event
                }
                else
                {
                    spawnedObject.transform.position = hitPose.position;
                }
            }
        }
    }
}
Drag the script into XR Origin (Mobile AR) GameObject (or select Add Component).
Import and add the prefab of the Gallery Model used in the first workshop (or any other chosen model) to the scene. The Gallery model is at a 1:1 scale, so in AR, we need to scale it down to 0.03. Select the Environment prefab from the Project window and change its scale to 0.03 for each X Y Z in the Inspector window.
Select the XR Origin (Mobile AR) GameObject in the Hierarchy window and in the TapToPlace component, add the Gallery (from Assets -> CE_Studios->Models->Prefab->Environment to the GameObject to Instantiate field.
Once the app is built, you can move your phone to detect both horizontal and vertical surfaces, which will be used as support for the model. By tapping the screen, the digital model will be instantiated, and by holding the tap, you will be able to move the object within the scene.
ARFoundation can be used also to track images and objects, however object tracking is currently available just on iOS devices.
Save the scene using File -> Save As and provide a new name (in this way we can keep all the existing settings and GameObjects in place).
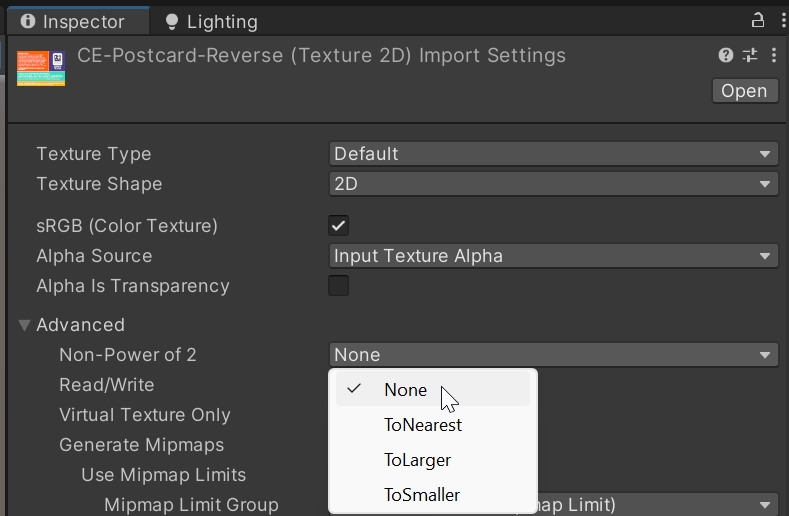
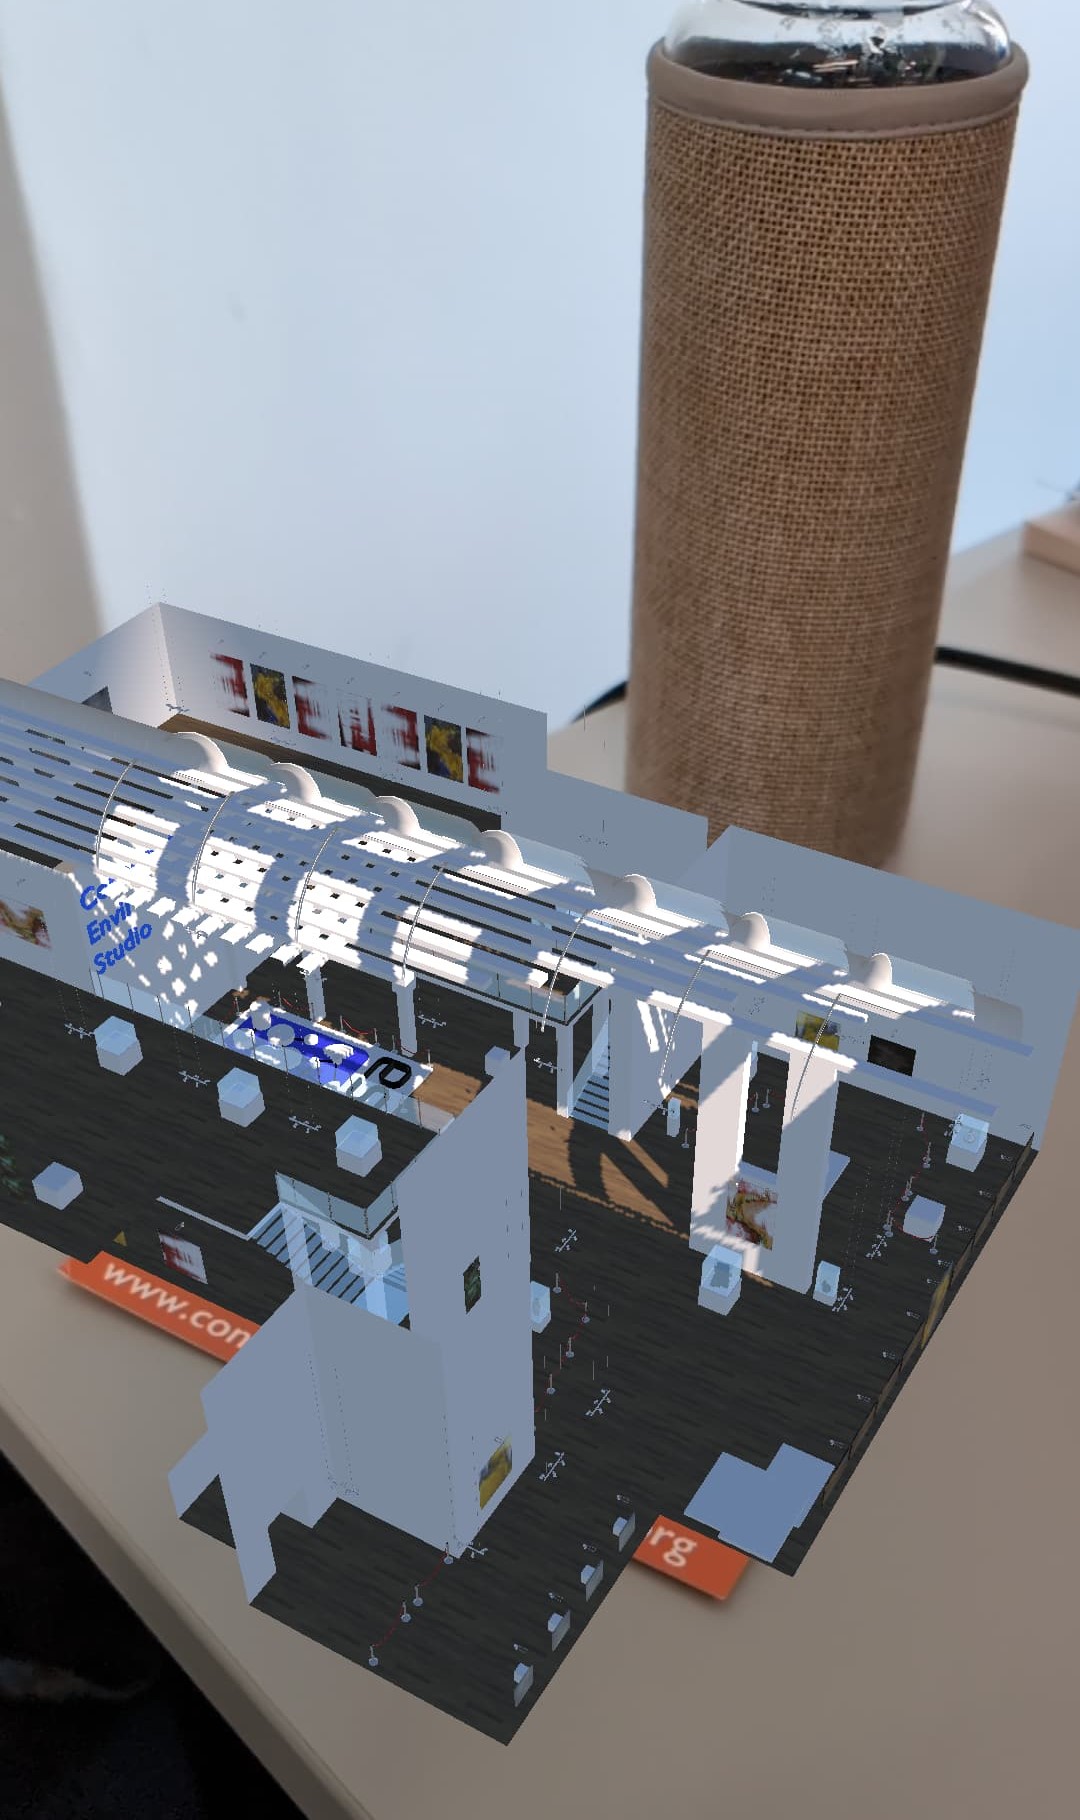
Import the CE Postcard Front and CE Postcard Reverse images in the Assets folder. In the Inspector Window, in Advanced change Non-Power of 2 to None and apply.
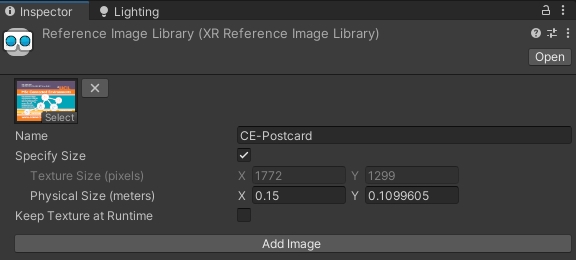
Create a new ReferenceImageLibrary in the Project folder from Asset -> Create -> XR -> Reference Image Library and add the CEcal Postcard Front as new image. Set the physical size (X = 0.15) and a unique name.
Select the XR Origin (Mobile AR) from the Scene and in the Inspector Window add a new component AR Tracked Image Manager. Select the Reference Image Library for the Serialized Library and the prefab of the digital model for the Tracked Image Prefab. It is possible to change the scale of the model to fit the size of the postcard.
Build the App. Remember to change the name in the Player Settings to avoid to overwrite the previous example.
The components provided by AR Foundation are limited to basic functionalities. To expand and customise them for our specific needs, we can use the C# scripting. For example, if we want to assign different actions to the various images recognized by AR Foundation, we can create a script to do that.
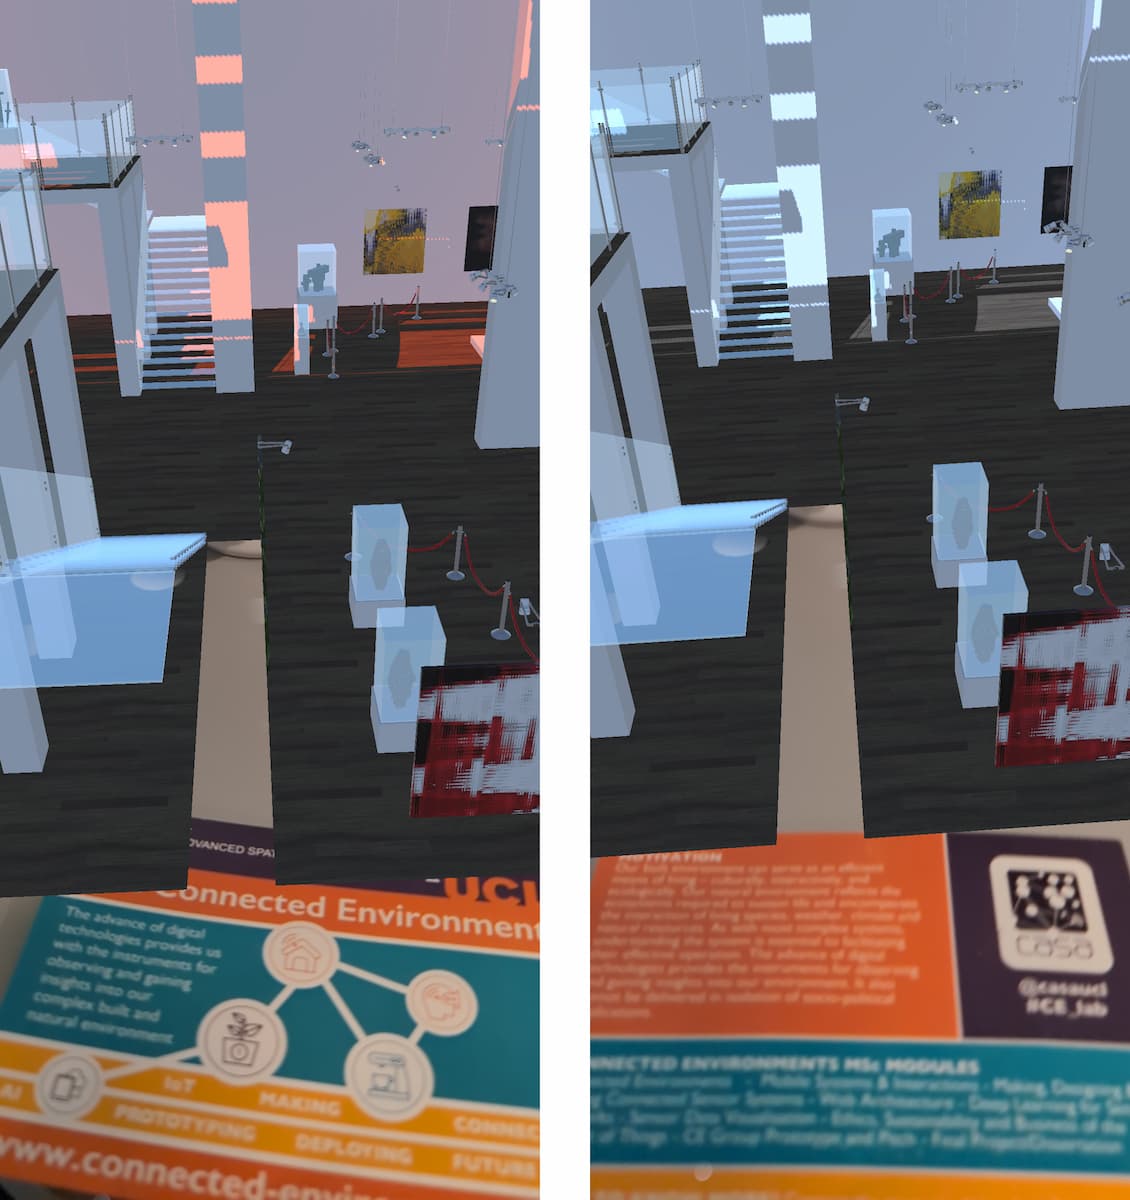
In this specific case, we are going to use tapToPlace to locate the model on a horizontal surface and the postcard images to change the colour temperature of the directional light in the scene. The front side of the postcard will make the light warm, and the back side will make it cold.
In the ReferenceImageLibrary created earlier, we need to rename the CE Postcard Front to lightWarm and add the CE Postcard Reverse with the name lightCold.
Also From the XR Origin (Mobile AR) remove the tracked Image Prefab (click on it and press the delete key) and change the Max Number of Moving Images to 2.
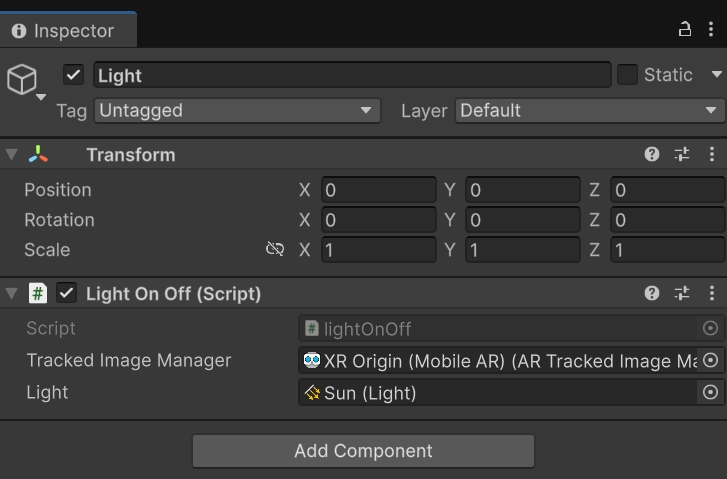
Then, Create -> MonoBehaviour script and name it lightOnOff and replace its content with the following code:
using UnityEngine;
using UnityEngine.XR.ARFoundation;
using UnityEngine.XR.ARSubsystems;

public class lightOnOff : MonoBehaviour
{
    public ARTrackedImageManager trackedImageManager;
    public Light _light; // Light in the scene

    void OnEnable()
    {
        trackedImageManager.trackedImagesChanged += OnTrackedImagesChanged;
    }

    void OnDisable()
    {
        trackedImageManager.trackedImagesChanged -= OnTrackedImagesChanged;
    }

    void OnTrackedImagesChanged(ARTrackedImagesChangedEventArgs eventArgs)
    {
        foreach (var trackedImage in eventArgs.added)
        {
            UpdateImage(trackedImage);
        }

        foreach (var trackedImage in eventArgs.updated)
        {
            UpdateImage(trackedImage);
        }
    }

    void UpdateImage(ARTrackedImage trackedImage)
    {
        string imageName = trackedImage.referenceImage.name;

        if (trackedImage.trackingState == TrackingState.Tracking)
        {

            if (imageName == "lightWarm")
            {
                _light.GetComponent<Light>().colorTemperature = 1500f;
            }
            if (imageName == "lightCold")
            {
                _light.GetComponent<Light>().colorTemperature = 20000f;
            }
        }
    }
}
Create a new empty GameObject and add the script to it as new component. Drag the XR Origin (Mobile AR) (the GameObject with the ARTrackedImageManager attached) into the AR Tracked Image Manager field of the component.
Select the light (e.g. Sun) and in the Inspector window change the Emission -> Light Appearance from Color to Filter and Temperature.
Finally, drag the light in the scene into the Light field of the new component.
Multiple images can also be used to trigger functions or pass variable values. Since ARCore can track up to 20 images simultaneously, it is possible to combine triggers using a combination of images.
Using real-time lighting in Augmented Reality with large models can negatively impact the overall performance of the application, especially on older devices. By using the lightmapping technique, it is possible to store light information in a lightmap texture with generally higher resolution than real-time lighting.
Lightmaps in Unity can be generated only for static GameObjects. However, in Augmented Reality, GameObjects need to be moved around the scene and instantiated at runtime. To overcome these limitations, it is possible to use this Prefab Lightmapping script, which allows us to save lightmap information to the prefab itself:
- download and import the
PrefabLightmapData.csscript from the above repository and save it in yourAssetsfolder - import the Prefab of the
Galleryin the scene; - add the script to the parent (or root) GameObject of the Prefab just added
- select all the children objects of the parent Prefab (children of the
Environment, but not the prefab/root itself) and, from the top right of theInspector Panelcheck the Static checkbox (the root of the prefab, doesn't need theStaticsetting) - change the visualisation style to
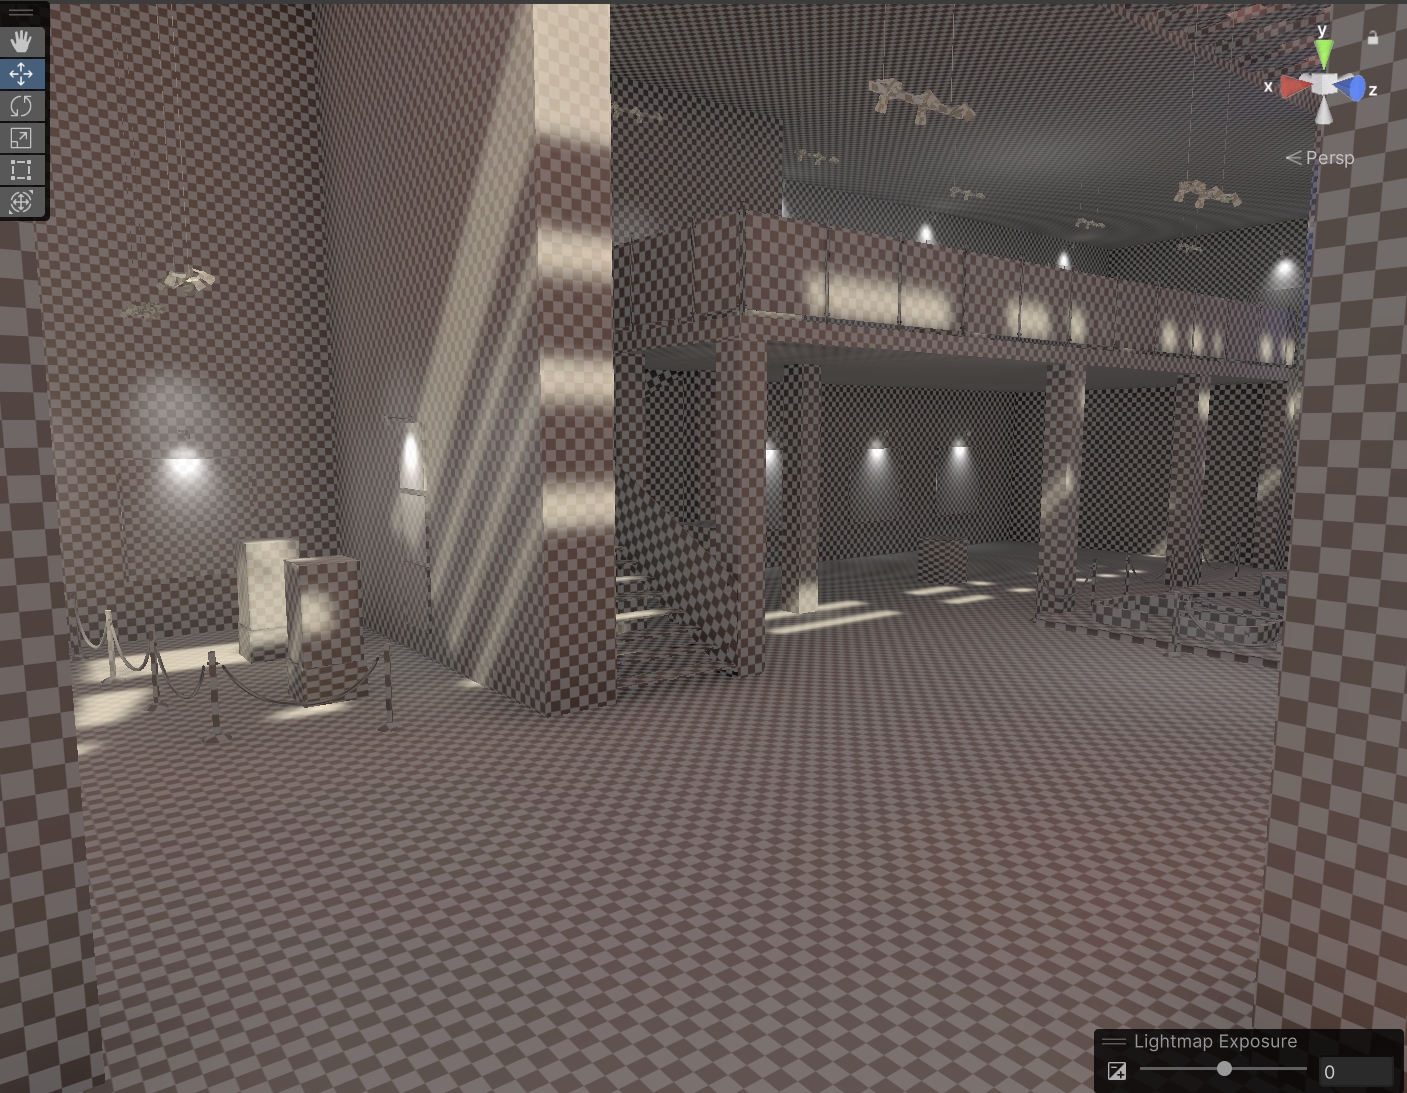
Baked Lightmap, the model will show a grey and white grid. This is the resolution of the lightmap, the smaller the square (or textel) the higher the quality (and the longer the computation time)
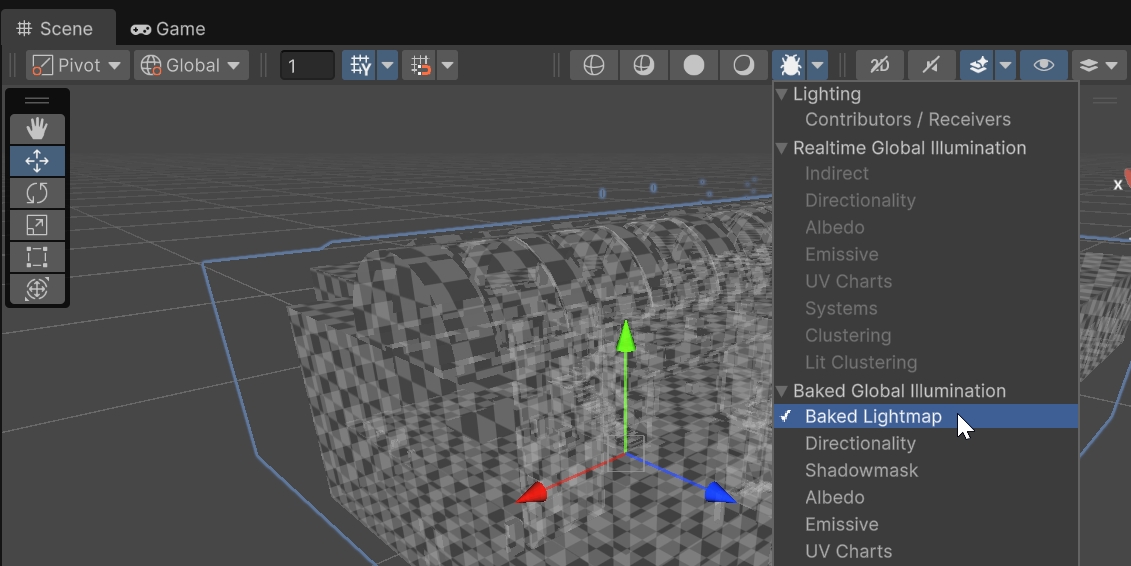
- in the
Inspector Panelit is possible to change, for each model the scale of the LightmapMesh Renderer -> Lightmapping -> Scale in Lightmapto4
The Gallery model already provides a series of lights. If a model does not have lights, you can add some from the top menu by selecting GameObject -> Light or by right-clicking in the Hierarchy window.
Positive:
A light in Unity is a component that can be applied to any GameObject, usually an empty one, but it doesn't need to be.
Unity provides four different types of lights. Some of them can be used as both real-time and baked lights, while others, like the Area Light, can only be used as baked lights. This setting (baked or real-time) is available in the Inspector window.
Ensure that shadows are active for each light in the Inspector window (Soft Shadows).
Remember to save the Prefab by selecting the parent object (e.g. Environment) and, in the Inspector window, clicking Overrides and Apply All.
- open the
Window -> Rendering -> Lighting Panelto set the lightmapper parameters. Most of the default values are fine - each scene needs a
Lighting Settings Assets. By pressingNew Lighting Settingsa new asset will be created. As the lightmap is linked to the scene, named theLighting Settings Assetwith the same name of the scene. - the following setting can be used as a reference for the lightmap:
- Lightmapper: Progressive GPU (Preview). This might not be available if a dedicated GPU card is not installed
- Filtering: Advanced. Optix is available just on NVidia GPU
- Max Lightmap Size: 1024 or 2048
- Lightmap Compression: None. Compression can reduce greatly the quality of the texture
- Ambient Occlusion: Enabled
Lightmaps depend on the scale of the model. The current prefab has a scale of 0.03. It is suggested to bake the lightmaps with the prefab at scale 1 and then change it back to the needed scale value
Finally, save the scene and generate the lightmap for the Prefab using Assets -> Bake Prefab Lightmap (the button Generate Lightmap will not work to create the lightmap for the prefab)
Change the scale back to 0.03 and remember to save the Prefab by selecting the parent object (e.g., Environment) and, in the Inspector window, clicking Overrides and Apply All. The Prefab can then be removed from the scene, and it will retain the lightmaps once instantiated in the AR app.
Build the app to test it.
If all is set up correctly then deploying to your device is easy. There are a few catches which are useful to solve failed builds.
To build and run on your device - File -> Build Profiles and be sure that the scene you want to build is listed.

Select Player Settings... from the Build Settings windows and provide:
- Company Name
- Product Name
- Version
Android
In the Other Settings section set the following parameters:
- Color Space: Linear
- Auto Graphics API: unchecked
- Graphics APIs: only OpenGLES3
- Override Default Package Name: unchecked
- Minimum API Level: Android 10.0
- Scripting backend: IL2CPP
- Target Architectures: ARM64 (uncheck ARMv7)
Icons and Splash screen can be added as well
Back to the Build Profiles windows, connect an Android phone (it must be in developer mode) and run File -> Build and Run. The first time Unity will ask a destination folder to save the application as an APK file format then, if a device is connected, Unity will install the application on the device. If the device is not connected, or not recognised, it is possible to upload the file directly on the Android device, the file will be recognised and installed.
The App will run automatically, move the phone so the camera can detect a plane and then tap to place your 3D model.
iOS
In the Other Settings section set the following parameters:
- Color Space: Linear
- Override Default Package Name: unchecked
- _Signing Team ID: your Apple Developer ID
- _Automatically Sign: checked
- Camera Usage Description: AR Camera permission
- Target Device: iPhone+iPad
- Target minimum iOS Version: 12
Icon and Splash screen can be added as well
On Windows, Unity cannot Build and Run, but it is still possible to build the project to open in XCode on a macOS system.
On macOS systems, after File -> Build and Run, Unity will launch XCode which in turn will process the build to be deployed on your mobile device. Your device needs to be connected and ‘trusted' by the computer it is connected to.
If you press the play button at the top of Xcode, with your mobile device selected and the destination the Xcode should install and run the application on your iPhone or iPad. When it loads, move the phone so the camera can detect a plane and then tap to place your 3D model. If XCode fails to build - the issue is normally with the Apple Account settings and often due to the Signing and Capabilities. Select the project from the left-hand side (the top blue icon) and in the middle navigate to Signing and Capabilities.
Select Automatic Signing and then your account via the drop-down Teams. If you now press the Play icon, the application should build to your device.
It is possible to introduce real-time data into Unity using REST APIs.
REST APIs are not limited to provide data as string and float. References to images, sounds and videos can be collected as well. In this example we are going to use the REST APIs of the Victoria & Albert Museum to dynamically change the paintings of the virtual Gallery.
The API is documented at https://api.vam.ac.uk/docs. If we are interested in changing the textures of our gallery with the objects of the museum in which the primary place is London we need to use add a query to the API call and specify the id_place=x28980. To further filter the records and obtain just the objects that contain at least one image, we need to add a second query _&imagesexist=1
If we open this URL, the browser will return the relative JSON string. This can be copied and used, as we did before with https://json2csharp.com/, to create the C# classes.
- In the folder
CE_Studios -> Models -> gallery -> models -> Materialsselect all nine _paintingn (create additional if less than 9). Remove the existing texture (from the small square next to Albedo click on it and press delete key on windows or backspace on Mac) and change the colour to white. - create a new
MonoBehaviour scriptnamedmuseumAPIand open it in VSCode - inside the
public class museumAPI, after theUpdate(){}, create apublic class museumva { }and inside this one paste the classes generated using the online tool https://json2csharp.com/ the result of the API URL above (i.e.https://api.vam.ac.uk/v2/objects/search?id_place=x28980&images_exist=1).
public class museumva
    {
        [System.Serializable]
        public class Parameters
        {
        }

        [System.Serializable]
        public class Info
        {
            public string version;
            public int record_count;
            public bool record_count_exact;
            public Parameters parameters;
            public int page_size;
            public int pages;
            public int page;
            public int image_count;
        }
    [ ....... ]
        [System.Serializable]
        public class Root
        {
            public Info info;
            public List<Record> records;
            public Clusters clusters;
        }


    }
at the top of the museumAPI.cs add the UnityEngine.Networking namespace, this will give us access to the methods we need to use to call the REST APIs
using System.Collections;
using System.Collections.Generic;
using UnityEngine;

using UnityEngine.Networking;
- in the public class
museumAPI, add the public variable wwwRequest (the URL of the API) and an array of Materials (the nine paintings)
public string wwwRequest = " ";
public Material[] paintings_mat;
Instead of using the Update() method for the WebRequest, we are going to use another solution called Coroutine. The reason is that every function inside the Update() need to be completed before the end of the frame, if the function is not complete Unity will likely drop the frame rate leading to a not satisfactory user experience. From the Unity manual: A coroutine is like a function that has the ability to pause execution and return control to Unity but then to continue where it left off on the following frame
A coroutine is created using the IEnumerator Interface and executed using the function StartCoroutine(IEnumerator routine). In our example
void Start()
    {
        StartCoroutine(museumRequest());
    }

IEnumerator museumRequest()
    {
        [...]
        yield ...
    }
 IEnumerator museumRequest()
    {
        yield return new WaitForSeconds(5); //wait 5sec before running
        UnityWebRequest www = UnityWebRequest.Get(wwwRequest);

        yield return www.SendWebRequest(); //wait to receive the JSON
        Debug.Log(www.downloadHandler.text);
        var response = JsonUtility.FromJson<museumva.Root>(www.downloadHandler.text); //deserialize the JSON using the public class museumva

        for (int i = 0; i < paintings_mat.Length; i++)
        {
            string MediaUrl = "https://framemark.vam.ac.uk/collections/" + response.records[i]._primaryImageId + "/full/!500,500/0/default.jpg";

            UnityWebRequest request = UnityWebRequestTexture.GetTexture(MediaUrl);
            yield return request.SendWebRequest();
            if (request.result == UnityWebRequest.Result.ConnectionError || request.result == UnityWebRequest.Result.ProtocolError)
                Debug.Log(request.error);
            else
               paintings_mat[i].mainTexture= ((DownloadHandlerTexture)request.downloadHandler).texture;

        }

    }
This are the various steps processed by the coroutine:
- wait 5 seconds
- send the request using the URL provided by the user in the public field wwwRequest
- wait to receive a valid JSON object
- deserialize the object using the C# classes
- create a new URL for each record using the standard IIIF API
- send a new WebRequest, but this time targeting specifically a Texture as response (
UnityWebRequestTexture.GetTexture(MediaUrl)) - wait to receive a valid texture
- apply the texture to the Materials of the public array set by the user in the
Inspector window
The final steps are:
- to create an empty GameObject (named e.g.
MuseumAPI) and add the script to it; - add the URL for the web-request, this need to be added in the
Inspector panelin thewww Requestfield - populate the Materials array with the 9 _paintingn from the folder
CE_Studios -> Models -> gallery -> models -> Materialsin the same script in theInspector Panel.
Build the project to test it. If the mobile build is chosen (Android or iOS) remember to enable the child UI_Canvas_StarterAssetsInputs_Joysticks of the Player GameObject to have the touch controller.
The final museumAPI.cs
using System.Collections;
using System.Collections.Generic;
using UnityEngine;
using UnityEngine.Networking;

public class museumAPI : MonoBehaviour
{
public string wwwRequest = " ";
public Material[] paintings_mat;
// Start is called before the first frame update
void Start()
{
    StartCoroutine(museumRequest());
}
IEnumerator museumRequest()
{
yield return new WaitForSeconds(5); //wait 5sec before running
UnityWebRequest www = UnityWebRequest.Get(wwwRequest);

yield return www.SendWebRequest(); //wait to receive the JSON
Debug.Log(www.downloadHandler.text);
var response = JsonUtility.FromJson<museumva.Root>(www.downloadHandler.text); //deserialize the JSON using the public class museumva

for (int i = 0; i < paintings_mat.Length; i++)
{
    string MediaUrl = "https://framemark.vam.ac.uk/collections/" + response.records[i]._primaryImageId + "/full/!500,500/0/default.jpg";

    UnityWebRequest request = UnityWebRequestTexture.GetTexture(MediaUrl);
    yield return request.SendWebRequest();
    if (request.result == UnityWebRequest.Result.ConnectionError || request.result == UnityWebRequest.Result.ProtocolError)
        Debug.Log(request.error);
    else
        paintings_mat[i].mainTexture = ((DownloadHandlerTexture)request.downloadHandler).texture;
}
}

    public class museumva
    {
        [System.Serializable]
        public class Category
        {
            public int other_terms_record_count;
            public List<Term> terms;
        }

        [System.Serializable]
        public class Clusters
        {
            public Category category;
            public Person person;
            public Organisation organisation;
            public Collection collection;
            public Gallery gallery;
            public Style style;
            public Place place;
            public ObjectType object_type;
            public Technique technique;
            public Material material;
        }
        [System.Serializable]
        public class Collection
        {
            public int other_terms_record_count;
            public List<Term> terms;
        }
        [System.Serializable]
        public class CurrentLocation
        {
            public string id;
            public string displayName;
            public string type;
            public string site;
            public bool onDisplay;
            public Detail detail;
        }
        [System.Serializable]
        public class Detail
        {
            public string free;
            public string @case;
            public string shelf;
            public string box;
        }
        [System.Serializable]
        public class Gallery
        {
            public int other_terms_record_count;
            public List<Term> terms;
        }
        [System.Serializable]
        public class Images
        {
            public string _primary_thumbnail;
            public string _iiif_image_base_url;
            public string _iiif_presentation_url;
            public string imageResolution;
        }
        [System.Serializable]
        public class Info
        {
            public string version;
            public int record_count;
            public bool record_count_exact;
            public Parameters parameters;
            public int page_size;
            public int pages;
            public int page;
            public int image_count;
        }
        [System.Serializable]
        public class Material
        {
            public int other_terms_record_count;
            public List<Term> terms;
        }
        [System.Serializable]
        public class ObjectType
        {
            public int other_terms_record_count;
            public List<Term> terms;
        }
        [System.Serializable]
        public class Organisation
        {
            public int other_terms_record_count;
            public List<Term> terms;
        }
        [System.Serializable]
        public class Parameters
        {
        }
        [System.Serializable]
        public class Person
        {
            public int other_terms_record_count;
            public List<Term> terms;
        }
        [System.Serializable]
        public class Place
        {
            public int other_terms_record_count;
            public List<Term> terms;
        }
        [System.Serializable]
        public class PrimaryMaker
        {
            public string name;
            public string association;
        }
        [System.Serializable]
        public class Record
        {
            public string systemNumber;
            public string accessionNumber;
            public string objectType;
            public CurrentLocation _currentLocation;
            public string _primaryTitle;
            public PrimaryMaker _primaryMaker;
            public string _primaryImageId;
            public string _primaryDate;
            public string _primaryPlace;
            public List<object> _warningTypes;
            public Images _images;
        }
        [System.Serializable]
        public class Root
        {
            public Info info;
            public List<Record> records;
            public Clusters clusters;
        }
        [System.Serializable]
        public class Style
        {
            public int other_terms_record_count;
            public List<Term> terms;
        }
        [System.Serializable]
        public class Technique
        {
            public int other_terms_record_count;
            public List<Term> terms;
        }
        [System.Serializable]
        public class Term
        {
            public string id;
            public string value;
            public int count;
            public int count_max_error;
        }
    }
}