This Workshop is OUTDATED refer to Workshop 3
This workshop will show you how to:
- install an MQTT Client in Unity
- Receive and consume MQTT messages
To complete this workshop you will need:
- Unity LTS Release 2020.3
- VS Code
- M2MQTT library
- an MQTT broker
Languages used:
- C#
This workshop shows how to setup a MQTT client, using a modified version of the M2MQTT .Net library, in a Unity project. The workshop shows also how to consume the MQTT message using TextMeshPro.
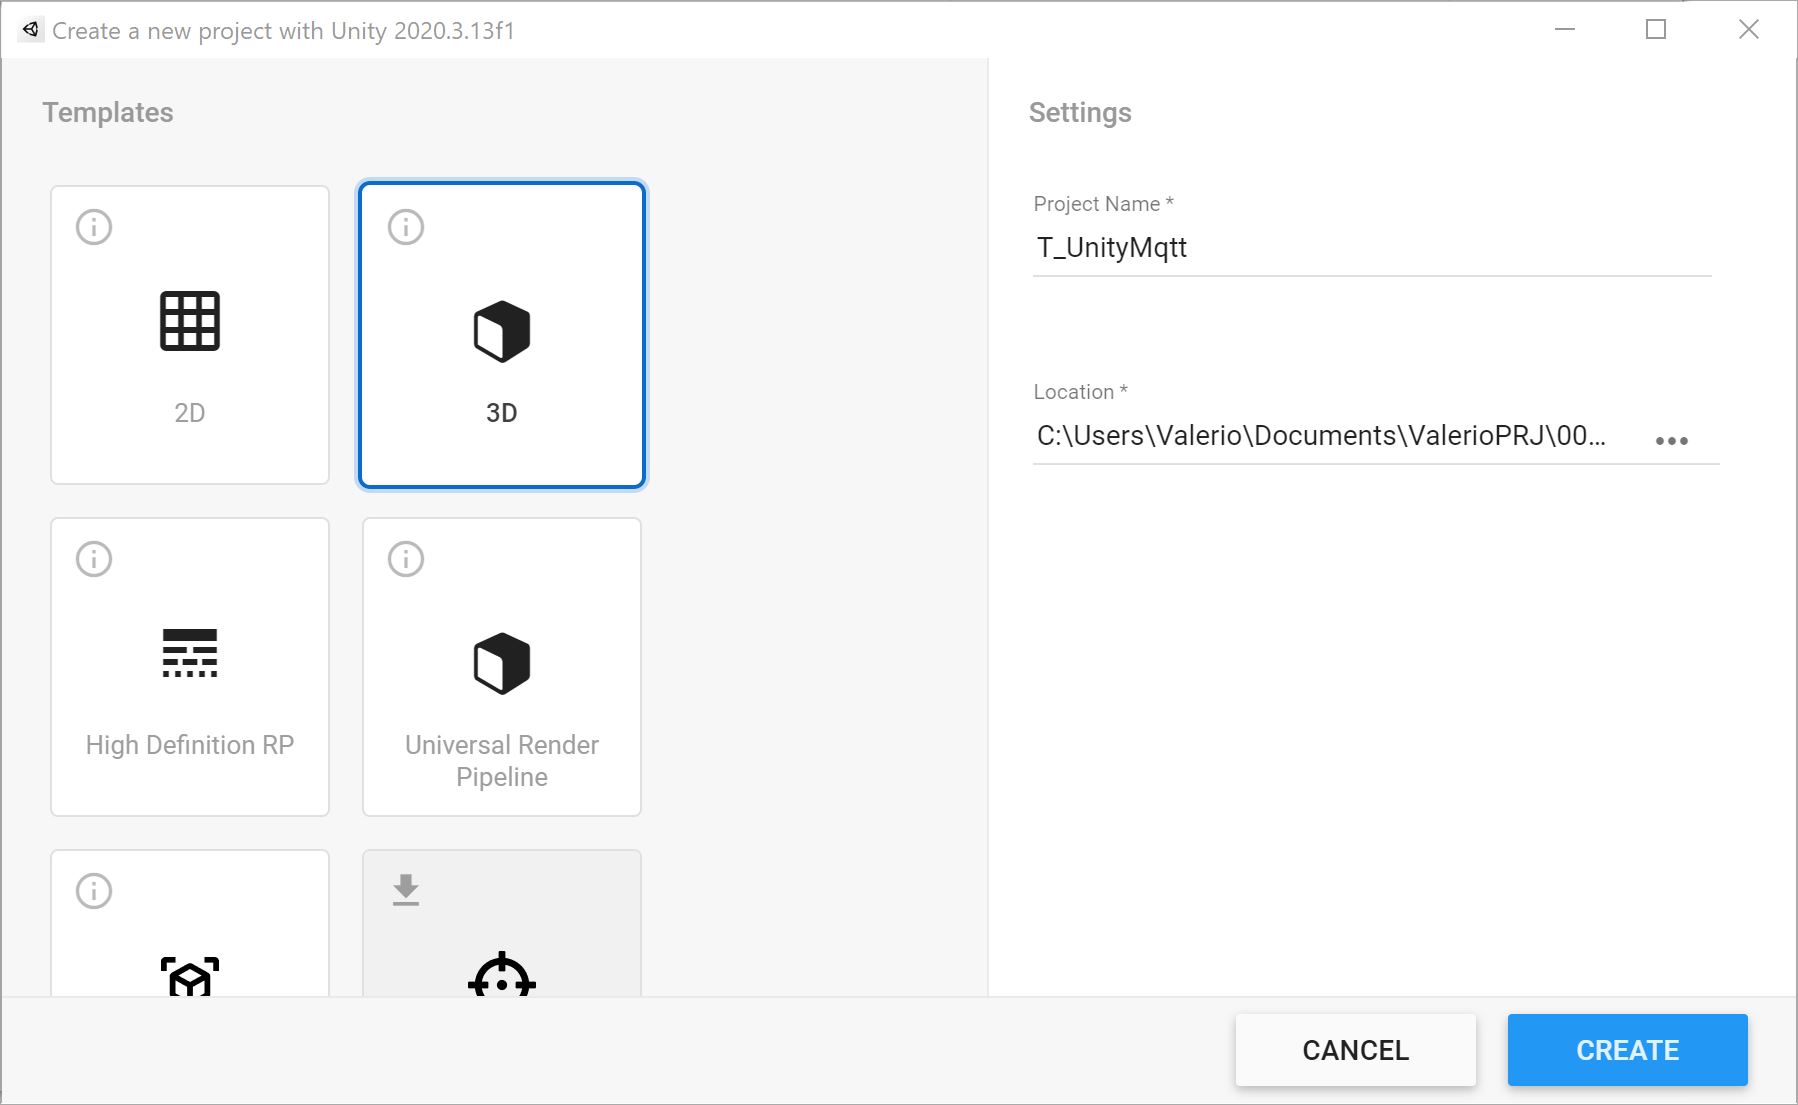
Create a new Unity project using UnityHub
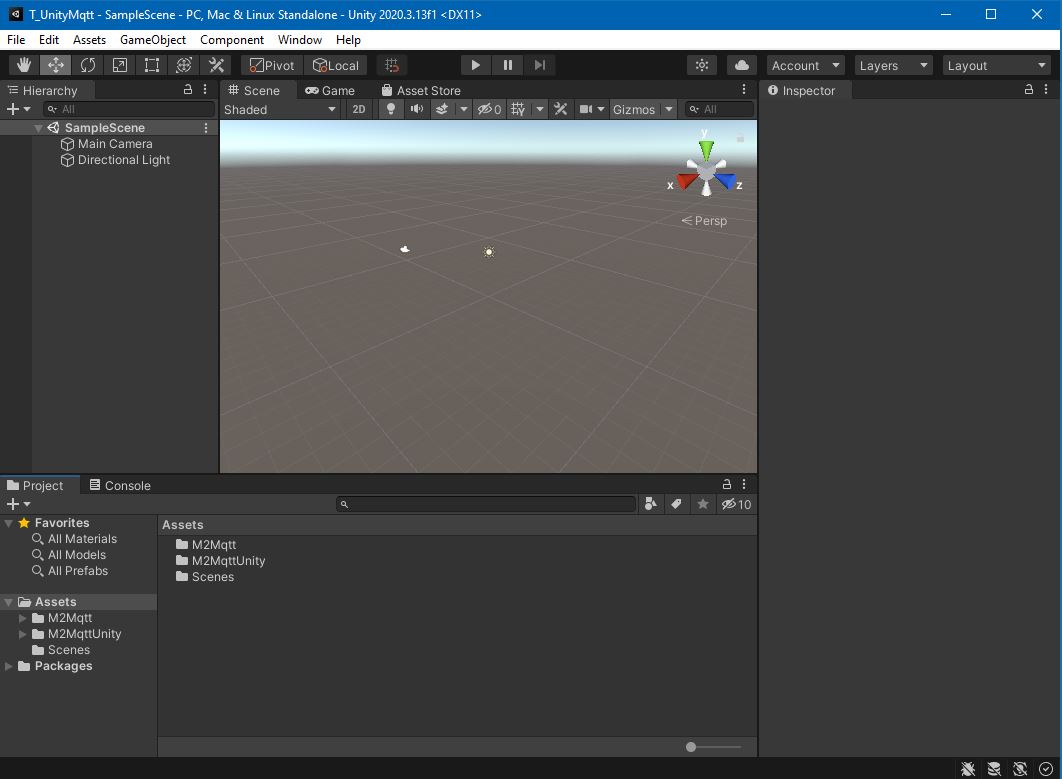
From the downloaded M2MQTT repository, we need to copy the folders M2Mqtt and M2MqttUnity in the Assets folder of the new Unity project
The library provides a test scene named M2MqttUnity_Test in the folder M2MqttUnity -> Examples -> Scenes
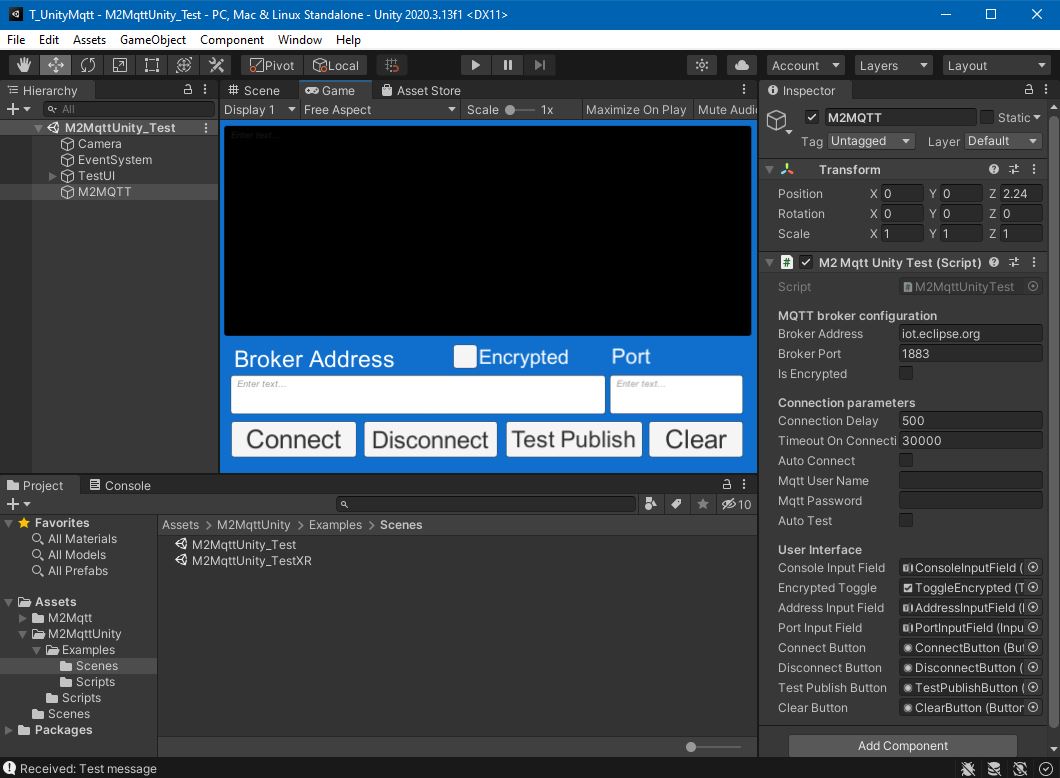
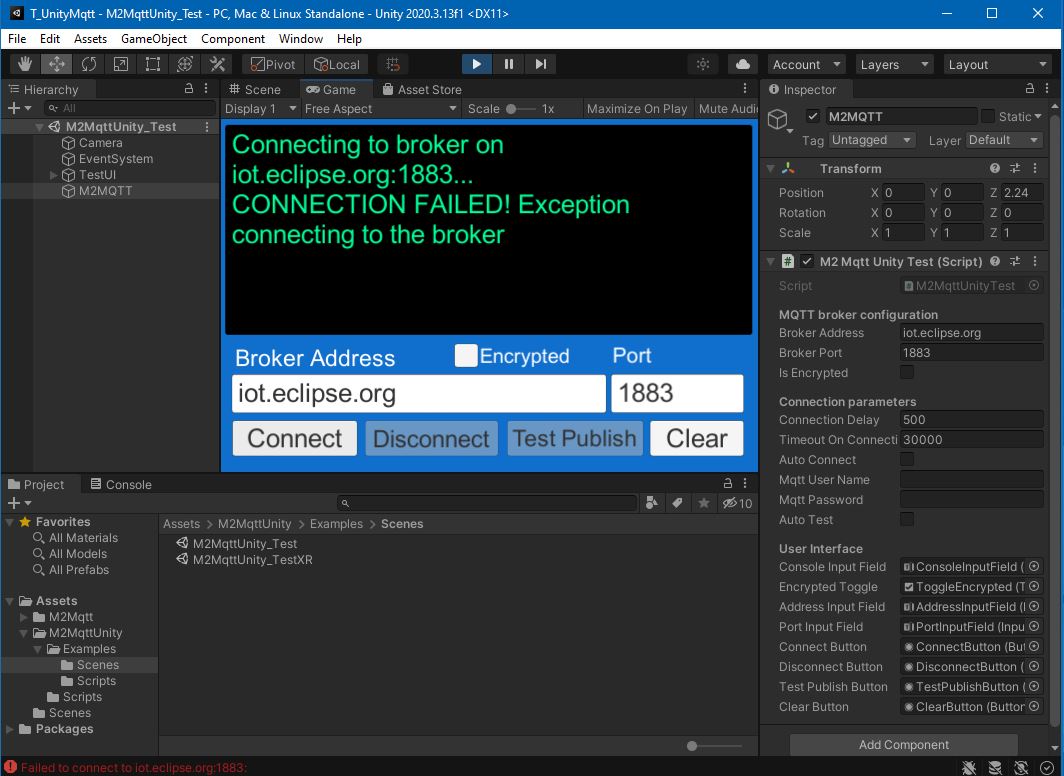
Press Play to test the library and, in the Game tab, press Connect to establish a connection with the default broker iot.eclipse.org using the port 1883.
In this case, the connection has failed, there could be various reasons for this e.g. the MQTT broker is offline
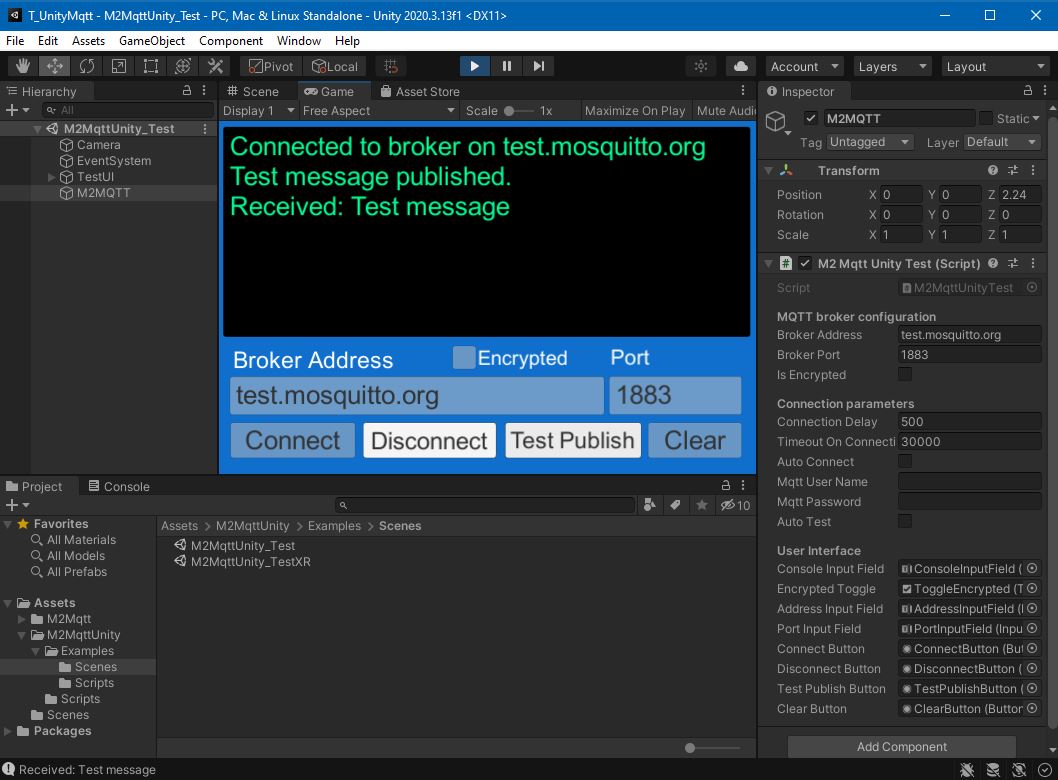
Without stopping Unity, we can change the MQTT Broker address to test.mosquitto.org, press again Connect and, once connected, Test Publish to check if the library can send and receive the message
By inspecting the scene, we can see that the only script used to setup the MQTT Client is M2MqttUnityTest.cs, attached to the M2MQTT GameObject in the scene, however, this script is linked with other classes of the main folder M2Mqtt.
We need to write two custom scripts based on the M2MqttUnityTest.cs used in the previous section.
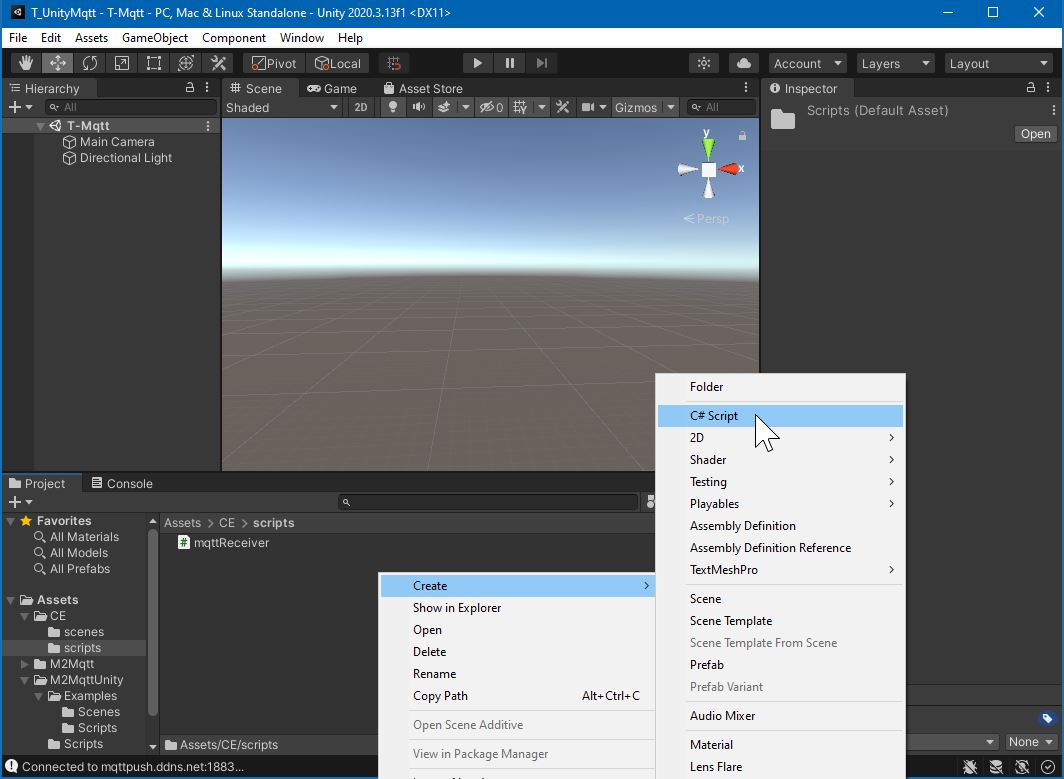
In Unity, from File create a New Scene and save it.
In a new folder in Assets (e.g. Assets\CE\scripts) create two new C# Script:
mqttReceiver.csmqttController.cs
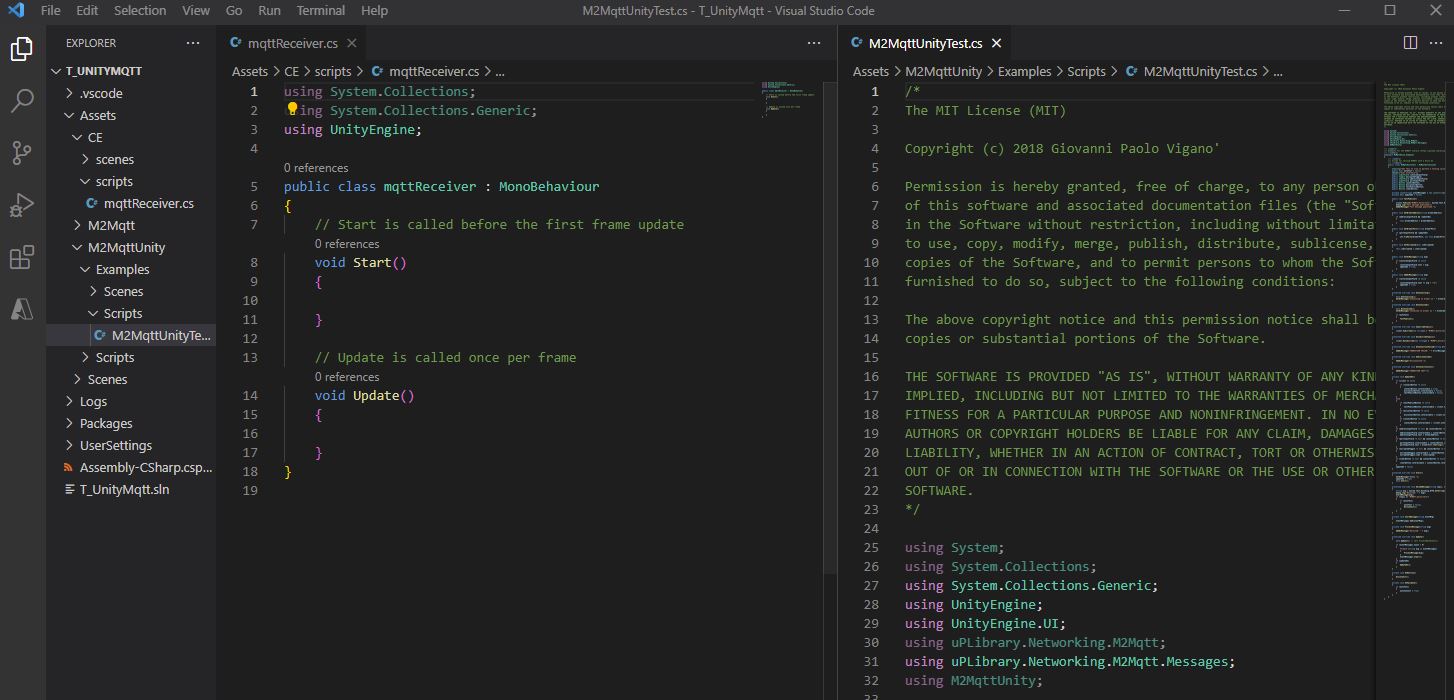
Open mqttReceiver.cs in VSCode and open on a side window the reference example script M2MqttUnityTest.cs
using System.Collections;
using System.Collections.Generic;
using UnityEngine;

public class mqttReceiver : MonoBehaviour
{
    // Start is called before the first frame update
    void Start()
    {

    }
    // Update is called once per frame
    void Update()
    {

    }
}
- Copy and paste the MIT licence at the top of the new script;
- import the
M2MqttUnityanduPLibraryclasses with theusingstatements; - the public class
mqttReceiverneeds to derive from the main classM2MqttUnityClient(that is part of the above importedM2MqttUnity) instead of the standardMonoBehaviour; - remove both
StartandUpdatefunctions and add the following variables
using System.Collections;
using System.Collections.Generic;
using UnityEngine;
using M2MqttUnity;
using uPLibrary.Networking.M2Mqtt;
using uPLibrary.Networking.M2Mqtt.Messages;

public class mqttReceiver : M2MqttUnityClient
{
    [Header("MQTT topics")]
    [Tooltip("Set the topic to subscribe. !!!ATTENTION!!! multi-level wildcard # subscribes to all topics")]
    public string topicSubscribe = "#"; // topic to subscribe. !!! The multi-level wildcard # is used to subscribe to all the topics. Attention i if #, subscribe to all topics. Attention if MQTT is on data plan
    [Tooltip("Set the topic to publish (optional)")]
    public string topicPublish = ""; // topic to publish
    public string messagePublish = ""; // message to publish

    [Tooltip("Set this to true to perform a testing cycle automatically on startup")]
    public bool autoTest = false;

    //using C# Property GET/SET and event listener to reduce Update overhead in the controlled objects
    private string m_msg;

    public string msg
    {
        get
        {
            return m_msg;
        }
        set
        {
            if (m_msg == value) return;
            m_msg = value;
            if (OnMessageArrived != null)
            {
                OnMessageArrived(m_msg);
            }
        }
    }

    public event OnMessageArrivedDelegate OnMessageArrived;
    public delegate void OnMessageArrivedDelegate(string newMsg);

    //using C# Property GET/SET and event listener to expose the connection status
    private bool m_isConnected;

    public bool isConnected
    {
        get
        {
            return m_isConnected;
        }
        set
        {
            if (m_isConnected == value) return;
            m_isConnected = value;
            if (OnConnectionSucceeded != null)
            {
                OnConnectionSucceeded(isConnected);
            }
        }
    }
    public event OnConnectionSucceededDelegate OnConnectionSucceeded;
    public delegate void OnConnectionSucceededDelegate(bool isConnected);

    // a list to store the messages
    private List<string> eventMessages = new List<string>();
}
The variables msg and isConnected use the C# properties GET/SET. Instead of using an Update function or a Coroutine, by using these properties it is possible to create a more efficient event system.
add the following functions in the public class mqttReceiver. They are from M2MqttUnityTest.cs and they have been changed to make them more suitable for our need
public void Publish()
    {
        client.Publish(topicPublish, System.Text.Encoding.UTF8.GetBytes(messagePublish), MqttMsgBase.QOS_LEVEL_EXACTLY_ONCE, false);
        Debug.Log("Test message published");
    }
public void SetEncrypted(bool isEncrypted)
    {
        this.isEncrypted = isEncrypted;
    }

protected override void OnConnecting()
    {
        base.OnConnecting();
    }

protected override void OnConnected()
    {
        base.OnConnected();
        isConnected=true;

        if (autoTest)
        {
            Publish();
        }
    }

protected override void OnConnectionFailed(string errorMessage)
    {
        Debug.Log("CONNECTION FAILED! " + errorMessage);
    }

protected override void OnDisconnected()
    {
        Debug.Log("Disconnected.");
        isConnected=false;
    }

protected override void OnConnectionLost()
    {
        Debug.Log("CONNECTION LOST!");
    }

protected override void SubscribeTopics()
    {
        client.Subscribe(new string[] { topicSubscribe }, new byte[] { MqttMsgBase.QOS_LEVEL_EXACTLY_ONCE });
    }

protected override void UnsubscribeTopics()
    {
        client.Unsubscribe(new string[] { topicSubscribe });
    }

protected override void Start()
    {
        base.Start();
    }

protected override void DecodeMessage(string topic, byte[] message)
    {
        //The message is decoded
        msg = System.Text.Encoding.UTF8.GetString(message);

        Debug.Log("Received: " + msg);
        Debug.Log("from topic: " + m_msg);

        StoreMessage(msg);
        if (topic == topicSubscribe)
        {
            if (autoTest)
            {
                autoTest = false;
                Disconnect();
            }
        }
    }

private void StoreMessage(string eventMsg)
    {
        if (eventMessages.Count > 50)
        {
            eventMessages.Clear();
        }
        eventMessages.Add(eventMsg);
    }

protected override void Update()
    {
        base.Update(); // call ProcessMqttEvents()

    }

private void OnDestroy()
    {
        Disconnect();
    }

private void OnValidate()
    {
        if (autoTest)
        {
            autoConnect = true;
        }
    }
From the original scripts, all the references and functions relying on the UI panel have been removed.
The message is received and decoded by the function DecodeMessage() that is used also to store a copy of the received message. Two Debug.Log functions are used to print the received message and topic in the console, they can be commented out in production.
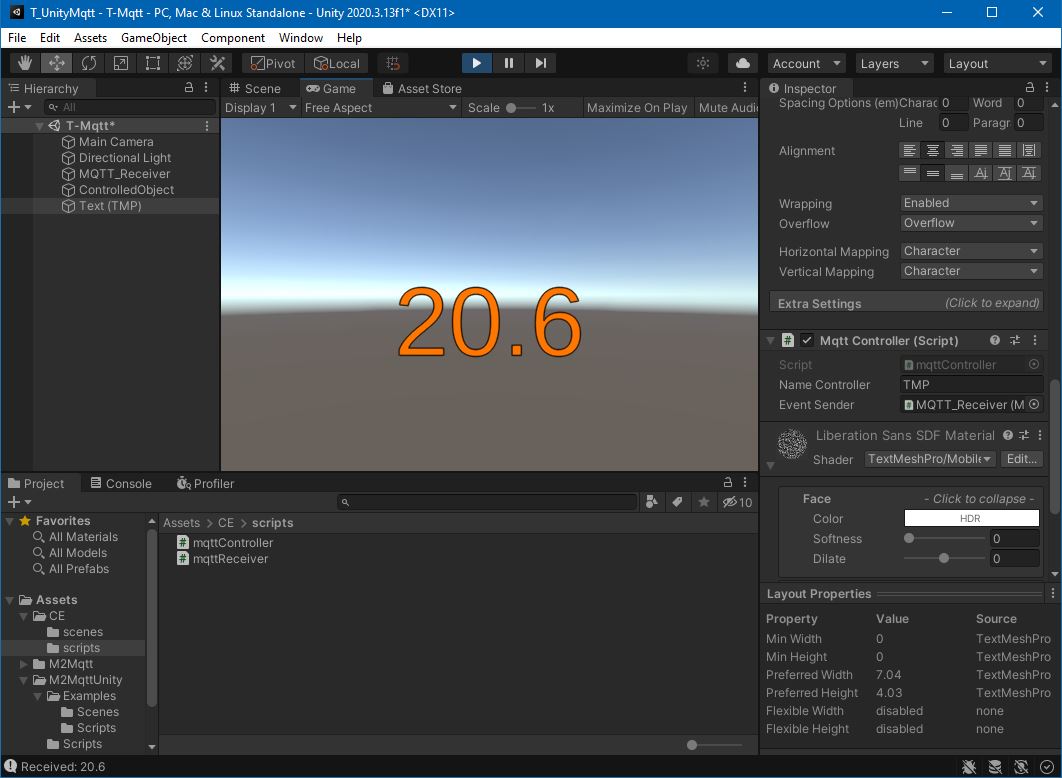
In Unity, create an empty Game Object, named MQTT_Receiver and add the script mqttReceiver.cs using Add component or dragging the script on it.
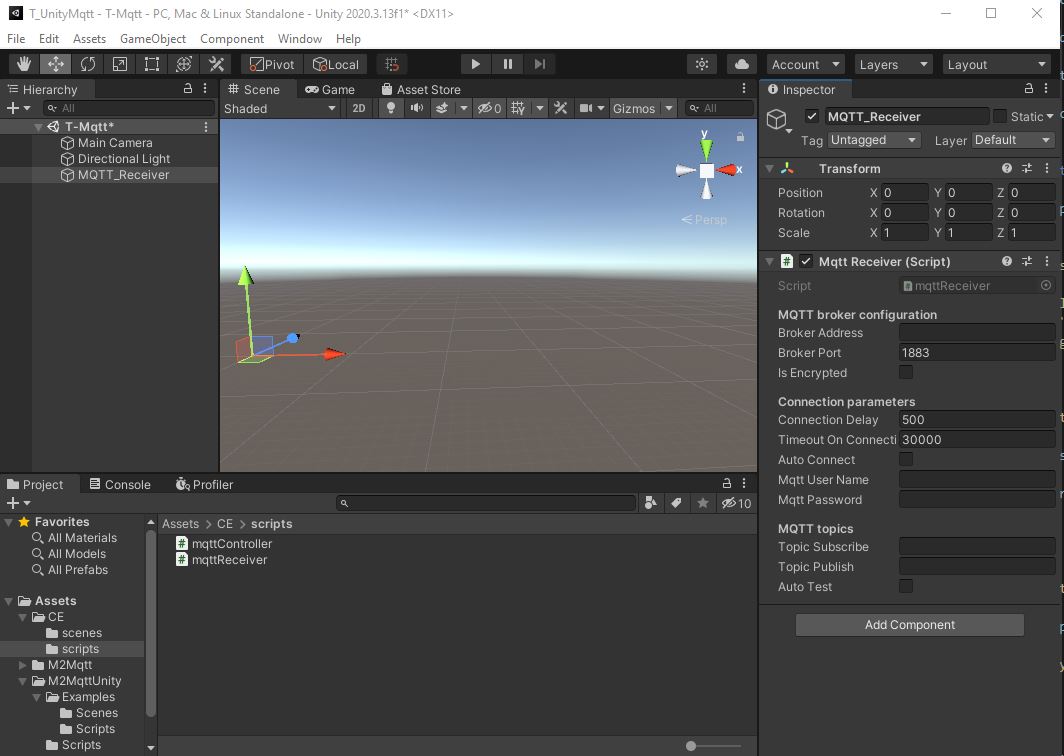
Add Broker Address, Broker Port and Topic Subscribe and enable Auto Connect. The received messages and topic will be display in the Unity Console.
To identify the MQTT_Receiver in the scene from other scripts, we have to set its Tag from the Inspector window (default value is Untagged). Select the Tag dropdown and select Add Tag.... Remember to add the Tag to the MQTT_Receiver once created.
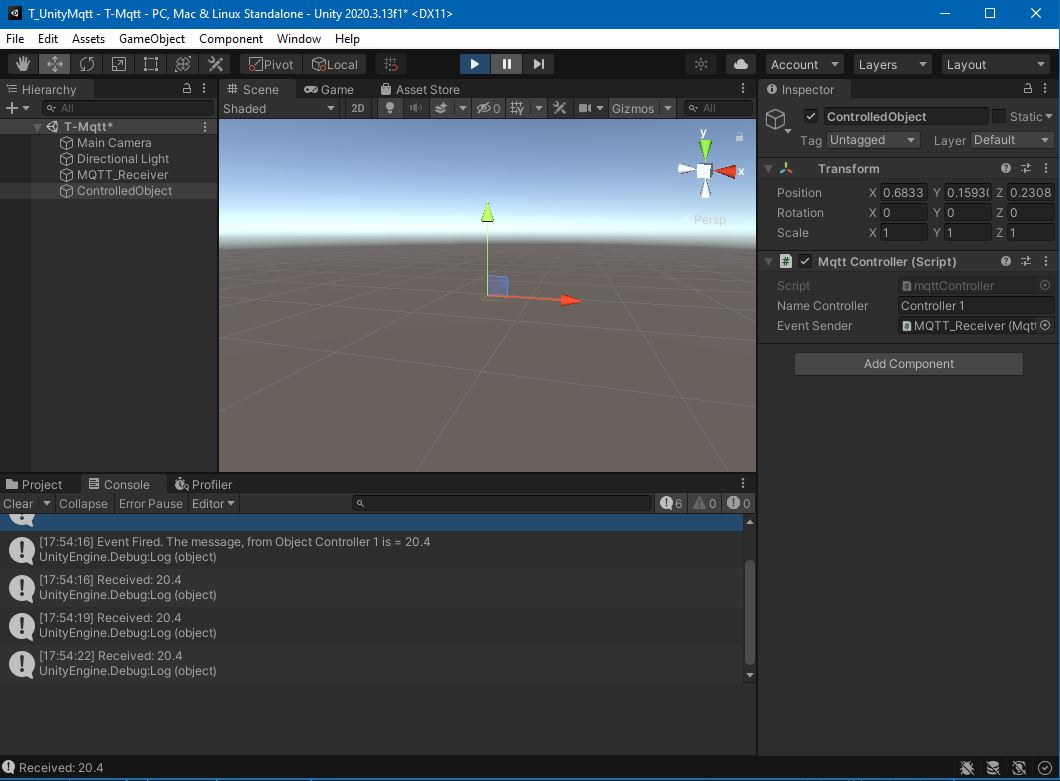
Open the empty mqttController.cs script in VSCode. This script is used to actively use the values received by the MQTT client, and it is the only script that needs to be customised, depending on the experience we want to develop.
In this case we are going to simply print a message in the Unity console every time a new value is received by the client.
using System.Collections;
using System.Collections.Generic;
using UnityEngine;

public class mqttController : MonoBehaviour
{
    public string nameController = "Controller 1";
    public string tagOfTheMQTTReceiver="";
    public mqttReceiver _eventSender;

  void Start()
  {
      _eventSender=GameObject.FindGameObjectsWithTag(tagOfTheMQTTReceiver)[0].gameObject.GetComponent<mqttReceiver>();
    _eventSender.OnMessageArrived += OnMessageArrivedHandler;
  }

  private void OnMessageArrivedHandler(string newMsg)
  {
    Debug.Log("Event Fired. The message, from Object " +nameController+" is = " + newMsg);
  }
}
Create a GameObject named ControlledObject and attach the script to it. Also, drag and drop the MQTT_Receiver object to the Event Sender field of the Mqtt Controller component.
The mqttController.cs script can be customise to control any GameObject in the scene. For the purpose of this tutorial, we are going to visualise the value received using a TextMeshPro (TMP) object.
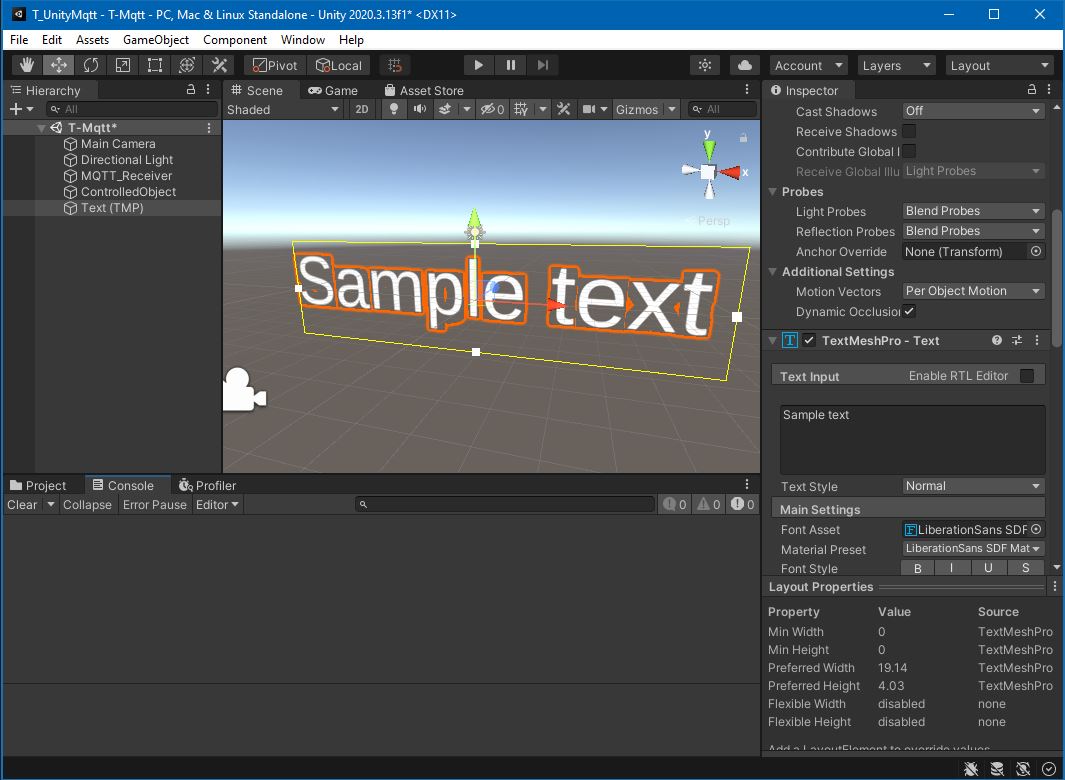
Attach the mqttController.cs script to the TMP Object and open it in VSCode to add the TMPro classes and the reference to the text field in the OnMessageArrivedHandler function.
using System.Collections;
using System.Collections.Generic;
using UnityEngine;
using TMPro;

public class mqttController : MonoBehaviour
{
    public string nameController = "Controller 1";

    public mqttReceiver _eventSender;

    void Start()
    {
        _eventSender.OnMessageArrived += OnMessageArrivedHandler;
    }

    private void OnMessageArrivedHandler(string newMsg)
    {
        this.GetComponent<TextMeshPro>().text=newMsg;
        Debug.Log("Event Fired. The message, from Object " +nameController+" is = " + newMsg);
    }

}
When the message is received by the client, the TMP object updates the text field with the value received