This Workshop is OUTDATED
This workshop will show you how to
- use a virtual environment created using 3D photogrammetry
- use the AltspaceVR Template and AltspaceVR Kit Unity package uploader
- create a Mixed Reality Experience (MRE) component to control digital models using real-time data
To complete this workshop you will need
- Unity 2020.3.9f1
- VS Code
- Flaxman Gallery model
- 3D model of a Gauge and its Pointer
- CE Mug
- CE Studio model
To upload and use AltspaceVR
- AltspaceVR Account
- AltspaceVR Client, AltspaceVR works on both VR headsets and 2D mode (Windows and Mac)
- Unity AltspaceVR Uploader 2.2.19
To code and deploy MRE
Additional resources
In addition to the traditional modelling techniques, 3D photogrammetry is an exceptional solution to rapid prototyping both small objects and entire rooms and buildings. A well-planned photogrammetry survey can speed up the conceptual phase and save time on the entire modelling process.
There are multiple software solutions, both commercial (Agisoft Metashape; Capturing Reality; Pix4D) and free or Open Source (MeshRoom; Regard3D; COLMAP), that provide step-by-step processes to easily create digital 3D models.
Input data used by these solutions are photos, or videos, taken from high-resolution cameras (that generally provide better results), smartphones and 360 cameras.
A series of online resources are available to start working with 3D photogrammetry that explains which lenses to use, how to take the photos as well as the optimal light conditions (e.g. Sketchfab, Agisoft]). Nevertheless, a good 3D photogrammetry model is 50% technique and 50% experience and trial-and-error. Every object and every room has features, details, materials, accessibility that are unique and therefore the approach to use, the number of photos to take, the settings of the software to use need to be considered case by case.
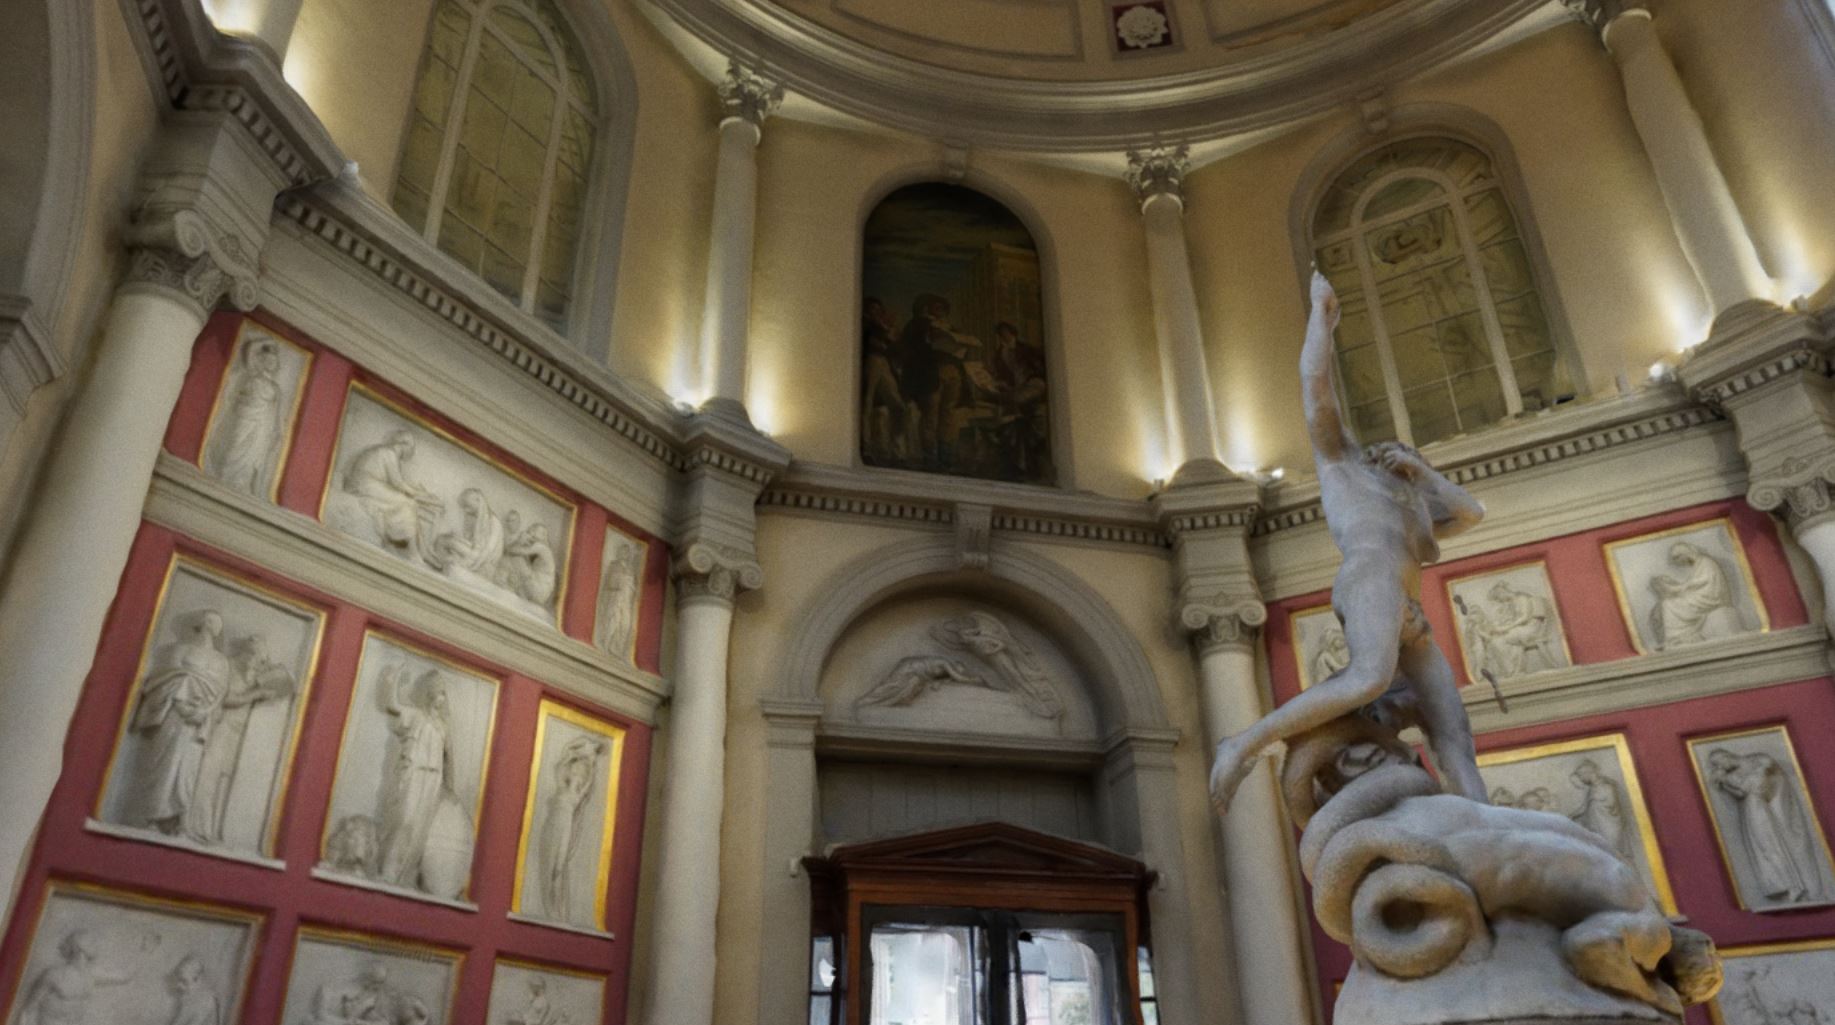
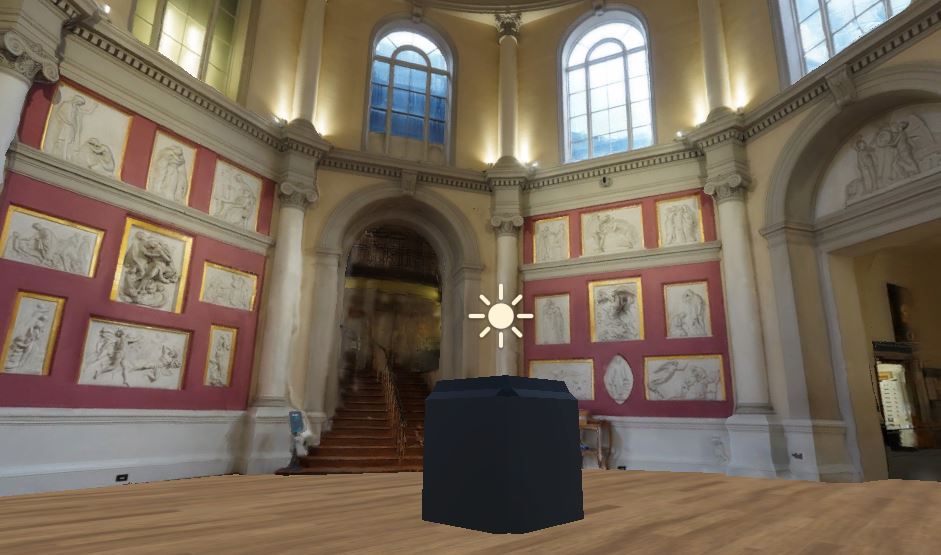
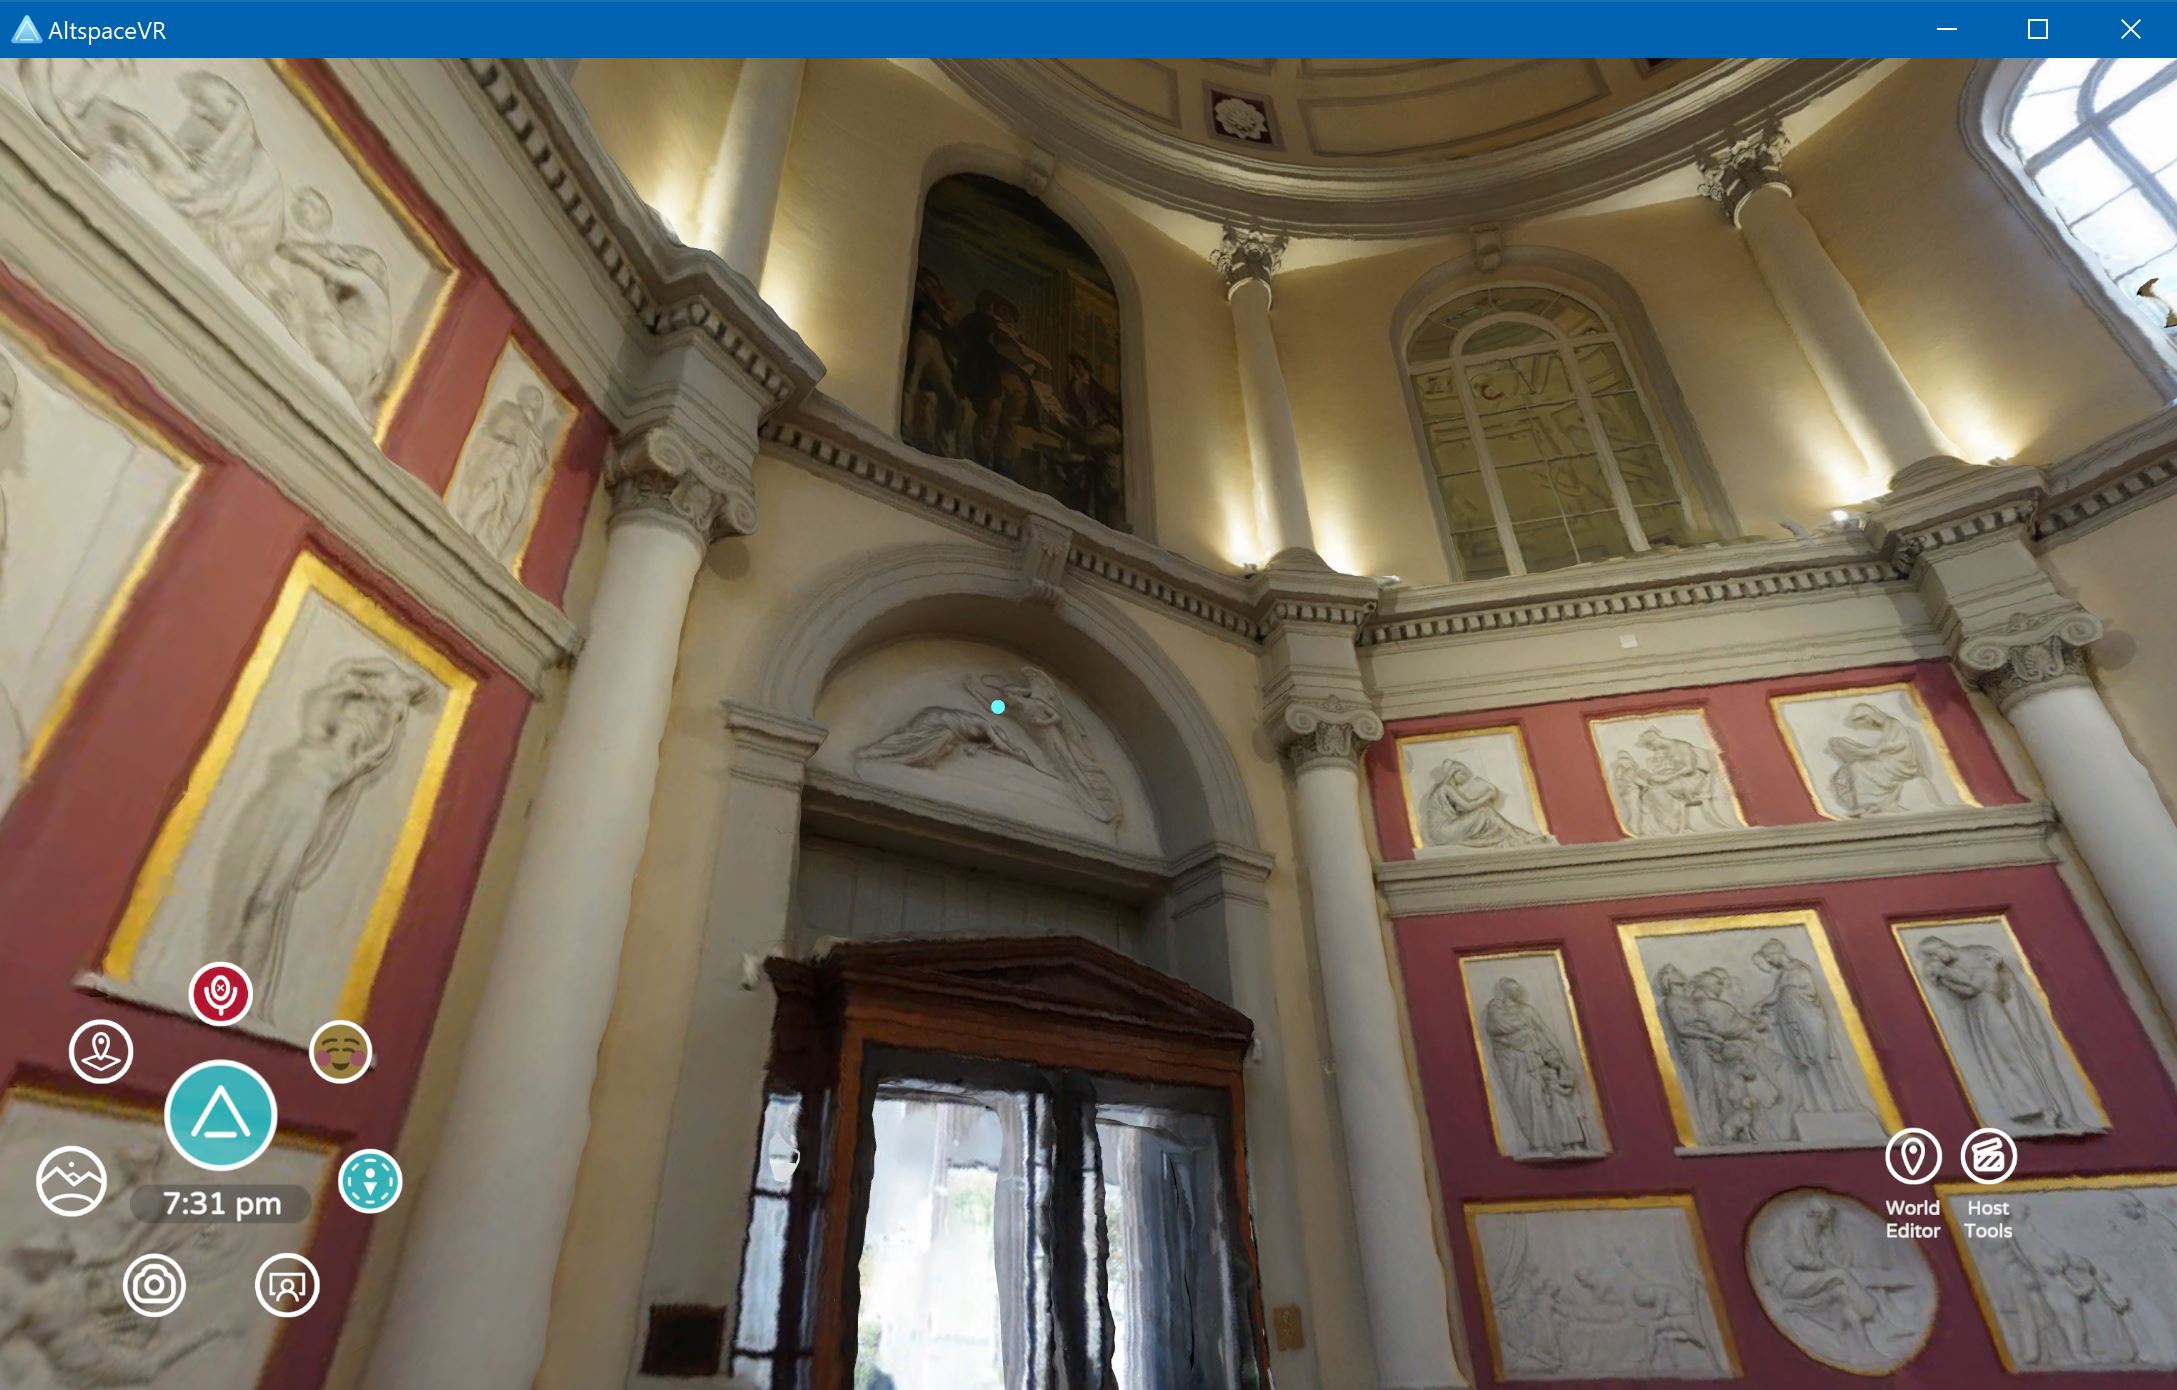
The model provided for this tutorial, the UCL Flaxman Gallery, has been created using Agisoft Metashape and 126 images (Sony a6400). The Gallery is a good testing environment that presents various features, details and materials not always easy to capture (result of the capture can be found on Sketchfab.
Feel free to use your own digital space to complete this tutorial. Bear in mind that large environments need to be optimised in terms of the number of vertices and resolution of the textures to be used on AltspaceVR or any other AR or VR system.
Shared experiences using AltspaceVR
AltspaceVR is a free to use social VR platform. Currently owned by Microsoft, it was initially developed using AFrame, and it is now based on Unity3D, which allows higher performances and better use of the system resources especially in VR context. While most of the features can be found also in other VR platforms, AltspaceVR, thanks to the Mixed Reality Extensions (MRE), allow the developers to introduce custom scripts and components. AltspaceVR provides an easy to use Unity package to upload virtual environments (Templates) and groups of digital objects (Kits) directly from the Game Engine.
AltspaceVR organises the users' digital spaces in Universes and Worlds, Templates, Kits and MRE.
- Universes and Worlds can be private or public, and different levels of rights can be granted to each user. There is not a hard limit on the number of Universes and Worlds that can be created.
- The Worlds are defined by the Templates. Each World can use just one Template at the time. The Template contains all the static and not interactable geometries of the digital environment (e.g. a room).
- Kits are collections of digital assets that can be spawned in the digital environment and the user can interact with. Kits can be shared among Worlds and other users.
- MRE are custom experiences connected to the World using websocket connection. A MRE can be used to spawn objects (contained in the MRE itself or from Kits), to generate primitive geometries but also to provide further customisation to the environment and to execute custom scripts. The language used by MRE is TypeScript.
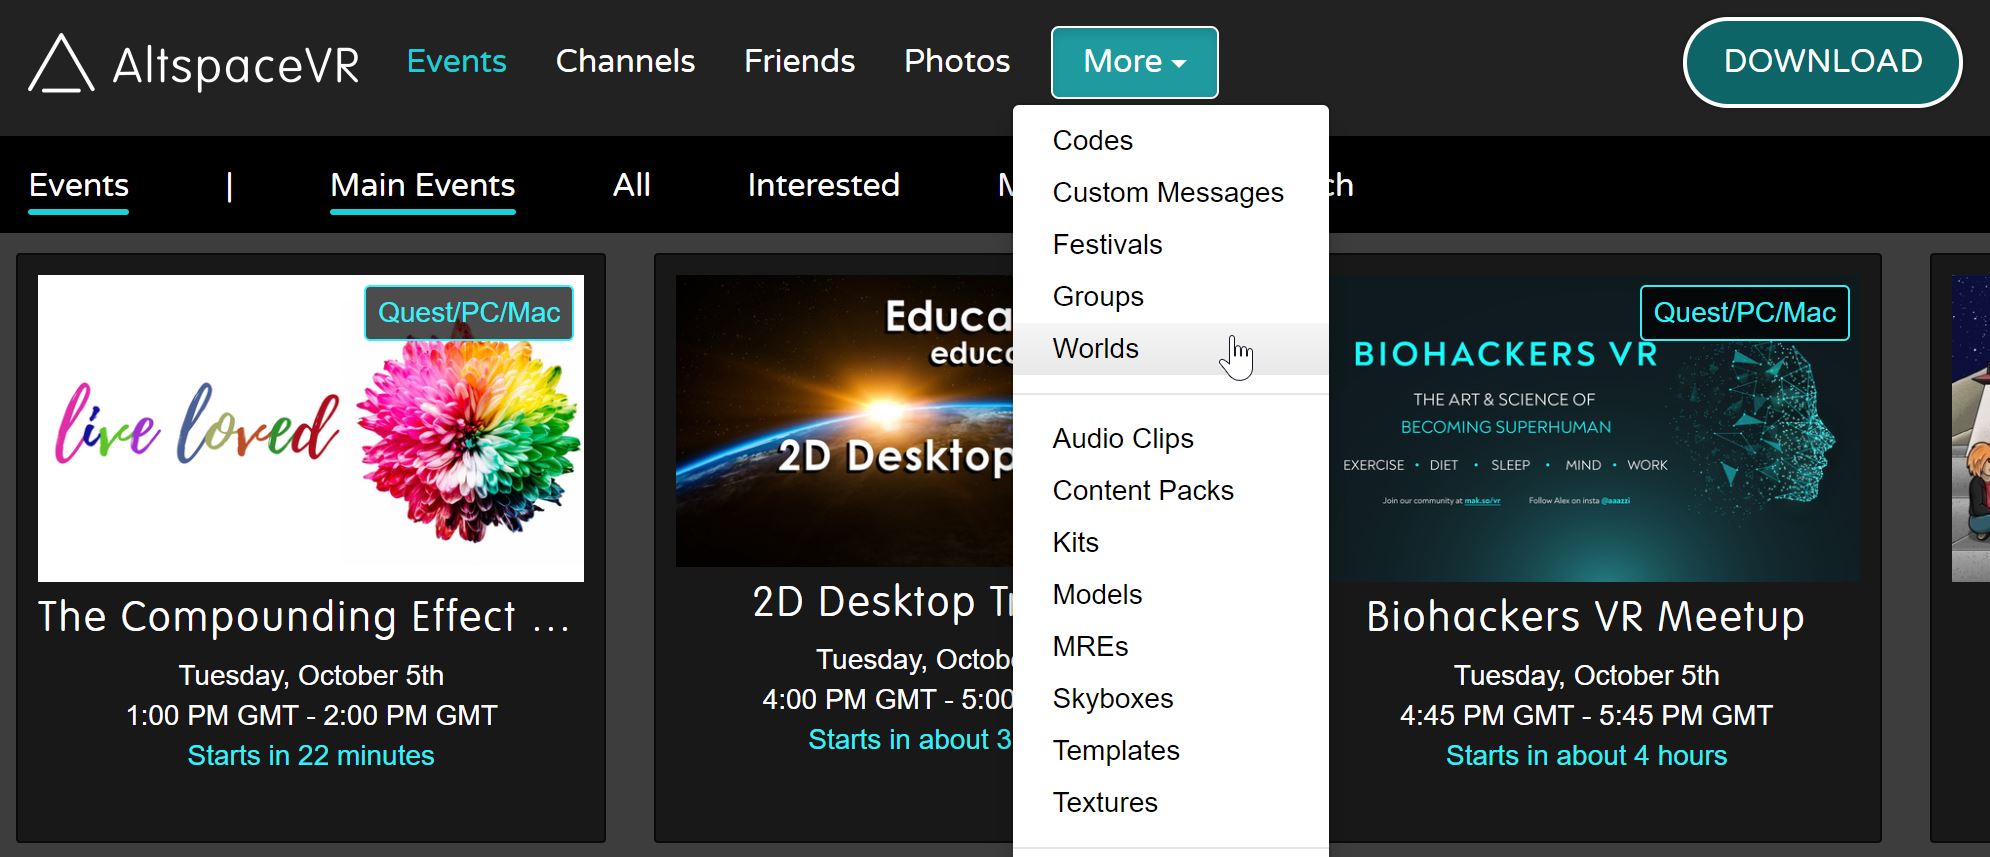
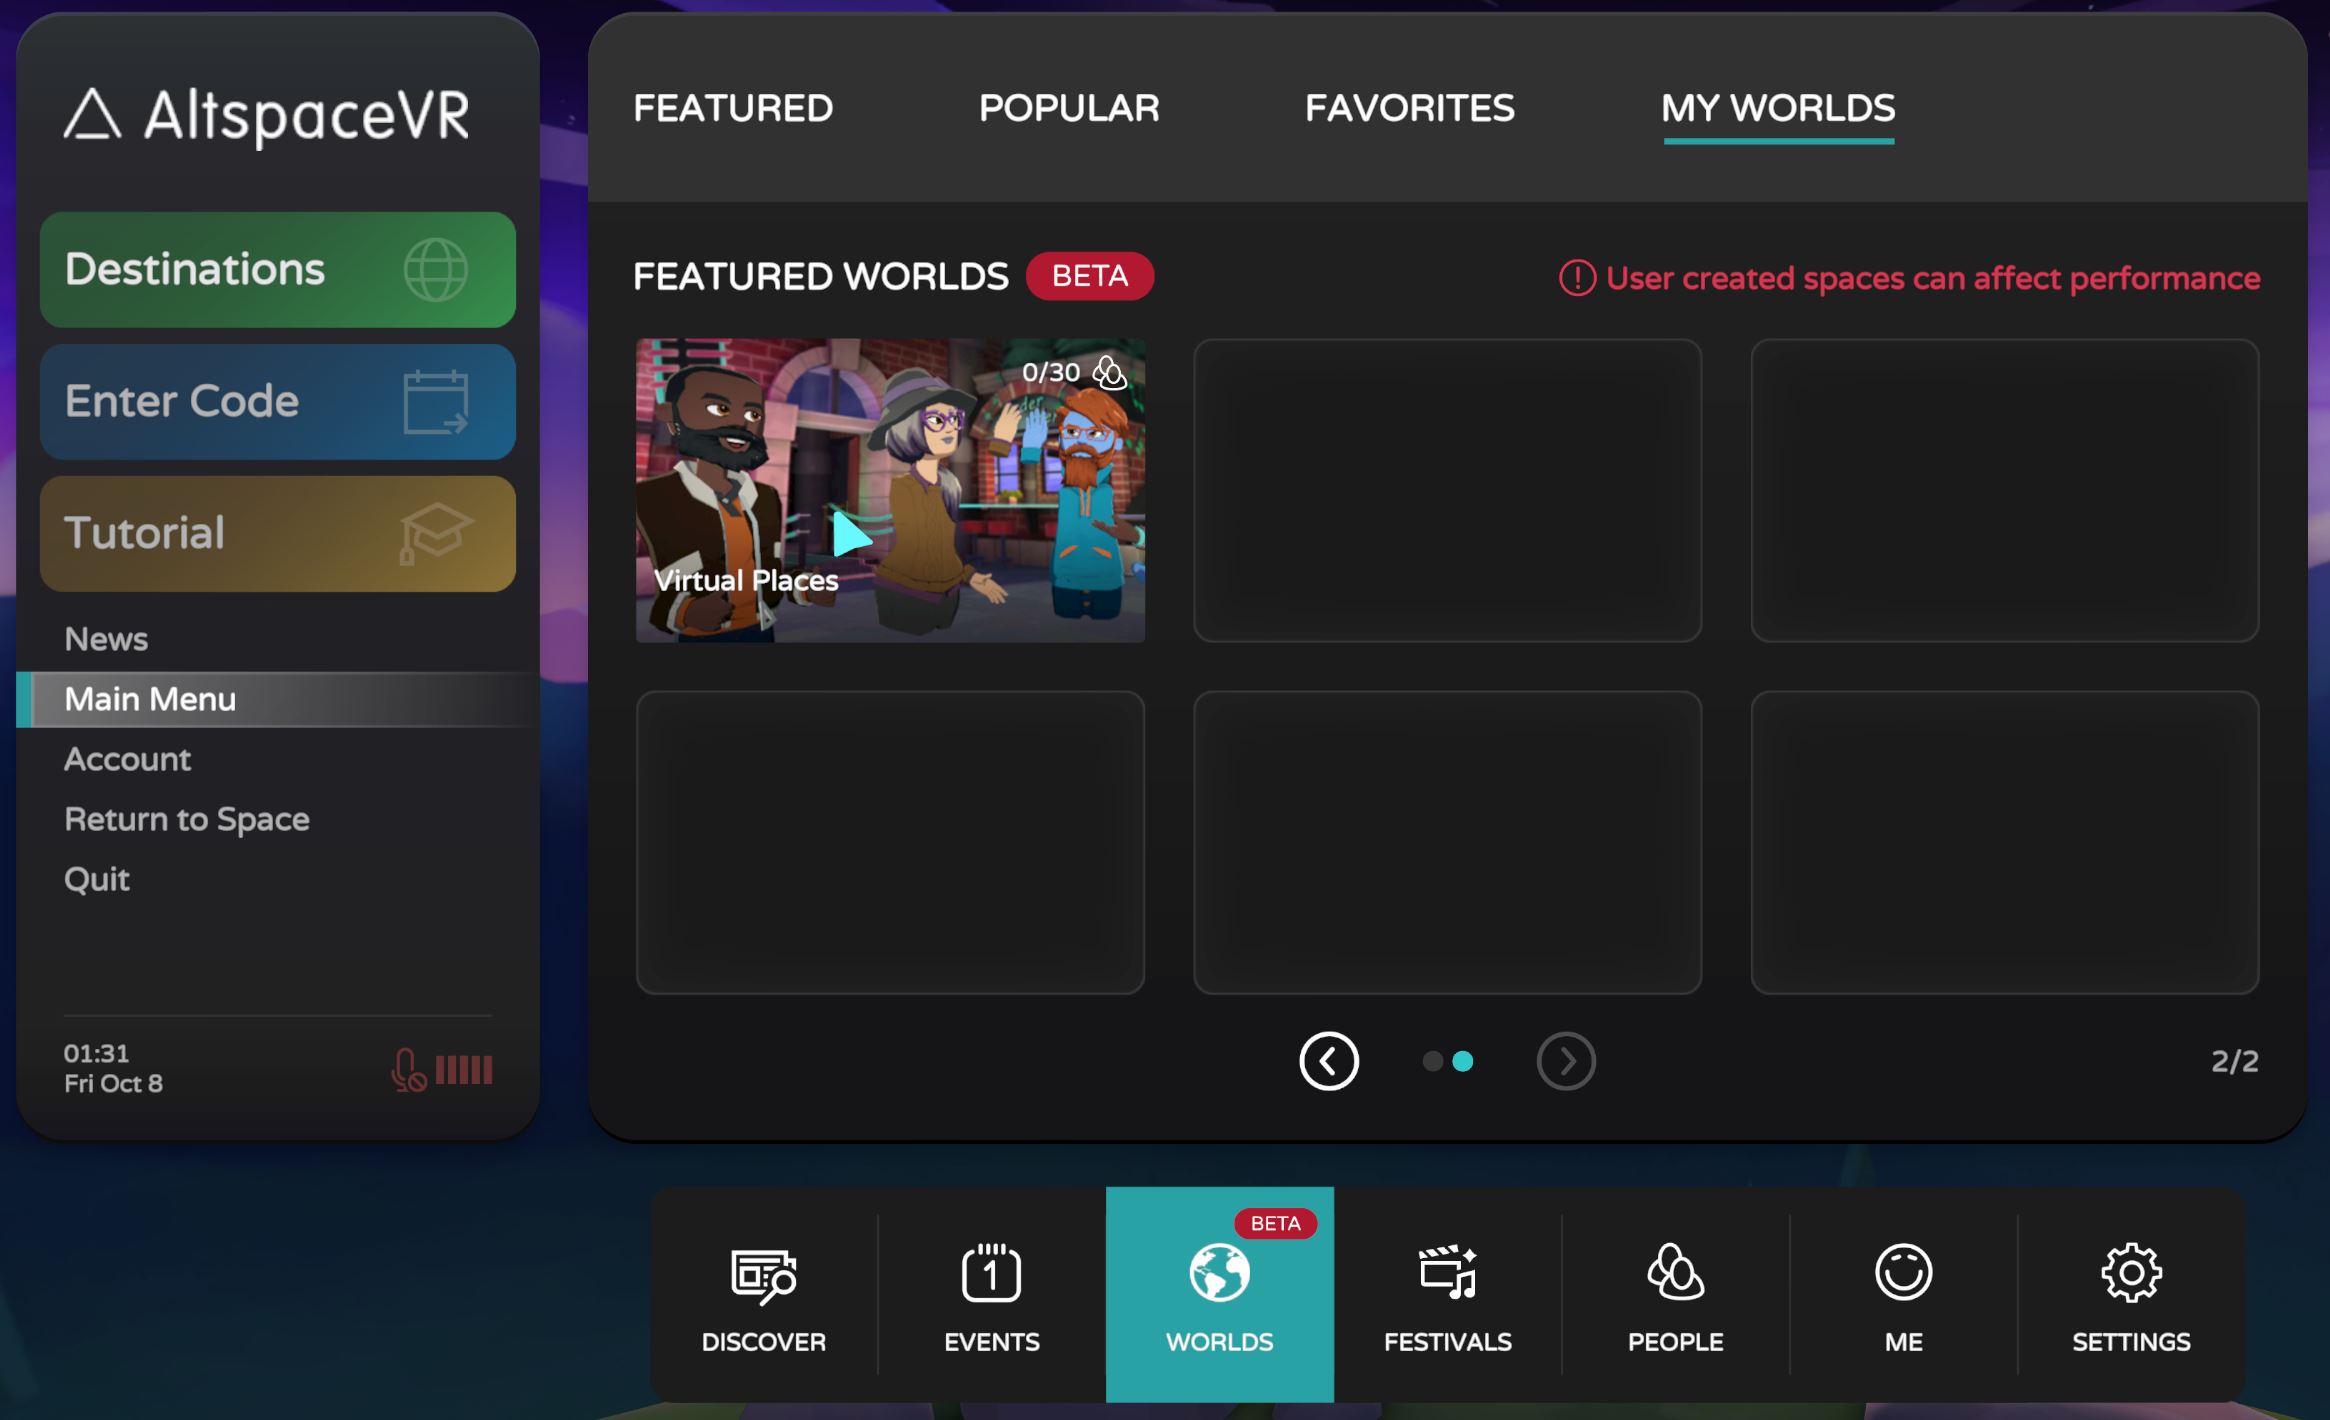
The first step is to create a World from the AltspaceVR website. From the top menu select More -> Worlds, select My Worlds and create a Universe
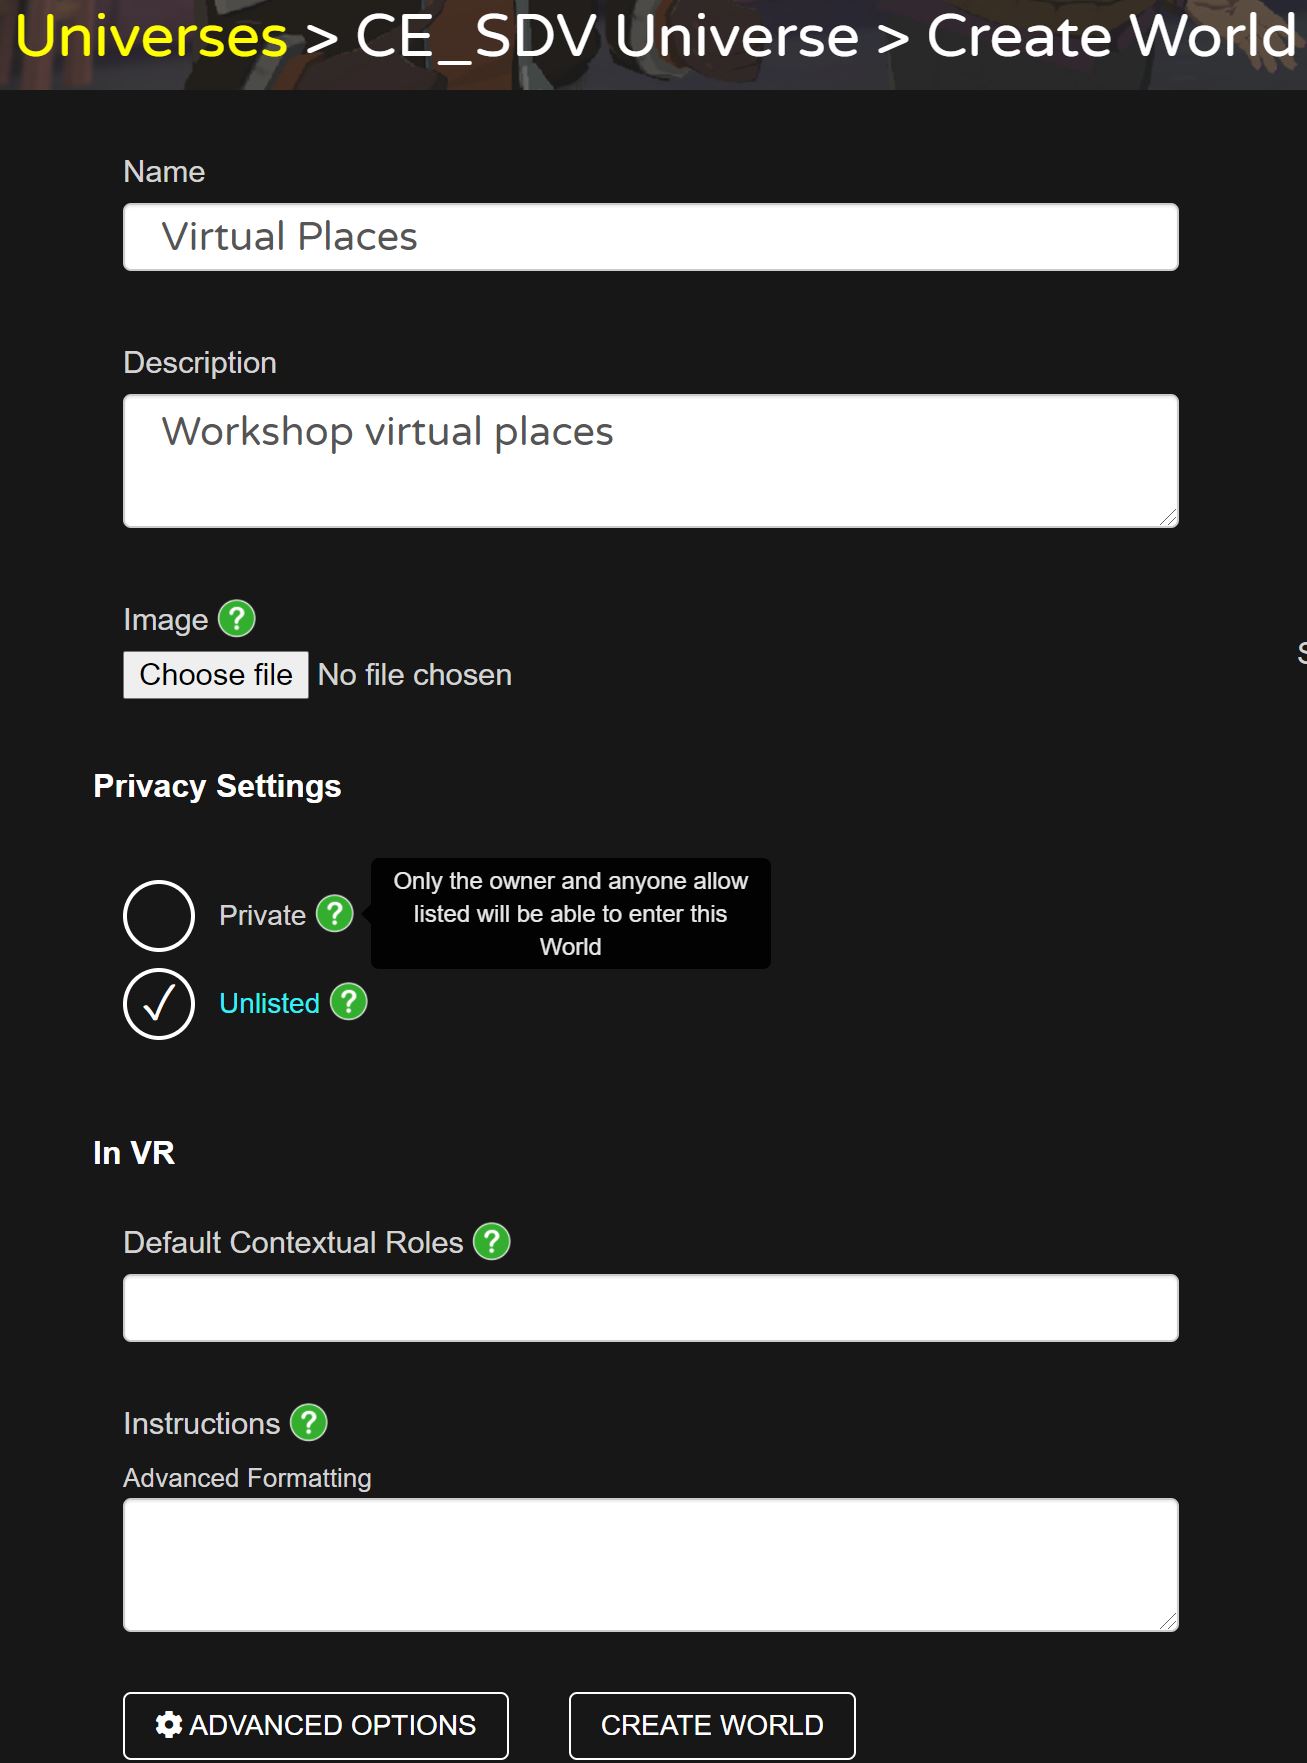
Inside the Universe, create a World. Together with the name and description, it is possible to add an image and to set the privacy level. Additional settings are available after its creation (e.g. users allowed to enter and edit the world).
After this setup, we can now move to Unity to create the scene that will be used as a Template for our brand new world, uploaded using the AltspaceVR Uploader package.
AltspaceVR is currently using the newUnity Universal Render Pipeline (URP). URP generally provides better performances and few limitations if compared to the standard rendering pipeline.
Prepare the Template
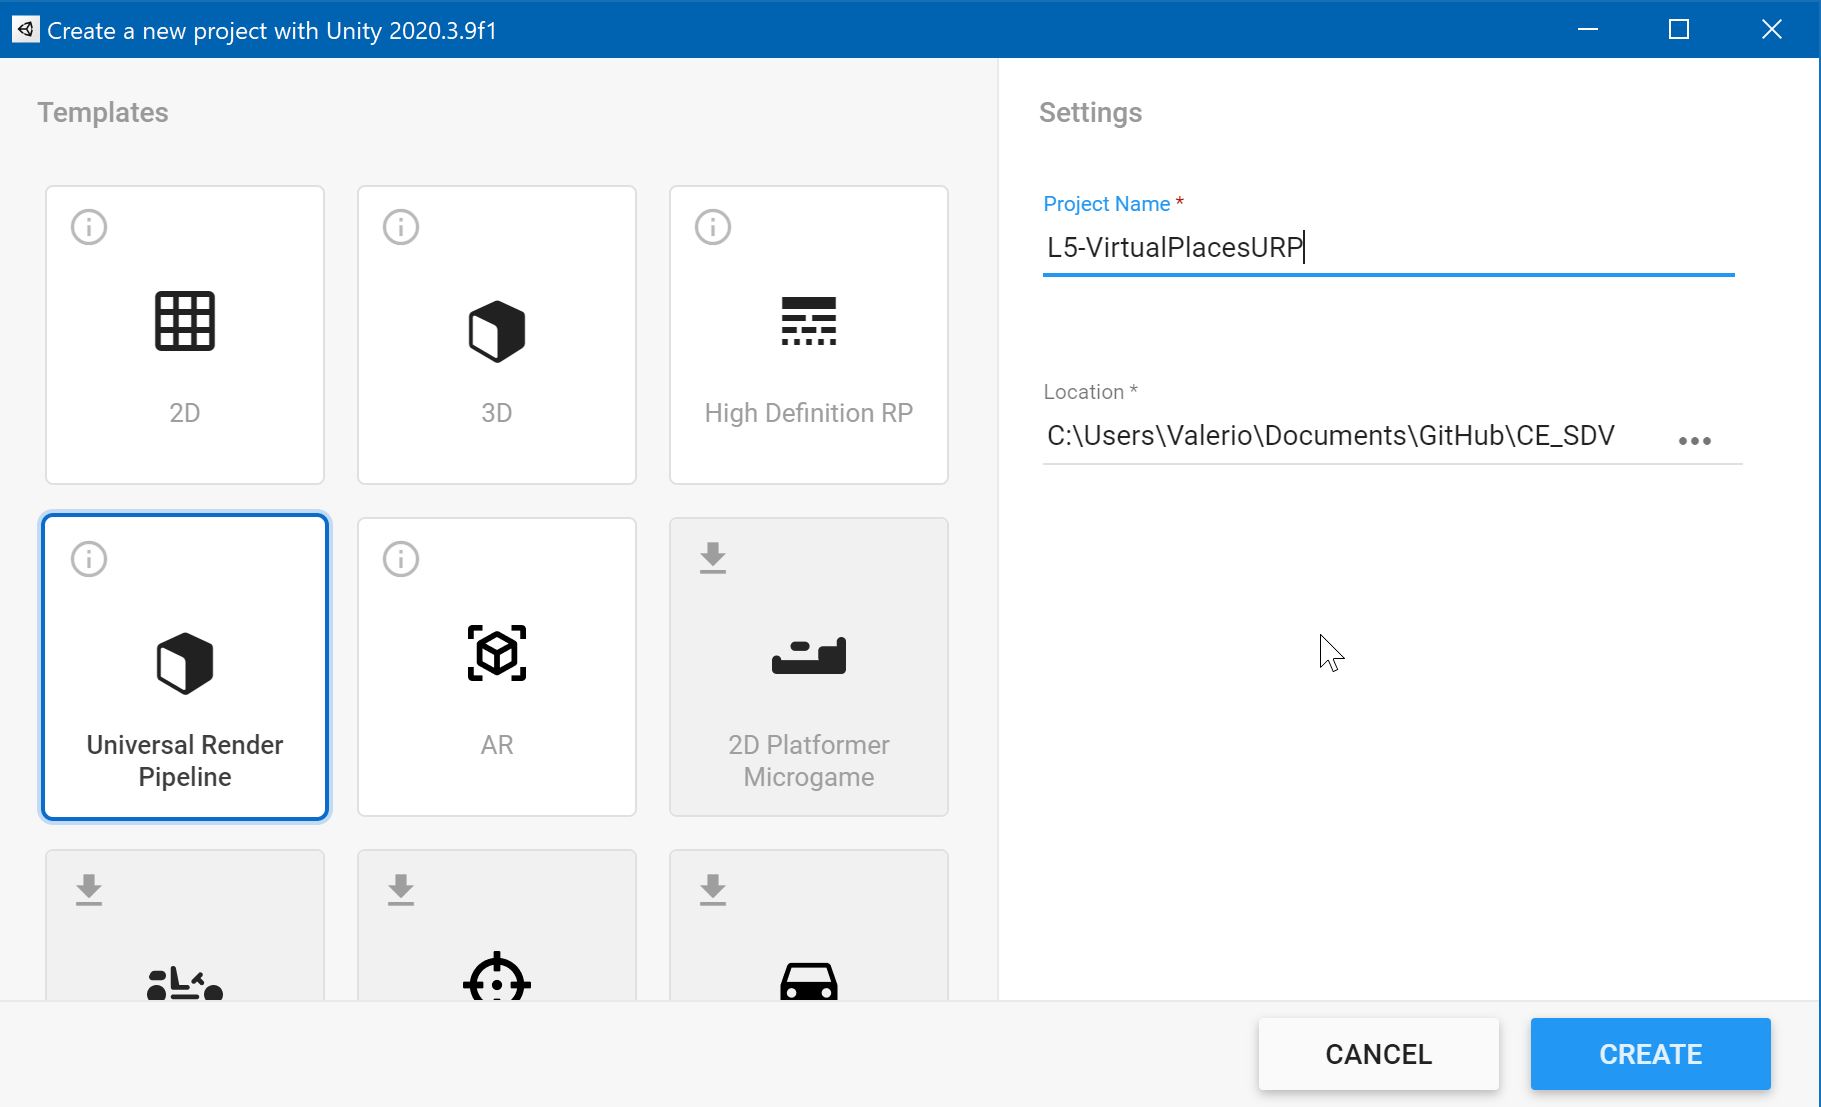
In Unity Hubs create a new project using the template Universal Render Pipeline (note that Unity version 2020.3.9f1, at the time of writing, Unity version 2020.3.18 are the only compatible with the AltspaceVR Uploader package)
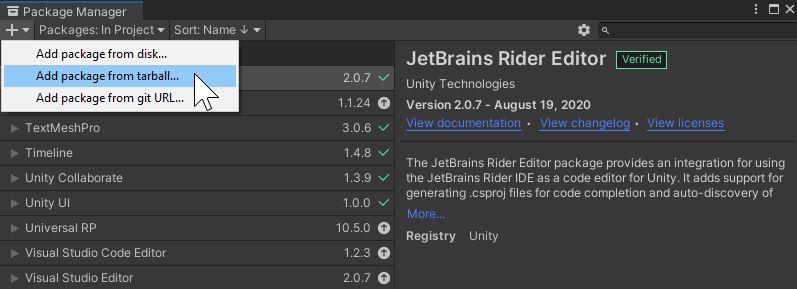
The downloaded AltspaceVR Uploader package.*tgz file needs to be always accessible to Unity even after its installation, as it is used as a reference. A good location is as a subfolder in the main Assets folder.
In Unity, open the Package Manager and from the + dropdown select Add package from tarball and select the downloaded *.tgz
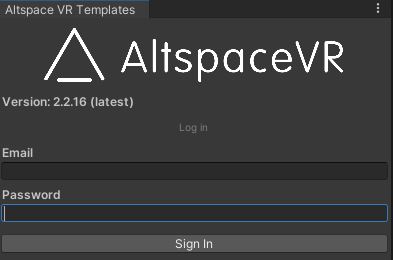
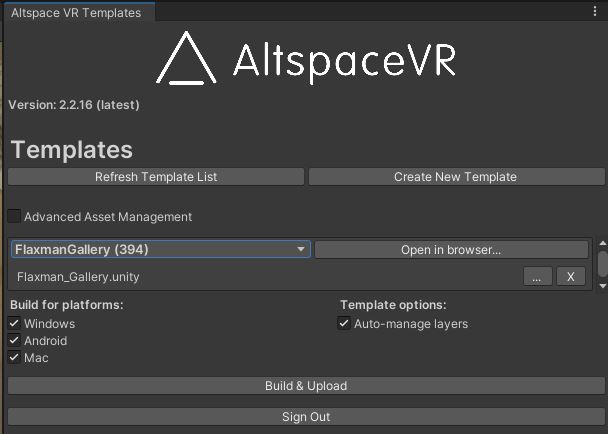
A new menu item AltspaceVR will be available. Select AltspaceVR -> Templates to open the uploader interface. To use the plugin we need to log in with an AltspaceVR account
Press on Create New Template, the default browser will open the web interface (you may need to log in again). Provide a name, an image (optional) and a short description for the Template (they can be added or changed also later). Select restricted to keep the template private.
Create a new Unity scene to upload as AltspaceVR Template.
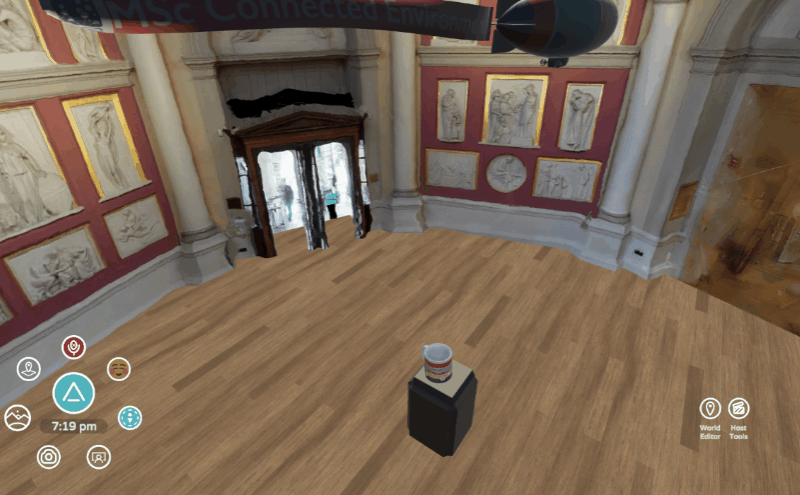
Import all the static digital models in the scene (all the digital assets that the user will not interact with). Generally the main environment and the furniture. We are going to use the Flaxman Gallery model, but you can test the template also with the CE Studio model, or another digital environment created using 3D photogrammetry, or any other abstract model.
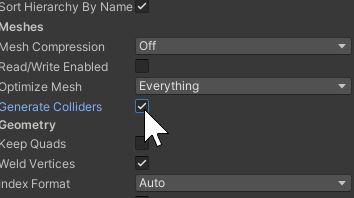
The 3D model needs to have colliders to avoid the user falling outside the boundaries of the environment. These can be automatically created in Unity:
- import the 3D model (suggested file format FBX) in the
Asset window - select the imported model from the
Assets window - in the
Inspector window, in the tab Model select Generate Colliders
for the Flaxman Gallery, in the Inspector Window, in the field LocationUse External Materials (Legacy)
if needed, generate lightmaps. Realtime lights are supported but they may impact the performances of the scene (especially if multiple objects are used).
Add a plinth in the centre of the scene (e.g. it can be a simple Unity GameObject Cube, or a 3D model downloaded from SketchFab)
Upload the scene
Using the AltspaceVR Uploader Templates (AltspaceVR -> Templates)
- press Refresh Template List
- From the dropdown menu Select a Template select the template created from in the web-interface
- press the ... next to Choose a .unity file and select the open scene to upload (by default it is inside the Assets folder)
- select the platforms to build. It is good practice to select all of them (Windows, Mac and Android) in this way, every user using different AltspaceVR Clients will be able to access the AltspaceVR environment we just created.
- Finally, press Build & Upload (press Save if asked)
The packages will create and upload the Template to AltspaceVR. Back to the AltspaceVR web interface, we can now link the World with the Template:
- Select the World created and press Edit
- from the new view, select the Template (the Templates we created have a label Owner. If set to public, these will be accessible to everyone in AltspaceVR, be sure that the models you are using can be shared before set them as public).
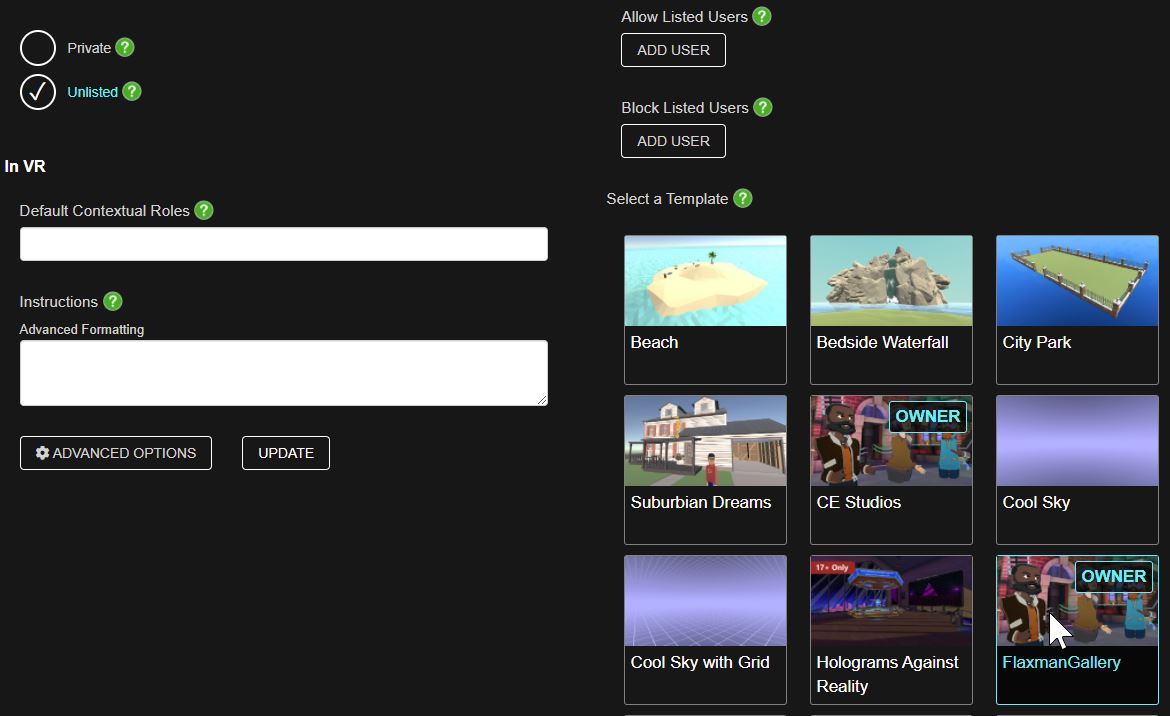
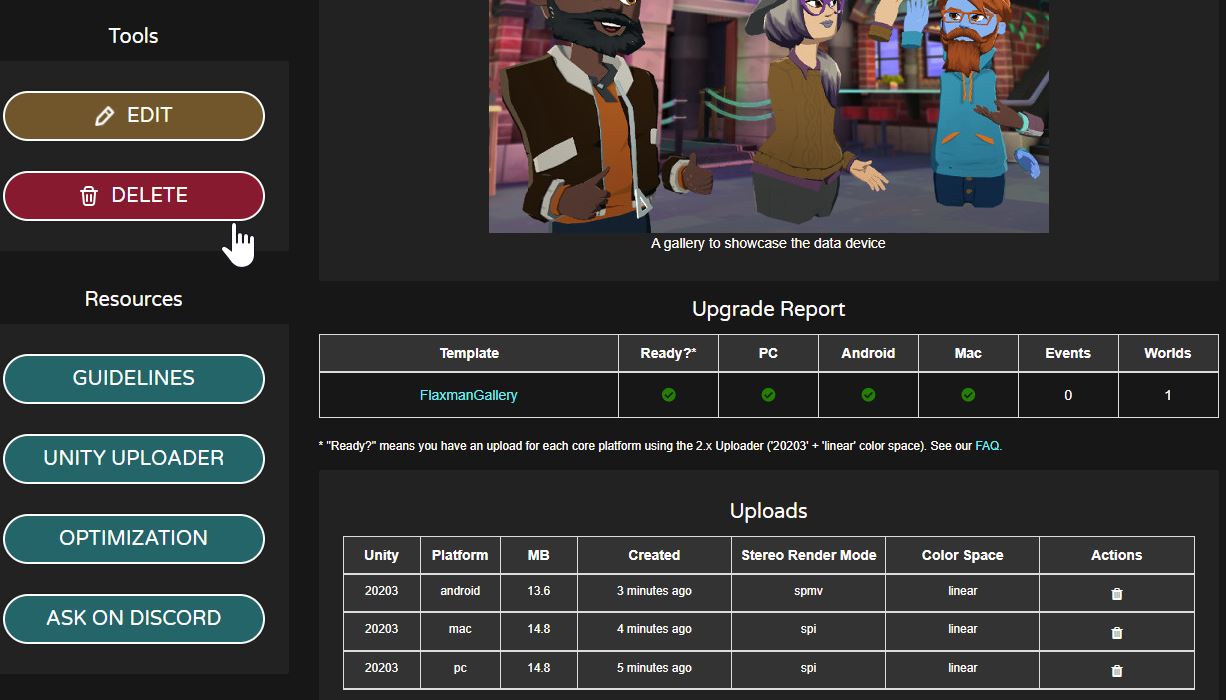
The web interface is useful also to control the status of the Templates, the versions created and where (in which World) they have been used.
 .
.
We are now ready to test our World: in the AltspaceVR Client (2D or VR), from Main Menu -> Worlds -> My Worlds select and enter in the created World. AltspaceVR will automatically place the correct player controller for each platform used (even if in the Unity Scene there are no Cameras).
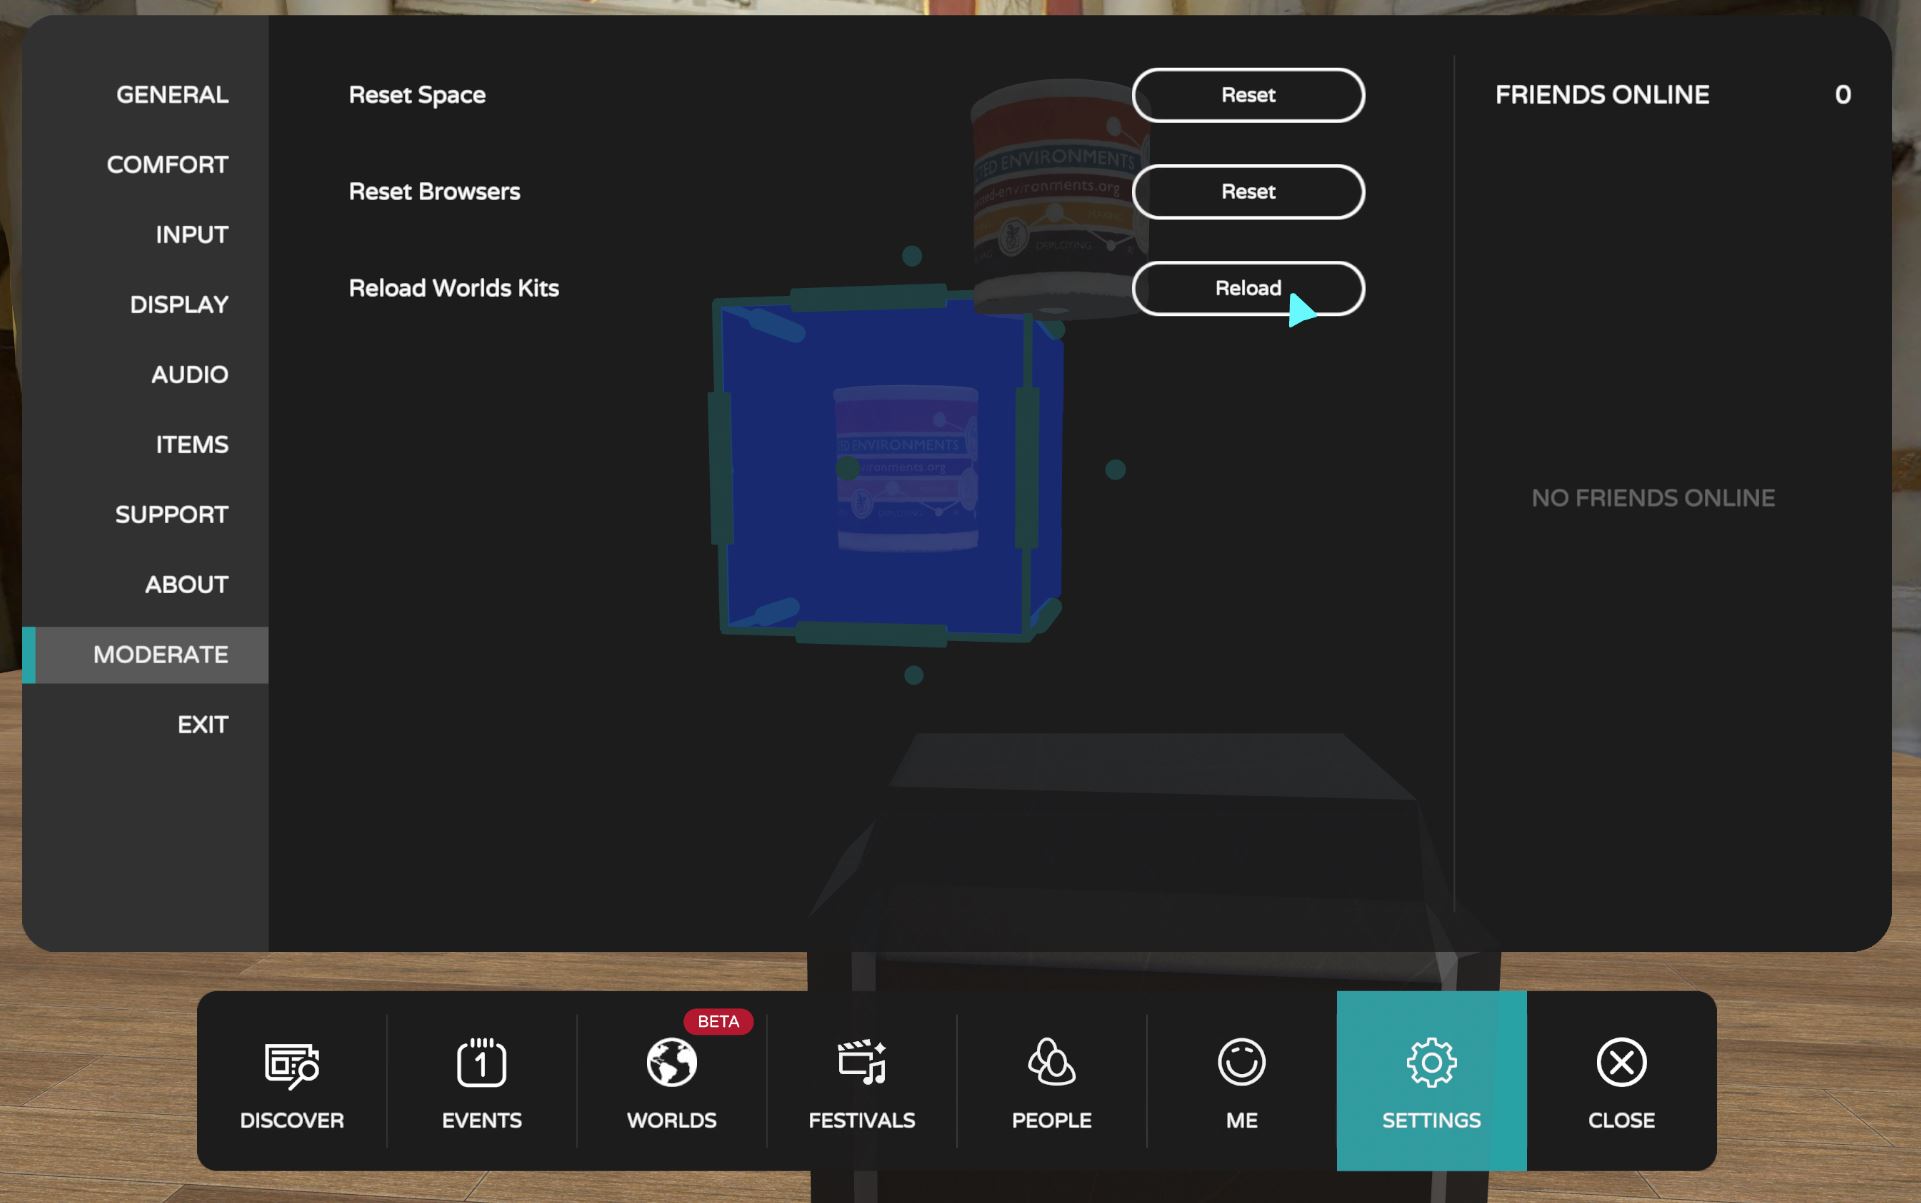
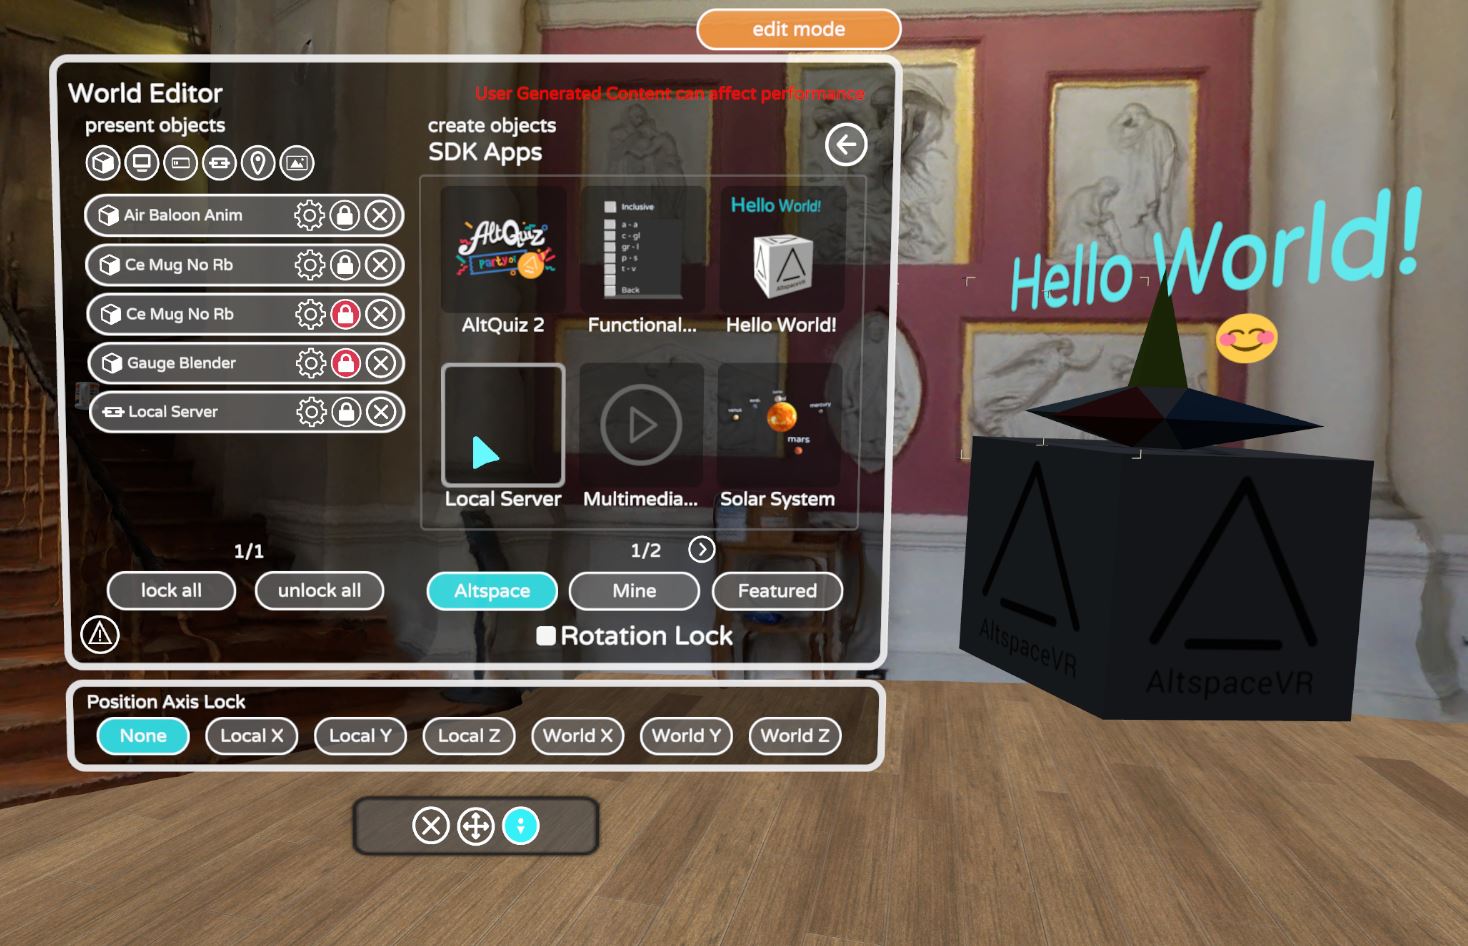
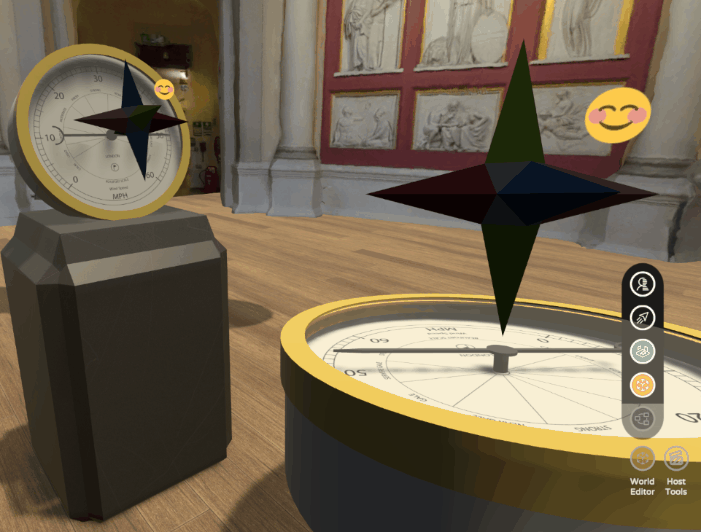
If the World has been set as public, other users can join the same session. The Client provides also features to take screenshots, enable and disable the microphone and personal bubble, as well as, on the right-hand side, Host tools to manage social events, and World Editor tools to customise the environment directly from the Client (e.g. add objects from the Kits and MRE)
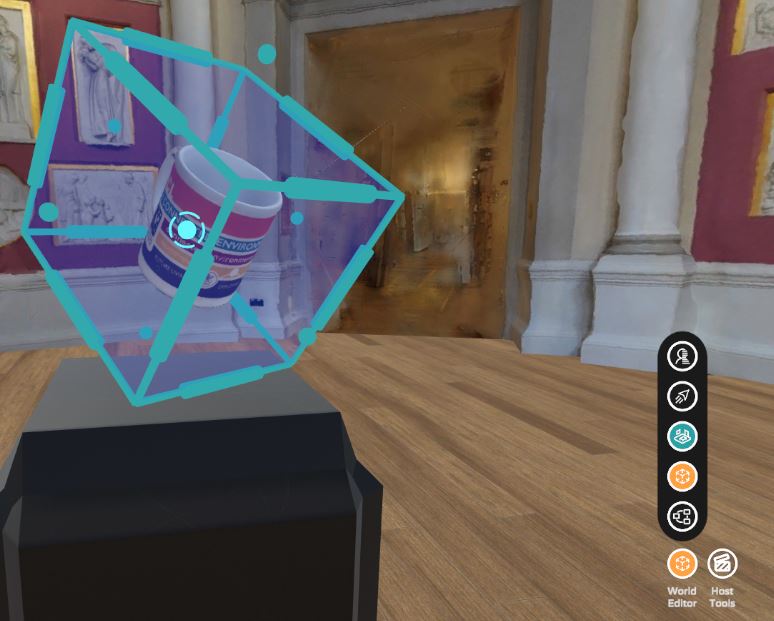
The AltspaceVR Package Uploader can be used to create Kits to place interactable, and not interactable, objects in the AltspaceVR environment. A Kit can be used across the Worlds and shared with other users. The digital objects in the Kit can be cloned, and multiple instances of the same object can be created.
To create a new Kit:
- import, as usual, a digital model in Unity in the
Assets window(e.g. CE Mug) - with the object selected, in the
Inspector window, under the tab Model enable Generate Colliders, and in the tab Materials change Location toUse External Materials (Legacy). Then pressApply(this will extract the materials in the same folder of the model)
- add the model in the scene in the
Hierarchy windowand, from theInspector windowset the Mesh Collider to Convex (if the collider used is of type Box or Plane this step is not needed). It is possible also to add aRigidBody component in case the GameObject needs to be affected by gravity. - transform the GameObject in a Prefab by dragging the object back to the
Assets windowand delete the object in the scene (otherwise it will be embedded in the template, in case we will need to re-upload it) - From the top menu in Unity select
AltspaceVR -> Kits, a new window, similar to the Templates one will pop up - press Create New Kit, the website will open and...
- similarly to the World creation, add a name and description to the Kit
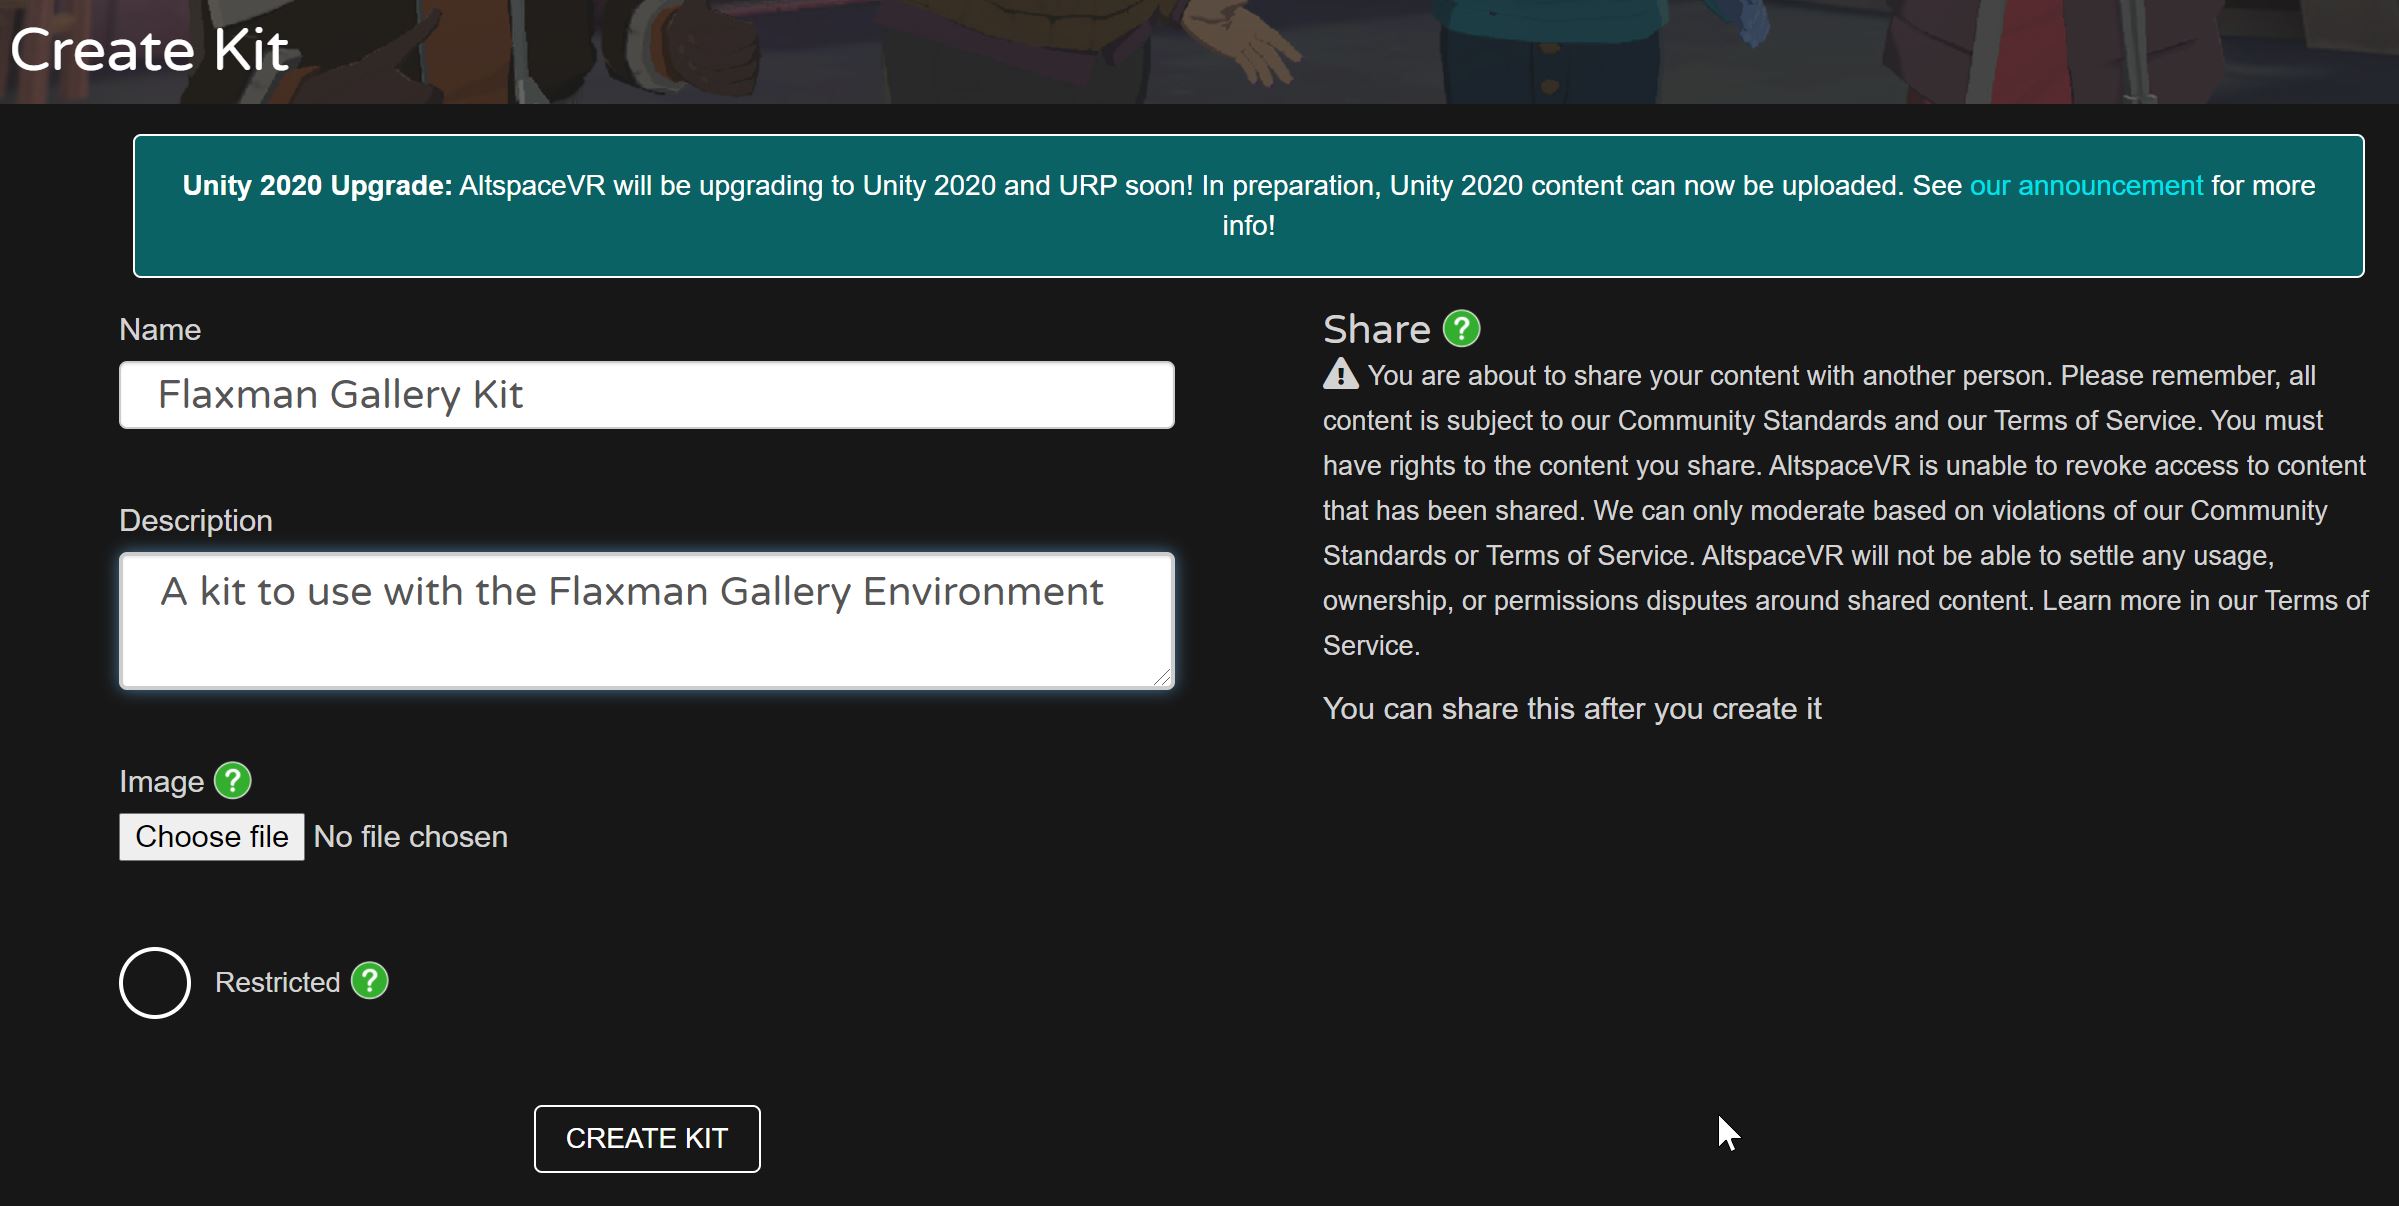
- back in Unity, in the AltspaceVR Kit Uploader, Select a kit and choose the one just created
- the uploader accepts Unity prefab, press the
...and select it. The prefab can be made of multiple objects and it can contain animations, but it cannot contain any script - Select the three platforms and press Build & Upload
To use the Kit, enter the created World using AltspaceVR Client:
- select, from the right-hand side of the UI,
World Editor -> Editor Panel - from the
Editor PanelselectMine -> Kitsand the Kit created and the item
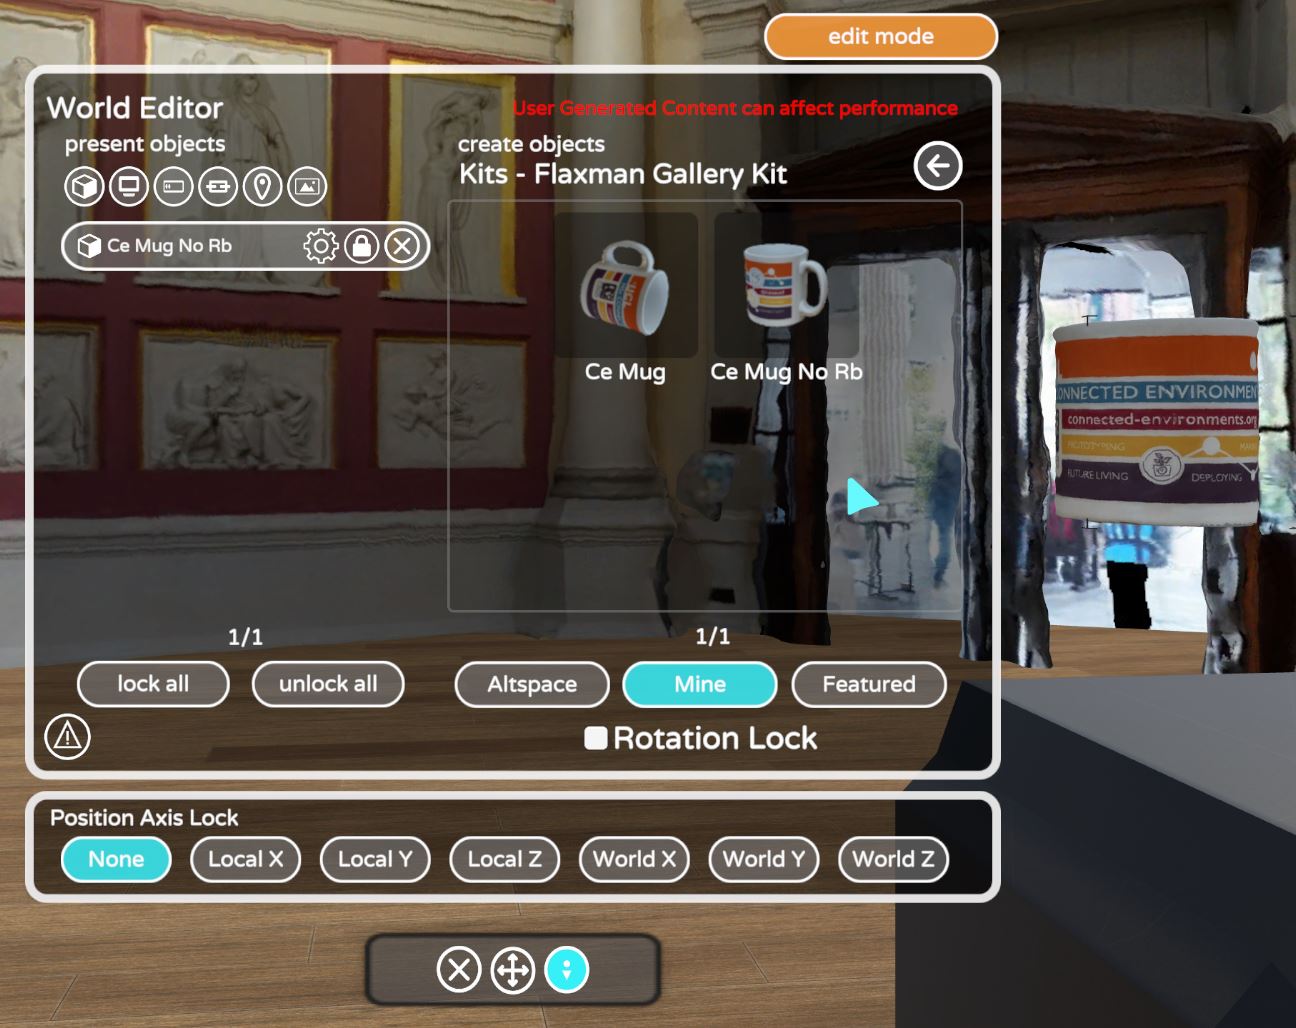
- close the
Editor Paneland selectWorld Editor -> Edit Mode - select the Kit Item and place it in the digital environment
A gentle introduction to MRE
Importing custom scripts in Virtual Reality social platforms is generally very limited, mostly for security reasons but not only. AltspaceVR provides a system called MRE (Mixed Reality Experience) that provides support for custom scripts in both private and public worlds.
In order to create and test the MRE we need to install NodeJS and the VSCode extension ESLint.
- Create a new folder for the MRE and open the folder in VSCode
- Download the last version of the MRE SDK Sample and, from the folder sample copy the content of the folder hello-world in the new MRE folder, we are going to use it as a blueprint for the MQTT MRE.
Open the folder in VS Code and from the top menu bar open Terminal -> New Terminal. The file package.json contains already all the dependencies we need to install (at the bottom of the file). In the terminal type npm install and when finished, npm audit fix to patch possible vulnerabilities.
To test the Hello world MRE, in the terminal type npm run build, this command will compile the source scripts, located in the folder src (server.ts and app.ts) in a new folder built.
In the terminal type npm start, this command will run a local server and the MRE will be accessible, via WebSocket from the address and port ws://127.0.0.1:3901
enter your World from the AltspaceVR Client, from the right-side UI select World Editor -> Editor Panel then SDK Apps -> Local Server. The MRE will load after few seconds: an interactive cube (it changes scale when the cursor is on it and makes a spin if clicked) with a text Hello World! on top of it.
- to stop the MRE, in the terminal press
CTRL+Cin Windows andCommand+Con MacOS
The language used to write the MRE is called TypeScript. TypeScript is built on JavaScript and it is a subset of it, therefore all the functions working in JavaScript, will work in TypeScript as well (and they should look familiar). It is a strongly typed language and most of the errors can be found directly in the editor before running the code.
Customise the MRE
The MRE Hello World have multiple files and folders. As it is a sample project for various scenarios, some of them are not going to be used in our example and we can safely remove them. The project can be also created from scratch, but some of the settings are the same for every MRE so it is easier to modify the existing files.
- create a new empty folder on your desktop and open it in VSCode
- copy in it the following files from the MRE Hello World
package.json, this file will be used to install all the dependencies used with Node.js. It also contains more generic information about the MRE that we can easily change (e.g. name of the app, version, description, author, license and keywords. The other information does not need to be changed).eslintrc.js, this is a hidden file, see above how to enable it.gitignore, this is a hidden file, see above how to enable ittsconfig.json, the configuration file used by theTypeScriptcompilersrcfolder with bothapp.ts(the actual script we are going to customise) andserver.tspublicfolder with bothmanifest.jsonand the placeholder websiteindex.html
- With all the files and folders in place, from the terminal type
npm install. As before, this command will install the dependencies in a new _nodemodules folder. - open and delete all the content of the
src/app.ts - add the copyright and licence notice and import the MRE library (this was installed in the folder _nodemodules when we run
npm install).
/*!
 * Copyright (c) Microsoft Corporation. All rights reserved.
 * Licensed under the MIT License.
 */

import * as MRE from '@microsoft/mixed-reality-extension-sdk';
- Create a new class
MQTTGaugeand inside the class the variables we will need to use
/**
 * The main class of this app. All the logic goes here.
 */
export default class MQTTGauge {
 private gaugeBody: MRE.Actor = null;
 private pointer: MRE.Actor = null;
 private assets: MRE.AssetContainer;
 private light: MRE.Actor = null;
}
we can now create the variable context and, when ready, execute the function this.started() that we are going to create next
constructor(private context: MRE.Context) {
		this.context.onStarted(() => this.started());
	}
- create the asynchronous function started
/*
* Once the context is "started", initialize the app.
*/
	private async started() {

  }
- let's now create our custom MRE inside the started() function
// set up somewhere to store loaded assets (meshes, textures, animations, gltfs, etc.)
this.assets = new MRE.AssetContainer(this.context);

// Load the glTF models before we use it, "box" refer to the collider to apply

const gaugeBodysrc = await this.assets.loadGltf('Gauge_Body.glb', "box");
const gaugePointersrc = await this.assets.loadGltf('Pointer.glb', "box");

// spawn a copy of the Gauge Body glTF model
this.gaugeBody = MRE.Actor.CreateFromPrefab(this.context, {
  // using the data we loaded earlier
	firstPrefabFrom: gaugeBodysrc,
	// Also apply the following generic actor properties.
	actor: {
			name: 'Gauge Body',
			transform: {
				local: {
					position: { x: 0, y: -1, z: 0 },
					rotation: { x: 0, y: 0, z: 0 }
					}
				}
			}
		});

// spawn a copy of the Pointer as child of the Gauge Body glTF model
this.pointer = MRE.Actor.CreateFromPrefab(this.context, {
		// using the data we loaded earlier
		firstPrefabFrom: gaugePointersrc,
		// Also apply the following generic actor properties.
		actor: {
			name: 'Gauge Pointer',
			// Parent the glTF model to the text actor, so the transform is relative to the text
			parentId: this.gaugeBody.id,
			transform: {
				local: {
					position: { x: 0, y: 0, z: 0 },
						rotation: { x: 0, y: 0, z: 0 }
					}
				}
			}
		});
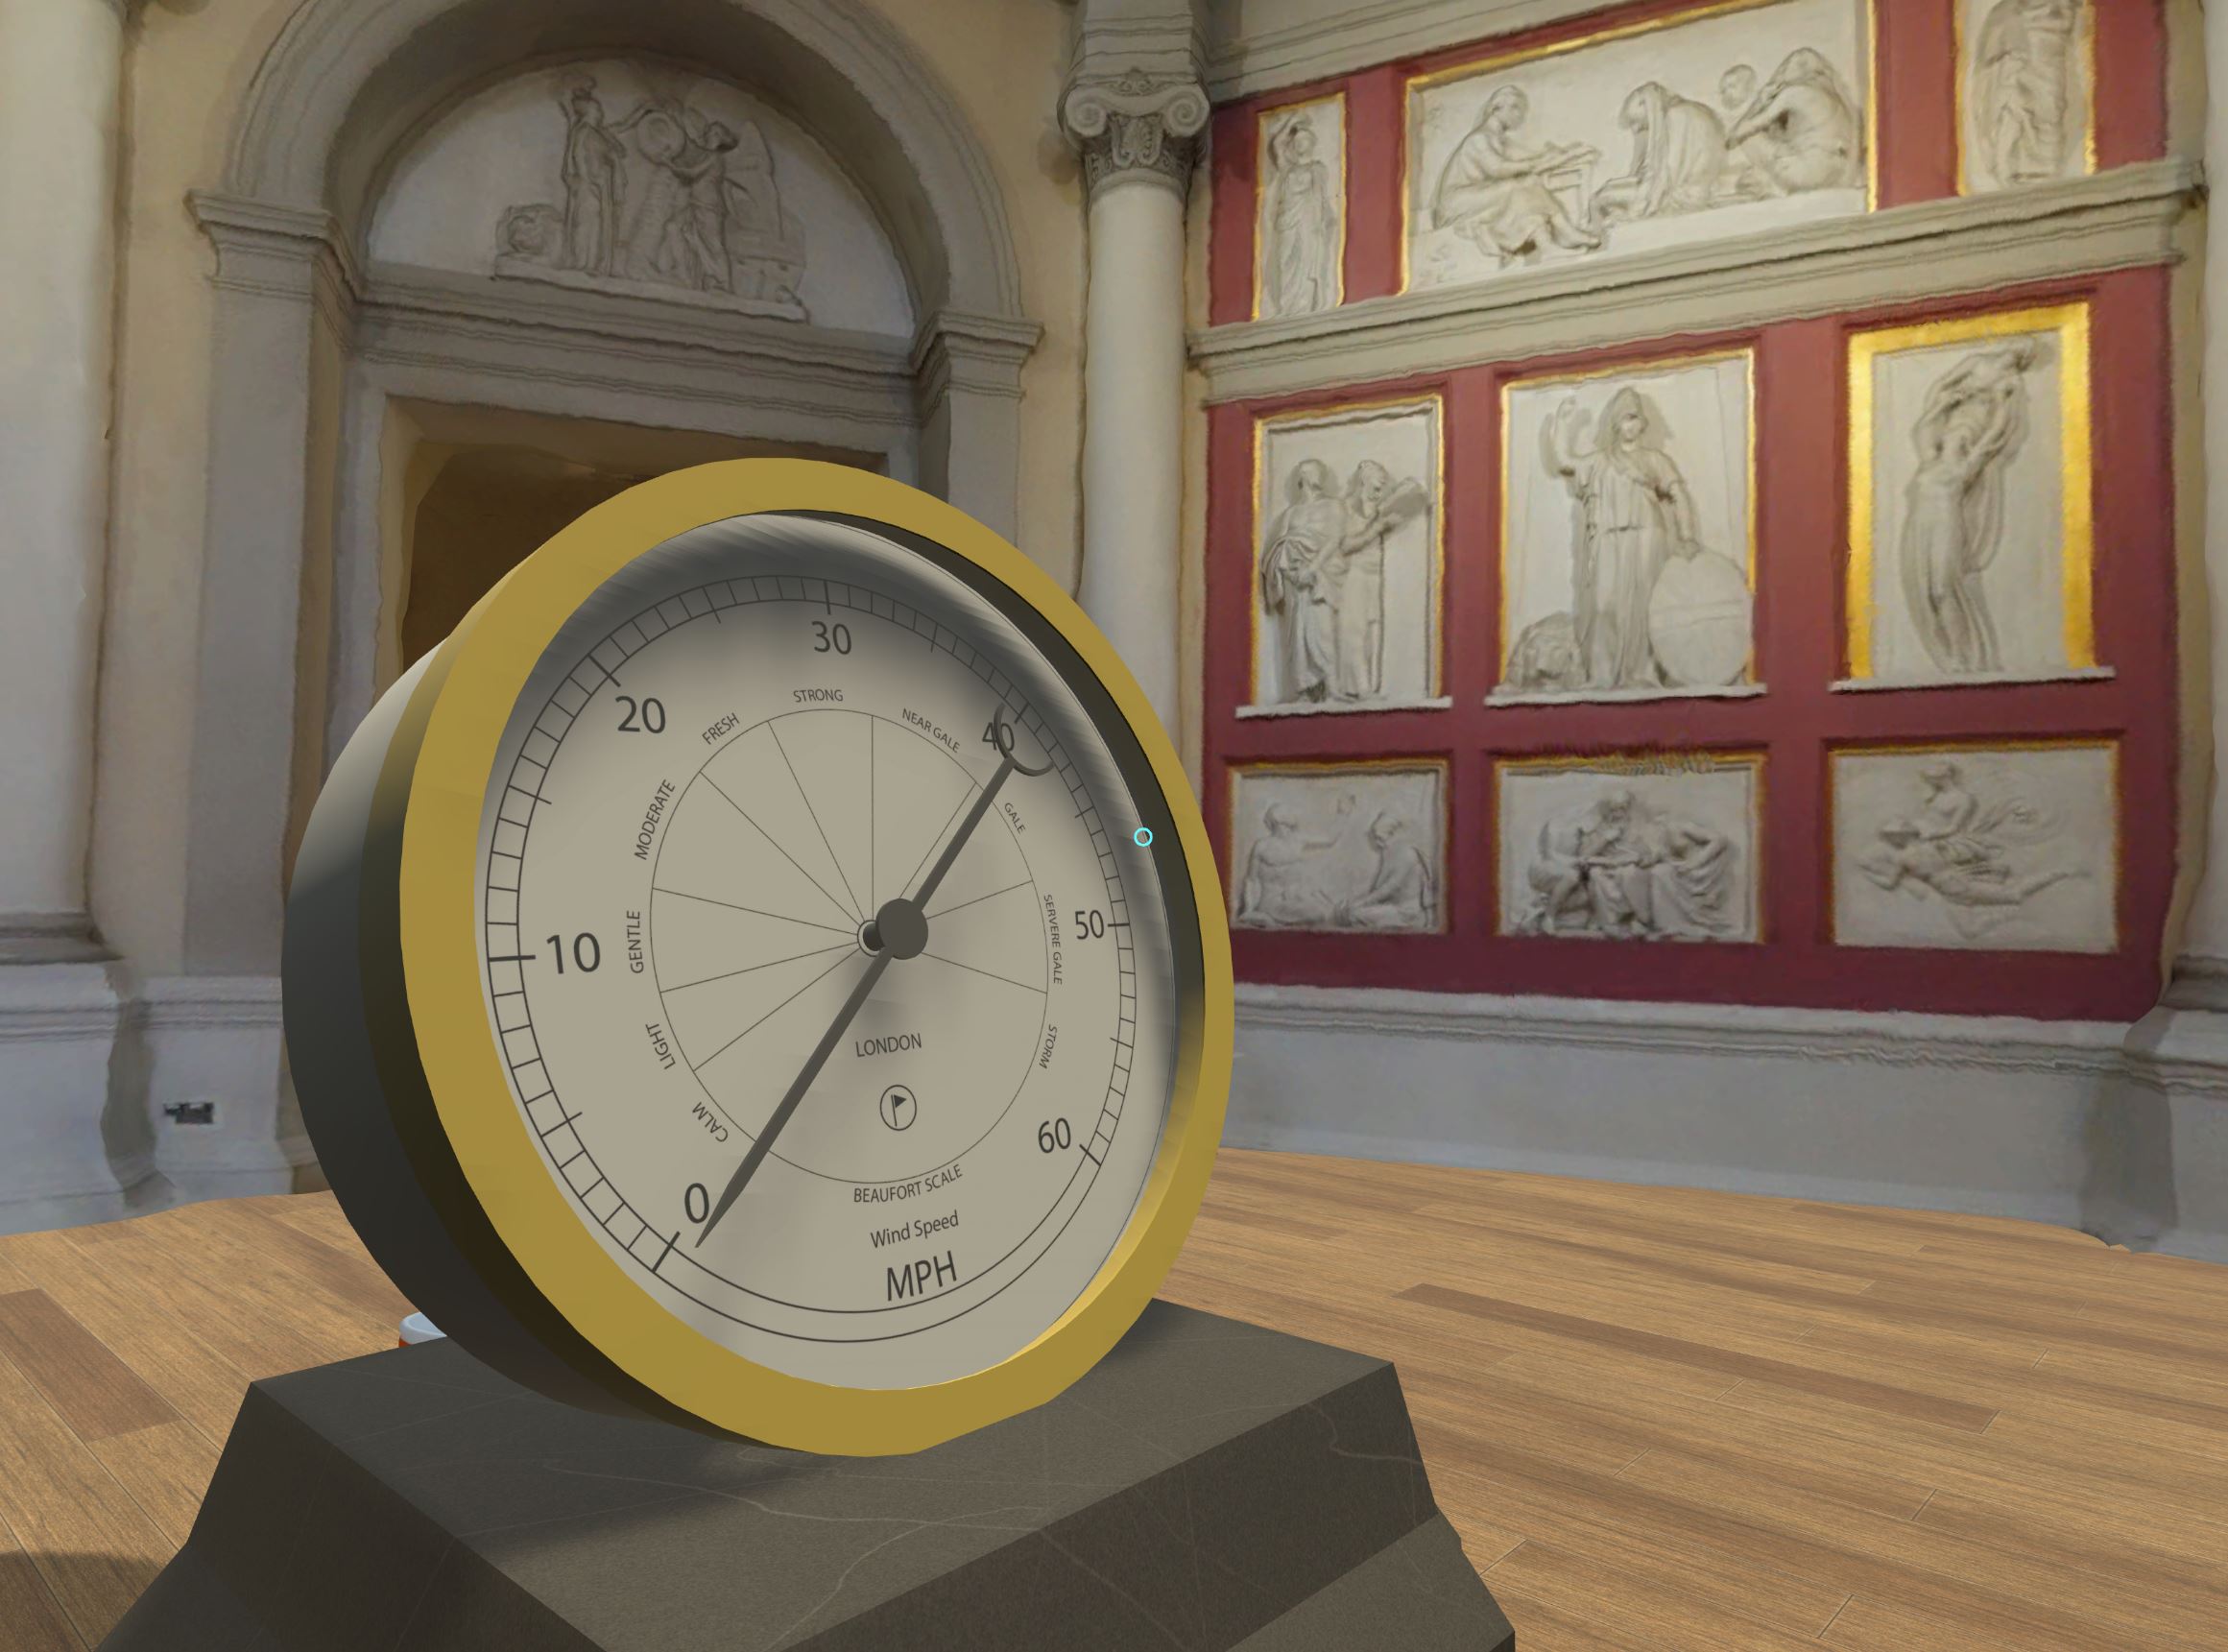
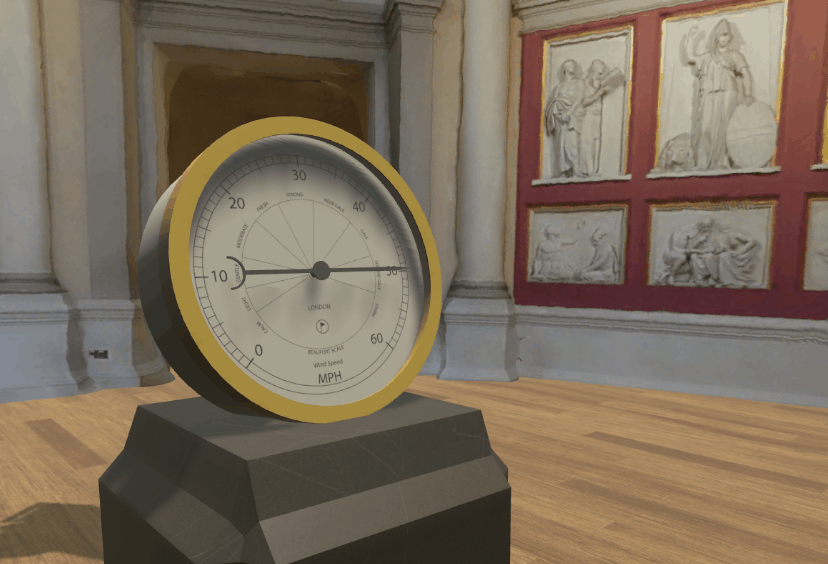
The script is using the 3D models of the Gauge and the Pointer in GLB format.
- download the ZIP file, extract the archive and copy the two 3D models in the folder
public. In the same folder we can remove thealtspace-cube.glbandaltspace-cube.jpg(if we reuse the Hello World folder), as they are not used anymore. We can also modify in the same folder themanifest.jsonandindex.htmlwith our data (a good practice, but not essential) - From the terminal type
npm run buildand thennpm startto build the new MRE and start the local server. We should be able to see the gauge in AltspaceVR
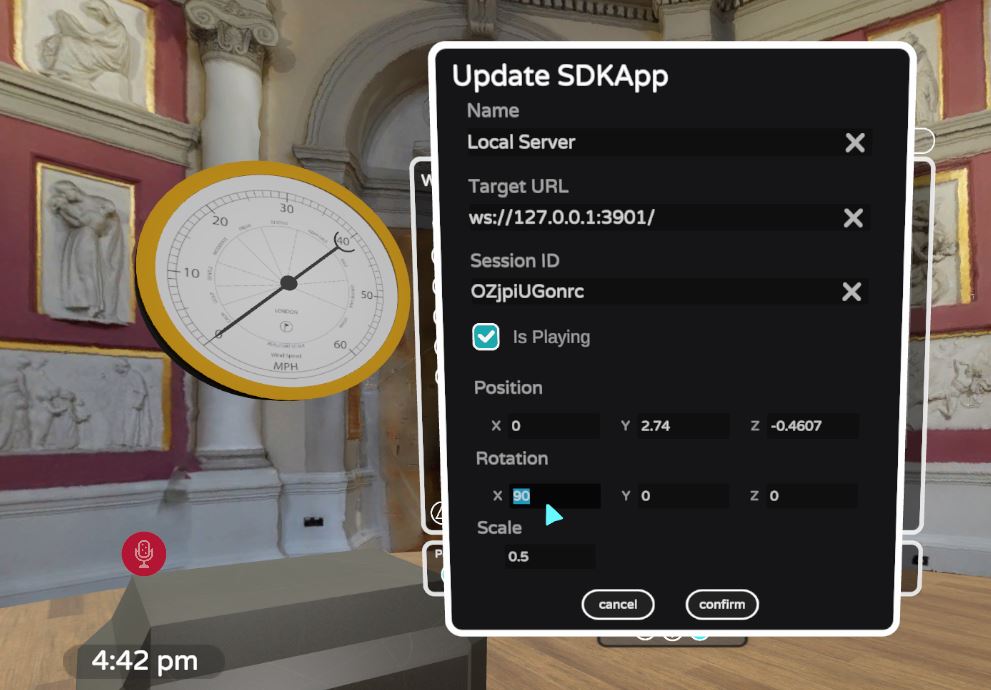
To change the rotation of the model, World Editor -> Editor Panel select the small cog-gear to see the settings and change the rotation value of X = 90. In the settings, we can change the position and scale of the object, as well as its name. It is of course possible to rotate the object from the MRE as we will see later on.
If the model looks dark, we can add a light actor just after the this.pointerActor
this.light = MRE.Actor.Create(this.context, {
			actor: {
				parentId: this.gaugeBody.id,
				name: 'Light',
				transform: {
					local: {
						position: { x: 0, y: 3.0, z: 0 },
					}
				},
				light: {
					color: { r: 1, g: 1, b: 1 },
					type: 'point',
					intensity: 1,
					range: 60
				},
			}
		});
This code will create a point light as child of the Gauge.
It is also possible to spawn 3D models that are already part of our AltspaceVR Kits. To do this, we need to remove the lines loadGltf (and the 3D models from the public folder) and remove async from private async started() (as the await is not there anymore) and instead of MRE.Actor.CreateFromPrefab use another method: MRE.Actor.CreateFromLibrary
In this case the method asks for a resourceId this value can be easily find from the AltspaceVR website:
- from the top menu
More -> Kitsand select the Kit - on the left-side menu select Artifacts
- from the list of object, select the one you need to use (in this case one for the gauge body and one for the pointer). The URL address on the top bar will show the uniqueID of the artifact to be placed in the code
this.gaugeBody = MRE.Actor.CreateFromLibrary(this.context, {
			resourceId: 'artifact:1846572962480653129',
			actor:{
				name:'Gauge',
				transform: {
					local: {
						position: { x: 0, y: -1, z: 0 },
						rotation:{ x: 0, y: 0, z: 0 },
					}
				}
			}
		})

		this.pointer = MRE.Actor.CreateFromLibrary(this.context, {
			resourceId: 'artifact:1846572951206363969',
			actor:{
				name:'Gauge Pointer',
				parentId: this.gaugeBody.id,
				transform: {
					local: {
						position: { x: 0, y: 0, z: 0 },
						rotation:{ x: 0, y: 0, z: 0 },
					}
				}
			}
		})
MQTT data and animation
As the MRE are written in TypeScript and works on the top of NodeJS, it is possible to add other external libraries and framework, such as the MQTT.js.
Before using it we need to install the modules in the _nodemodules folder. There are two ways for doing it:
- open the package.json and add to the dependencies
"mqtt": "^4.2.6",
"dependencies": {
    "@microsoft/mixed-reality-extension-sdk": "^0.20.0",
    "@types/dotenv": "^6.1.0",
    "@types/node": "^10.3.1",
    "mqtt": "^4.2.6",
    "dotenv": "^6.2.0"
  }
Then type in the terminal npm install to add the required modules
- or directly install the module by typing in the terminal
npm i mqtt(be sure to be in the root of the folder and not in any of the subfolder, such as _nodemodules)
Once installed, in src/app.ts we need to import the modules we are going to use:
import * as MRE from '@microsoft/mixed-reality-extension-sdk';
import { IClientOptions, Client, connect, IConnackPacket } from "mqtt";
- and a new set of variables, just after the ones used before
//MQTT variable
	private BROKER: string;
	private TOPIC: string;
	private client: Client;

	private valueWind: number = null; // value used to move the pointer
- create a new private function
private mqttConnect(){}after the previousprivate started(){}(the new function needs to be outsidestarted()but still within the mainexport default class MQTTGauge {})
private mqttConnect() {
		console.log("ready");

		this.BROKER = "mqtt://URL OF THE MQTT BROKER";
		this.TOPIC = "TOPIC/TO/SUBSCRIBE";
		const opts: IClientOptions = { port: 1883 };
    //username:USER, password: PW can be added in the opts

		this.client = connect(this.BROKER, opts);
		this.client.subscribe({ [this.TOPIC]: { qos: 2 } }, (err, granted) => {
			granted.forEach(({ topic, qos }) => {
				console.log(`subscribed to ${topic} with qos=${qos}`);
			});
		}).on("message", (topic: string, payload: Buffer) => {

      //if response is JSON use
			//const responseJson = JSON.parse(payload.toString());

      //if response is value use
      const responseJson = payload.toString();
			console.log(responseJson);

			this.valueWind = parseFloat(responseJson);
      //rotation from 0 to 270dg->[3(Math.PI)/2]->4.712. Value to multiply 4.721/60->0.07853
  this.pointer.transform.local.rotation = MRE.Quaternion.FromEulerAngles(0, this.valueWind*((3*(Math.PI)/2)/60),0);
			// client.end(); //uncomment to stop after 1 msg
		}).on("connect", (packet: IConnackPacket) => {
			console.log("connected!", JSON.stringify(packet));
		});
	}
finally, call the function this.mqttConnect(); inside the private started(), just before its last curly bracket.
in the terminal we need to stop the running MRE using CTRL+C in Windows and Command+C on MacOS. Then type npm run build and npm start
The function now connects to the MQTT broker and, for each message received, it changes the rotation of the pointer. A great result, but we want to do something better, like a smooth animation for the pointer:
- comment, or delete the line
this.pointer.transform.local.rotation = MRE.Quaternion.FromEulerAngles(0, this.valueWind*((3*(Math.PI)/2)/60),0);and add instead:
MRE.Animation.AnimateTo(this.context, this.pointer, {
destination:
  {
    transform:
    {
      local:
      {
      //rotation from 0 to 270dg->[3(Math.PI)/2]->4.712. Value to multiply 4.721/60->0.07853
      rotation: MRE.Quaternion.FromEulerAngles(0, this.valueWind * ((3 * (Math.PI) / 2) / 60), 0)
      }
    }
  },
	duration: 0.5,
	easing: MRE.AnimationEaseCurves.EaseOutSine
});
We can control the duration of the animation and the type of curve for the animation. Once again, from the terminal type npm run build and then npm start to build the new MRE and start the local server
So far we run the MRE from a local server, but if we want the MRE to be used by other users, we need to render it public.
Any service that provide access to WebSocket and a Node.js platform will fit our needs.
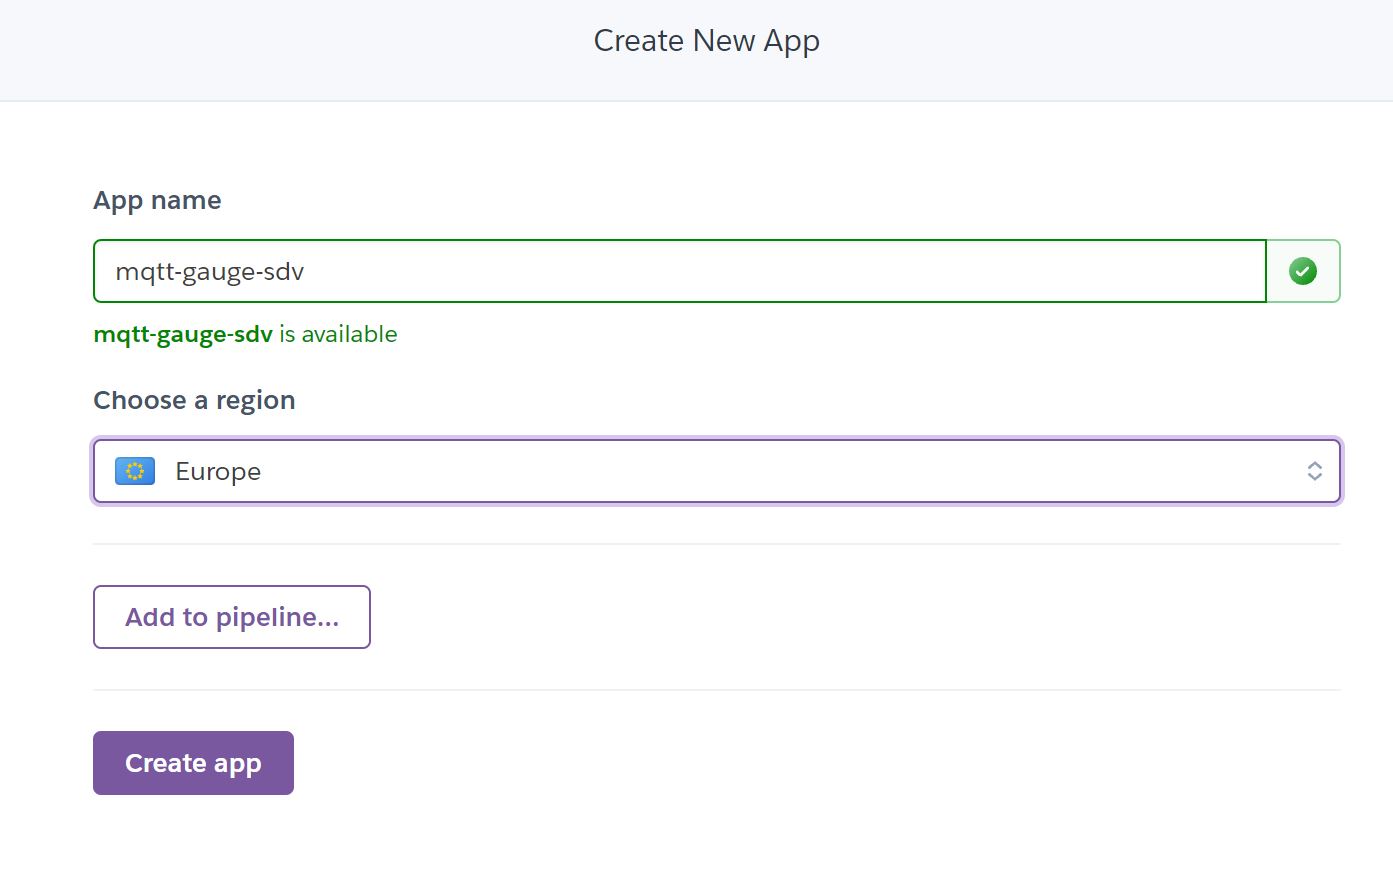
In this example we are going to use the free tiers of Heroku.
Create a Herokuapp
- Install the Heroku CLI
- in the
Herokuwebsite, login and pressNew -> Create new app

- give a unique name to the app and choose Europe as region and press
Create app
It is possible to deploy the App using three different systems, Using the Heroku CLI, by linking a GitHub repository, or a Container Registry. We will see here Deploy using Heroku Git
- from the terminal in VSCode type
heroku login(follow the installation instruction from Heroku to add the command to the environment path if not recognised, a restart generally is needed on Windows) - press enter to open the default browser and login in your
Herokuaccount

- back to the terminal, be sure to be in the root folder of your MRE and type
git initto initialise an empty Git repository
link the local repository with the remote App create on Heroku
heroku git:remote -a NAME-OF-YOUR-APP
finally, deploy the App using:
git add .git commit -am "First commit"git push heroku main
The final command will also start the process to install the _nodemodules remotely.
At the end of the process on the Heroku website we should be able to see our App as https://NAME OF THE APP.herokuapp.com/. By opening the Https link of the App we will see the content of the index.html file we copied in the public folder.
To the MRE in AltspaceVR we just need to change the address of the local server from ws://127.0.0.1:3901 to wss://NAME OF THE APP.herokuapp.com (note the WSS, Secure WebSocket)
- Open
World Editorfrom the right-hand side of the UI - Select
Editor panel - Then SDK Apps and Local Server or choose the existing one in the scene
- Click on the small cog gear to access the settings
- Change the Target URL to
wss://NAME OF THE APP.herokuapp.com
Final app.ts script
/*!
 * Copyright (c) Microsoft Corporation. All rights reserved.
 * Licensed under the MIT License.
*/

import * as MRE from '@microsoft/mixed-reality-extension-sdk';
import { IClientOptions, Client, connect, IConnackPacket } from "mqtt";

/**
 * The main class of this app. All the logic goes here.
 */
export default class MQTTGauge {
	private gaugeBody: MRE.Actor = null;
	private pointer: MRE.Actor = null;
	private assets: MRE.AssetContainer;
	//private light: MRE.Actor = null;

	//MQTT variable
	private BROKER: string;
	private TOPIC: string;
	private client: Client;

	private valueWind: number = null; // windDir

	constructor(private context: MRE.Context) {
		this.context.onStarted(() => this.started());
	}

	/**
	 * Once the context is "started", initialize the app.
	 */
	//private async started() {
	private started() {

		// set up somewhere to store loaded assets (meshes, textures, animations, gltfs, etc.)
		this.assets = new MRE.AssetContainer(this.context);

		// Load a glTF model before we use it, "box" refer to the collider to apply
		// The started function needs to have the async
		//const gaugeBodysrc = await this.assets.loadGltf('Gauge_Body.glb', "box");
		//const gaugePointersrc = await this.assets.loadGltf('Pointer.glb', "box");

		/*
		// spawn a copy of the Gauge Body glTF model
		this.gaugeBody = MRE.Actor.CreateFromPrefab(this.context, {
		// using the data we loaded earlier
			firstPrefabFrom: gaugeBodysrc,
			// Also apply the following generic actor properties.
			actor: {
				name: 'Gauge Body',
				// Parent the glTF model to the text actor, so the transform is relative to the text
				transform: {
					local: {
						position: { x: 0, y: -1, z: 0 },
						rotation: { x: 0, y: 0, z: 0 }
					}
				}
			}
		});

		// spawn a copy of the Pointer as child of the Gauge Body glTF model
		this.rotPointer = MRE.Quaternion.FromEulerAngles(0, 0, 0);
		this.pointer = MRE.Actor.CreateFromPrefab(this.context, {
		// using the data we loaded earlier
			firstPrefabFrom: gaugePointersrc,
			// Also apply the following generic actor properties.
			actor: {
				name: 'Gauge Pointer',
				// Parent the glTF model to the text actor, so the transform is relative to the text
				parentId: this.gaugeBody.id,
				transform: {
					local: {
						position: { x: 0, y: 0, z: 0 },
						rotation: this.rotPointer,
					}
				}
			}
		});
	*/
		this.gaugeBody = MRE.Actor.CreateFromLibrary(this.context, {
			resourceId: 'artifact:1846572962480653129',
			actor:{
				name:'Gauge',
				transform: {
					local: {
						position: { x: 0, y: -1, z: 0 },
						rotation:{ x: 0, y: 0, z: 0 },
					}
				}
			}
		})

		this.pointer = MRE.Actor.CreateFromLibrary(this.context, {
			resourceId: 'artifact:1846572951206363969',
			actor:{
				name:'Gauge Pointer',
				parentId: this.gaugeBody.id,
				transform: {
					local: {
						position: { x: 0, y: 0, z: 0 },
						rotation:{ x: 0, y: 0, z: 0 },
					}
				}
			}
		})

		this.mqttConnect();
/*
		this.light = MRE.Actor.Create(this.context, {
			actor: {
				parentId: this.gaugeBody.id,
				name: 'Light',
				transform: {
					local: {
						position: { x: 0, y: 3.0, z: 0 },
					}
				},
				light: {
					color: { r: 1, g: 1, b: 1 },
					type: 'point',
					intensity: 1,
					range: 60
				},

			}
		});
*/

	}

	private mqttConnect() {
		console.log("ready");

		this.BROKER = "mqtt://URL OF THE MQTT BROKER";
		this.TOPIC = "TOPIC/TO/SUBSCRIBE";
		const opts: IClientOptions = { port: 1883 }; //to change with the port of the broker
		//username:USER, password: PW can be added in the opts

		this.client = connect(this.BROKER, opts);
		this.client.subscribe({ [this.TOPIC]: { qos: 2 } }, (err, granted) => {
			granted.forEach(({ topic, qos }) => {
				console.log(`subscribed to ${topic} with qos=${qos}`);
			});
		}).on("message", (topic: string, payload: Buffer) => {

			//if response is JSON use
			//const responseJson = JSON.parse(payload.toString());

			//if response is value use
			const responseJson = payload.toString();
			console.log(responseJson);

			this.valueWind = parseFloat(responseJson);
      //rotation from 0 to 270dg->[3(Math.PI)/2]->4.712. Value to multiply 4.721/60->0.07853
  //this.pointer.transform.local.rotation = MRE.Quaternion.FromEulerAngles(0, this.valueWind*((3*(Math.PI)/2)/60),0);

  MRE.Animation.AnimateTo(this.context, this.pointer, {
	destination:
	{
		transform:
		{
			local:
			{
			//rotation from 0 to 270dg->[3(Math.PI)/2]->4.712. Value to multiply 4.721/60->0.07853
			rotation: MRE.Quaternion.FromEulerAngles(0, this.valueWind * ((3 * (Math.PI) / 2) / 60), 0)
			}
		}
	},
				duration: 0.5,
				easing: MRE.AnimationEaseCurves.EaseOutSine
			});
			// client.end(); //uncomment to stop after 1 msg
		}).on("connect", (packet: IConnackPacket) => {
			console.log("connected!", JSON.stringify(packet));
		});
	}
}