This workshop will show you how to
- create a Unity VR project using the XR Interaction Toolkit
- interact with digital objects in the virtual scene
- create a teleportation system
- publish MQTT message to interact beyond the virtual environment
To complete this workshop you will need:
- Unity 2020.3.9f1
- with Android module
- XR Interaction Toolkit 1.0.0-pre.8
- Oculus Quest2 Controller models
- Oculus App for Android or iOS
- Oculus Quest 2 (on developer mode)
- M2MQTT library
- a MQTT broker
Language used:
- C#
Additional resources:
This workshop will show you how to setup a virtual reality environment using the Unity XR interaction toolkit; how to interact with the virtual objects in the scene; how to move around the environment using a teleportation system; how to develop a custom script to interact with a MQTT Broker.
URP Scene and the XR Integration Toolkit
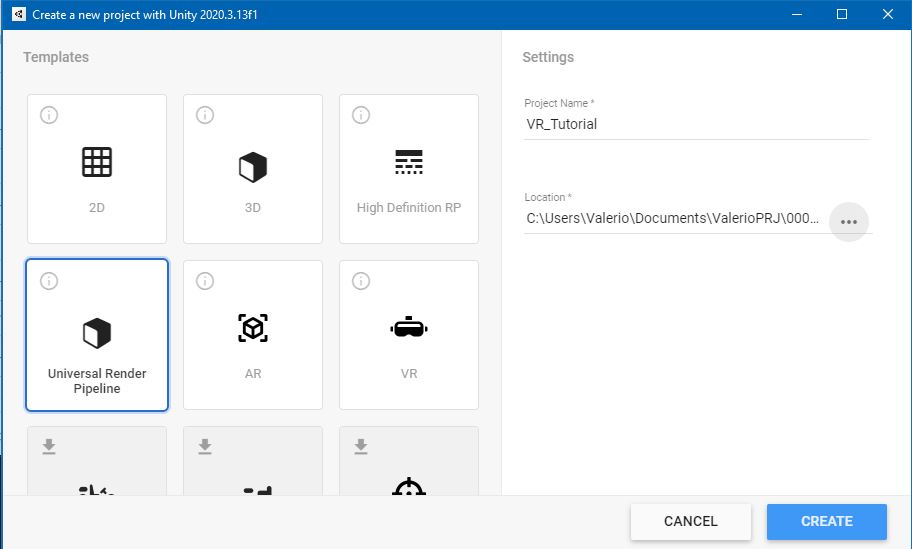
Create a new Universal Render Pipeline (URP) Unity project using UnityHub.
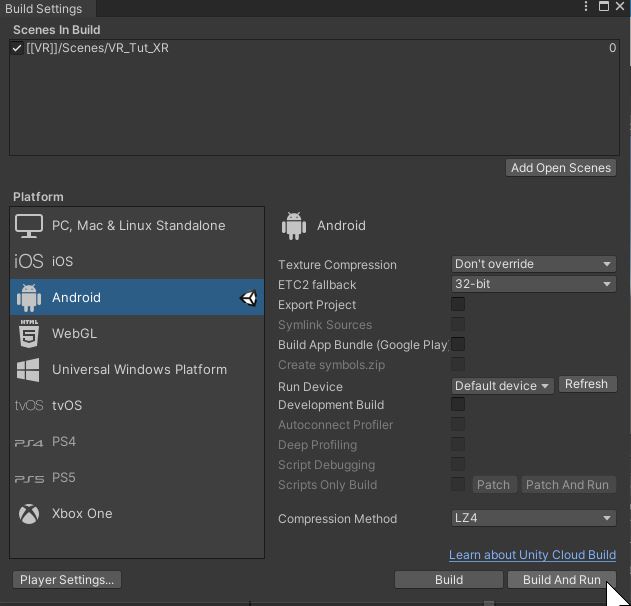
As the Oculus Quest 2 is based on Android, we need to change the target platform from the build settings. From File -> Build Settings select Android and press Switch Platform.
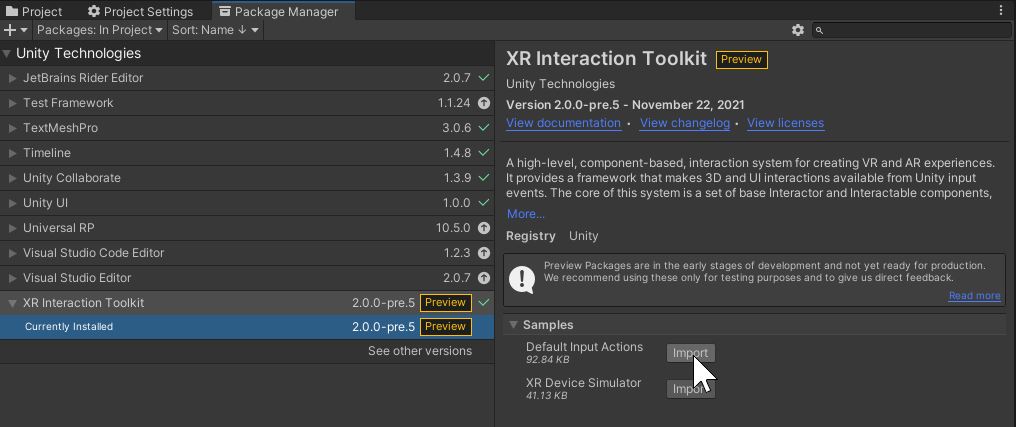
Install the XR Interaction Toolkit 1.0.0-pre.8 from the Package Manager window. Updated to the new input system if prompted, Unity will restart.
Import the Default Input Actions from the Sample menu. If prompted, enable the new input system.
Once the plug-in is installed and the samples imported, from Project Settings select XR Plug-in Management, install the plug-in if it is not, and enable the Oculus Plug-in Provider.

In Project Settings -> Player provide the following information:
- Company name
- Product name
Minor changes need to be done to the quality settings as well. When the URP is used, some quality settings are bypassed by a Universal Render Pipeline Asset. It is possible to create a new Universal Render Pipeline Asset, or modify the UniversalRP-MediumQuality (the default used by Android).
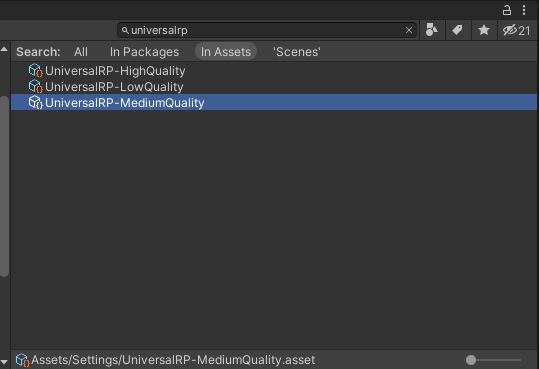
Select the asset and, in the inspector window, change the Anti Aliasing MSAA from Disable to 4x. From this window is possible to improve the quality of the shadows by changing the Shadows Max Distance to a lower value.
A virtual place
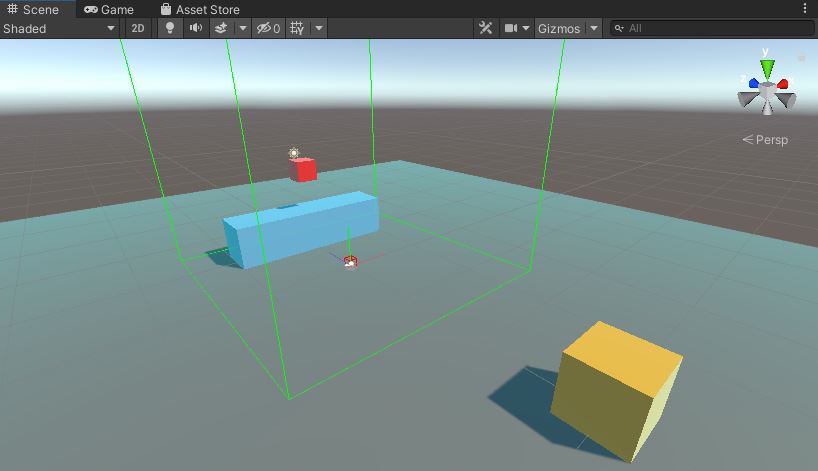
Create a New Scene using the Empty template and add:
- a Directional light (we do not need the Camera)
- a Plane
position (0,0,0) - a Red cube in
position (0,1,1)|scale (0.25,0.25,0.25)
Create a new GameObject XR -> XR Rig(Action-Based). This GameObject is the digital representation of the Oculus Headset, and its controllers, in the virtual scene.
Change the Tracking Origin Mode to Floor. This parameter is used to set the right height of the headset based on the Oculus calibration of the Guardian.
With the XR Rig in the scene it is already possible to build a VR experience and walk around the environment, however, the controllers are not yet in place and properly linked to the input control system.
On the XR Controller component of each hand (XR Origin -> Camera Offset -> LeftHand Controller and XR Origin -> Camera Offset -> RightHand Controller), there is a field Model -> Model Prefab that is used to control the mesh of the VR controllers.
The Oculus Quest2 controllers, as the controllers of other VR HMD, are not provided with the XR Interaction package but they can be downloaded and added manually. To add the Oculus Quest2 controllers:
- download the controls from here;
- the folder
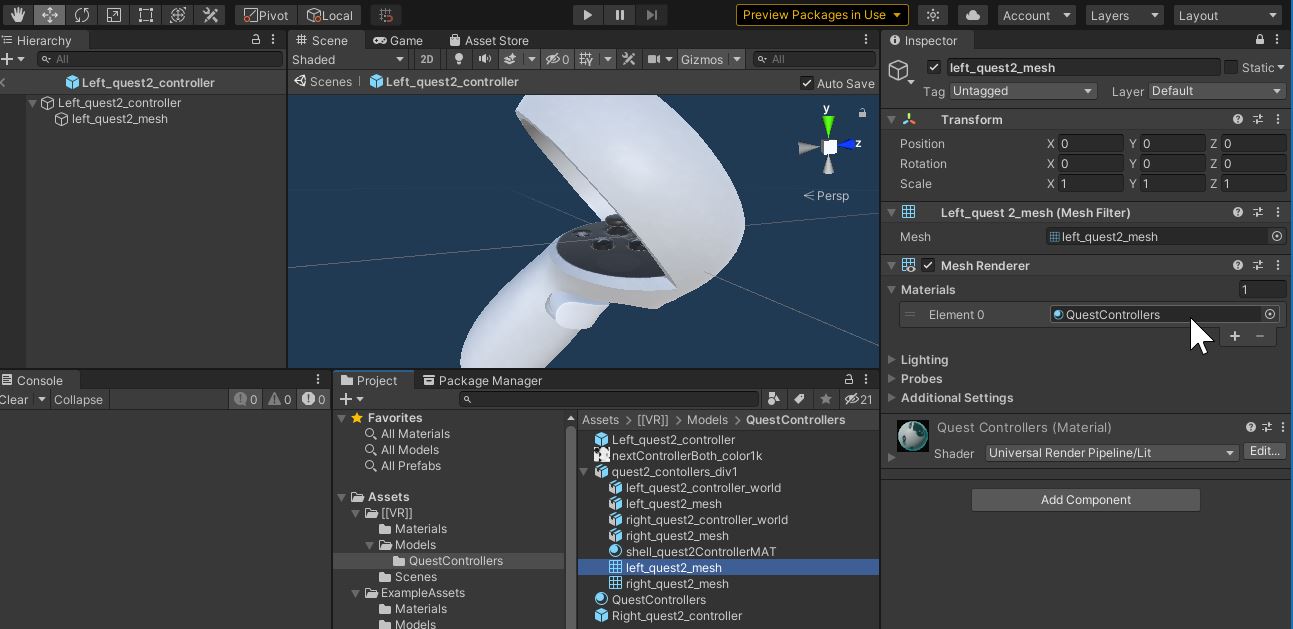
Oculus Touch for Quest 2contains three versions of the controllers, each one with a different level of detail. We need to import in Unity the modelquest2_controllers_div1.fbxand the texturenextControllerBoth_color1k.png; - create a new material named
QuestControllersand apply thenextControllerBoth_color1k.pngtexture as Base Map; - create two new empty Prefabs named:
Left_quest2_controllerRight_quest2_controller
- Open each Prefab and, from the
quest2_controllers_div1, drag and drop theleft_quest2_meshandright_quest2_meshas well as the material created and remove theMesh collidercomponents.
- Finally, add the two Prefabs to the fields Model Prefab of the
XR Controllercomponents of each hand.
Set the actions
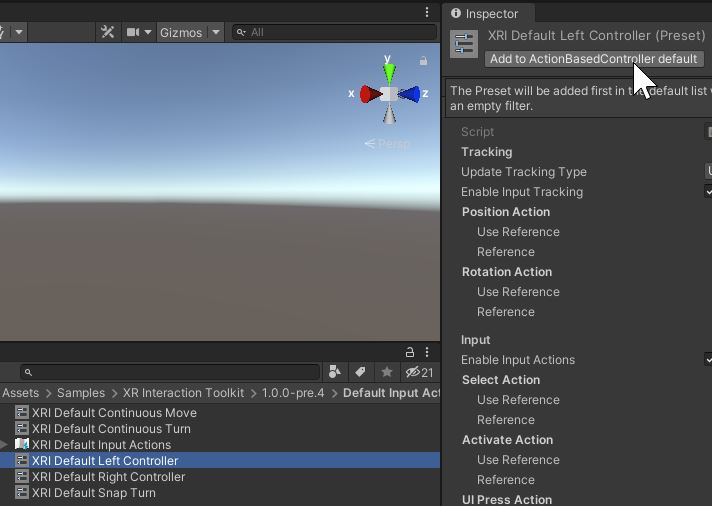
The controllers are in place, but they need to be linked to the interaction system. We are going to use the Samples imported from the XR Interaction Toolkit:
- find the folder
Default Input Actionsin the project tab; - for both
XRI Default Left ControllerandXRI Default Right Controllerselect Add to ActionBasedController default;
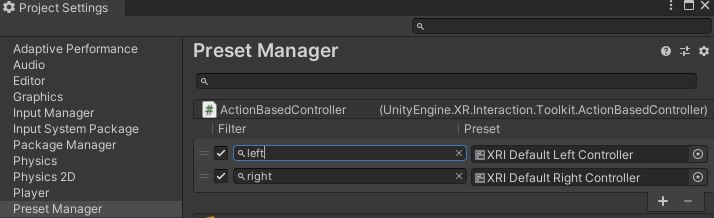
- from
Edit -> Project Settings -> Preset Managerset the filter of theActionBasedControllertoleftandrightrespectively;
- From the
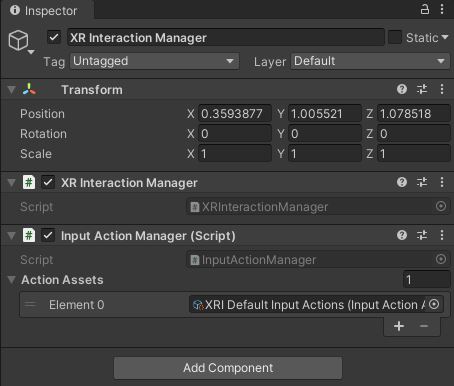
Hierarchy Windowadd to theXR Interaction ManagerGameObject a new componentInput Action Manager. Add a new Action Assets Element 0 needs to refer to theXRI Default Input Actions
- Finally, for the
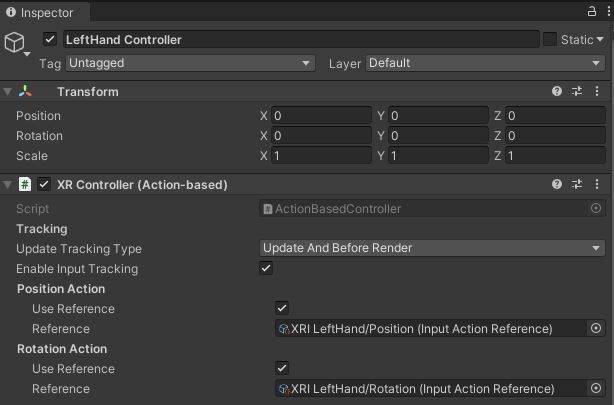
XR Controllercomponents of both left and right hands (XR Origin -> Camera Offset -> LeftHand ControllerandXR Origin -> Camera Offset -> RightHand Controller), activate the Position Action and the Rotation Action using the Use Reference tick box and pointing at- XRI LeftHand/Position
- XRI LeftHand/Rotation
same for the XRI RightHand/Position and XRI RightHand/Rotation.
Test the scene
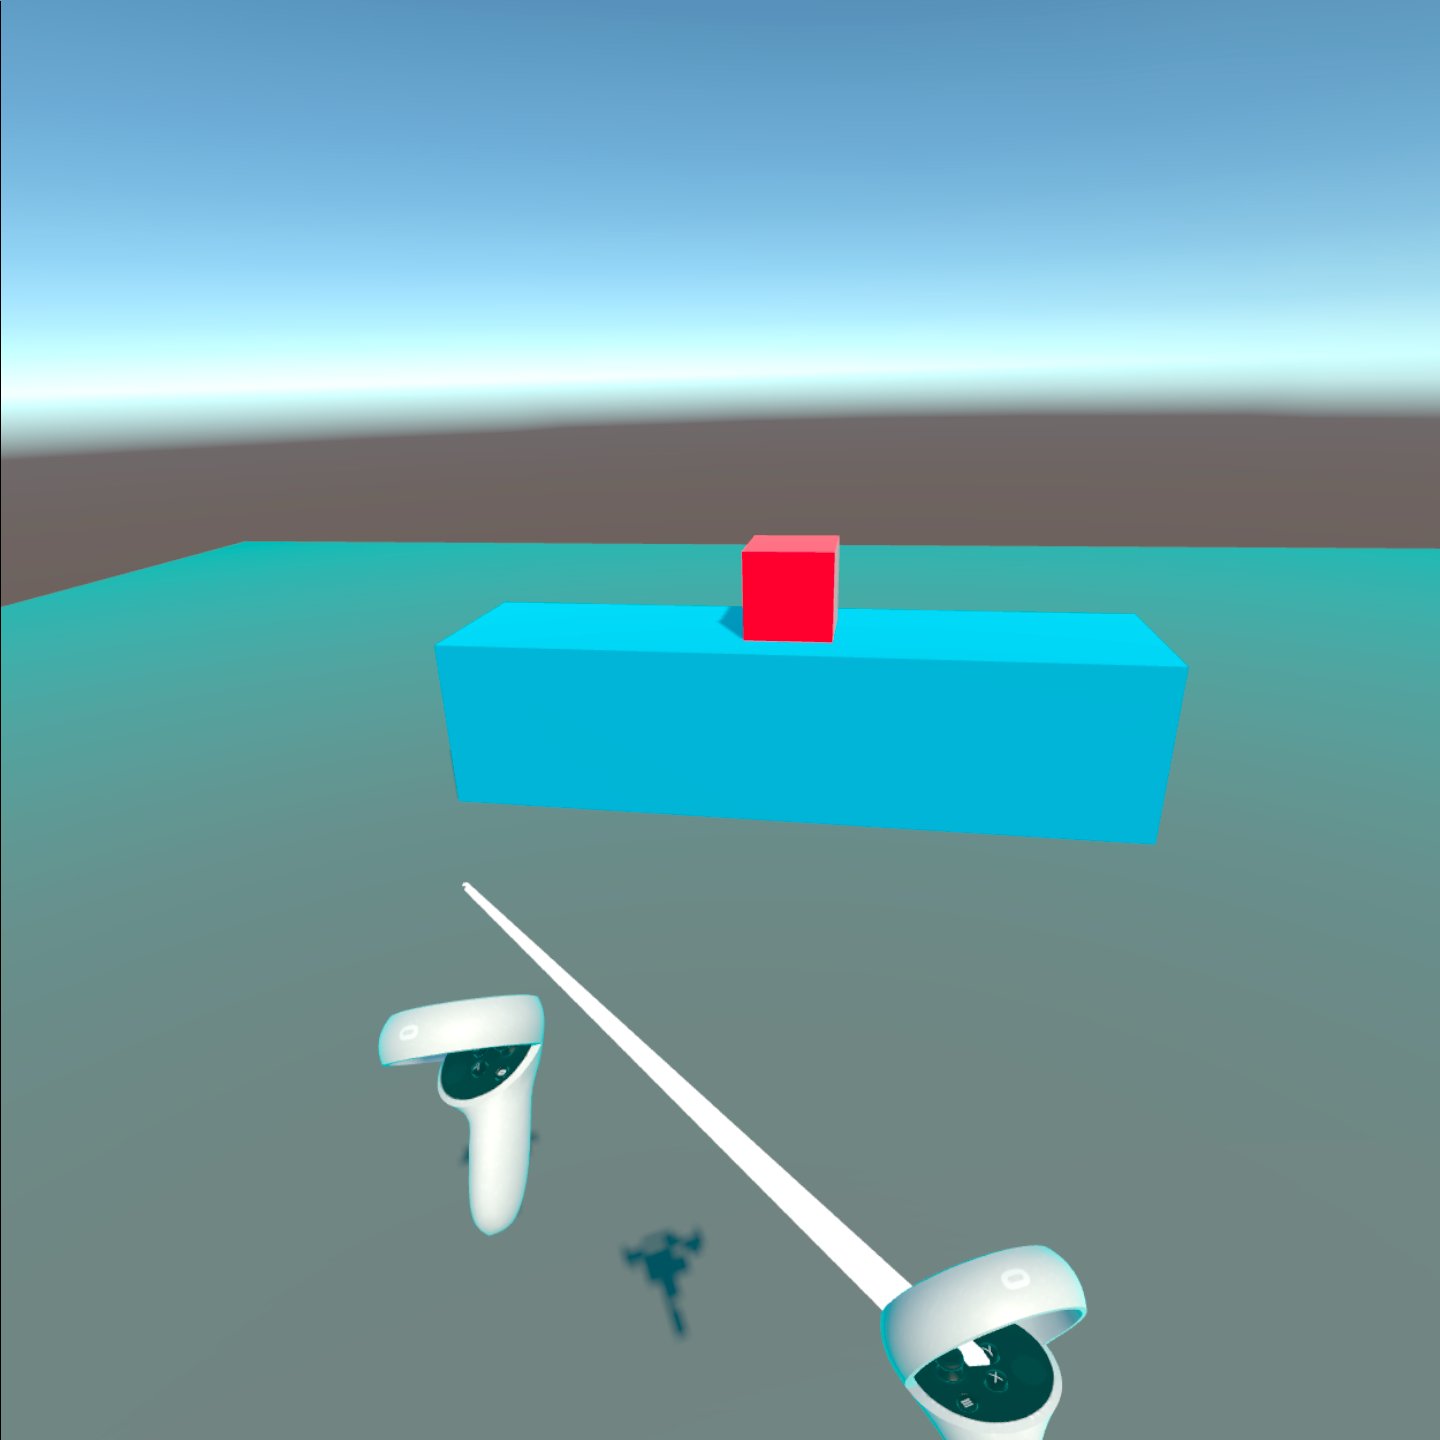
From File -> Build Settings and click on Add Open Scenes. With the Oculus Quest2 connected to your computer, press Build and Run, select the local destination folder for the APK.
The APK is installed on the Quest2. You should be able to see the Quest2 controllers tracked with a red line coming out from them. In the next part we will see how to use the controller to interact with the object in the scene.
To interact with the virtual environment, we need to attach the interactable components of the XR Interaction Toolkit to the digital objects and to the controllers themselves. Both controllers of the XR Rig prefab have already a XR Ray Interactor component attached (the red line). We are going to transform the Right controller in a direct interaction control to grab the digital objects in the scene.
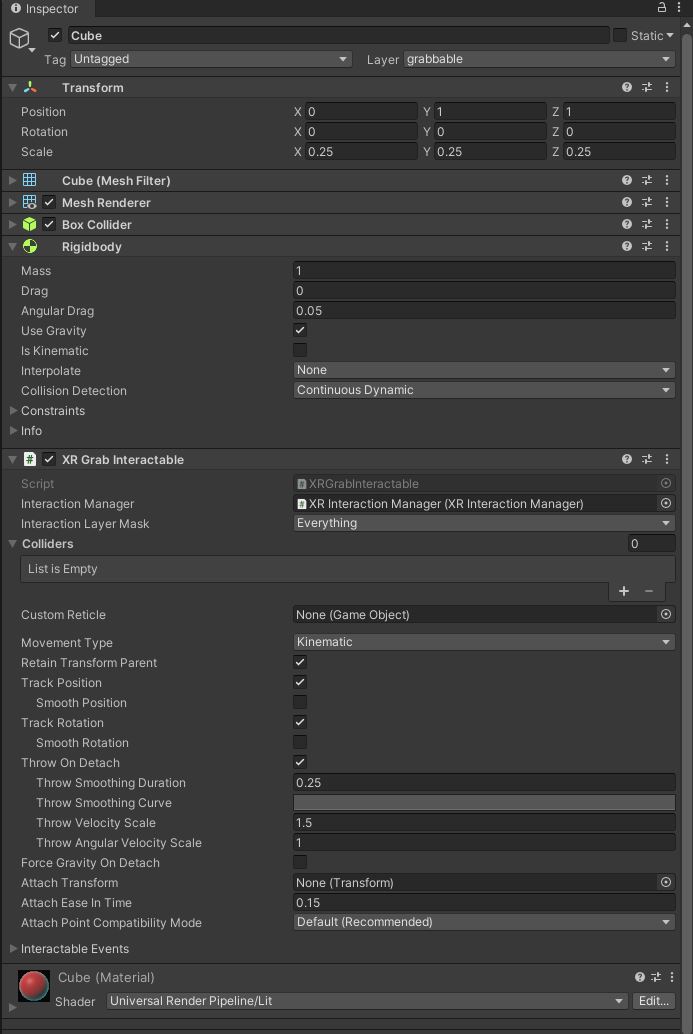
- Select the red cube in the scene and add a
XRGrabInteractablecomponent to it. Change theMovement typeto Kinematic and theCollision Detectionof the Rigidbody to Continuous Dynamic. Create a new Layer called grabbable and set it to the cube.
- select the RightHand Controller and, if present, remove the
XRInteractorLineVisualcomponent, theLineRenderercomponent and theXRRayInteractorcomponent; - enable the
Select Actionwith ReferenceXRI RightHand/Selectand theHaptic Device Actionwith referenceXRI RightHand/Haptic Device Actionsinside theXR Controllercomponent (this should be the only one available now); - add new component
XR Direct Interactor, set an Haptic EventOn Select Enteredto0.5and duration of0.5seconds; - finally, add a sphere collider with
radius 0.2andIsTriggerenabled; - select the LeftHand Controller and, in the
XR Ray Interactor, disable the Force Grab.
Create two new GameObjects cubes in the scene with the following parameters and name:
- Table:
position (0,0.25,-1)|scale (2,0.5,0.5) - Podium:
position (0,0.25,-3)|scale (0.5,0.5,0.5)
Create a different materials for each of them.
Build the current scene to test the environment. It is now possible to interact with the red cube: with the right hand by touching it and pressing the grip button on the side of the controller; with the left controller by pointing at the cube and pressing and holding the grip button.
Create a new GameObject XR -> Locomotion System and add a new GameObject to the scene XR -> Teleportation Area in position (0,0,0). To avoiding the overlapping, we can now delete, or disable, the Plane create at the beginning of the workshop.
- Select the
Locomotion Systemfrom theHierarchy Window - in the
Inspector Window, in the component Snap Turn provider tick bothUse Referencefor the Left Hand Snap Turn Action and the Right Hand Snap Turn Action and use as Reference theXRI LeftHand/TurnandXRI RightHand/Turn.
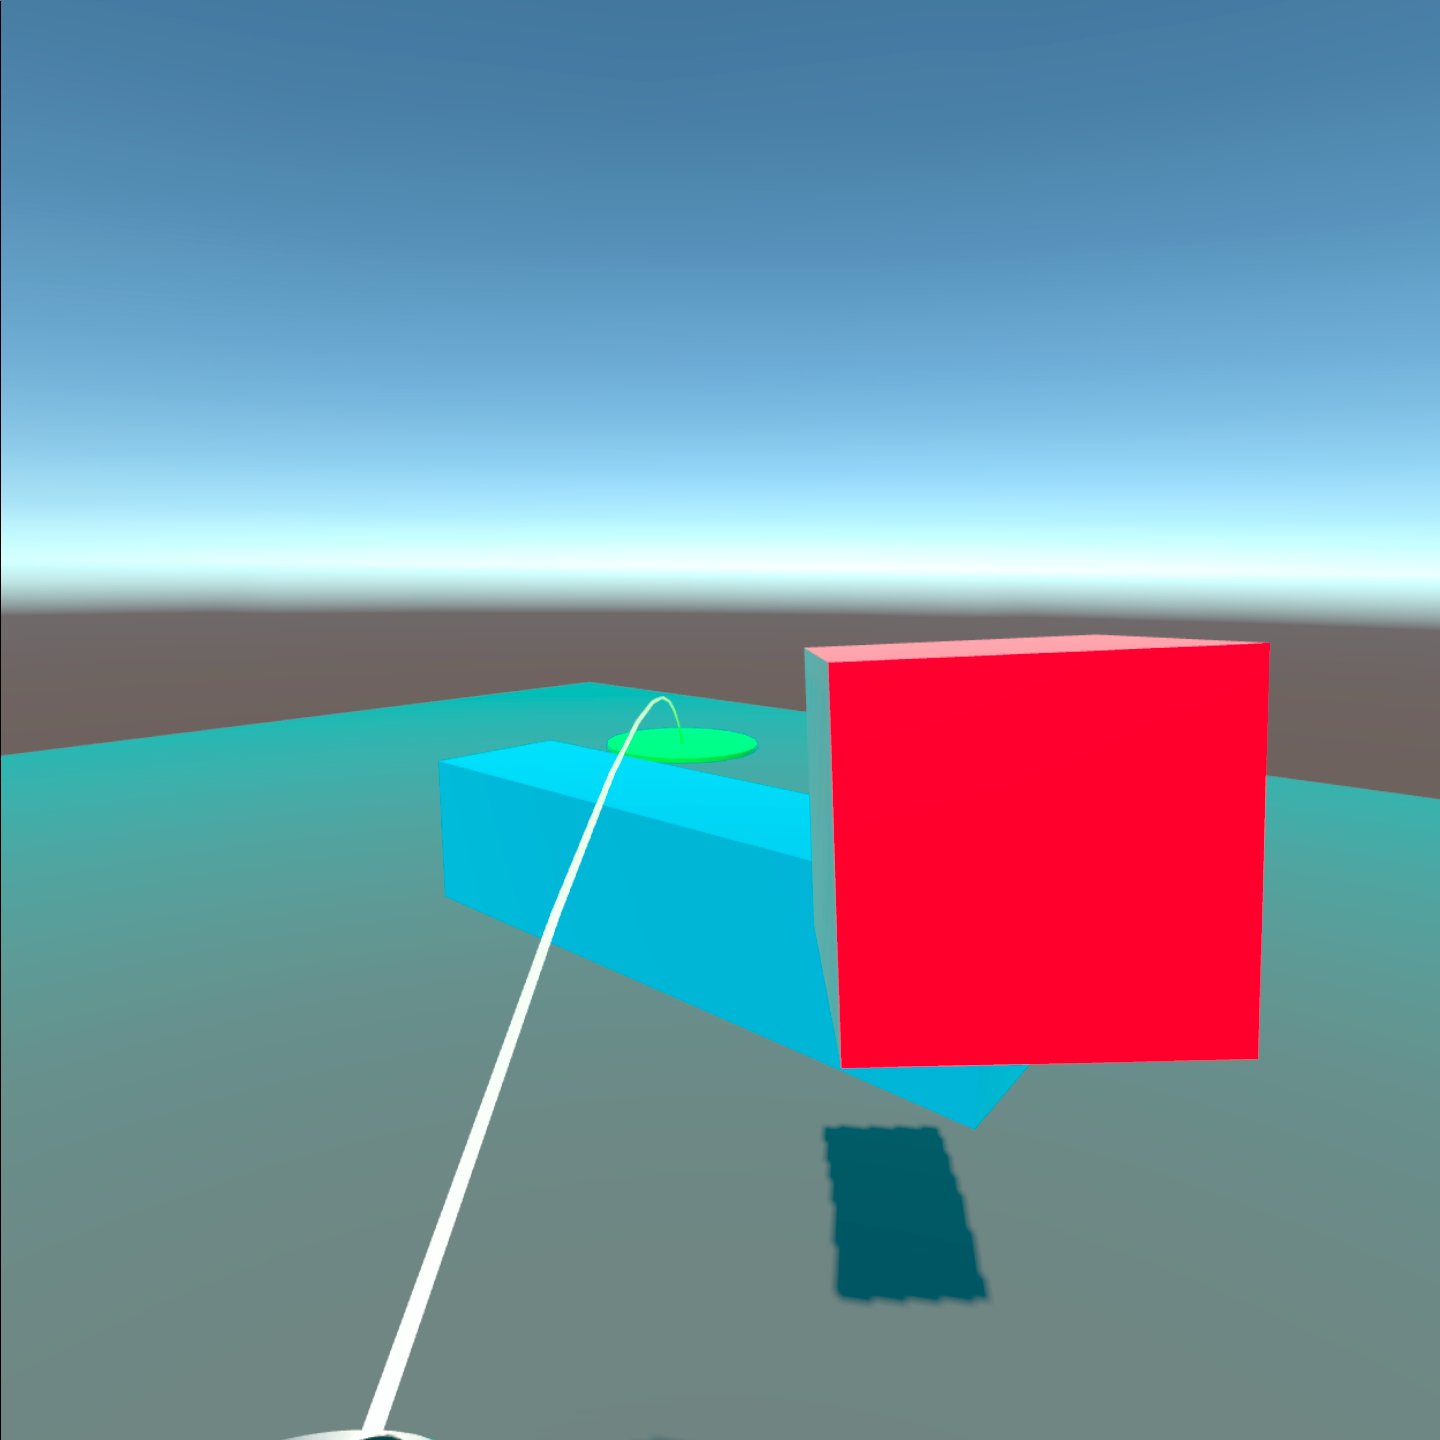
Create a new 3D Object -> Cylinder named customReticle with scale (0.5 , 0.01 , 0.5), position(0 , 0 , 0). Remove the component capsule collider and change the material with a green coloured one. Create a Prefab with this GameObject and delete it from the scene
- Select the
Teleportation Areafrom theHierarchy Window - in the
Inspector Windowin the component Teleportation Area in Custom Reticle add the Prefab created with the Cylinder. - Add the
Teleportation Areato a new LayerteleportArea and use this as Interaction Layer Mask (i.e. the user can teleport just on the GameObject on this layer)
The teleportation system is already working, however, the default straight line render and the key behaviour are not the most effective solutions. Moreover, we want to use both hands to teleport and interact with the objects.
We are going to create two new parent GameObjects for both hands and, for each of them, we are going to add a grab controller and a teleport controller:
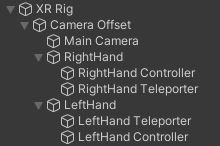
- create two new GameObjects named
LeftHandandRightHandinside theCamera OffsetGameObject of theXR Rig; - move the
RightHand Controllerand theLeftHand Controllerin the new parents GameObjects; - the
RightHand Controllerhas already the direct interaction setup, we need to add a teleportation controller. Create a new empty GameObject in theRighHandparent namedRightHand Teleporter; - copy the
XR Controller (Action-Based)component from theRightHand Controllerto theRightHand Teleporter(use the three dots next to the component name toCopy Componentand toPaste Component as New); - add the
XR Ray interactorcomponent, theLine Renderercomponent and theXR Interactor Line Visualcomponent to theRightHand Teleporter(these three components can be copied from the previously createdLeftHand Controlleras well or added as new components); - to avoid conflicts deactivate the
XR Ray interactorcomponent just added.
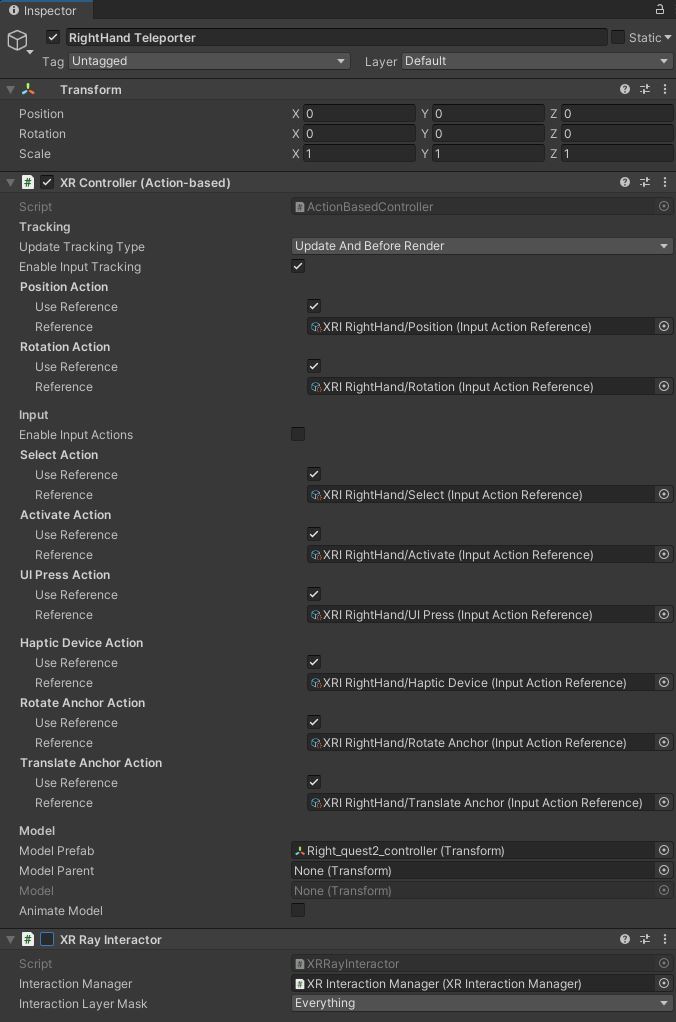
- in the
XR Controllerof theRightHand Teleporter, change the Select Action -> Reference toXRI RightHand/Teleport Mode Activateand in theXR Ray interactorcomponent to theRightHand Teleporterdisable the Keep Selected Target Valid
The XR Origin should have this structure now:
Create a new C# script TeleportationManager :
using UnityEngine;
using UnityEngine.InputSystem;
using UnityEngine.Events;

public class TeleportationManager : MonoBehaviour
{
    public GameObject baseController; //the Right / Left Hand Controller GameObject
    public GameObject teleportationController; //the Right / Left Teleport Controller GameObject
    public InputActionReference teleportActivationReference; //The `XRI RightHand/Teleport Mode Activate` / `XRI LeftHand/Teleport Mode Activate`

    public UnityEvent onTeleportationActive;
    public UnityEvent onTeleportationCancel;

    private void Start()
    {
        teleportActivationReference.action.performed += TeleportModeActivate;
        teleportActivationReference.action.canceled += TeleportModeCancel;
    }

    private void TeleportModeCancel(InputAction.CallbackContext context) => Invoke("DeactivateTeleporter", 0.1f);

    void DeactivateTeleporter() => onTeleportationCancel.Invoke();

    private void TeleportModeActivate(InputAction.CallbackContext context) => onTeleportationActive.Invoke();

}
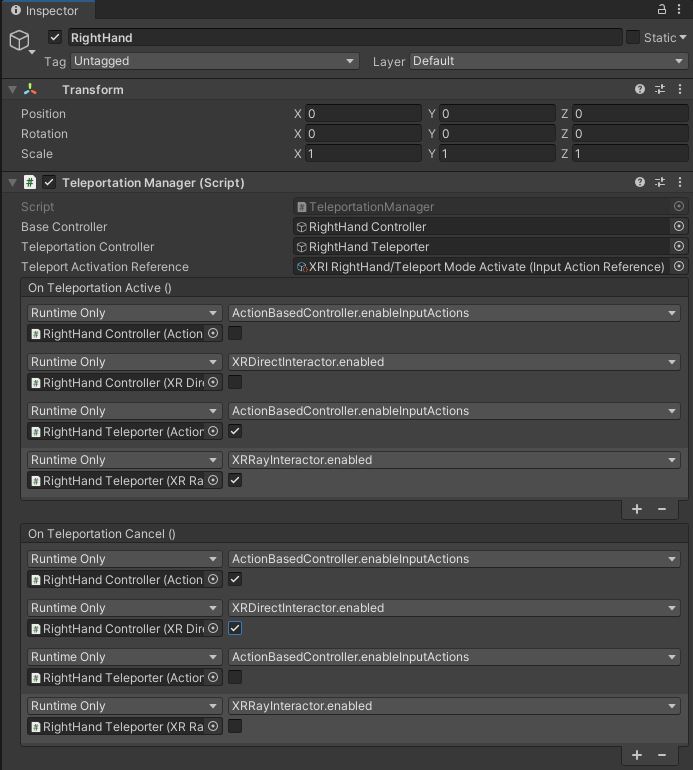
Attach the script to the RightHand Parent GameObject (it will be attached also to the LeftHand Parent GameObject but without the event for the XRDirectInteractor) with the following values for the public fields:
- Base Controller: RightHand Controller
- Teleportation Controller: RightHand Teleporter
- Teleport Activation Reference: XRI RightHand/Teleport Mode Activate
To switch between the main controller and the teleportation one, add four entries for each OnTeleportationActive and OnTeleportationCancel
On the OnTeleportationActive add:
RightHand ControllerfunctionActionBaseController -> bool enableInputActionsdisabled;RightHand ControllerfunctionXRDirectInteractor -> bool enabledisabled;RightHand TeleporterfunctionActionBaseController -> enableInputActionsenabled;RightHand TeleporterfunctionXRRayInteractor -> bool enabledenabled;
On the OnTeleportationCancel the values will be inversed:
RightHand ControllerfunctionActionBaseController -> bool enableInputActionsenabled;RightHand ControllerfunctionXRDirectInteractor -> bool enableenabled;RightHand TeleporterfunctionActionBaseController -> bool enableInputActionsdisabled;RightHand TeleporterfunctionXRRayInteractor -> bool enableddisabled;
In the XR Ray Interactor of the RightHand Teleporter change the Line Type to Bezier Curve.
Using the XR Interaction Toolkit it is possible to provide custom functions to interact with the scene. In this last part of the VR workshop we will link a virtual object with a MQTT broker to publish a message when the red cube is place to the podium.
Download the M2MQTT library and copy the folders M2Mqtt and M2MqttUnity in the Assets folder of the Unity project.
Create a new C# script mqttReceiver:
/*
The MIT License (MIT)

Copyright (c) 2018 Giovanni Paolo Vigano'

Permission is hereby granted, free of charge, to any person obtaining a copy
of this software and associated documentation files (the "Software"), to deal
in the Software without restriction, including without limitation the rights
to use, copy, modify, merge, publish, distribute, sublicense, and/or sell
copies of the Software, and to permit persons to whom the Software is
furnished to do so, subject to the following conditions:

The above copyright notice and this permission notice shall be included in all
copies or substantial portions of the Software.

THE SOFTWARE IS PROVIDED "AS IS", WITHOUT WARRANTY OF ANY KIND, EXPRESS OR
IMPLIED, INCLUDING BUT NOT LIMITED TO THE WARRANTIES OF MERCHANTABILITY,
FITNESS FOR A PARTICULAR PURPOSE AND NONINFRINGEMENT. IN NO EVENT SHALL THE
AUTHORS OR COPYRIGHT HOLDERS BE LIABLE FOR ANY CLAIM, DAMAGES OR OTHER
LIABILITY, WHETHER IN AN ACTION OF CONTRACT, TORT OR OTHERWISE, ARISING FROM,
OUT OF OR IN CONNECTION WITH THE SOFTWARE OR THE USE OR OTHER DEALINGS IN THE
SOFTWARE.
*/

using System.Collections.Generic;
using UnityEngine;
using M2MqttUnity;
using uPLibrary.Networking.M2Mqtt.Messages;

public class mqttReceiver : M2MqttUnityClient
{
    [Header("MQTT topics")]
    [Tooltip("Set the topic to subscribe. !!!ATTENTION!!! multi-level wildcard # subscribes to all topics")]
    public string topicSubscribe = "#"; // topic to subscribe. !!! The multi-level wildcard # is used to subscribe to all the topics. Attention i if #, subscribe to all topics. Attention if MQTT is on data plan
    [Tooltip("Set the topic to publish (optional)")]
    public string topicPublish = ""; // topic to publish
    public string messagePublish = ""; // topic to publish

    [Tooltip("Set this to true to perform a testing cycle automatically on startup")]
    public bool autoTest = false;

    //using C# Property GET/SET and event listener to reduce Update overhead in the controlled objects
    private string m_msg;
    public string msg
    {
        get
        {
            return m_msg;
        }
        set
        {
            if (m_msg == value) return;
            m_msg = value;
            if (OnMessageArrived != null)
            {
                OnMessageArrived(m_msg);
            }
        }
    }
    public event OnMessageArrivedDelegate OnMessageArrived;
    public delegate void OnMessageArrivedDelegate(string newMsg);

    //using C# Property GET/SET and event listener to expose the connection status
    private bool m_isConnected;
    public bool isConnected
    {
        get
        {
            return m_isConnected;
        }
        set
        {
            if (m_isConnected == value) return;
            m_isConnected = value;
            if (OnConnectionSucceeded != null)
            {
                OnConnectionSucceeded(isConnected);
            }
        }
    }
    public event OnConnectionSucceededDelegate OnConnectionSucceeded;
    public delegate void OnConnectionSucceededDelegate(bool isConnected);

    // a list to store the messages
    private List<string> eventMessages = new List<string>();

    public void Publish()
    {
        client.Publish(topicPublish, System.Text.Encoding.UTF8.GetBytes(messagePublish), MqttMsgBase.QOS_LEVEL_EXACTLY_ONCE, false);
        Debug.Log("Message published");
    }
    public void SetEncrypted(bool isEncrypted) => this.isEncrypted = isEncrypted;
    protected override void OnConnecting() => base.OnConnecting();

    protected override void OnConnected()
    {
        base.OnConnected();
        isConnected = true;
        if (autoTest) { Publish(); }
    }

    protected override void OnConnectionFailed(string errorMessage)
    {
        Debug.Log("CONNECTION FAILED! " + errorMessage);
    }

    protected override void OnDisconnected()
    {
        Debug.Log("Disconnected.");
        isConnected = false;
    }
    protected override void OnConnectionLost() => Debug.Log("CONNECTION LOST!");
    protected override void SubscribeTopics() => client.Subscribe(new string[] { topicSubscribe }, new byte[] { MqttMsgBase.QOS_LEVEL_EXACTLY_ONCE });
    protected override void UnsubscribeTopics() => client.Unsubscribe(new string[] { topicSubscribe });
    protected override void Start() => base.Start();
    protected override void DecodeMessage(string topic, byte[] message)
    {
        //The message is decoded
        msg = System.Text.Encoding.UTF8.GetString(message);

        Debug.Log("Received: " + msg);

        StoreMessage(msg);
        if (topic == topicSubscribe)
        {
            if (autoTest)
            {
                autoTest = false;
                Disconnect();
            }
        }
    }
    private void StoreMessage(string eventMsg)
    {
        if (eventMessages.Count > 50)
        {
            eventMessages.Clear();
        }
        eventMessages.Add(eventMsg);
    }

    protected override void Update() => base.Update(); // call ProcessMqttEvents()

    private void OnDestroy() => Disconnect();
    private void OnValidate()
    {
        if (autoTest)
        {
            autoConnect = true;
        }
    }
}
Create a new C# script mqttPublisher
using UnityEngine;
[RequireComponent(typeof(mqttReceiver))]
public class mqttPublisher : MonoBehaviour
{
    public mqttReceiver _eventSender;
    public string messagePublish = "";

    void Start()
    {
        _eventSender = this.gameObject.GetComponent<mqttReceiver>();

        _eventSender.OnConnectionSucceeded += OnConnectionSucceededHandler;
    }

    private void OnConnectionSucceededHandler(bool connected)
    {
        if (!connected) //publish if connected
            return;
//if the messagePublish is null, use the one of the MQTTReceiver
        if (messagePublish.Length > 0)
        { _eventSender.messagePublish = messagePublish; }

        _eventSender.Publish();
        Debug.Log("Publish" + messagePublish);
    }
}
Create a new C# script mqttController:
using UnityEngine;

[RequireComponent(typeof(mqttReceiver))]
public class mqttController : MonoBehaviour
{
    public GameObject objectToControl;
    public mqttReceiver _eventSender;
    void Start()
    {
        _eventSender = this.gameObject.GetComponent<mqttReceiver>();
        _eventSender.OnMessageArrived += OnMessageArrivedHandler;
    }

    private void OnMessageArrivedHandler(string newMsg)
    {
        Debug.Log("Event Fired. The message is = " + newMsg);
    }
}
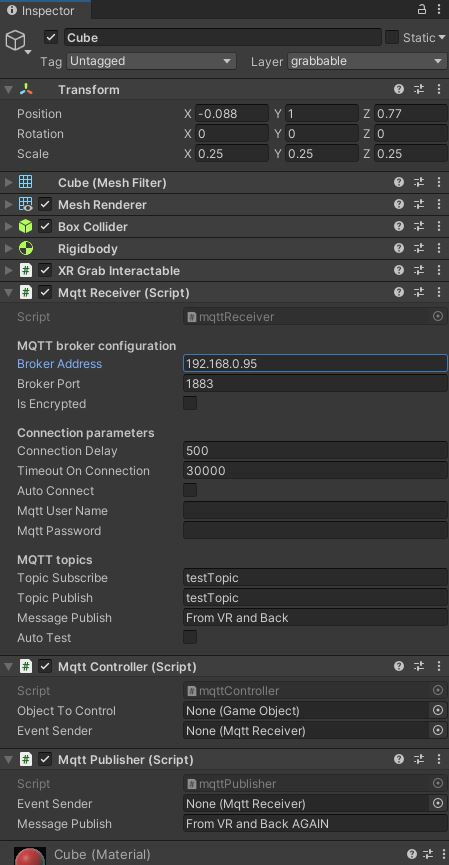
Attach the three scripts to the Red Cube GameObject:
- add the parameters to the
MQTTReceiver(i.e. Broker Address, Broker Port, Topic Subscribe, Topic Publish) - add the message to publish to the
MQTTPublisher.
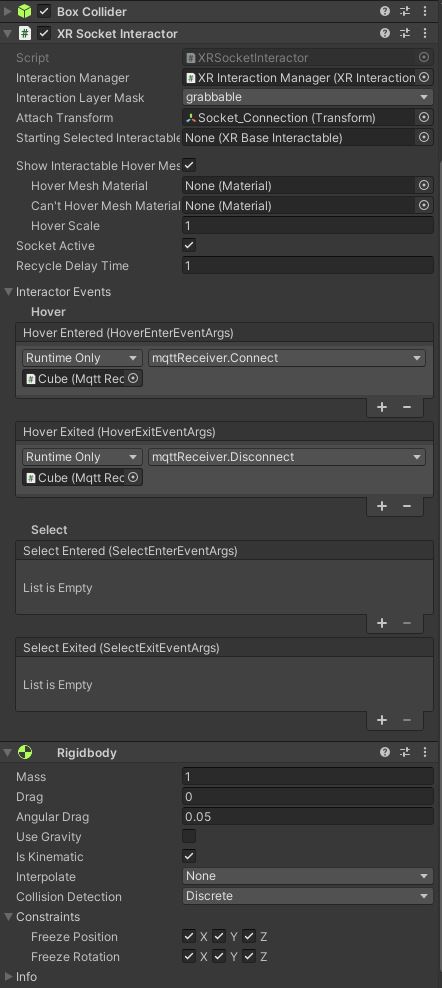
Select the Podium GameObject from the Hierarchy and add a XRSocketInteractor component. This component will link the Red Cube GameObject and trigger both connection and publishing to the MQTT Broker:
- set the Interaction Layer Mask to the same layer of the
RedCube(e.g. grabbable); - create an empty GameObject named attachPoint as child of the
Podiumwithposition (0,0.75,0)and set this object as Attach Transform of theXRSocketInteractorcomponent (the centre of this GameObject is going to be the attach point of theRedCube); - Add a new Hover Entered event under Interactor Events, drag-and-drop the
RedCubeand set the functionmqttReceiver.Connect - Add a new Hover Exited event under Interactor Events, drag-and-drop the
RedCubeand set the functionmqttReceiver.Disconnect
Finally, set the Box Collider of the Podium GameObject IsTrigger and add a RigidBodyKinematic and freeze X, Y and Z of both position and rotation
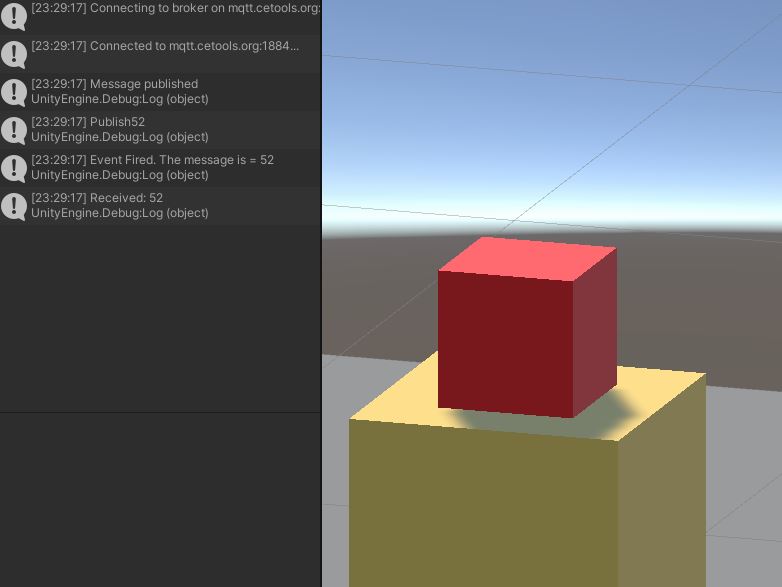
Build and Run the project, it will be now possible to grab the RedCube, teleport to the Podium and trigger the MQTT connection by placing the RedCube near the Podium.
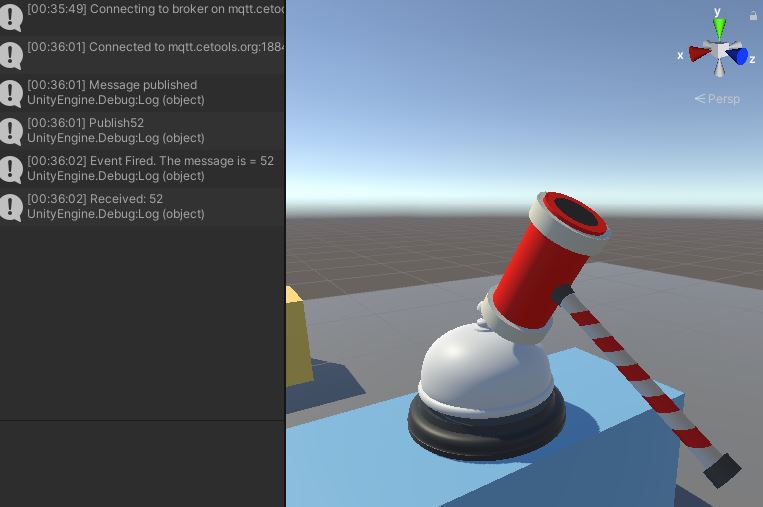
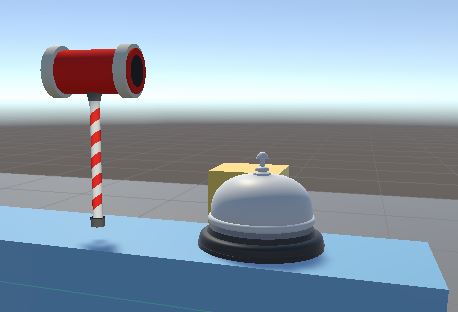
Of course, It is possible to use any other digital models instead of the two cubes, for example an actual Bell and an Low Poly Hammer.
- Generate the colliders for the hammer (the bell will use just a cube collider) and import both models in the scene just over the
TableGameObject.
Select the Hammer GameObject from the Hierarchy Window and in the Inspector Window add the XR Grab Interactable component with Movement Type set to Kinematic. To avoid to grab the hammer in its gravity centre, add to it a child Empty GameObject named attachPosition and move it nearby the end of the handle and drag the attachPosition GameObject on the empty field _Attach Transform of the XR Grab Interactable component. On the RigidBody component, enable Is Kinematic and disable Use Gravity
Inside the bell GameObject select the Bell and add a Box Collider component, make it bigger as the bell (or slightly smaller, e.g. Center (0 , 0.005 , 0); Size (0.007 , 0.004 , 0.007)) and set Is Trigger enable. Add a RigidBodyKinematic without Gravity and freeze X, Y and Z for both position and rotation and change Collision Detection to Continuos Speculative.
Create a new C# Script named simpleCollision
using UnityEngine;
using System.Collections;

public class simpleCollision : MonoBehaviour
{
    public static simpleCollision current;

    private void Awake()
    {
        current = this;
    }


    private void OnTriggerEnter(Collider other)
    {
        if (other.name == "hammer")
        {
            this.GetComponent<mqttReceiver>().Connect();
        }
    }

    private void OnTriggerExit(Collider other)
    {
        if (other.name == "hammer")
        {
            this.GetComponent<mqttReceiver>().Disconnect();
        }
    }
    }
Control that the other.name as the exact name of the GameObject that will collide with the bell (in this case hammer), and add the script to the Bell GameObject.
Finally, add mqttReceiver, mqttController and mqttPublisher (the same used on the RedCube GameObject will work).