This workshop will show you how to:
- Create Geolocation experiences using Lightship WPS and GPS
- Add spatial sounds
To complete this workshop you will need:
- Unity 6000.0 LTS
- VS Code
- Lightship Free Account
- Lightship ARDK 3 Package
- Steam Audio Unity plugin 4.5.3
- Bat Sensors
- Pluck sound
Languages used:
- C#
Additional resources
multiple sensors on a mobile device. GPS location, for example, can be useful for triggering AR experiences when the user is in a specific place. Note that newer versions of Android and iOS require explicit user permissions to access various sensors.
Create a new Unity project using Unity Hub and select the AR Mobile template.
Once the project is ready, switch the platform to Android from the File -> Build Profiles.
Create a new empty scene name GPSNative
- create an empty GameObject, named
GPSData - add to it a
UI -> Text - TextMeshProUnity will create automatically a Canvas. Select the Canvas and in theInspector window:- Set the Render Mode to ‘Screen Space - Overlay`
- In the
Canvas Scaler, change theUI Scale Modeto Scale With Screen Size and set the Reference Resolution tox=1080; y=1920
- Add a new component
Horizontal Layout Group- Set Child Alignment to
Middle Center - and enable both Width and Height for
Control Child SizeandChild Force Expand
- Set Child Alignment to
- Select the TextMeshPro GameObject and in the
Inspector window- Change
Sample texttoWaiting GPS... - change
Font SizetoAuto Size - Alignment middle and centre
- Change
Create a new MonoBehaviour Script and name it GPSManager
using UnityEngine;
using System.Collections;
using UnityEngine.Android;
using TMPro;

public class GPSManager : MonoBehaviour
{
    [Header("UI Output")]
    public TextMeshProUGUI gpsText; // Link TextMeshProUGUI in Inspector

    private bool isRunning = false;

    void Start()
    {
        StartCoroutine(StartLocationService());
    }

    IEnumerator StartLocationService()
    {
        // Request permission for Android
        if (!Permission.HasUserAuthorizedPermission(Permission.FineLocation))
        {
            Permission.RequestUserPermission(Permission.FineLocation);
            yield return new WaitForSeconds(2); // wait for user response
        }

        // Check if location service is enabled
        if (!Input.location.isEnabledByUser)
        {
            Debug.Log("Location services not enabled by user.");
            yield break;
        }

        Input.location.Start(); //Start to get the location GPS, this works just on devices with GPS

        int maxWait = 30;
        while (Input.location.status == LocationServiceStatus.Initializing && maxWait > 0)
        {
            yield return new WaitForSeconds(1);
            maxWait--;
        }

        if (maxWait < 1)
        {
            Debug.Log("Timed out");
            yield break;
        }

        if (Input.location.status == LocationServiceStatus.Failed)
        {
            Debug.Log("Unable to determine device location");
            yield break;
        }

        isRunning = true;
        StartCoroutine(UpdateGPSData());
    }

    IEnumerator UpdateGPSData()
    {
        while (isRunning)
        {
            var data = Input.location.lastData;

            float latitude = data.latitude;
            float longitude = data.longitude;
            float altitude = data.altitude;
            float hAcc = data.horizontalAccuracy;
            float vAcc = data.verticalAccuracy;
            double timestamp = data.timestamp;

//F is used to set the number of decimals in the string
            string info = $"Lat: {latitude:F6}\n" +
                          $"Lon: {longitude:F6}\n" +
                          $"Alt: {altitude:F2} m\n" +
                          $"H-Acc: {hAcc:F2} m\n" +
                          $"V-Acc: {vAcc:F2} m\n" +
                          $"Time: {timestamp:F0} s";

            Debug.Log(info);

            if (gpsText != null)
                gpsText.text = info;

            yield return new WaitForSeconds(1f); // update every second
        }
    }

    void OnDisable()
    {
        isRunning = false;
        Input.location.Stop();
    }
}
Attach the script to the GameObject GPSData and add to the field GPS Text in the Inspector window the GameObject TextMeshProUI.
Save the Scene.
To test the script we need to build the project as the plugin can access just GPS devices on Android or iOS devices

The on board GPS sensor can be used with ARFoundation to create location-based Augmented Reality experiences.
However, using specialised packages such as ARDK allows to provide a more straightforward developing experience.
Setting up ARDK
Install the ARDK package (more details can be find in the documentation).
- open the
Window -> Package Manager - From the plus menu on the
Package Manager tab, selectAdd package from git URL... - Enter
https://github.com/niantic-lightship/ardk-upm.git
Unity will display a Project Validation window with warnings and errors that can be automatically fixed. Typically, there will be one warning asking you to enable XR Plug-In Management. Click Edit to open the Plug-In settings automatically, or navigate to Project Settings -> XR Plug-In Management manually.
From XR Plug-in Management menu, select Niantic Lightship SDK + Google ARCore.
In Player Settings:
Other Settings -> Rendering- Uncheck Auto Graphics API. If Vulkan appears in the Graphics API list, remove it.Other Settings -> Identification- Set the Minimum API Level to Android 8.1 ‘Oreo' (API Level 27)Other Settings -> Configuration- Set the Scripting Backend toIL2CPP, and enable justARM64.- Open
Lightship -> Settingsand click onGet API KeyunderCredentials - Log in to your
Lightship accountor create a new free account. - Open the
Projects page, then select an existing project or create a new one by clicking New Project. - In your project's Overview, copy the
API Keyby clicking the copy icon next to it. - Return to the
Lightship Settingswindow in Unity and paste yourAPI Keyinto the API Key field.
Control that there aren't any issues in the Project Validation (it can be found in Edit -> Project Settings or Lightship -> Project Validation).
Create a new scene
Create a new Empty scene
- From
File -> New Scene -> Empty SceneandSave as.. - Add in the
Hierarchy panelthe essentialARFoundationobjects:- right click
XR -> XR Origin (Mobile AR), this GameObject contains theCamera OffsetandMain Camera - right click
XR -> AR Session
- right click
- In the
Hierarchy, select theXR Origin (Mobile AR), then, in theInspector, clickAdd Componentand add anARWorldPositioningObjectHelperto it. This will also create aARWorldPositioningManagerComponent - Still in the
Hierarchy, expand theXROrigin (Mobile AR)andCamera Offsetto expose theMain Camera, then select theMain Camera - In the
Inspector, locateClipping PlanesunderCameraand set theFar valueto10000 - In the
ARWorldPositioningObjectHelperComponent, attached to theXR Origin (Mobile AR), set theAltitude ModetoMeters above sea level (WGS84) - Create two
Prefabs, a cube and a sphere, both scaled to5,5,5, with two different materials, one red and the other blue.
Finally, Create a new MonoBeahiour# script namedAddWPSObjects`
using UnityEngine;
using System;
using Niantic.Lightship.AR.WorldPositioning;

public class AddWPSObjects : MonoBehaviour
{
    [SerializeField] ARWorldPositioningObjectHelper positioningHelper;
    [SerializeField] Camera trackingCamera;
    // Replace the coordinates here with your location
    double latitude = 51.538418391071;
    double longitude = -0.01290085376900409;
    double altitude = 115.0; // It is possible to change the refence altitude from the ARWorldPositioningObjectHelper attached on the XR Origin (Mobile AR)

    public GameObject Cube; //to be set on the Inspector
    public GameObject Sphere;

    void Start()
    {
        // instantiate a cube, scale it up for visibility if needed, then update its location using Niantic WPS
        GameObject cubeClone = Instantiate(Cube) as GameObject;
        positioningHelper.AddOrUpdateObject(cubeClone, latitude, longitude, altitude, Quaternion.identity);
    }

    // Create a Sphere and move it to the position predicted using the raw GPS + compass
    private GameObject gpsSphere = null;

    void Update()
    {
        // If the Sphere doesn't exist:
        if (gpsSphere == null)
        {
            gpsSphere = Instantiate(Sphere) as GameObject;
        }

        if (Input.location.isEnabledByUser)
        {
            double deviceLatitude = Input.location.lastData.latitude;
            double deviceLongitude = Input.location.lastData.longitude;

            Vector2 eastNorthOffsetMetres = EastNorthOffset(latitude, longitude, deviceLatitude, deviceLongitude);
            Vector3 trackingOffsetMetres = Quaternion.Euler(0, 0, Input.compass.trueHeading) * new Vector3(eastNorthOffsetMetres[0], (float)altitude, eastNorthOffsetMetres[1]);
            Vector3 trackingMetres = trackingCamera.transform.localPosition + trackingOffsetMetres;
            gpsSphere.transform.localPosition = trackingMetres;
        }
    }

    public Vector2 EastNorthOffset(double latitudeDegreesA, double longitudeDegreesA, double latitudeDegreesB, double longitudeDegreesB)
    {
        double DEGREES_TO_METRES = 111139.0;
        float lonDifferenceMetres = (float)(Math.Cos((latitudeDegreesA + latitudeDegreesB) * 0.5 * Math.PI / 180.0) * (longitudeDegreesA - longitudeDegreesB) * DEGREES_TO_METRES);
        float latDifferenceMetres = (float)((latitudeDegreesA - latitudeDegreesB) * DEGREES_TO_METRES);
        return new Vector2(lonDifferenceMetres, latDifferenceMetres);
    }
}
In the Hierarchy, create a new empty GameObject by right-clicking and selecting Create Empty. Name it WPSObjects and attach the script you just created. Fill the public field:
Positioning Helper: drag theXR Origin (Mobile AR)Tracking Camera: theMain Cameraof the scene, inside theXR Origin (Mobile AR)Cube: the prefab of the cube (it could be any Prefab or 3d object)Sphere: the prefab of the sphere (it could be any Prefab or 3d object)
Build and run the app, then test it outdoors. The device's GPS usually acquires position faster, but WPS generally offers greater precision.
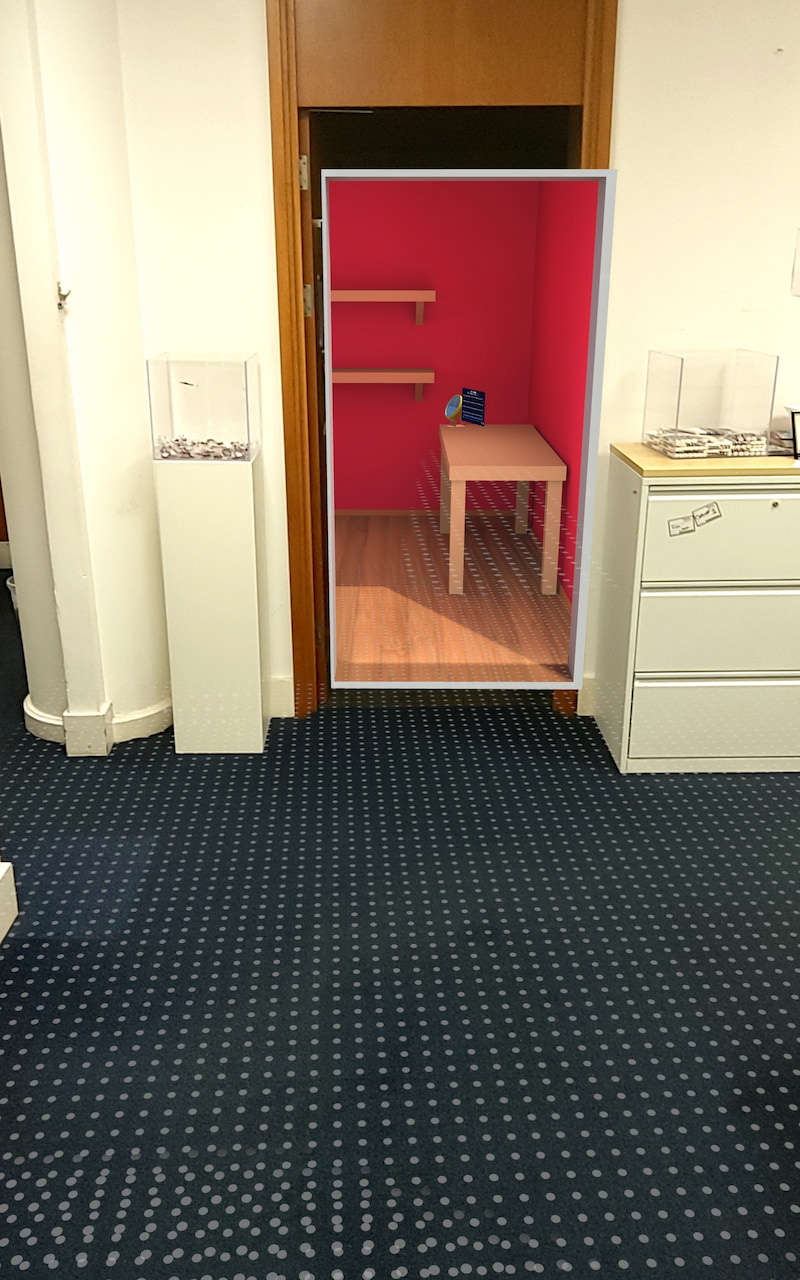
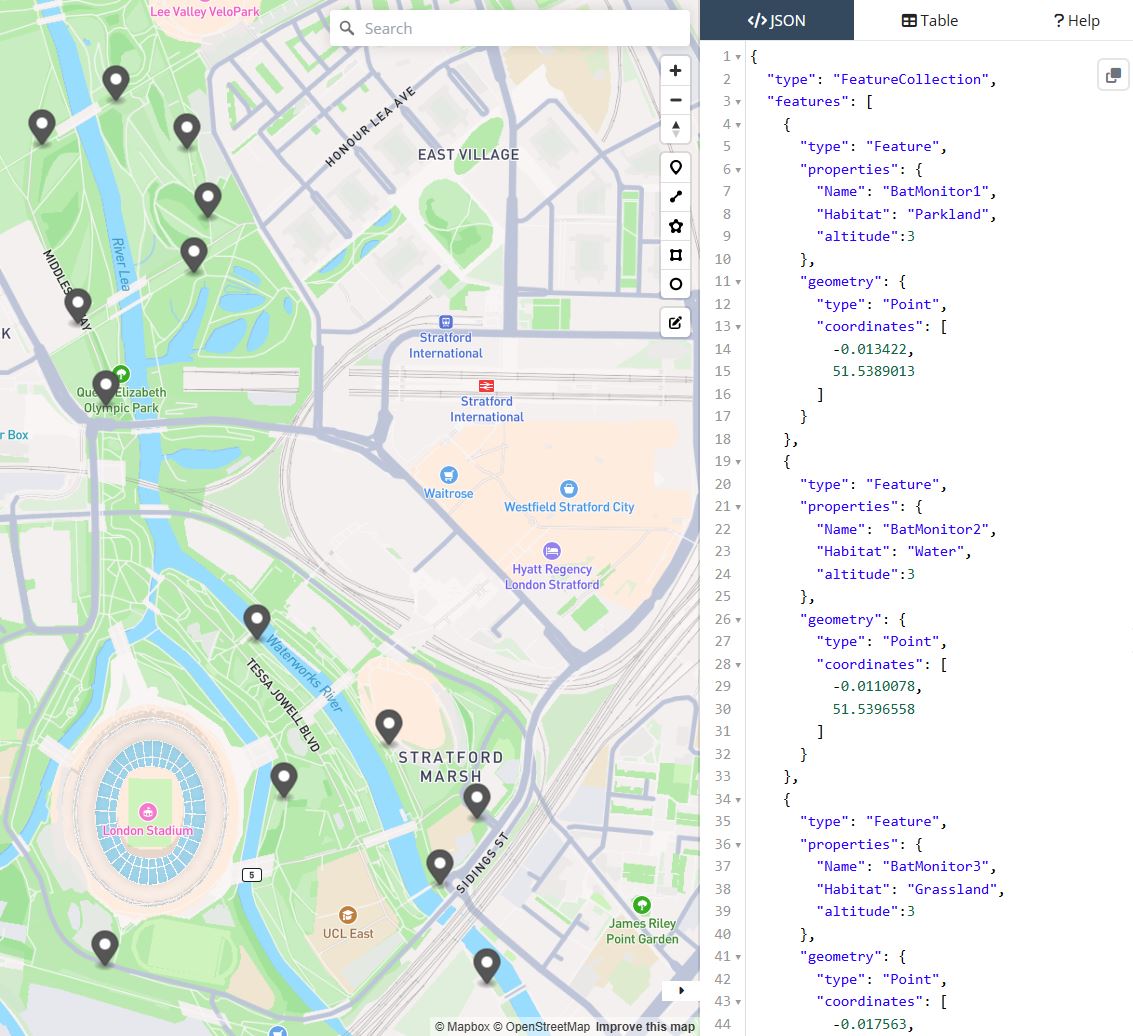
In order to add multiple elements at runtime, we can modify the script to import an external JSON object. First, we need to generate a GeoJSON file with the locations of the sensors or other elements that we want to visualize in our app. In this example, we are going to use the BatSensors located in the Queen Elizabeth Olympic Park.
If the GeoJSON file is not readily available, it is possible to create a new one quite easily using geojson.io. Through this online service, it is also possible to add additional properties to the locations that can be used in our application.
Create a new Prefab GameObject to be use as visualisation of the sensor. It could be a primitive such a sphere (scale 2 2 2), or an actual 3D model. Inside of the prefab add also a TextMeshPro - Text with width = 0.2; height = 0.3 and Font Size = 0.2, place it on top of the primitive object and name it Info (the name is used also in the script below).
In order to provide a feedback to the user on the position of the closest sensor we are going to add a simple UI:
- add a new
UI -> Canvasand set- Canvas Scaler to
Scale with Scren Size - Reference Resolution
X = 1080; Y = 1920 - Screen Match Mode to
Expand - add a
Horizontal Layout
- Canvas Scaler to
- add to the
CanvasaUI - > Text - TextMeshPro- Anchor Preset
Left Bottom Pos X = 0; Pos Y = 50; Pos Z = 0width = 1080; height = 50- Alignment
Right - change the Text to
Closest Sensor:......... Distance:............and the Font Size to36
- Anchor Preset
Create a new MonoBeahviour script named AddWPSObjectsList that is going to read the JSON file and instantiate a prefab for each location
using UnityEngine;
using System.Collections.Generic;
using Niantic.Lightship.AR.WorldPositioning;
using TMPro;

public class AddWPSObjectsList : MonoBehaviour
{
    [SerializeField] ARWorldPositioningObjectHelper positioningHelper;
    [SerializeField] GameObject prefab; // Assign your prefab in the Inspector
    [SerializeField] TextAsset jsonFilePath; // Path to your JSON file
    private List<GameObject> sensors = new List<GameObject>();

    public Camera mainCamera;
    public TextMeshProUGUI distanceText;
    private Vector3 previousCameraPosition;

    void Start()
    {
        // Initialize the previous camera position
        previousCameraPosition = mainCamera.transform.position;

        string jsonText = jsonFilePath.text;
        var json = JsonUtility.FromJson<batSensors.Root>(jsonText);

        foreach (var feature in json.features)
        {
            double longitude = feature.geometry.coordinates[0];
            double latitude = feature.geometry.coordinates[1];
            double altitude = feature.properties.altitude;

            // Instantiate the prefab and update its location
            GameObject obj = Instantiate(prefab);
            obj.name = feature.properties.Name;
            positioningHelper.AddOrUpdateObject(obj, latitude, longitude, altitude, Quaternion.identity);

            Debug.Log("add " + obj.name);

            obj.transform.Find("Info").GetComponent<TextMeshPro>().text = feature.properties.Name + "\n" + feature.properties.Habitat;

            sensors.Add(obj);
        }
    }

    void LateUpdate()
    {
        // Check if the camera has moved
        if (mainCamera.transform.position != previousCameraPosition)
        {
            // Update the previous camera position
            previousCameraPosition = mainCamera.transform.position;
            // Find the closest object and display the distance
            FindAndDisplayClosestObject();
        }
    }


    void FindAndDisplayClosestObject()
    {
        GameObject closestObject = null;
        float closestDistance = Mathf.Infinity;

        // Iterate through all objects with the tag "Detectable"
        foreach (GameObject obj in sensors)
        {
            float distance = Vector3.Distance(mainCamera.transform.position, obj.transform.position);

            if (distance < closestDistance)
            {
                closestDistance = distance;
                closestObject = obj;
            }
        }

        if (closestObject != null)
        {
            // Display the distance in meters and two decimals
            distanceText.text = $"Closest Sensor: {closestObject.name:F2} | Distance: {closestDistance:F2} m";
        }
    }
}

// Root myDeserializedClass = JsonConvert.DeserializeObject<Root>(myJsonResponse);
public class batSensors
{
    [System.Serializable]
    public class Feature
    {
        public string type;
        public Properties properties;
        public Geometry geometry;
    }
    [System.Serializable]
    public class Geometry
    {
        public string type;
        public List<double> coordinates;
    }
    [System.Serializable]
    public class Properties
    {
        public string Name;
        public string Habitat;
        public double altitude;
    }
    [System.Serializable]
    public class Root
    {
        public string type;
        public List<Feature> features;
    }
}
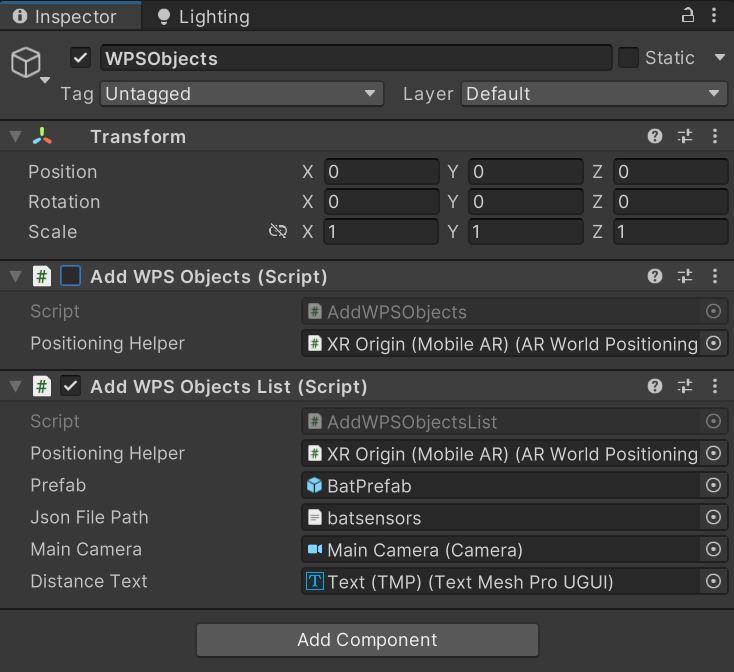
We can add the script to the same WPSObjects GameObject, paying attention to disable the old one (AddWPSObjects) and to fill the public variables
Build and test the app outdoor (it is possible to use it indoor, but the quality of the GPS signal might not be optimal)
Valve Steam Audio is a free, open-source spatial audio toolkit designed to create highly immersive soundscapes in VR and AR environments. It supports advanced features such as Sound Occlusion, to simulate how objects block or absorb sound, making audio behave realistically when sources are behind obstacles; Reflections and Reverb, how sound bounces off surfaces; HRTF-based Spatialization, Head-Related Transfer Functions to deliver accurate 3D positioning of sounds for headphones; Dynamic Geometry Handling, updating audio propagation in real time as environments change. Cross-Platform Integration works across Windows, Linux, and macOS.
- Download and install the Steam Audio Unity plugin. Inside the zip file, in the folder
Unityyou should find theSteamAudio.unitypackage - in
Edit -> Project Settings -> AudioselectSpatializer PlugintoSteam Audio Spatializer, andAmbisonic Decoder PlugintoSteam Audio Ambisonic Decoder - Open the Prefab
BatPrefaband add a new ComponentAudio Source - in the
Inspector PanelAudio Resourceadd an audio file (wav or mp3, use the Pluck sound or any other sounds from Freesound.org)- Spatialize
True - Loop
True - Spatial Blend
1
- Add a new component
Steam Audio Source- Distance Attenuation
Truewith inputPhysics Based - Directivity:
True
- Distance Attenuation
- Finally select the
Main Camerain theHierarchy Paneland control that a componentAudio Listeneris present
Build and Run the application