This workshop will show you how to:
- Add interaction using LeanTouch
- Animate and control animations
- Control a physical device or a remote service using MQTT
To complete this workshop you will need:
- Unity 6000.0 LTS
- M2MQTT library
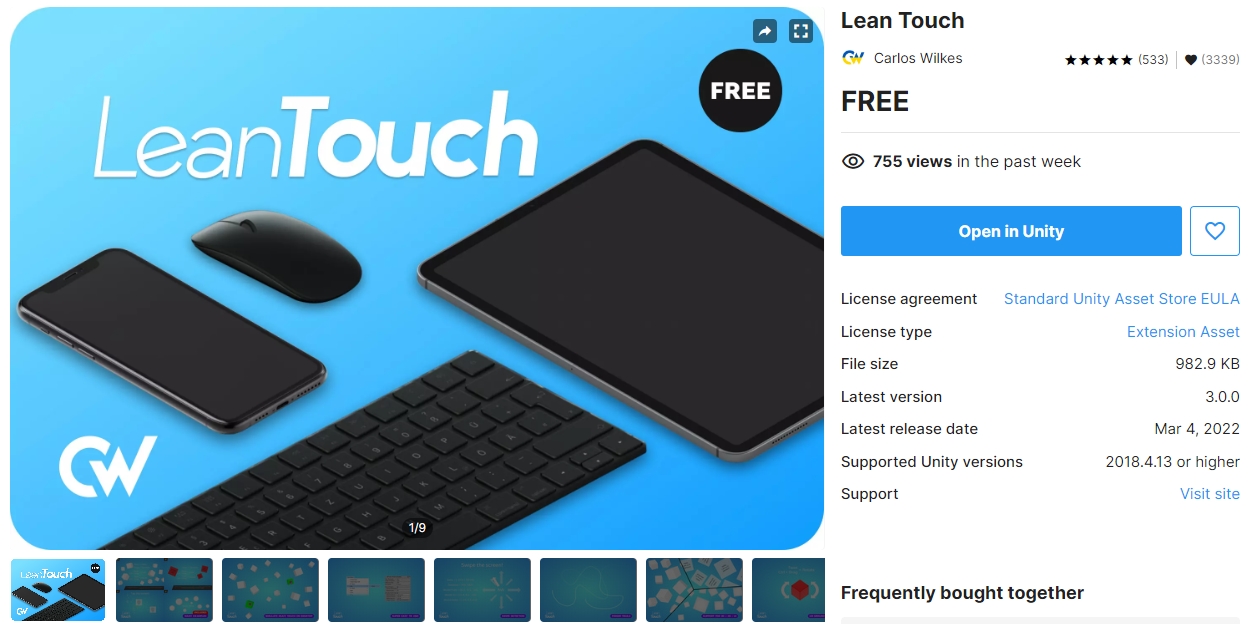
- Lean Touch Asset
- VS Code
- Unity scene with MQTT Gauge and UI
- Complete Workshop 6 project
Languages used:
- C#
Additional resources
With the main scene open, we need to import the Lean Touch Asset. Lean Touch provides a quick and easy way to add multiple gestures to an AR project without writing (almost) any code.
Installation is a two-step process, firstly you need to download the Unity Assets (there are two versions of LeanTouch, the Free version is enough for our needs) from the Unity Store, to add it to your asset collection.
Head to The Unity Store
Secondly, install it in Unity by going to Window -> Package Manager
Search under Packages: My Assests for Lean Touch, download and import.

Add the LeanTouch GameObject by right-clicking on the Hierarchy panel and Lean -> Touch.
Select it and in the Inspector click on Add Simulator

We now need to add the touch controls to the Prefab GameObject (e.g. ARObject), there are numerous options and Lean Touch can be used for any application with a touch screen.
Double-click your ARObject Prefab to open it in Edit mode and click on Add Component. If you type in Lean you will see a long list of options. The first one is Lean Selectable and we want to tick the Self Selected option, this simple makes sure our object is automatically selected and ready to touch.
- Add
Lean Pinch Scalewith Required Finger Count3; - Add
Lean Twist Rotate Axisand we are moving the y axis - so set y to1, with Required Finger Count2; - Add
Lean Drag Transaltewith Required Finger Count1;
As the Lean Drag Translate will be in conflict with the tapToPlace script, we can change the latter and use Lean touch for the input tap.
Exit from the Prefab editing mode.
Open the tapToPlace script in VSCode (tapToPlace should be attached to XROrigin GameObject).
The updated script needs to have:
- the
using Lean.Touch;at the top of the file - the two event listeners
onEnableandonDisable - the
Updatefunction commented out, with the newOnFingerTap(LeanFinger finger)function - the
timeThresholdvariable is not used anymore and it can be removed
The complete script will look like this:
using System.Collections.Generic;
using UnityEngine;
using UnityEngine.XR.ARFoundation;
using UnityEngine.XR.ARSubsystems;
using UnityEngine.InputSystem;

using Lean.Touch;


[RequireComponent(typeof(ARRaycastManager))]
public class tapToPlace : MonoBehaviour
{
    public GameObject gameObjectToInstantiate; //the Prefab GameObject to instantiate in the AR environment. To be added in the inspector window
    private GameObject spawnedObject; //the Prefab Instantiate in the scene. Used internally by the script
    private ARRaycastManager _arRaycastManager; //part of the XROrigin

    static List<ARRaycastHit> hits = new List<ARRaycastHit>();
    public float timeThreshold = 0.5f; //User need to tap and hold the finger for at least 0.5 sec to create the content
    public bool isTouching = false;

    //Event design to fire when content is created
    public delegate void ContentVisibleDelegate();
    public event ContentVisibleDelegate _contentVisibleEvent;

    private void Awake()
    {
        _arRaycastManager = GetComponent<ARRaycastManager>();
    }

    private void OnEnable()
    {
        LeanTouch.OnFingerTap += OnFingerTap;
    }

    private void OnDisable()
    {
        LeanTouch.OnFingerTap -= OnFingerTap;
    }

    public bool TryGetTouchPosition(out Vector2 touchPosition)
    {
        if (Touchscreen.current.primaryTouch.press.isPressed)
        {
            isTouching = true;
            touchPosition = Touchscreen.current.primaryTouch.position.ReadValue();
            return true;
        }
        touchPosition = default;
        isTouching = false;
        timeThreshold = 0;
        return false;
    }

    /*
    void Update()
     {
      [...]
     }
     */
    private void OnFingerTap(LeanFinger finger)
    {
        if (finger.TapCount == 2) // Check for double tap
        {
            Vector2 touchPosition = finger.ScreenPosition;

            if (_arRaycastManager.Raycast(touchPosition, hits, TrackableType.PlaneWithinPolygon))
            {
                var hitPose = hits[0].pose;

                if (spawnedObject == null)
                {
                    spawnedObject = Instantiate(gameObjectToInstantiate, hitPose.position, hitPose.rotation);
                    _contentVisibleEvent?.Invoke();
                }
                else
                {
                    spawnedObject.transform.position = hitPose.position;
                }
            }
        }
    }
}
Select the LeanTouch GameObject in the Hierarchy, and in the Inspector Panel:
- add a new component
Lean Select By Fingerand set the Camera to theMain Camerain the Scene
With the double tap we will create the object, and a single tap used to select the object (this is provided by the new tapToPlace script).
We also need to change the text in the C# script uiAR to Double Tap to Place
You should now be able to:
- double tap to place the object
- drag the object with one finger, also on vertical axis
- rotate the object with two fingers
- scale the object with three fingers
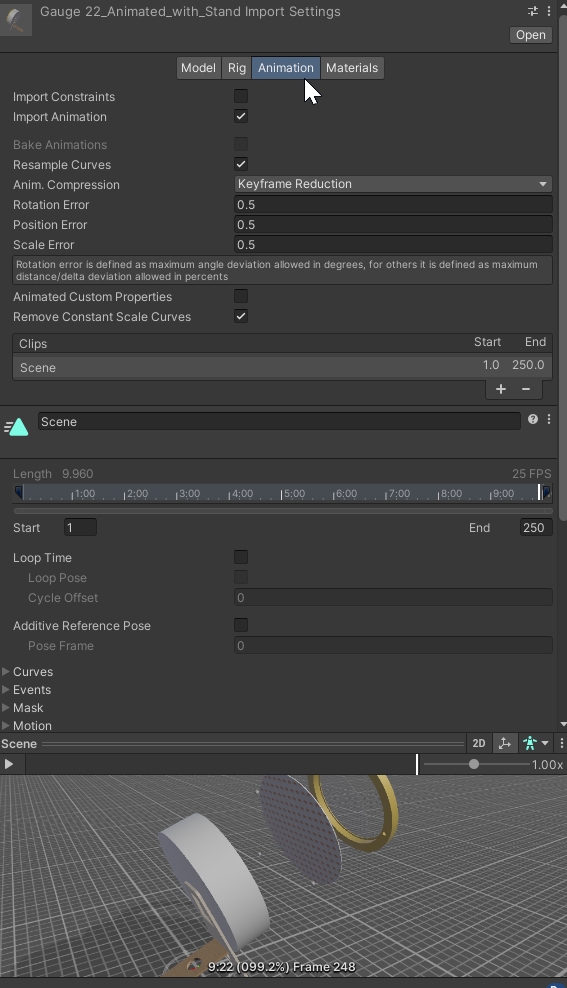
We are now going to play and control the animation of the gauge. It this example the animation needs to be part of the FBX object imported.
- Control from the Inspector that the animation exists and it has been imported
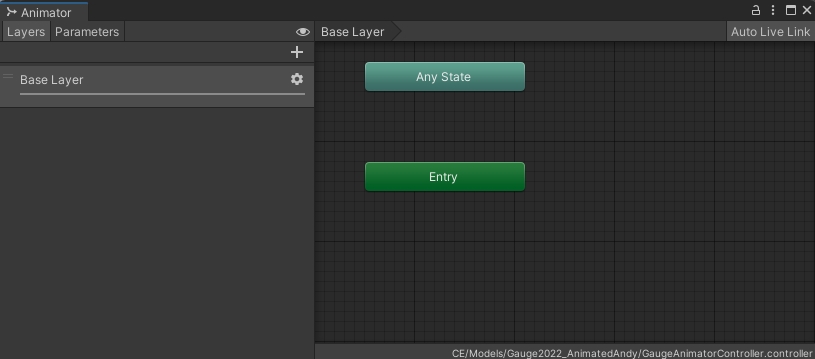
- Right click on the Project windows (a good location is the folder where the 3D model is located)
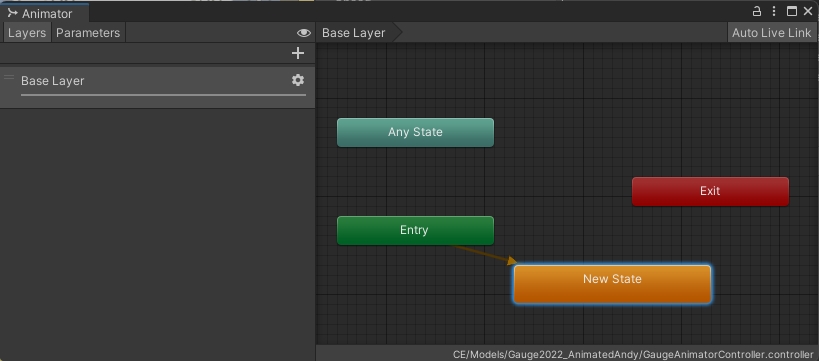
Create -> Animation -> Animator Controller, provide a name for the controller (i.e. GaugeAnimatorController) and double click on it to open theAnimation Panel.
- Right click on
Animation Panel, not on the three existing block (Any State, Entry, Exit), andCreate State -> Empty. ANew Stateblock, link with theEntryblock, will be created. If not automatically linked, select theEntryblock, right click on it andSet StateMachine Default Stateand create the link with theNew Stateblock.
- Drag and drop the 3D model with the animation on the
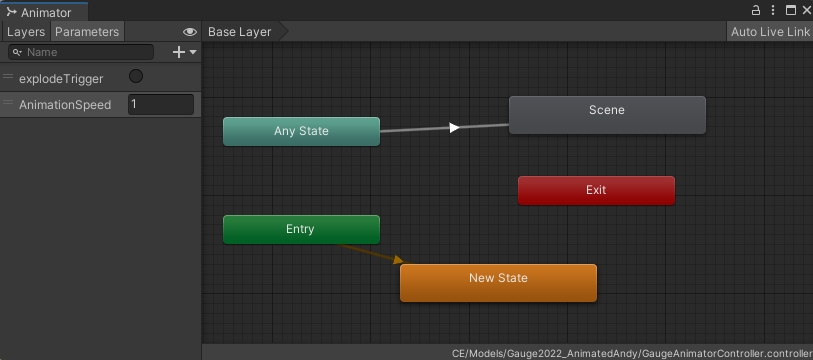
Animation Panel(not the Prefab, but the FBX imported in Unity). A new grey block with the name of the animation will appear (e.g. Scene). - Right click on
Any Stateblock and Make Transition with the new grey blockScene. - On the left side, select the tab Parameters press the
+button and add a Trigger namedexplodeTrigger(set to false, unchecked) and a Float namedAnimationSpeedto be set to 1.
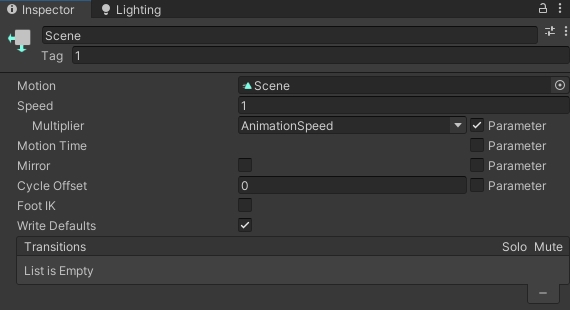
- with the grey block of the animation (Scene) selected, in the Inspector add the Tag
1(any value or name can be used), we will need this later. - tick the Parameter box next to the Multiplier field and select
AnimationSpeedfrom the drop-down menu
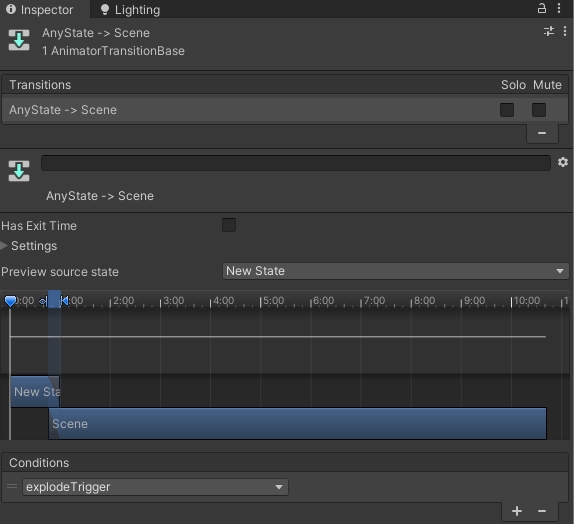
- In the
Animator Panelclick on the arrow that connectAny StatewithScene - in the
Inspector Paneladd a new Conditions and setexplodeTriggeras conditions to start the animation.
The Animator controller is now ready to be connected with a user interface. In this example we are controlling the animation using the Lean Touch asset. Specifically, we want to use a single tap on the object to start the animation (explodeTrigger), and another single tap on the object to play the animation backwards (AnimationSpeed from 1 to -1).
- double click the
ARObjectprefab to open the Prefab Edit view - add a new component
Animatorto the gauge model inside the Prefab (not the parent Prefab) and add to the Controller the GaugeAnimatorController - Create a new MonoBehaviour script
animationExplodeand add it to the gauge model inside the Prefab (not the parent Prefab). Open the script and add the following code blocks: - Code block 1 / 3
using UnityEngine;
[RequireComponent(typeof(Animator))]
public class animationExplode : MonoBehaviour
{
    Animator animator;
    float speed;
    bool isExploding = false;

    void Start()
    {
        //Get Animator component
        animator = GetComponent<Animator>();
        speed = animator.GetFloat("AnimationSpeed");
    }
The [RequireComponent(typeof(Animator))] ensure that the component Animator is added to the GameObject. The variable speed is used in this case to control the direction of the animation.
- Code block 2 / 3
public void Explosion()
    {
        if (isExploding == false)
        {
            //Add a Tag value to the animation block, select the animation block from the Animator Controlelr and set its Tag in the Inspector
            if (animator.GetCurrentAnimatorStateInfo(0).IsTag("1"))
            {
                speed = 1;
                animator.SetFloat("AnimationSpeed", speed);
                isExploding = true;
            }
            else
            {
                animator.SetTrigger("explodeTrigger");
                isExploding = true;
            }

        }

        else
        {
            if (animator.GetCurrentAnimatorStateInfo(0).IsTag("1"))
            {
                speed = -1;
                animator.SetFloat("AnimationSpeed", speed);
                isExploding = false;
            }
            else
            {
                speed = -1;
                animator.SetFloat("AnimationSpeed", speed);
                animator.SetTrigger("explodeTrigger");
                isExploding = false;
            }

        }
    }
The Explosion function is used to control the animation and it will be trigger when the ARObject is selected using a Lean Finger Tap.
- Code block 3 / 3
    void Update()
    {

        if (animator.GetCurrentAnimatorStateInfo(0).IsTag("1") && animator.GetCurrentAnimatorStateInfo(0).normalizedTime > 1)
        {
            animator.Play("Scene", -1, 1);
        }
        else if (animator.GetCurrentAnimatorStateInfo(0).IsTag("1") && animator.GetCurrentAnimatorStateInfo(0).normalizedTime < 0)
        {
            animator.Play("Scene", -1, 0);
        }
    }
}
The Update function contains a conditional function to control when the animation is finished (to reset its Time to 0 or 1).
- still in the Prefab Edit Mode, remove the Self Selected option from the
Lean Selectablecomponent of the parentARObject - On the same
Lean Selectablecomponent, expand Show Unused Events, add a new one in OnSelected, and add drag the Gauge model inside the prefab on it and select the component animationExplode.Explosion() - Check that the components
Lean Pinch Scale,Lean Twist Rotate Axis,Lean Drag Translatehave on the Required Selectable the Prefab of the Gauge itself. You should see in the fieldARObject (Lean Selectable)(or the name you gave to the Gauge) - Finally add a new component
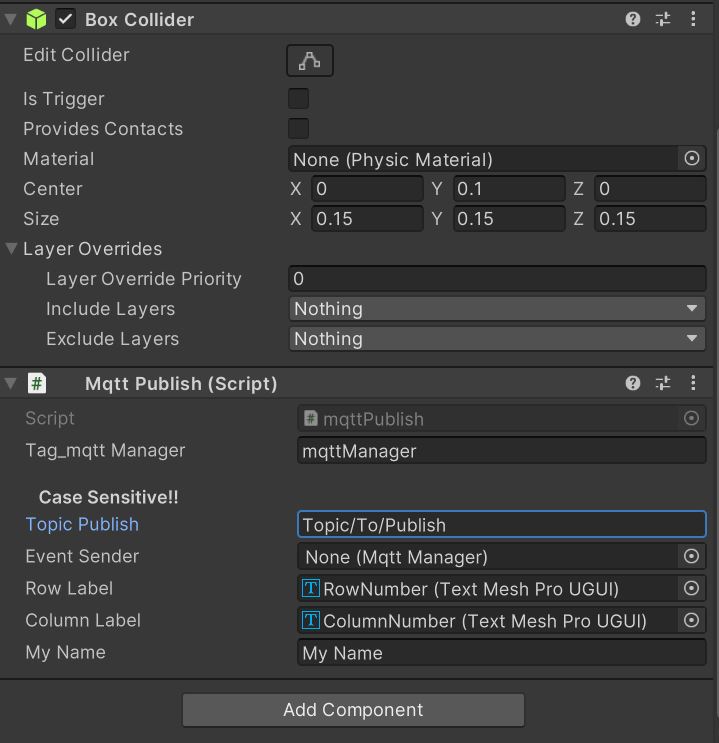
Box Colliderto the parent Prefab of the Gauge. Set Size (e.g.0.15 0.1 0.15) and Centre to fit the Gauge (e.g.y 0.1)
Exit the Prefab Edit Mode and select the LeanTouch GameObject in the Hierarchy window and in the Inspector window
- add a new component
Lean Finger Tap - expand the
Show Unused Eventsand add a new one to theOn Finger - add the
LeanTouchGameObject itself to the field and, on the No Function dropdown menu, selectLeanSelectByFinger -> SelectScreenPosition
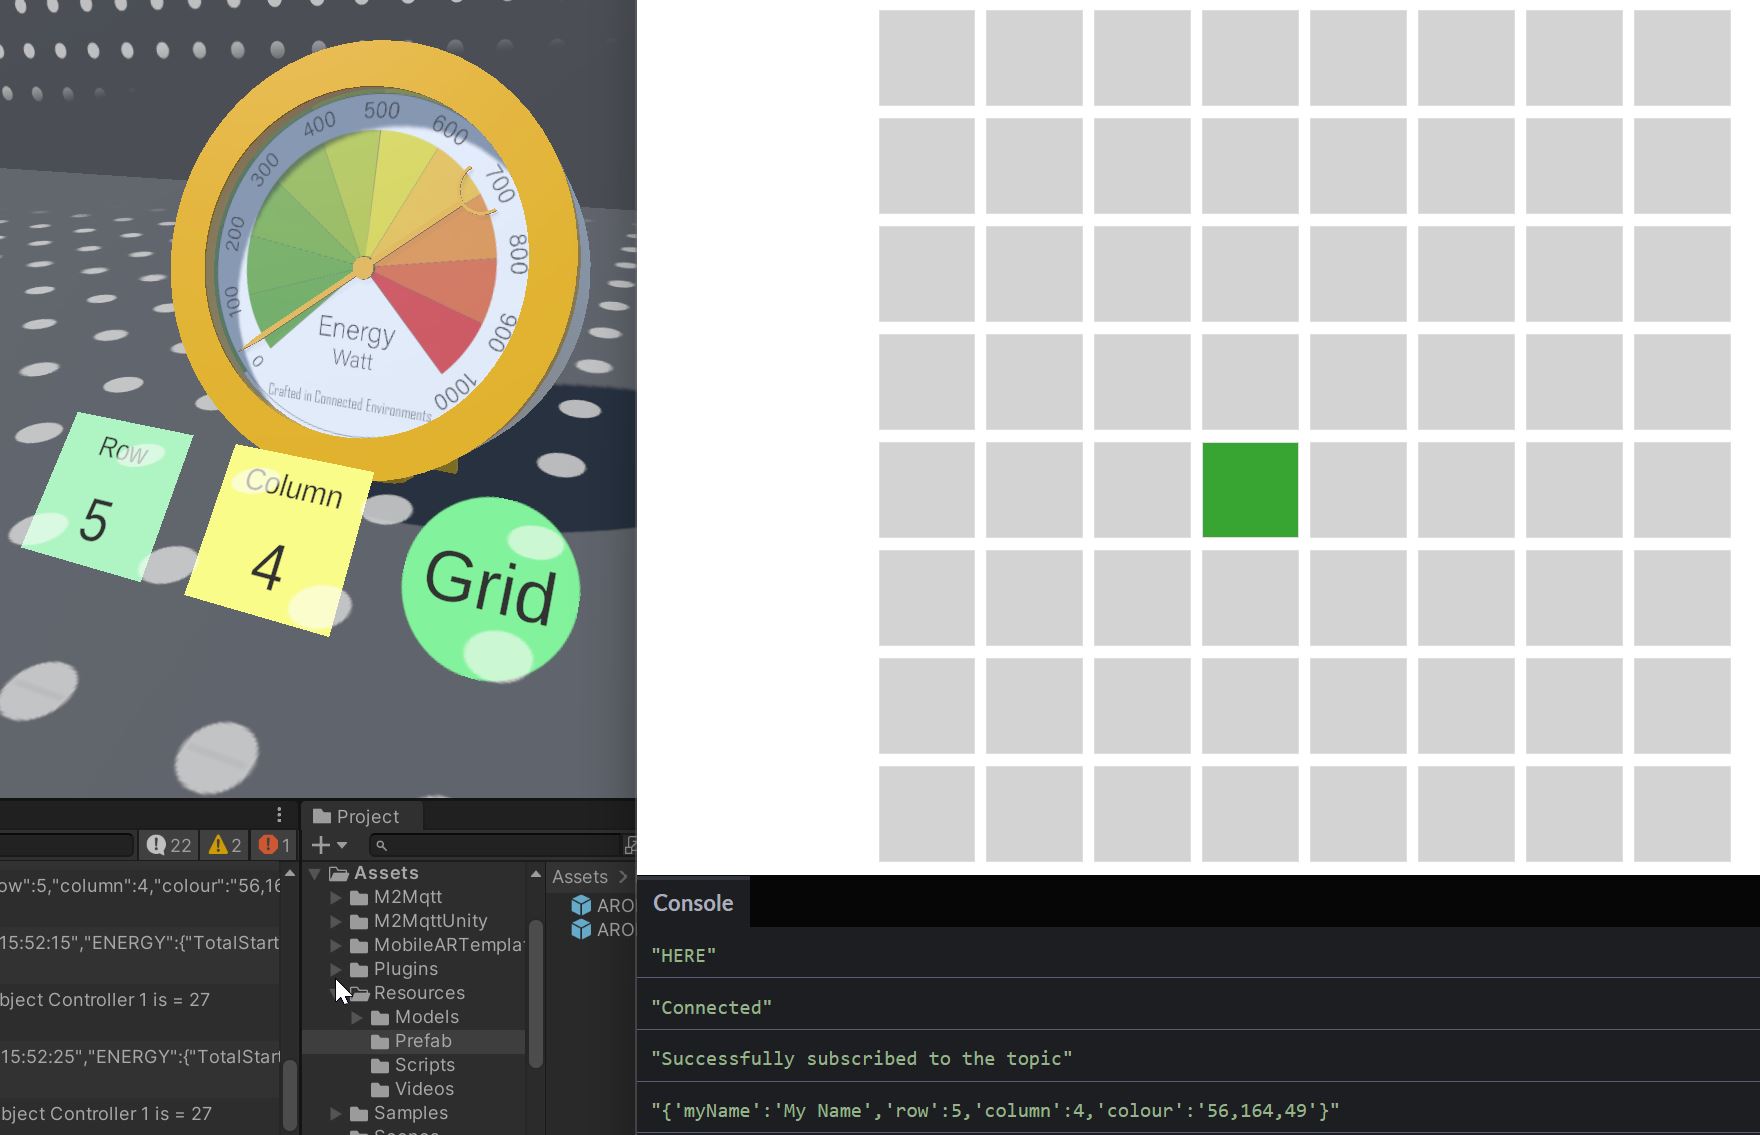
You can now Build and Run your project, or run in the simulator, to place the digital gauge in your environment.
In the same way we can control a digital object using MQTT, we can use the same library to publish MQTT messages and therefore control physical devices or other services from the AR mobile app. In this example, we will use the AR app to control a custom website.
Open the Prefab ARObject in Prefab Edit Mode
- Add a new
UI -> Canvasto the root, select it, and in theInspector window- change
Canvas -> Render ModetoWorld Space - set
Pos X = 0; Pos Y= 0.1; Pos Z = 0;width = 0.2; height = 0.2 - add a
Horizontal Layout Groupwith Child Alignment set toLower Center
- change
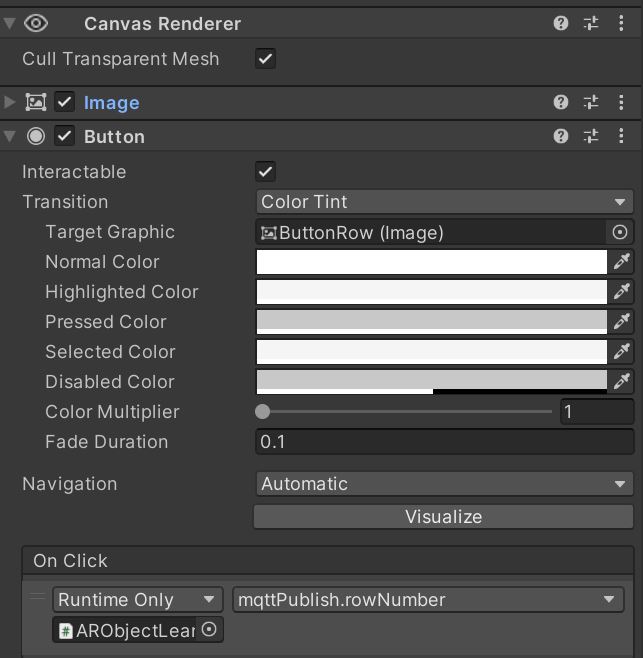
- Add a
UI -> Button - TextMeshProto theCanvasand rename it ButtonRow, select it, and in theInspector window- set
Pos Z = -0.1 width = 0.05 ; height = 0.05rotation X = 45- remove the
Source ImagefromImageand change colour - Add a
Vertical Layout Groupwith Child Alignment set toMiddle Centerand only Control Child Size selected (bothWidthandHeight), so uncheck Child Force Expand - Expand the
ButtonRowand duplicate theText (TMP)- rename the first
Text (TMP)toRowand in theInspector windowchange the Text toRowand the FontSize to0.01 - rename the second
Text (TMP)toRowNumberand in theInspector windowchange the Text to1and the FontSize to0.02
- rename the first
- set
- Duplicate the ButtonRow and rename the various components (ButtonRow to ButtonColumn and Row to Column)
- Duplicate, once again, the just created and renamed ButtonColumn and rename in ButtonGrid
- Remove the
columnNumberand rename the GameObject Column to Grid and change the Text accordingly
- Remove the
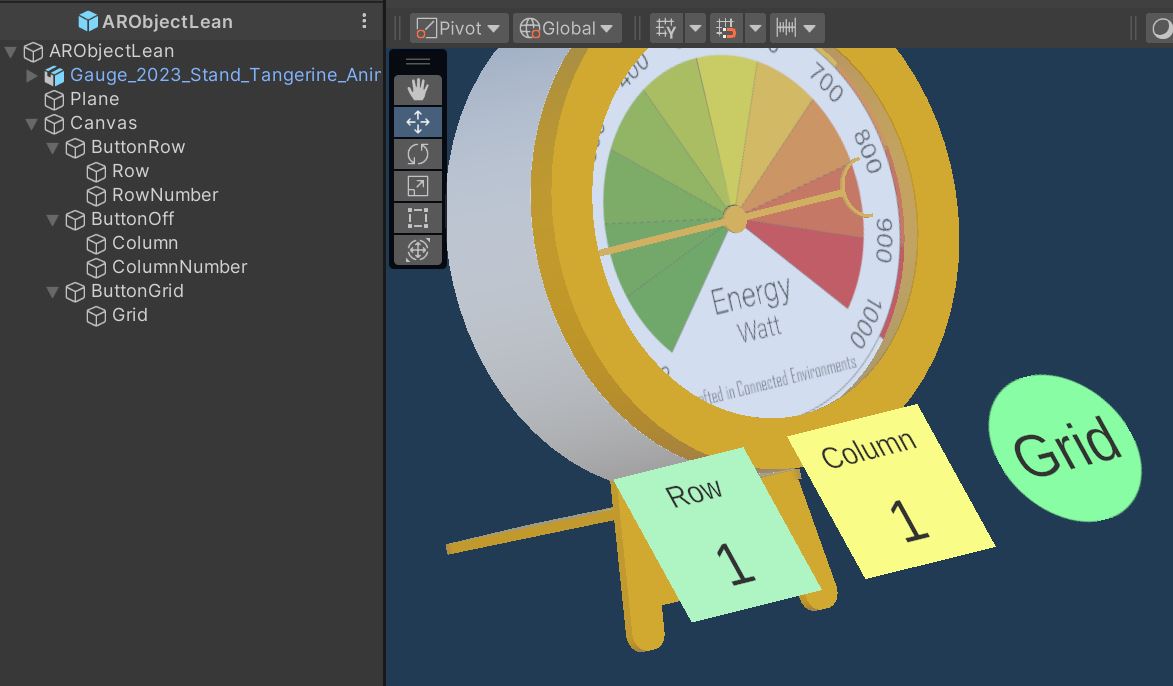
The structure in the Hierarchy should look like this
We now need to create a new script named mqttPublish to publish the message to the broker
using UnityEngine;
using TMPro;

public class mqttPublish : MonoBehaviour
{
    public string tag_mqttManager = ""; //to be set on the Inspector panel. It must match one of the mqttManager.cs GameObject
    [Header("   Case Sensitive!!")]
    [Tooltip("the topic to publish !!Case Sensitive!! ")]
    public string topicPublish = ""; //the topic to subscribe
    public mqttManager _eventSender;
    private bool _connected;
    private int row = 1;
    private int column = 1;
    private int[] colour;
    public TextMeshProUGUI rowLabel;
    public TextMeshProUGUI columnLabel;
    public string myName;
    private string messagePublish = "";

    void Awake()
    {
        if (GameObject.FindGameObjectsWithTag(tag_mqttManager).Length > 0)
        {
            _eventSender = GameObject.FindGameObjectsWithTag(tag_mqttManager)[0].gameObject.GetComponent<mqttManager>();
            _eventSender.OnConnectionSucceeded += OnConnectionSucceededHandler;
        }
        else
        {
            Debug.LogError("At least one GameObject with mqttManager component and Tag == tag_mqttManager needs to be provided");
        }
    }

    private void OnConnectionSucceededHandler(bool connected)
    {
        _connected = true; //control if we are connected to the MQTT Broker
    }

    public void rowNumber()
    {
        row = (++row > 8) ? 1 : row;
        rowLabel.text = row.ToString();
    }

    public void columnNumber()
    {
        column = (++column > 8) ? 1 : column;
        columnLabel.text = column.ToString();
    }

    public void Grid()
    {
        colour = new int[3] {
            UnityEngine.Random.Range(0, 256), // Range: 0-255
            UnityEngine.Random.Range(0, 256), // Range: 0-255
            UnityEngine.Random.Range(0, 256)  // Range: 0-255
        };

        messagePublish = "{\"myName\":\"" + myName + "\",\"row\":" + row + ",\"column\":" + column + ",\"colour\":\"" + colour[0] + "," + colour[1] + "," + colour[2] + "\"}";

        if (!_connected) //publish if connected
            return;
        //if the messagePublish is null, use the one of the MQTTReceiver
        if (messagePublish.Length > 0)
        {
            _eventSender.topicPublish = topicPublish;
            _eventSender.messagePublish = messagePublish;
        }

        _eventSender.topicPublish = topicPublish;
        _eventSender.Publish();
        Debug.Log("Publish" + messagePublish);
    }
}
Attach the script to the root of the prefab (e.g. ARObject)
- set the Tag of the
mqttManager - set the
Topic Publish(e.g.group/your ID/grid) - select the two labels of the Buttons (
RowNumberandColumnNumber) - set your name in the
My Namefield
Before closing the Prefab Edit Mode set the behaviour of the three buttons
- select the
ButtonRowand in theInspector, under Button, add a new event On Click. Drag in the empty field the Prefab root (e.g.ARObjectwith themqttPublishscript attached) - on the dropdown menu select
mqttPublish -> rowNumber - repeat the same for the other buttons selecting the right function to trigger (e.g.
mqttPublish -> columnNumberandmqttPublish -> Grid)
Additionally, we need to set the user ID and password in the mqttManager and change the port accordingly for the MQTT service. Build and Run the project or run in the simulator.
On this GridTTQ CodePen can be use to see if the publishing is working correctly