This workshop will show you how to:
- Add UI elements and interactivity to the AR experience
- Add charts to visualise real time data
To complete this workshop you will need:
- Unity 2022.3 LTS or above
- UX Video from arfoundation-demos repository
- VS Code
- Unity scene with MQTT Gauge and ARFoundation set up
Languages used:
- C#
Additional resources
The onboarding experience is an important aspect of any AR app. Its main purpose is to provide users with straightforward information on how to use the app. While each application will have specific instructions, the initial steps (e.g., finding a plane, placing an object) are commonly used in any application. There are no specific rules on how the onboarding experience needs to be; the important part is that the user needs to be informed from the beginning about what they need to do to use the application (e.g., which button to press, which actions to perform).
Overlays video
One effective solution is to add overlaid videos and/or text to alert the user. Both uGUI and UIToolkit can be used for displaying and controlling the user interface. In this tutorial, we are going to use the new uGUI system.
Canvas Screen space
Before building the UI we need to import the onboarding AR videos. Import the findaplane.webm and taptoplace.webm in a subfolder of the Assets.
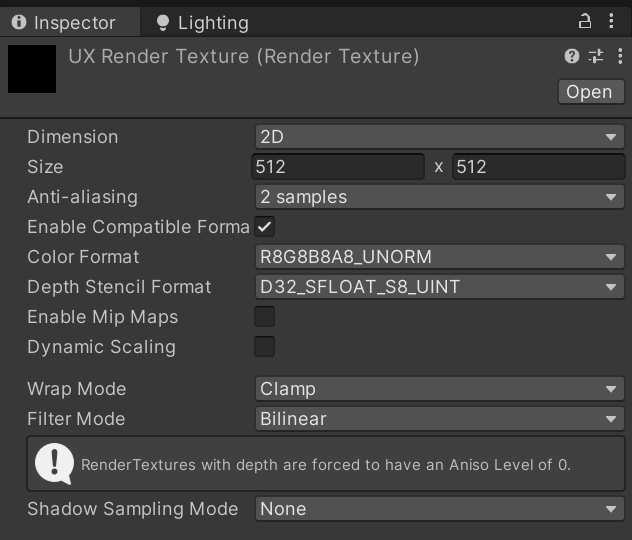
Inside the same subfolder create a RenderTexture named UXRenderTextureand change the size to 512 x 512 in the Inspector window and Anti-aliasing to 2 samples
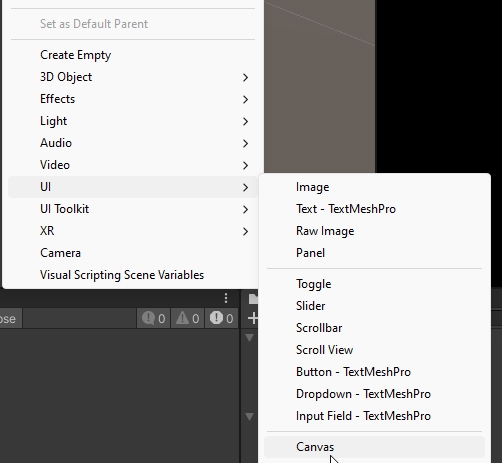
Create a new UI -> Canvas and change the name to Onboarding
In the Inspector Window:
- Render Mode: Screen Space - Overlay
- Pixel perfect: check
- Canvas Scaler: Scale with screen with Size
x:1080 y:1920
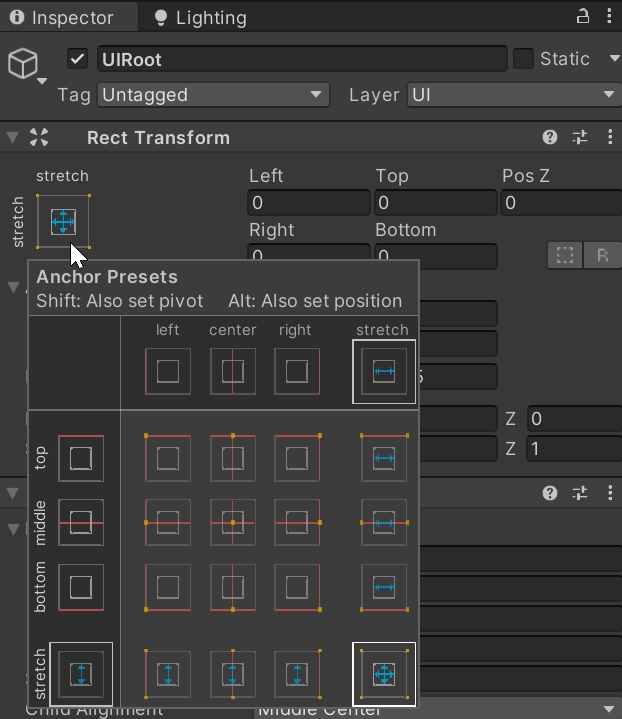
Create a new Empty Game Object inside the Canvas GameObject and name it UIRoot this is going to be the container of the UI.
With the UIRoot selected, in the Inspector Window:
- change the pivot to
Stretch Stretchand set all the properties to 0 (i.e. Top Left Pos Z Right Bottom)
- Add a new component
Vertical Layout Group, this will help to organise the three additional UI components we need to create. Set the following parameters:- Spacing:
100 - Child Alignment:
Middle Centre - Control Child Size:
WidthandHeight - Child Force Expand:
Height
- Spacing:
We can now add the actual components that hold the UX information, a UI -> Text - TextMeshPro, named Info1, an Empty Game Object named Video and another UI -> Text - TextMeshPro named Info2. The order of these components in the Hierarchy Panel is important.
With both Info1 and Info2 selected, in the Inspector Window:
- Add a
Layout Elementcomponent and set the min width to 1080 - in the
TextMeshPro - Text (UI)component, check the Auto Size and set themin 70; max 100and alignment tomiddle and centre
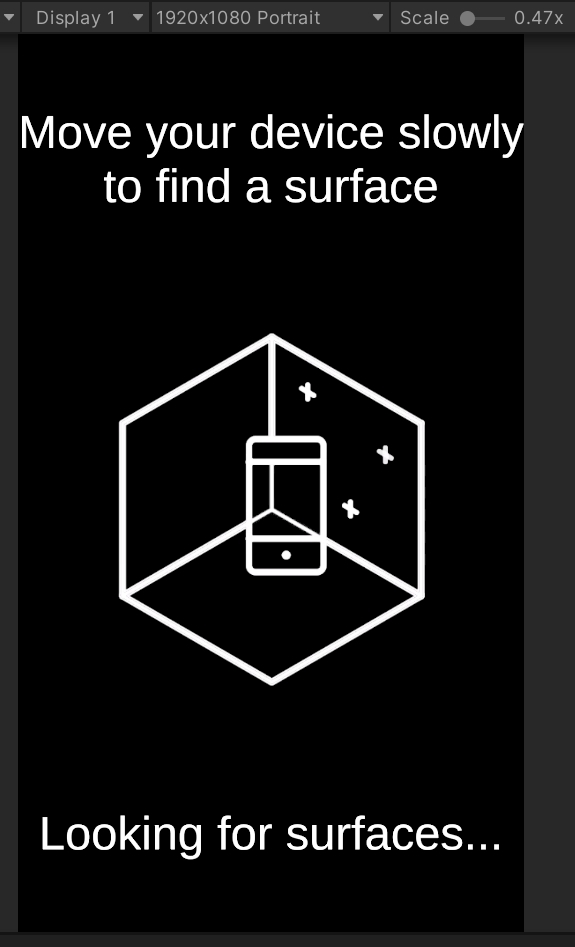
Select the Info1 GameObject and in the TextMeshPro - Text (UI) component change the text input to:
Move your device slowly to find a surface
Similarly, for the Info2, change the text to:
Looking for surfaces...
Select the the Video GameObject, and in the Inspector Window:
- add a
Layout Elementcomponent with bothMin Size Width and Height450 - add a
Vertical Layout Group:- Alignment:
Middle Centre - Child Size:
WidthandHeight - Force to Expand:
WidthandHeight
- Alignment:
Finally, add to the Video GameObject a new UI -> Raw Image and named it videoUX, and in the Inspector Window:
- Control that the
Rect transformis set toStretch Stretchand Pivot isX 0.5; Y 1 - Add a
Video Playercomponent- Video Clip:
findaplane - Play On Awake:
check - Loop:
check - Target Texture:
UXRenderTexture
- Video Clip:
- Add an
Aspect Ratio Fittercomponent- Aspect Mode:
Fit In Parent - Aspect Ratio:
1
- Aspect Mode:
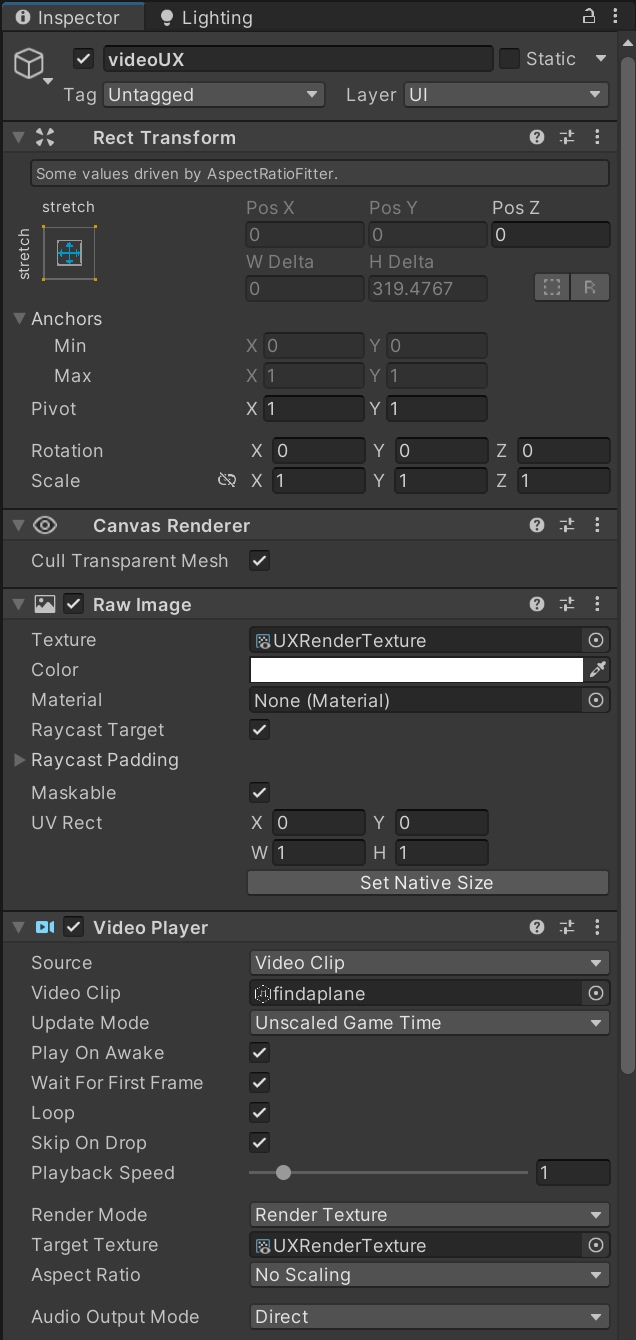
Press Play, you should be able to see the UI interface and the video running in the centre
Control the UI
The final step is to make the UI respond to the underlying ARFoundation system. This involves changing the text and video when the surface is found and removing the interface once the user places the object. This functionality is controlled by a new C# script.
Create a new script named uiAR
using UnityEngine;
using UnityEngine.Video;
using UnityEngine.XR.ARFoundation;
using TMPro;
//Script need to be added to XROrigin, as it has ARPlaneManager and tapToPlace
public class uiAR : MonoBehaviour
{
//Video player
public VideoPlayer videoUX;
//Video Clips
public VideoClip v_findSurface;
public VideoClip v_tapPlace;
//Info texts
public TextMeshProUGUI t_info1;
public TextMeshProUGUI t_info2;
// Events for found plane and content created
private ARPlaneManager m_ARPlaneManager; //ARFoundation system
private tapToPlace m_tapToPlace; //used to detect when the user create the content
bool isContentVisible = false;
// Start is called before the first frame update
private void Awake()
{
videoUX.clip = v_findSurface;
m_ARPlaneManager = GetComponent<ARPlaneManager>();
m_ARPlaneManager.planesChanged += planeFound; //Subscribe to the event `plane is detected`
m_tapToPlace = GetComponent<tapToPlace>();
m_tapToPlace._contentVisibleEvent += contentVisible; //Subscribe to the event `content is created` (user Tap)
}
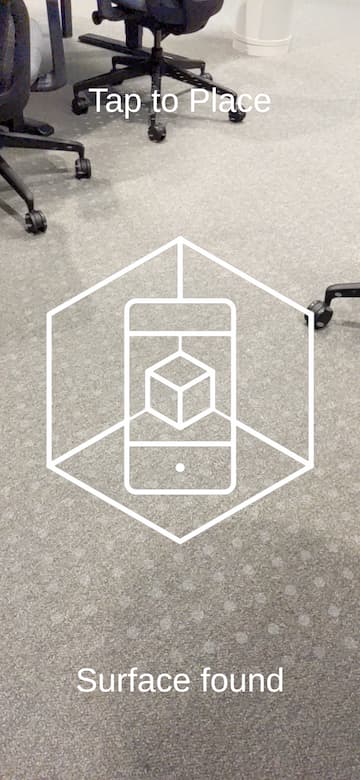
void planeFound(ARPlanesChangedEventArgs args)
{
//Plane found, turn off UI and Video
videoUX.clip = v_tapPlace;
t_info1.text = "Tap to Place";
t_info2.text = "Surface found";
m_ARPlaneManager.planesChanged -= planeFound; //Unsubcribe
if (isContentVisible)
{ //Content created, turn off UI and Video
videoUX.gameObject.SetActive(false);
t_info1.gameObject.SetActive(false);
t_info2.gameObject.SetActive(false);
}
}
void contentVisible()
{
isContentVisible = true; //if the content is visible
m_tapToPlace._contentVisibleEvent -= contentVisible; //Unsubscribe
//Content created, turn off UI and Video
videoUX.gameObject.SetActive(false);
t_info1.gameObject.SetActive(false);
t_info2.gameObject.SetActive(false);
}
}
Add the script to the XR Origin GameObject and set the public variables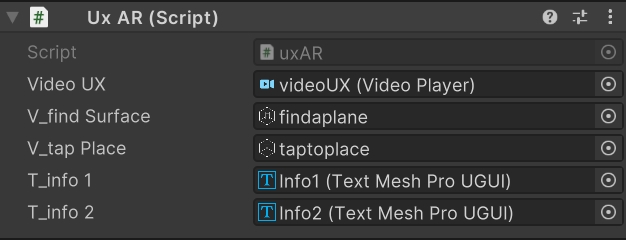
In order to see the script in action we need to build and deploy the App
The Lean Touch Asset provides a quick and easy way to add multiple gestures to your AR project without writing (almost) any code.
Installation is a two-step process, firstly you need to download the Unity Assets (there are two versions of LeanTouch, the Free version is enough for our needs) from the Unity Store, to add it to your asset collection.
Head to The Unity Store
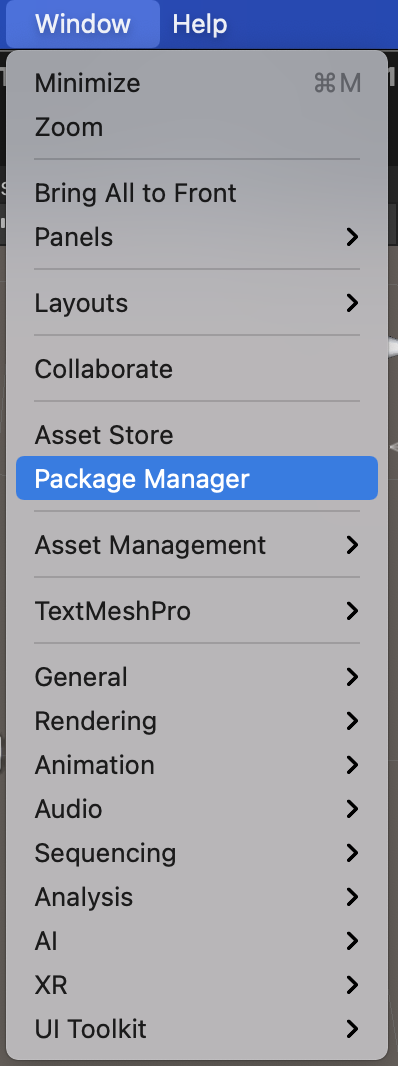
Secondly, install it in Unity by going to Window -> Package Manager
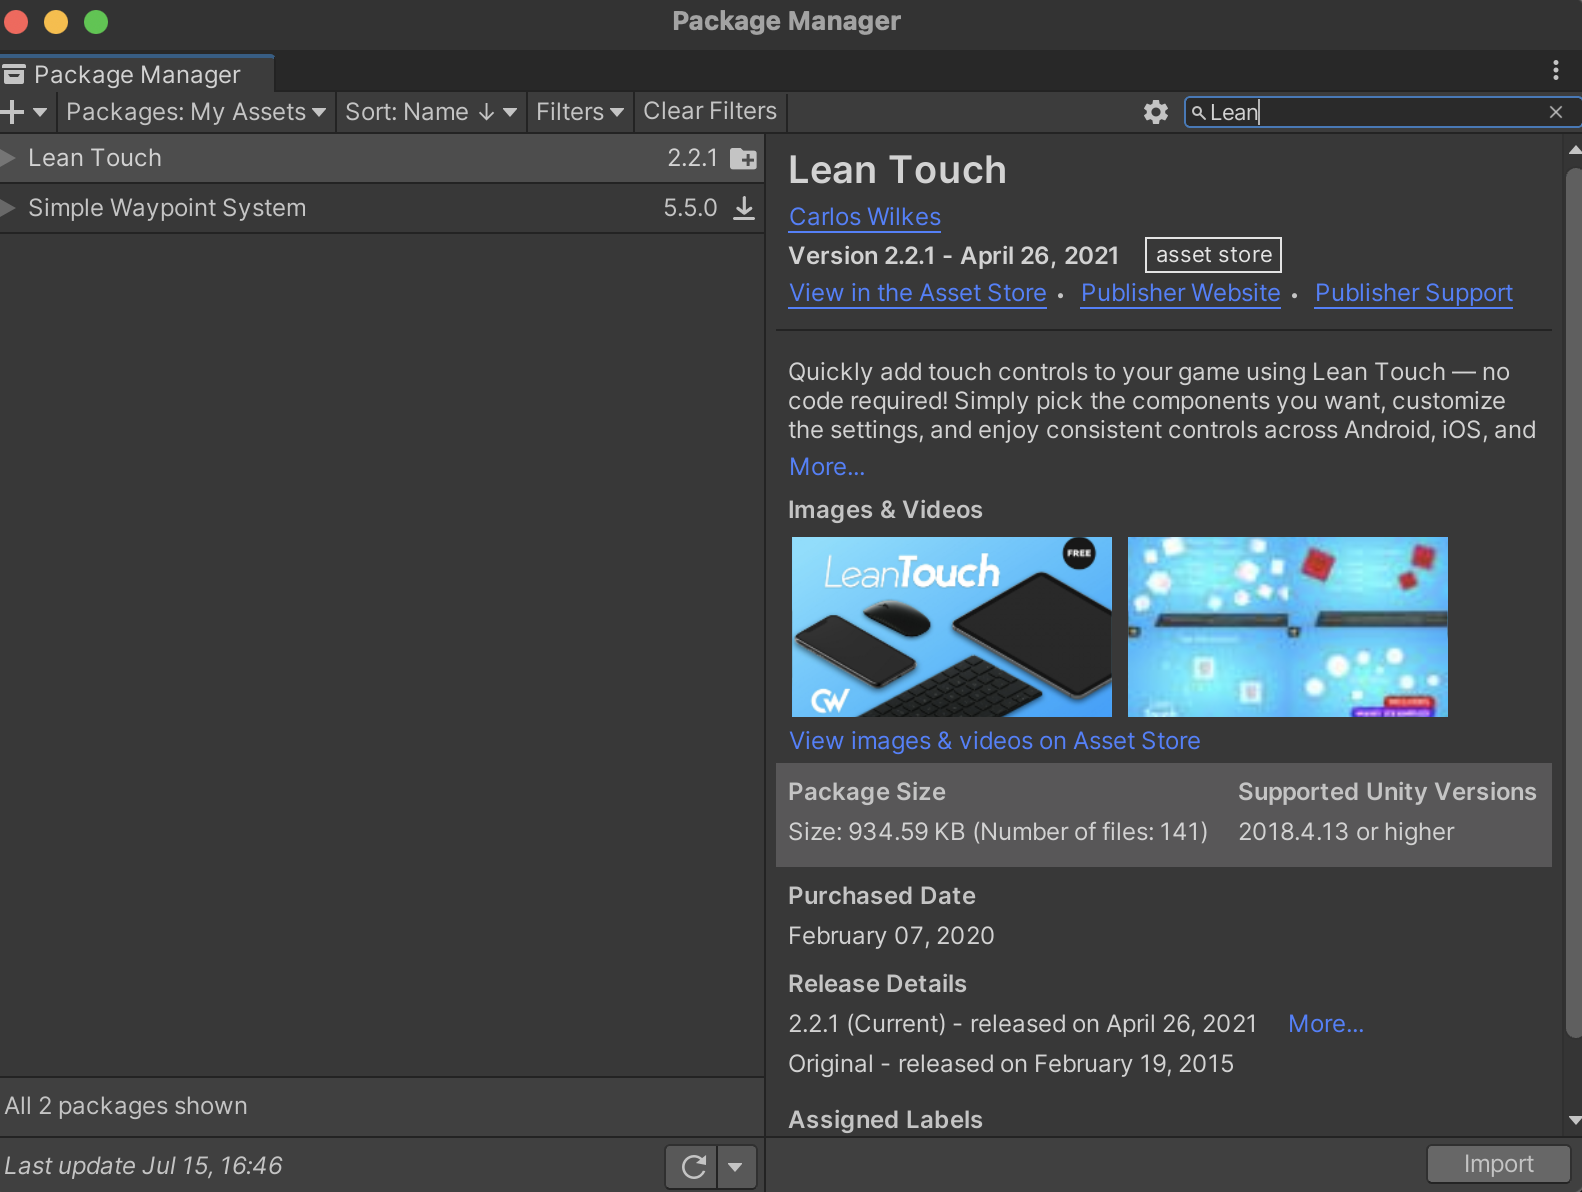
Search under Packages: My Assests for Lean Touch, download and import.
Add the LeanTouch GameObject by right-clicking on the Hierarchy panelLean -> Touch
We now need to add the touch controls to our object (ARGauge) - there are numerous options and Lean Touch can be used for any application with a touch screen.
Double-click your AR Object Prefab to open it in Edit mode and Add Component. If you type in Lean you will see a long list of options. Our first one is Lean Selectable and we want to tick the Self Selected option - this simple makes sure our object is automatically selected and ready to touch.
- Add
Lean Pinch Scalewith Required Finger Count3; - Add
Lean Twist Rotate Axisand we are moving the y axis - so set y to1, with Required Finger Count2; - Add
Lean Drag Transaltewith Required Finger Count1;
As the Lean Drag Translate will be in conflict with the tapToPlace script, we can change the latter and use Lean touch for the input tap.
Open the tapToPlace script in VSCode (tapToPlace should be attached to XROrigin GameObject), comment out the Update function and add a new spawnObject() function. The timeThreshold variable is not used anymore
using System.Collections.Generic;
using UnityEngine;
using UnityEngine.XR.ARFoundation;
using UnityEngine.XR.ARSubsystems;

[RequireComponent(typeof(ARRaycastManager))]
public class tapToPlace : MonoBehaviour
{
    public GameObject gameObjectToInstantiate; //the Prefab GameObject to instantiate in the AR environment. To be added in the inspector window
    public GameObject spawnedObject; //the Prefab Instantiate in the scene. Used internally by the script
    private ARRaycastManager _arRaycastManager; //part of the XROrigin
    private Vector2 touchPosition; //XZ position of the user Tap

    static List<ARRaycastHit> hits = new List<ARRaycastHit>();
    public float timeThreshold = 0.5f; //User need to tap and hold the finger for at least 0.5 sec to create the content
    public bool isTouching = false;


    public delegate void ContentVisibleDelegate();
    public event ContentVisibleDelegate _contentVisibleEvent;

    private void Awake()
    {
        _arRaycastManager = GetComponent<ARRaycastManager>();
    }

    public bool TryGetTouchPosition(out Vector2 touchPosition)
    {
        if (Input.touchCount > 0)
        {
            isTouching = true;
            touchPosition = Input.GetTouch(index: 0).position;
            return true;
        }
        touchPosition = default;
        isTouching = false;
        timeThreshold = 0;
        return false;
    }
/*
  void Update()
    {
       [...]
    }
*/
public void spawnObject()
{
    if (!TryGetTouchPosition(out Vector2 touchPosition))
        return;

    if (_arRaycastManager.Raycast(touchPosition, hits, trackableTypes: TrackableType.PlaneWithinPolygon))
    {
    var hitPose = hits[0].pose;
        if (spawnedObject == null)
           {
            spawnedObject = Instantiate(gameObjectToInstantiate, hitPose.position, hitPose.rotation);
            _contentVisibleEvent();
        }
        else
        {
            spawnedObject.transform.position = hitPose.position;
        }
    }
}
}
Exit from the Prefab editing mode and select the LeanTouch GameObject, in the Inspector Panel:
- add a new component
Lean Select By Fingerand set the Camera to theMain Camerain the Scene - add a new component
Lean Finger Tap, setRequired Tap Intervalto1and, in the Show Unused Events drag theLean TouchGameObject itself on a new event inside theOn Finger (LeanFinger)and chose from the dropdown menuLeanSelectByFinger.SelectScreenPosition - add another
Lean Finger Tap, setRequired Tap Intervalto2(this is a double tap). Expand the Show Unused Events and, on the OnFinger (LeanFinger) event drag theXR OriginGameObject. Target the event to the componenttapToPlaceand the public functionspawnObject().
We will now have two Lean Finger Tap, one with the double tap to create the object, and one with a single tap used to select the object.
Change also the text in the script uxAR to Double Tap to Place
You should now be able to:
- double tap to place the object
- drag the object with one finger, also on vertical axis
- rotate the object with two fingers
- scale the object with three fingers
Designing dashboards and charts in Unity can be very challenging without dedicated add-ons. XCharts is a community plugin that takes away the most complex coding part leaving the user a flexible tool to design and customise different chart types with ease. Most of the charts are part of the package delivered with an MIT licence.
Download and install the Unity XCharts 3.8.0 package
The chart can be added directly to the UI, as part of the Screen Space or as a 3D object in the World Space.
To add the chart next to the gauge, open the Prefab and in the Prefab editor right click in the Hierarchy panel and create a UI -> Canvas, right click on it and create a XCharts -> Line Chart.
As XCharts is based on the uGUI system, it will create a new Canvas GameObject as a parent of the selected chart. However, if a Canvas already exists, like the one used for the UI system, it will create the chart inside that one.
By default, the Canvas GameObject is set to Screen Space. select the Canvas GameObject and in the Inspector panel change the Canvas -> Render Mode to World Space.
At this point it is possible to change the scale and position of the Canvas GameObject, e.g.:
- Pos X: 0.25; Pos Y: 0.15; Pos Z: 0.0
- Width: 600; Height: 400
- Scale: 0.0005
The style of the chart is entirely customisable from the Inspector panel, after selecting the Line Chart GameObject from the Hierarchy Panel.
Select the Anchor Presetscenter - middle
- Pos X: 0.0; Pos Y: 0.0; Pos Z: 0.0
- Width: 600; Height: 400
The following is just an example of the style that can be set:
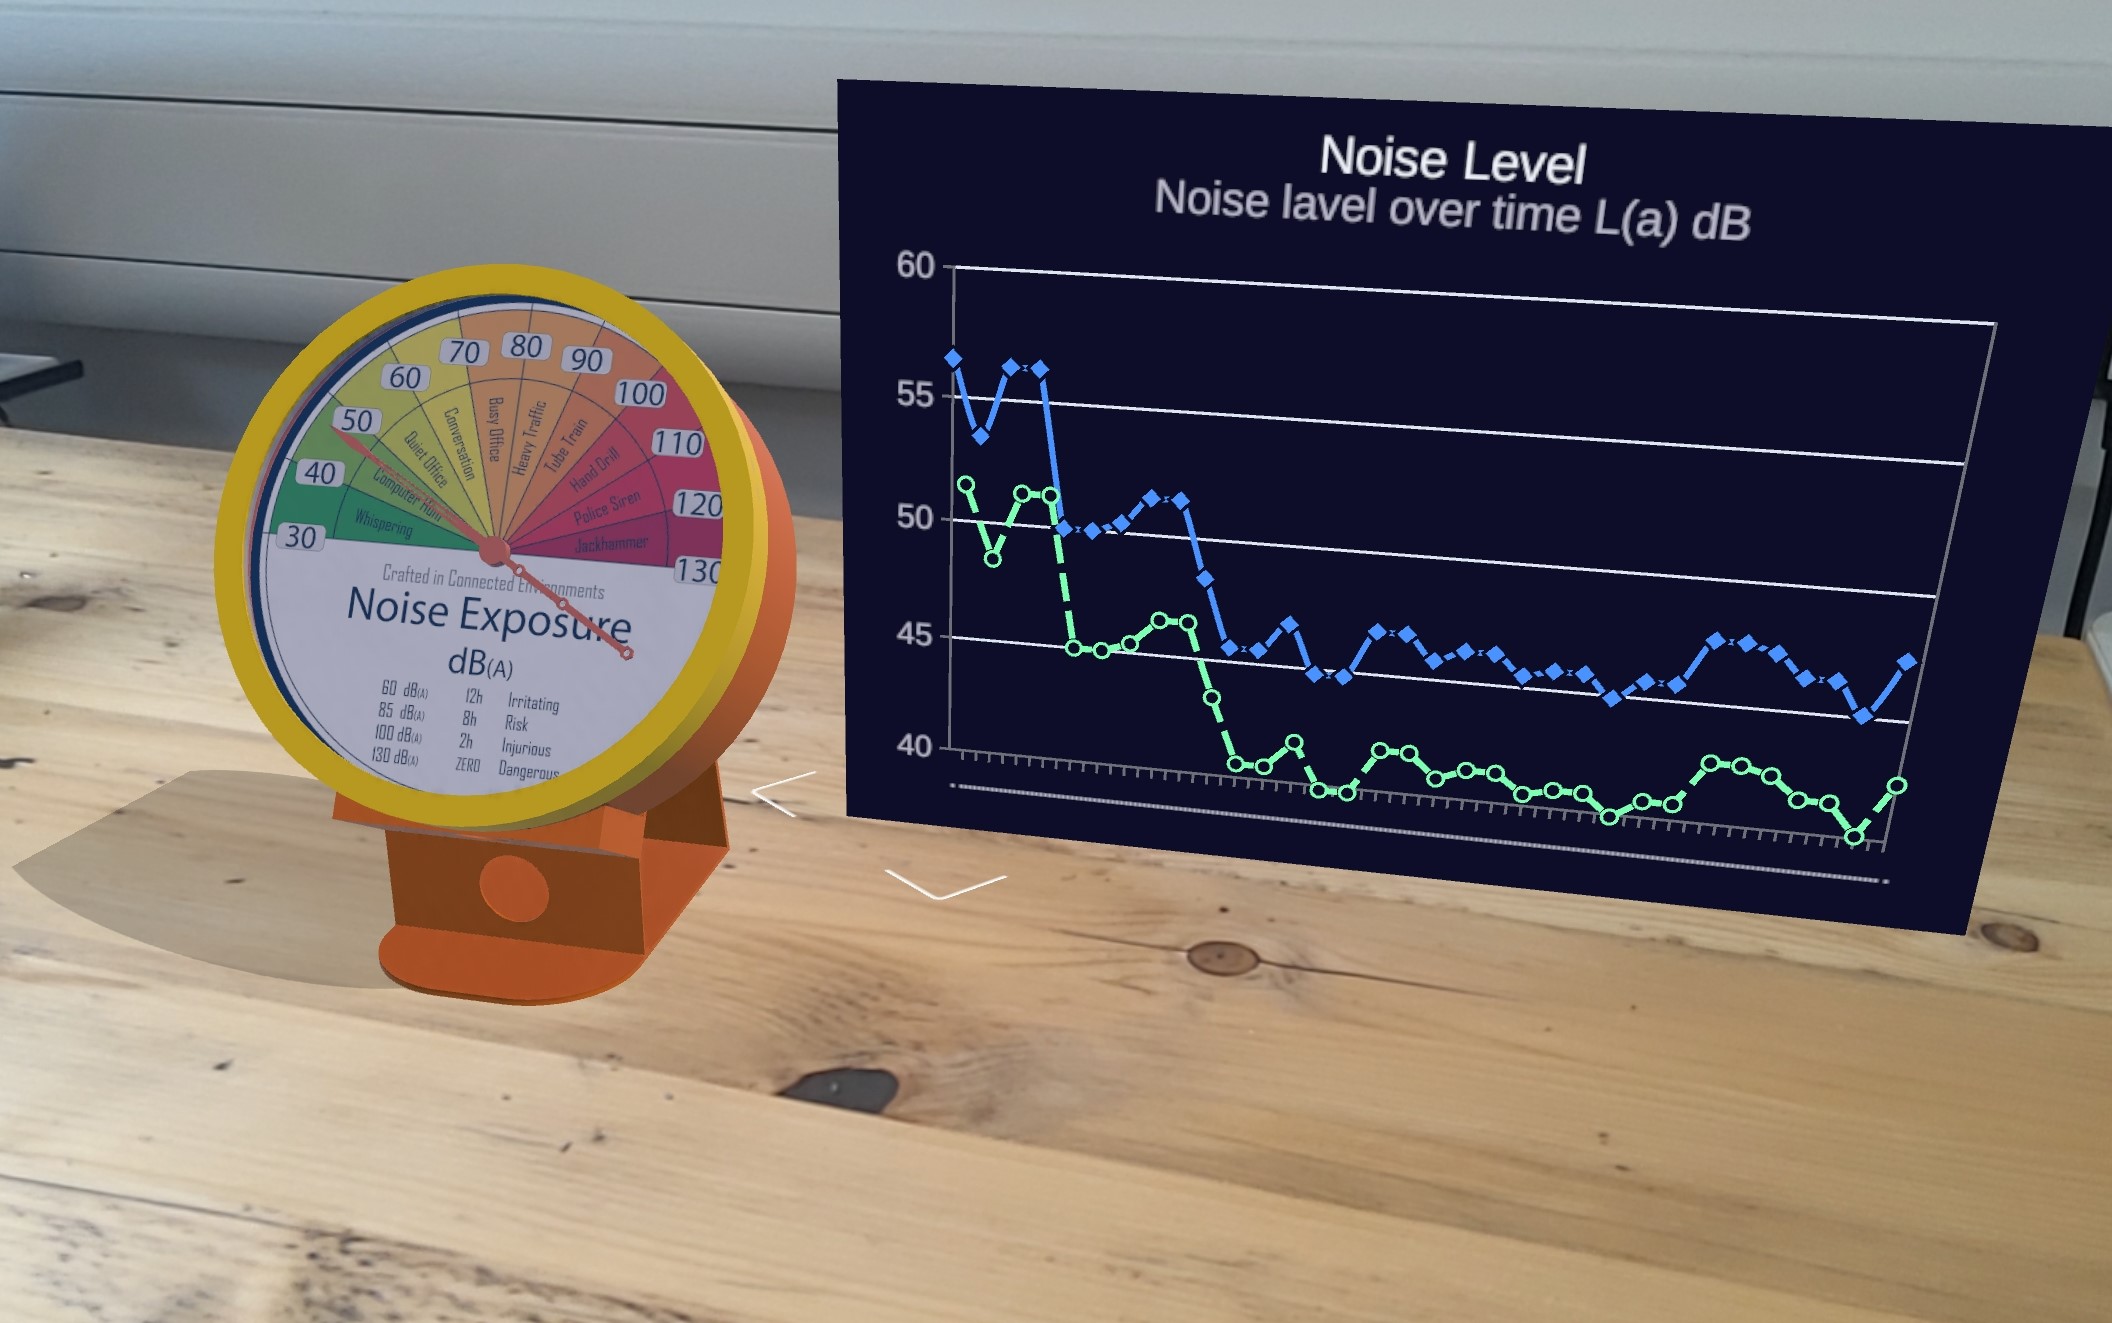
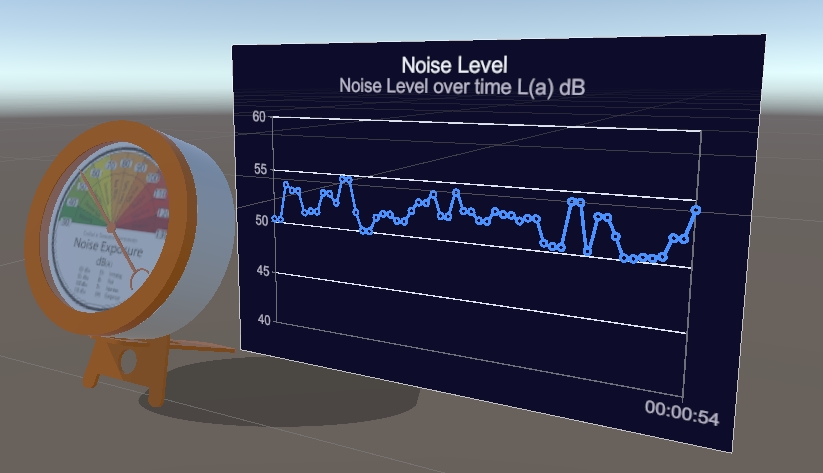
- Theme -> Shared Theme:
Dark - Grid Coord -> Show Border:
checked - Title -> Text:
Noise Level - Title -> Sub Text:
Noise level over time L(a) dB - X Axis -> Type:
Time - Y Axis -> Min Max Type:
Custom; Min: 40; Max: 60 - Serie 0: Line -> Line Type:
Smooth - Serie 0: Line -> Data:
Size: 0
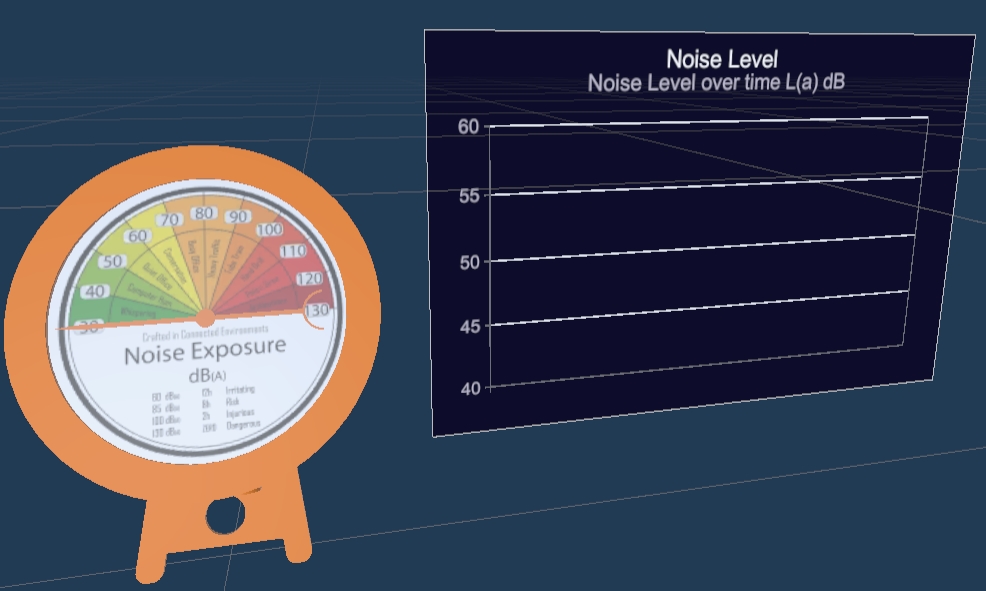
Chart manager
To dynamically change the data of the chart, we can use the same mqttController used to control the pointer of the gauge (it is of course possible to create a new script) with some minor changes:
- add the using directive
using XCharts.Runtime; - add new variable for the used chart (e.g.
LineChart); - add a new int variable named counter;
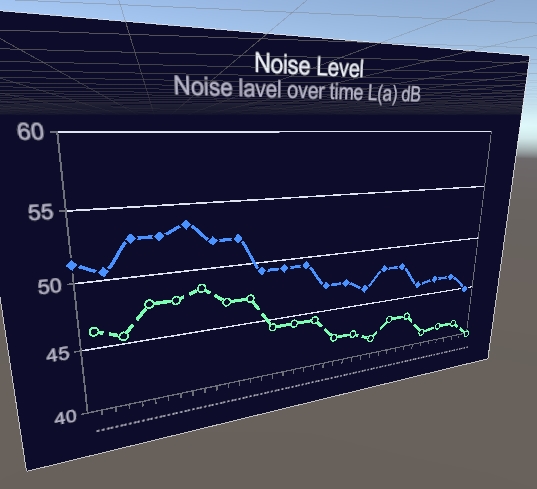
- in the OnMessageArrivedHandler event, add the
AddDatamethod to the variableLineChart;
using UnityEngine;
using XCharts.Runtime;

[More Code]

public float adjustedStart = 0f; // negative values CCW; positive value CW
[Space]
public mqttManager _eventSender;

[Space]
public LineChart lineChart;
int count = 0; //simple counter for the data

[More Code]

private void OnMessageArrivedHandler(mqttObj mqttObject) //the mqttObj is defined in the mqttManager.cs
{
//We need to check the topic of the message to know where to use it
if (mqttObject.topic.Contains(topicSubscribed))
{
    pointerValue = float.Parse(mqttObject.msg);

    Debug.Log("Event Fired. The message, from Object " + nameController + " is = " + pointerValue);

    lineChart.AddData(0, count++, pointerValue); // first value refer to the serieIndex, serieName can be used instead
}
}
Save the modified script and fill the field Line Chart in the Inspector with the GameObject Line Chart created above and test the app (remember to set also the Tag of the mqttController to link the mqttManager)
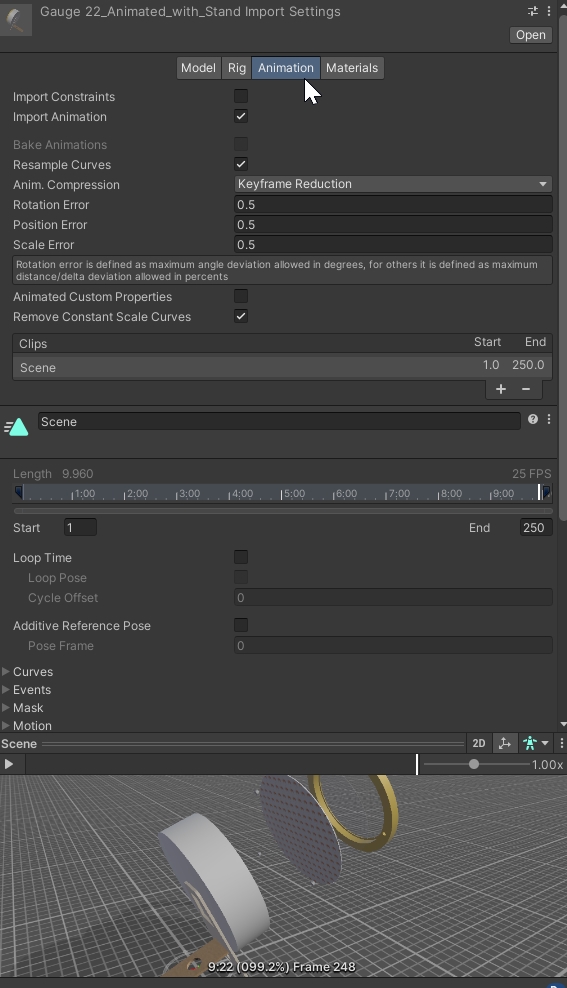
In the final part of the workshop we are going to play and control the animation of the gauge. It this example the animation needs to be part of the FBX object imported.
- Control from the Inspector that the animation exists and it has been imported
- Right click on the Project windows (a good location is the folder where the 3D model is located)
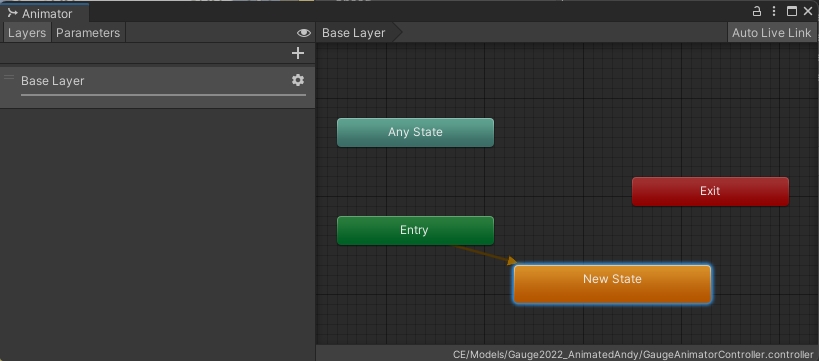
Create -> Animator Controller, provide a name for the controller (i.e. GaugeAnimatorController) and double click on it to open theAnimation Panel.
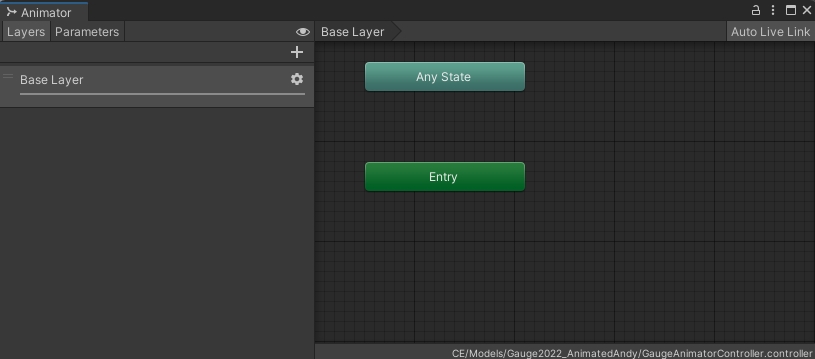
- Right click on
Animation Panel, not on the three existing block (Any State, Entry, Exit), andCreate State -> Empty. ANew Stateblock, link with theEntryblock, will be created. If not automatically linked, select theEntryblock, right click on it andSet StateMachine Default Stateand create the link with theNew Stateblock.
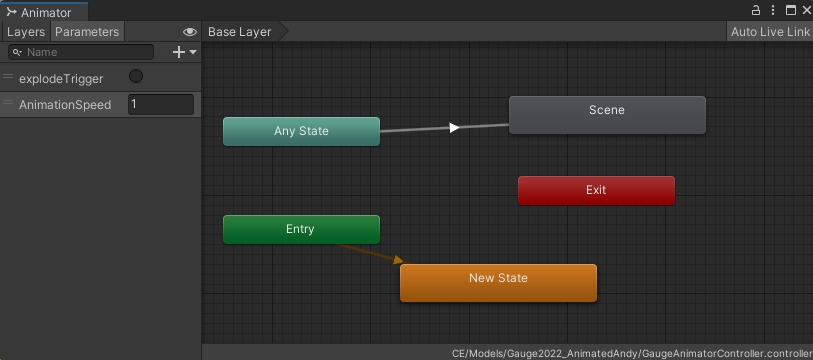
- Drag and drop the 3D model with the animation on the
Animation Panel(not the Prefab, but the FBX imported in Unity). A new grey block with the name of the animation will appear (e.g. Scene). - Right click on
Any Stateblock and Make Transition with the new grey blockScene. - On the left side, on the tab Parameters press the
+button and add a Trigger namedexplodeTriggerand a Float namedAnimationSpeedto be set to 1.
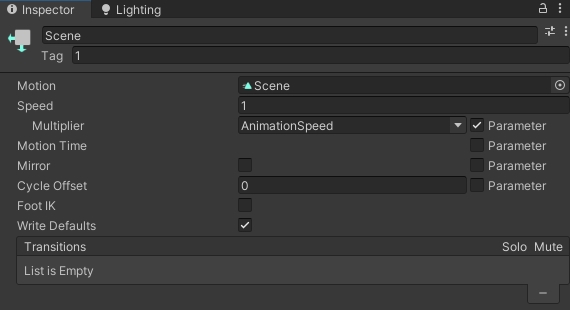
- with the grey block of the animation (Scene) selected, in the Inspector add the Tag
1(any value or name can be used), we will need this later. - tick the Parameter box next to the Multiplier field and select
AnimationSpeedfrom the drop-down menu
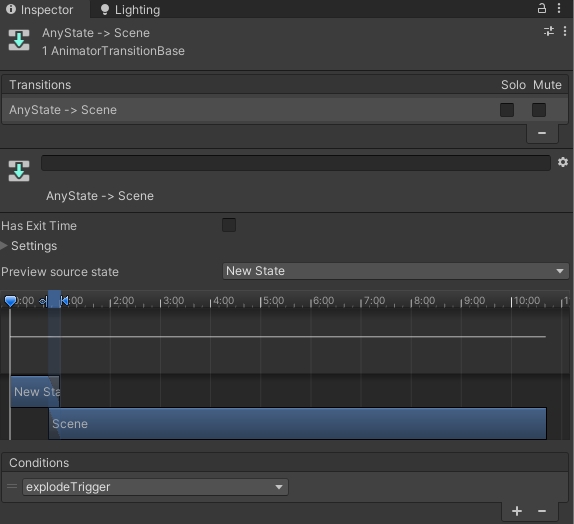
- In the
Animator Panelclick on the arrow that connectAny StatewithScene - in the
Inspector Paneladd a new Conditions and setexplodeTriggeras conditions to start the animation.
The Animator controller is now ready to be connected with a user interface. In this example we are controlling the animation using the Lean Touch asset. Specifically, we want to use a single tap on the object to start the animation (explodeTrigger), and another single tap on the object to play the animation backwards (AnimationSpeed from 1 to -1).
- add a new component
Animator(from Component/Miscellaneous) to the gauge model inside the Prefab (not the parent Prefab) and add to the Controller the GaugeAnimatorController - Create a new C# script
animationExplodeand add it to the gauge model inside the Prefab (not the parent Prefab). Open the script and add the following code blocks: - Code block 1⁄3
using UnityEngine;
[RequireComponent(typeof(Animator))]
public class animationExplode : MonoBehaviour
{
    Animator animator;
    float speed;
    bool isExploding = false;

    void Start()
    {
        //Get Animator component
        animator = GetComponent<Animator>();
        speed = animator.GetFloat("AnimationSpeed");
    }
The [RequireComponent(typeof(Animator))] ensure that the component Animator is added to the GameObject. The variable speed is used in this case to control the direction of the animation.
- Code block 2⁄3
public void Explosion()
    {
        if (isExploding == false)
        {
            //Add a Tag value to the animation block, select the animation block from the Animator Controlelr and set its Tag in the Inspector
            if (animator.GetCurrentAnimatorStateInfo(0).IsTag("1"))
            {
                speed = 1;
                animator.SetFloat("AnimationSpeed", speed);
                isExploding = true;
            }
            else
            {
                animator.SetTrigger("explodeTrigger");
                isExploding = true;
            }

        }

        else
        {
            if (animator.GetCurrentAnimatorStateInfo(0).IsTag("1"))
            {
                speed = -1;
                animator.SetFloat("AnimationSpeed", speed);
                isExploding = false;
            }
            else
            {
                speed = -1;
                animator.SetFloat("AnimationSpeed", speed);
                animator.SetTrigger("explodeTrigger");
                isExploding = false;
            }

        }
    }
The Explosion function is used to control the animation and it will be trigger when the ARObject is selected using a Lean Finger Tap.
- Code block 3⁄3
    void Update()
    {

        if (animator.GetCurrentAnimatorStateInfo(0).IsTag("1") && animator.GetCurrentAnimatorStateInfo(0).normalizedTime > 1)
        {
            animator.Play("Scene", -1, 1);
        }
        else if (animator.GetCurrentAnimatorStateInfo(0).IsTag("1") && animator.GetCurrentAnimatorStateInfo(0).normalizedTime < 0)
        {
            animator.Play("Scene", -1, 0);
        }

        //Play animation on key press
        if (Input.GetKeyDown(KeyCode.Q))
        {
            //Add a Tag value to the animation block, select the animation block from the Animator Controlelr and set its Tag in the Inspector
            if (animator.GetCurrentAnimatorStateInfo(0).IsTag("1"))
            {
                speed = 1;
                animator.SetFloat("AnimationSpeed", speed);
            }
            else { animator.SetTrigger("explodeTrigger"); }
        }
        //Reverse animation on key press
        if (Input.GetKeyDown(KeyCode.W))
        {
            if (animator.GetCurrentAnimatorStateInfo(0).IsTag("1"))
            {
                speed = -1;
                animator.SetFloat("AnimationSpeed", speed);
            }
            else
            {
                speed = -1;
                animator.SetFloat("AnimationSpeed", speed);
                animator.SetTrigger("explodeTrigger");
            }
        }

    }
}
The Update function contains a conditional function to control when the animation is finished (to reset its Time to 0 or 1), and the same animation controller of the Explosion function, but triggered using the key Q and W.
- in the Prefab Edit mode, remove the Self Selected option from the
Lean Selectablecomponent - On
Lean Selectablecomponent, expand Show Unused Events, add a new one, and add drag the Gauge model inside the prefab on it and select the component animationExplode.Explosion() - Check that the components
Lean Pinch Scale,Lean Twist Rotate Axis,Lean Drag Translatehave on the Required Selectable the Prefab of the Gauge itself (you should see in the fieldARGauge (Lean Selectable)(or the name you gave to the Gauge) - Finally add a new component
Box Colliderto the parent Prefab of the Gauge. Set Size (e.g.0.15 0.1 0.15) and Centre to fit the Gauge (e.g.y 0.1)
You can now Build and Run your project to place the digital gauge in your environment.