This workshop will show you how to:
- Scaffold a Babylon.js application
- Use the WebXR API for surface recognition
- Use 8th Wall to track planar image targets
- Import and use GLB models
- Interact with the imported models
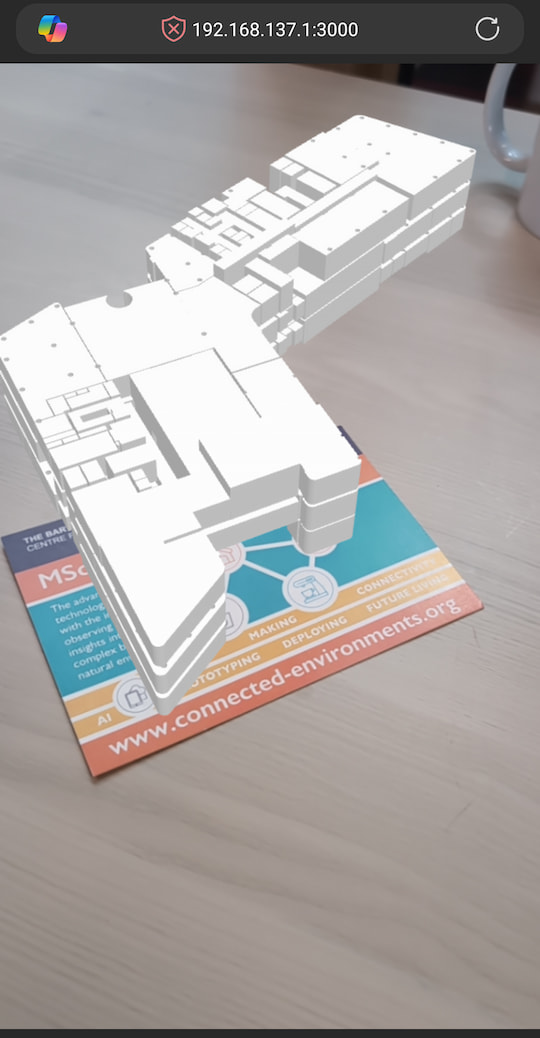
To complete this workshop you will need:
- Visual Studio Code
- Node.js LTS and NPM
- Android SDK Platform Tools
- Chromium-based browser (e.g. Microsoft Edge or Google Chrome)
- Connected Environments Postcard Image Front
- Connected Environments Postcard Image Reverse
- Digital models in GLB format
- Mobile Device (suggested Android for using the WebXR API)
Languages used:
- HTML
- JavaScript
Additional resources
There are several approaches to developing and deploying web visualisations. These range from an immediate method using pure JavaScript and HTML, where entire libraries are loaded in the head of the page, to more contemporary methods employing frameworks like React, Angular, and Vue.js. In this workshop, we are not going to use any of the above frameworks, but we will explore the use of JavaScript modules that allow us import only the code (the module) we need, rather than entire libraries, helping in keeping a cleaner, more maintainable, and faster code.
To set up the project, we will use npm create babylonjs, the official
Babylon.js project scaffolding tool. Rather than manually configuring a development environment, this command generates a complete project structure and guides us through a series of setup options. In this workshop, we will select the ES6 modules, JavaScript (rather than TypeScript), and ViteJS as the build tool. This provides a modern development workflow based on native JavaScript modules, allowing us to import only the Babylon.js components we need while benefiting from a lightweight development server and optimised production builds.
Let's begin by creating a new folder on our system and opening it in VSCode.
- from the top menu, select
Terminal -> New Terminal - type:
npm create babylonjs
Provide a name for the project, a folder will be created with the same name
Select the module format ES6
Select the language JavaScript
Select the Bundler Vite
npm create babylonjs may not install the latest version of Babylon.js. To check whether any library updates are available:
- Navigate to the folder you just created, as instructed in the terminal
cd [name of your project]: - run
npx npm-check-updates -u - finally run
npm install.
NPM will download the most updated packages needed to run a basic version of Babylon.js. To see this in action,
- run the command
npm run devin the terminal.
This will launch ViteJS in developer mode with a local server accessible from the local network at the address indicated in the terminal (e.g. http://localhost:5173/).
- Open this address in any browser to see the webpage.
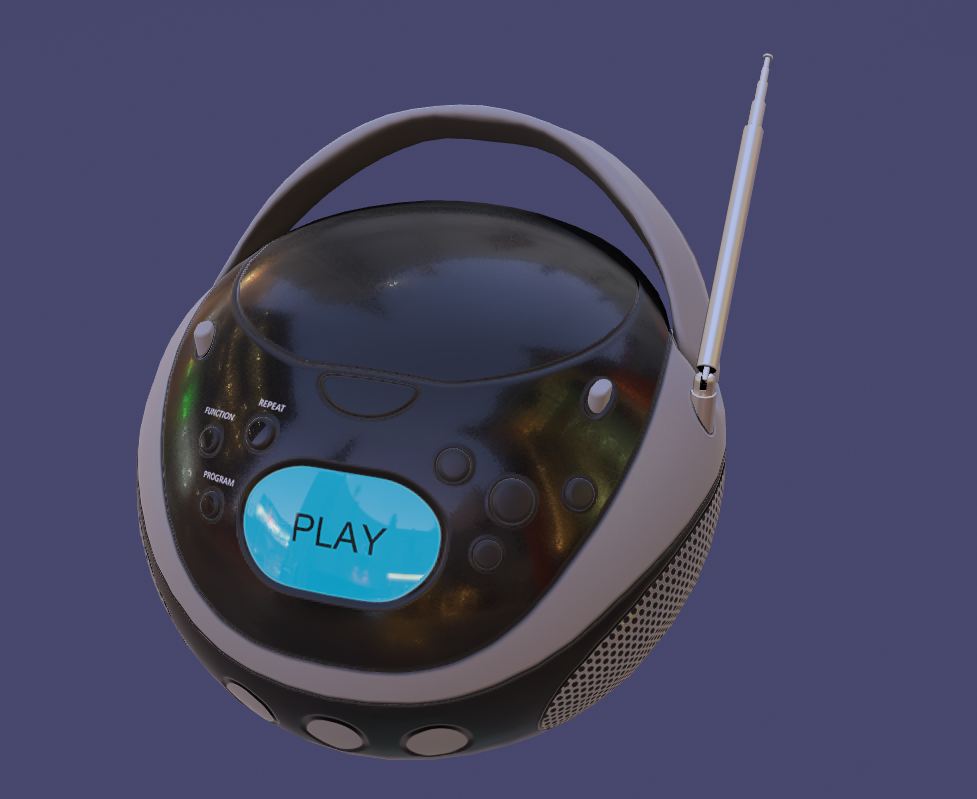
You should be able to see, after the animation of Babylon.js logo, the sample interactive 3D model
In addition to the standard packages, we also now need to install some additional libraries required to build the project:
@tweenjs/tween.jshandles animations and transitions between object states.@vitejs/plugin-basic-ssl, a lightweight plugin that creates a local HTTPS server, enabling secure access to device sensors, like the mobile camera, during development.- Exit the local server by pressing
CTRL+CorOption+Cwith the Terminal on focus. We can download all of them in one go with the following command:
npm install @tweenjs/tween.js @vitejs/plugin-basic-ssl
We are now ready to develop our web visualization. We might need to install additional packages later on.
When developing a WebXR application for mobile, testing only in a desktop browser is not sufficient. A desktop computer may not provide the same sensors, camera permissions, touch controls, or immersive AR capabilities as a mobile device. The WebXR experience must therefore run on the phone itself. However, when the application runs on the phone, we cannot directly see its browser console or developer tools. To address this we will use ADB (Android Debug Bridge), to connect the Android device to a Windows or macOS computer using a USB cable. This allows us to run the WebXR application on the phone while using our browser DevTools on the computer to inspect it.
Install ADB
Download the latest Android SDK Platform Tools for your operating system from Download Android SDK Platform Tools
Extract the downloaded ZIP file in a known and accessible location.
Windows
Open the extracted platform-tools folder, select the folder address bar, type cmd, and press Enter.
Test the installation:
adb version
macOS
Open Terminal and move into the extracted folder:
cd ~/Downloads/platform-tools
Test the installation:
./adb version
Enable USB debugging
On the Android device:
- Open Settings.
- Open About phone.
- Select Build number seven times to enable Developer options.
- Return to Settings and open Developer options.
- Enable USB debugging.
Connect and test the device
Connect the Android device to the computer using a USB data cable. Keep the phone unlocked and accept the Allow USB debugging? prompt.
On Windows, run:
adb devices
On macOS, run:
./adb devices
A successful connection should look similar to this:
List of devices attached
R58M123ABC    device
The device identifier will be different. The important part is that its status is device.
If the status is unauthorised, unlock the phone and accept the USB debugging prompt.
Inspect
To inspect a website running on the mobile device:
- Open the WebXR application on the Android device
- Open
Google ChromeorMicrosoft Edgeon the computer - Enter the following address in the desktop browser:
edge://inspect/#devices
or
chrome://inspect/#devices
- Find the Android device under Remote Target
- Find the tab containing the WebXR application
- Select inspect
A DevTools window will open for the page running on the Android device.
To restart ADB, if needed:
Windows
adb kill-server
adb start-server
adb devices
macOS
./adb kill-server
./adb start-server
./adb devices
It is important to understand that WebXR is still an evolving technology. While work on standardisation has been ongoing for several years, the WebXR API and browser support remains uneven. Support is generally good on Android devices and Meta Quest headsets, however, support on iOS is currently limited, with Apple's Vision Pro being the only platform so far to provide native WebXR support.
For this reason, depending on the experiences being developed, cross-platform testing is particularly important when creating WebXR applications, as features and behaviours may vary significantly between devices and browsers.
In this workshop, we will use both the WebXR API and the 8th Wall library. The latter offers more mature support for WebAR capabilities such as image tracking, as well as wider device compatibility.
Surface recognition enables a WebXR application to detect flat surfaces such as floors, tables, and walls in the user's environment. This allows virtual objects to be placed and anchored in the real world, creating more stable and realistic AR experiences.
For BabylonJs, there is one additional package that we need to install
npm install earcut
The next step is to enable XR support in Babylon.js. Also in this case, we need to import the WebXR-related modules at the top of the index.js file
import "@babylonjs/core/XR/webXRDefaultExperience";

import {WebXRPlaneDetector,
        WebXRAnchorSystem,
        WebXRHitTest,
        WebXRState} from '@babylonjs/core'
- WebXRPlaneDetector: Detects real-world surfaces such as floors, tables, and walls.
- WebXRAnchorSystem: Keeps virtual objects fixed in a stable real-world position.
- WebXRHitTest: Finds suitable surface locations for placing virtual objects.
- WebXRState: Represents the current state of the XR session (entering, in, exiting, or not in XR).
- We can then remove everything inside the
tryandcatchstatements and replace it with the following code
try {
    //create a FreeCamera, replace existing ones, attach controls
     scene.createDefaultCamera(false, true, true);

    //setup the XR Experience
     const xr = await scene.createDefaultXRExperienceAsync({
        uiOptions: {
            sessionMode: "immersive-ar",
            referenceSpaceType: "local-floor"
        },
        optionalFeatures: true
    });

    console.log("XR created", xr);
    // Enable surface detection and persistent anchors
        const fm = xr.baseExperience.featuresManager;

        const xrTest = fm.enableFeature(WebXRHitTest.Name, "latest");
        const xrPlanes = fm.enableFeature(WebXRPlaneDetector.Name, "latest");
        const anchors = fm.enableFeature(WebXRAnchorSystem.Name, 'latest');
    } catch (err) {
    // Report errors if XR is unsupported or cannot start
            console.error("XR failed",err);
      }
Remove also the scene.createDefaultEnvironmentas the default environment adds a background to the scene, which prevents the phone camera's passthrough from being visible during the AR experience.
// Create a default environment (skybox + ground + environment lighting)
        scene.createDefaultEnvironment({
            createGround: true,
            createSkybox: true,
        });
This is a perfectly working WebAR application but the detected surfaces are not yet visible. The next step is to add a visual indicator to highlight them.
- Create a new
utilsfolder insidesrc, then create a file calledxrPlanes.jsinside it
import {
    PolygonMeshBuilder,
    Quaternion,
    Color3,
    Vector2,
    StandardMaterial
} from "@babylonjs/core";

// Required by PolygonMeshBuilder to triangulate polygon shapes
// https://doc.babylonjs.com/features/featuresDeepDive/mesh/creation/param/polyMeshBuilder
// Install with: npm install earcut

import earcut from 'earcut';

export function setupXRPlanes(xr, xrPlanes, scene) {
    // Associate each detected XR plane with its Babylon.js mesh
    const planes = new Map();

    function createPlaneMesh(plane, material = null) {
      // Ignore planes that do not yet have enough points
        if (!plane?.polygonDefinition || plane.polygonDefinition.length < 3) {
            return null;
        }

      // Convert the detected 3D points into a flat 2D polygon
        const points = plane.polygonDefinition
            .filter(Boolean)
            .map(point => new Vector2(point.x, point.z));

      // Close the polygon without changing the original plane data
        points.push(points[0].clone());

// Build a thin mesh from the detected boundary
        const builder = new PolygonMeshBuilder(
            `xr-plane-${plane.id}`,
            points,
            scene,
            earcut
        );

        const mesh = builder.build(false, 0.01);

      // Create a transparent material for newly detected planes
        if (!material) {
            material = new StandardMaterial(
                `xr-plane-material-${plane.id}`,
                scene
            );

            material.alpha = 0.5;
            material.diffuseColor = Color3.Random();
        }

        mesh.material = material;
        mesh.receiveShadows = true;
        mesh.rotationQuaternion = new Quaternion();

      // Match the mesh position and rotation to the detected surface
        plane.transformationMatrix.decompose(
            mesh.scaling,
            mesh.rotationQuaternion,
            mesh.position
        );

        plane.mesh = mesh;
        planes.set(plane.id, mesh);

        return mesh;
    }

    // Create a mesh when a new surface is detected
    xrPlanes.onPlaneAddedObservable.add(plane => {
        createPlaneMesh(plane);
    });

  // Rebuild the mesh when the detected surface changes
    xrPlanes.onPlaneUpdatedObservable.add(plane => {
        const oldMesh = planes.get(plane.id);
        const material = oldMesh?.material ?? null;

        oldMesh?.dispose(false, false);

        createPlaneMesh(plane, material);
    });

  // Remove the mesh when the surface is no longer detected
    xrPlanes.onPlaneRemovedObservable.add(plane => {
        const mesh = planes.get(plane.id);

        if (mesh) {
            mesh.dispose();
            planes.delete(plane.id);
        }

        plane.mesh = null;
    });

  // Clear meshes when a new XR session starts
    xr.baseExperience.sessionManager.onXRSessionInit.add(() => {
        planes.forEach(mesh => mesh.dispose());
        planes.clear();
    });
}
Then, in index.js, import the setupXRPlanes function
import { setupXRPlanes } from "./utils/xrPlanes.js";
At the end of the try block, call the function and pass it the objects required to create and update the detected planes
setupXRPlanes(
    xr,
    xrPlanes,
    scene
);
We can now test the WebApp. At this stage, we are using WebXR capabilities that are not supported on a laptop, so testing must be carried out on an Android device.
To access the device's camera and sensors, the application must be served over a secure HTTPS connection. The basic-ssl package installed earlier allows us to enable HTTPS in our local development environment.
- To activate it, add the SSL plugin to the plugins array in the
vite.config.jsfile:
import { defineConfig } from 'vite'
import basicSsl from '@vitejs/plugin-basic-ssl'

export default defineConfig({
  plugins: [
    basicSsl(),
      ]
    })
Once configured, start the development server using
npm run dev -- --host
The -- --host flag makes the development server accessible from other devices on the same local network. Vite will display one or more local network URL that can be opened on the Android device.
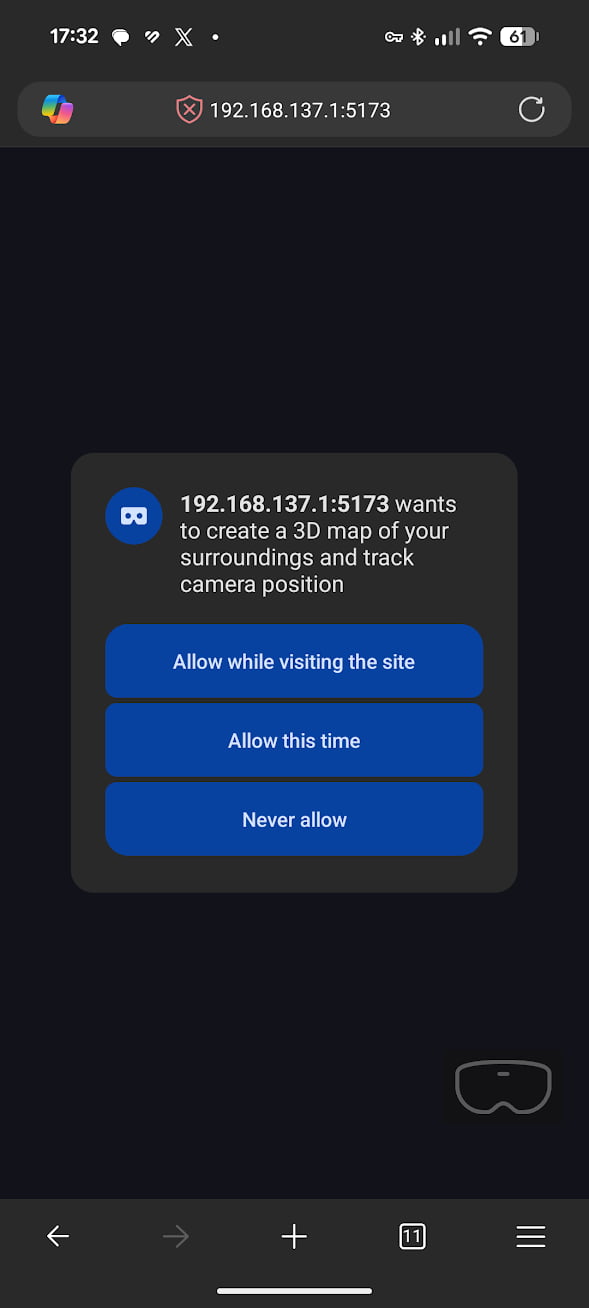
The first time the application runs, the browser will ask the user for permission to access the device's camera
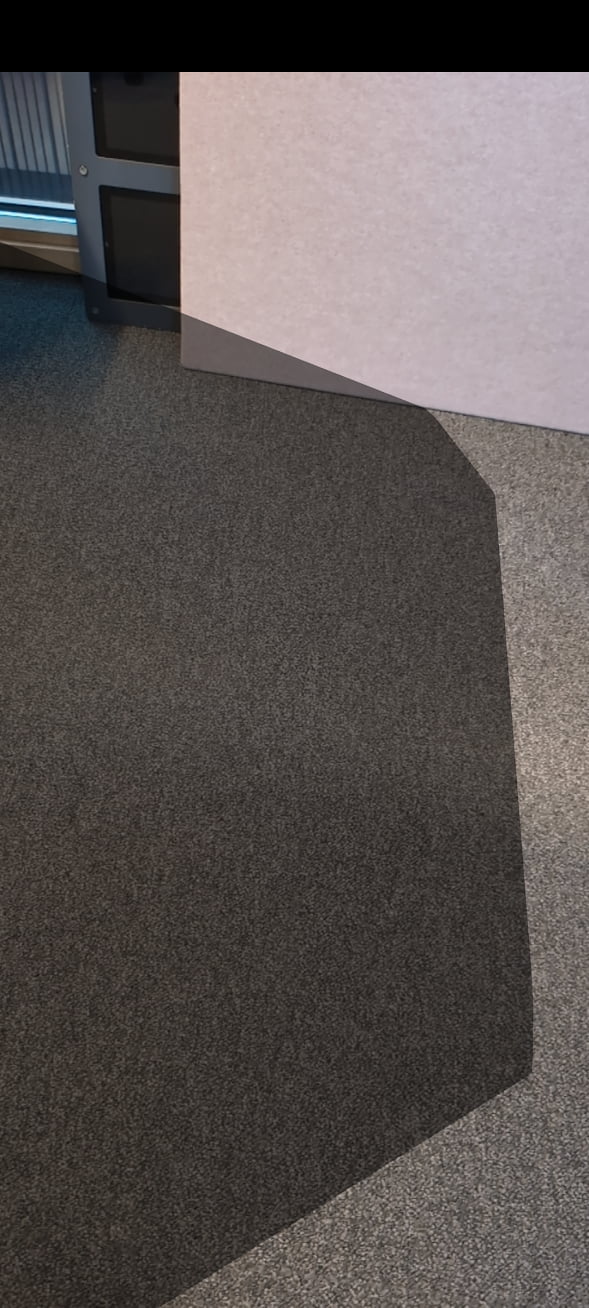
By slightly moving the device from left to right, the XR system will identify both vertical and horizontal planes, which can then be used to anchor the digital content in the physical environment.
To place a model on a detected surface, the application will use two additional WebXR features:
WebXRHitTestallows the application to detect where a virtual ray, originating from a user tap, intersects with a real-world surface detected by the XR system, helping determine where digital content should be placed.WebXRAnchorSystemcreate a stable reference point in the physical environment, ensuring that virtual objects remain fixed in place as the user moves around.
Before enabling these features, prepare the model:
- Create a
publicfolder in the project root if it does not already exist - Copy the model in
GLBformat into thepublicfolder
Instead of adding the model to the scene immediately, we use the BabylonJS function LoadAssetContainerAsync to load it into an asset container. The model can then be created when the user selects a position. in the index.js
import { LoadAssetContainerAsync } from "@babylonjs/core/Loading/sceneLoader";
Add also TransformNode and Quaternion to the existing imports from @babylonjs/core:
import {WebXRPlaneDetector,
        WebXRAnchorSystem,
        WebXRHitTest,
        WebXRState,

        TransformNode, Quaternion} from '@babylonjs/core'
Then add the following code after the const scene declaration and before the try block
// --------------------------------------------------
// Model to place
// --------------------------------------------------
//A reference node used as a container for the model
const origin = new TransformNode("origin", scene);
origin.rotationQuaternion = new Quaternion();

//Import the model, but keep it in an asset pool and do not add it to the scene
const office = await LoadAssetContainerAsync(
"./MODEL_GLB.glb",
scene
);

//Setup of the model
 let rootNode = office.meshes[0]; //the root of the scene
     rootNode.rotationQuaternion = new Quaternion();
     rootNode.scaling=new Vector3(0.01,0.01,0.01) //needed if the model is too big

     //add the reference node
     rootNode.parent=origin
If the model's materials require lighting, such as StandardMaterial or PBRMaterial, add a light to the scene. Otherwise, the model may appear dark or black.
- Add the following code after the
const scenedeclaration and immediately before the// Model to placeblock to create aHemisphericLight
// --------------------------------------------------
// Lights
// --------------------------------------------------
// Add soft ambient light to illuminate the whole scene
const light=new HemisphericLight(
    "light",
    new Vector3(0, 1, 0),
    scene
);
light.intensity = 0.7;

// --------------------------------------------------
// Model to place
// --------------------------------------------------
//
- And, as usual, add
HemisphericLightto the importsfrom @babylonjs/core:
import {WebXRPlaneDetector,
        WebXRAnchorSystem,
        WebXRHitTest,
        WebXRState,

        TransformNode, Quaternion, HemisphericLight} from '@babylonjs/core'
Where to place the model
The user needs a clear way to choose where the model will appear in the physical environment. A hit-test checks the surfaces in front of the device and provides a possible placement position. A visual marker then follows this position, giving the user a visual cue to where the model will be placed.
This example uses the BabylonJS method MeshBuilder to create a simple torus as the placement marker, but any suitable shape or model can be used.
- Add
MeshBuilderto the existing imports from@babylonjs/core:
import {WebXRPlaneDetector,
        WebXRAnchorSystem,
        WebXRHitTest,
        WebXRState,

        TransformNode, Quaternion, HemisphericLight, MeshBuilder } from '@babylonjs/core'
- Immediately after the
setupXRPlanes()call, inside thetryblock, add the following code:
// --------------------------------------------------
// Placement Marker
// --------------------------------------------------
// Create a marker showing the current hit-test position
    const marker = MeshBuilder.CreateTorus("marker", {diameter: 0.1,thickness: 0.01},scene);
    // Hide the marker until a surface is detected
    marker.isVisible = false;

    let hitTest = null;
// Update the marker when a surface is detected
xrTest.onHitTestResultObservable.add((results) => {
        if (results.length) {
            // Use the first detected surface position
            hitTest = results[0];
            marker.isVisible = true;

            // Align the marker to the detected surface
            hitTest.transformationMatrix.decompose(undefined, marker.rotationQuaternion, marker.position);
        } else {
            // Hide the marker when no surface is detected
            marker.isVisible = false;
            hitTest = undefined;
        }
    });

// --------------------------------------------------
// Anchors
// --------------------------------------------------

// Keep a reference to the currently active anchor
    let currentAnchor=null

    if (anchors) {
    // Attach a copy of the model when an anchor is created
    anchors.onAnchorAddedObservable.add(anchor => {
    console.log('anchors attached',anchor);
    currentAnchor=anchor
// Clone the model node origin and add it to this anchor
        const placedNode=origin.clone()
        // Attach the cloned model to the real-world anchor
        anchor.attachedNode=placedNode
        // Make the model visible after placement
        rootNode.isVisible=true
        rootNode.setEnabled(true)
        })
// Listen for anchors removed from the XR scene
        anchors.onAnchorRemovedObservable.add(anchor => {
            console.log('disposing', anchor);
            if (anchor) {
                // Dispose of the model attached to the removed anchor
                anchor.attachedNode?.dispose();
            }
        });
    }
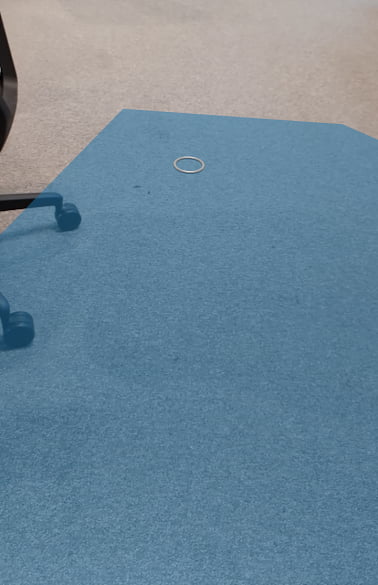
The placement marker shows where the model will be added, but the user still needs a way to confirm that position.
- Add an
onPointerDownevent immediately after the code above.
// Place the model when the user taps a detected surface
scene.onPointerDown = async() => {
    if (!hitTest || !anchors || xr.baseExperience.state !== WebXRState.IN_XR){
        return;}
    try {
        // Remove the previous anchor before creating a new one
        if(currentAnchor){
            currentAnchor.remove();
            currentAnchor = null;
            console.log('removed');
        }

        await anchors.addAnchorPointUsingHitTestResultAsync(hitTest);
        console.log("Anchor requested");
    } catch (error) {
        // Report errors if the anchor cannot be created
        console.error("Anchor placement failed", error);
    }
    }
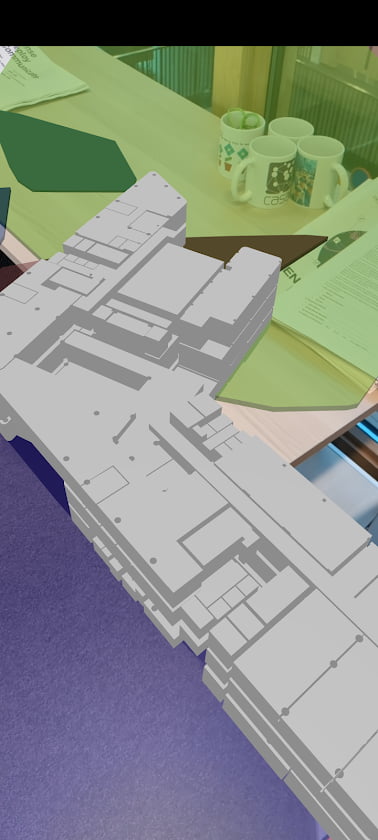
When the user taps the screen, the event uses the current hit-test result to place the model and create an anchor at that position
Another way to position virtual content in AR is to use a known image as a marker. Instead of finding floors, tables, or other surfaces, the application looks for a predefined image and places the virtual model relative to it.
Image tracking is useful when the AR content needs to appear and be linked to a specific location. Although image tracking is not yet widely supported through WebXR in mobile browsers, third-party tools provide their own tracking systems. In this workshop, we will use 8th Wall, a free and open-source WebAR toolset that supports, on both Android and iOS, image tracking and can be used with Babylon.js.
- Install the additional libraries required to use image tracking with Babylon.js:
npm install vite-plugin-static-copy @8thwall/engine-binary @8thwall/xrextras
- Set up the
vite.config.jsfile as below (this will need for the build)
import { defineConfig } from 'vite'
import basicSsl from '@vitejs/plugin-basic-ssl'
import { viteStaticCopy } from 'vite-plugin-static-copy'

export default defineConfig({
  build: {
    target: 'esnext'
  },

  plugins: [
    basicSsl(),

// Copy the required 8th Wall runtime assets into the final build output.
// stripBase: 4 removes the leading path segments:
// node_modules/@8thwall/<package>/dist -> .
// so only the contents of the dist folder are copied.
    viteStaticCopy({
      targets: [
        {
        // 8th Wall engine binaries required at runtime
          src: 'node_modules/@8thwall/engine-binary/dist',
          dest: 'external/xr',
          rename: {stripBase: 4}
        },
        {
        // XR Extras utilities (loading screen, coaching overlay, etc.)
          src: 'node_modules/@8thwall/xrextras/dist',
          dest: 'external/xrextras',
          rename: {stripBase: 4}
        }
      ]
    })
  ]
})
In index.html, add the following script elements inside the head, before the application entry script
<script src="./external/xr/xr.js" data-preload-chunks="slam"></script>
<script src="./external/xrextras/xrextras.js"></script>
and be sure that in the index.html a canvas named id="renderCanvas" is present.
overall the index.html should looks like this
<!DOCTYPE html>
<html lang="en">

<head>
    <meta charset="UTF-8" />
    <meta name="viewport" content="width=device-width, initial-scale=1.0" />
    <title>WebAR App</title>

    <!-- 8th Wall XR Engine (local binary, copied via Vite) -->
    <script src="./external/xr/xr.js" data-preload-chunks="slam"></script>
    <script src="./external/xrextras/xrextras.js"></script>
    <style>
        body {
            margin: 0;
            padding: 0;
        }
        #renderCanvas {
            display: block;
            width: 100dvw;
            height: 100dvh;
            touch-action: none;
        }
    </style>
</head>

<body>
    <canvas id="renderCanvas"></canvas>
    <script type="module" src="/src/index.js"></script>
</body>

</html>
Image targets for 8th Wall can be in colour or black and white. The tracking engine primarily detects contrast, corners, edges, and distinctive visual features rather than colour itself.
There is no single perfect image target, so some testing may be required. In general, choose an image with plenty of detail and strong contrast.
Avoid images that are:
- highly symmetrical;
- low contrast or mostly a single colour;
- composed of smooth curves with few corners;
- repetitive or heavily patterned;
- reflective or glossy.
The more distinctive features an image contains, the easier it will be to detect and track reliably.
In this example, we will use the front and back of the Connected Environments (CE) postcard as two image targets.
- Connected Environments front
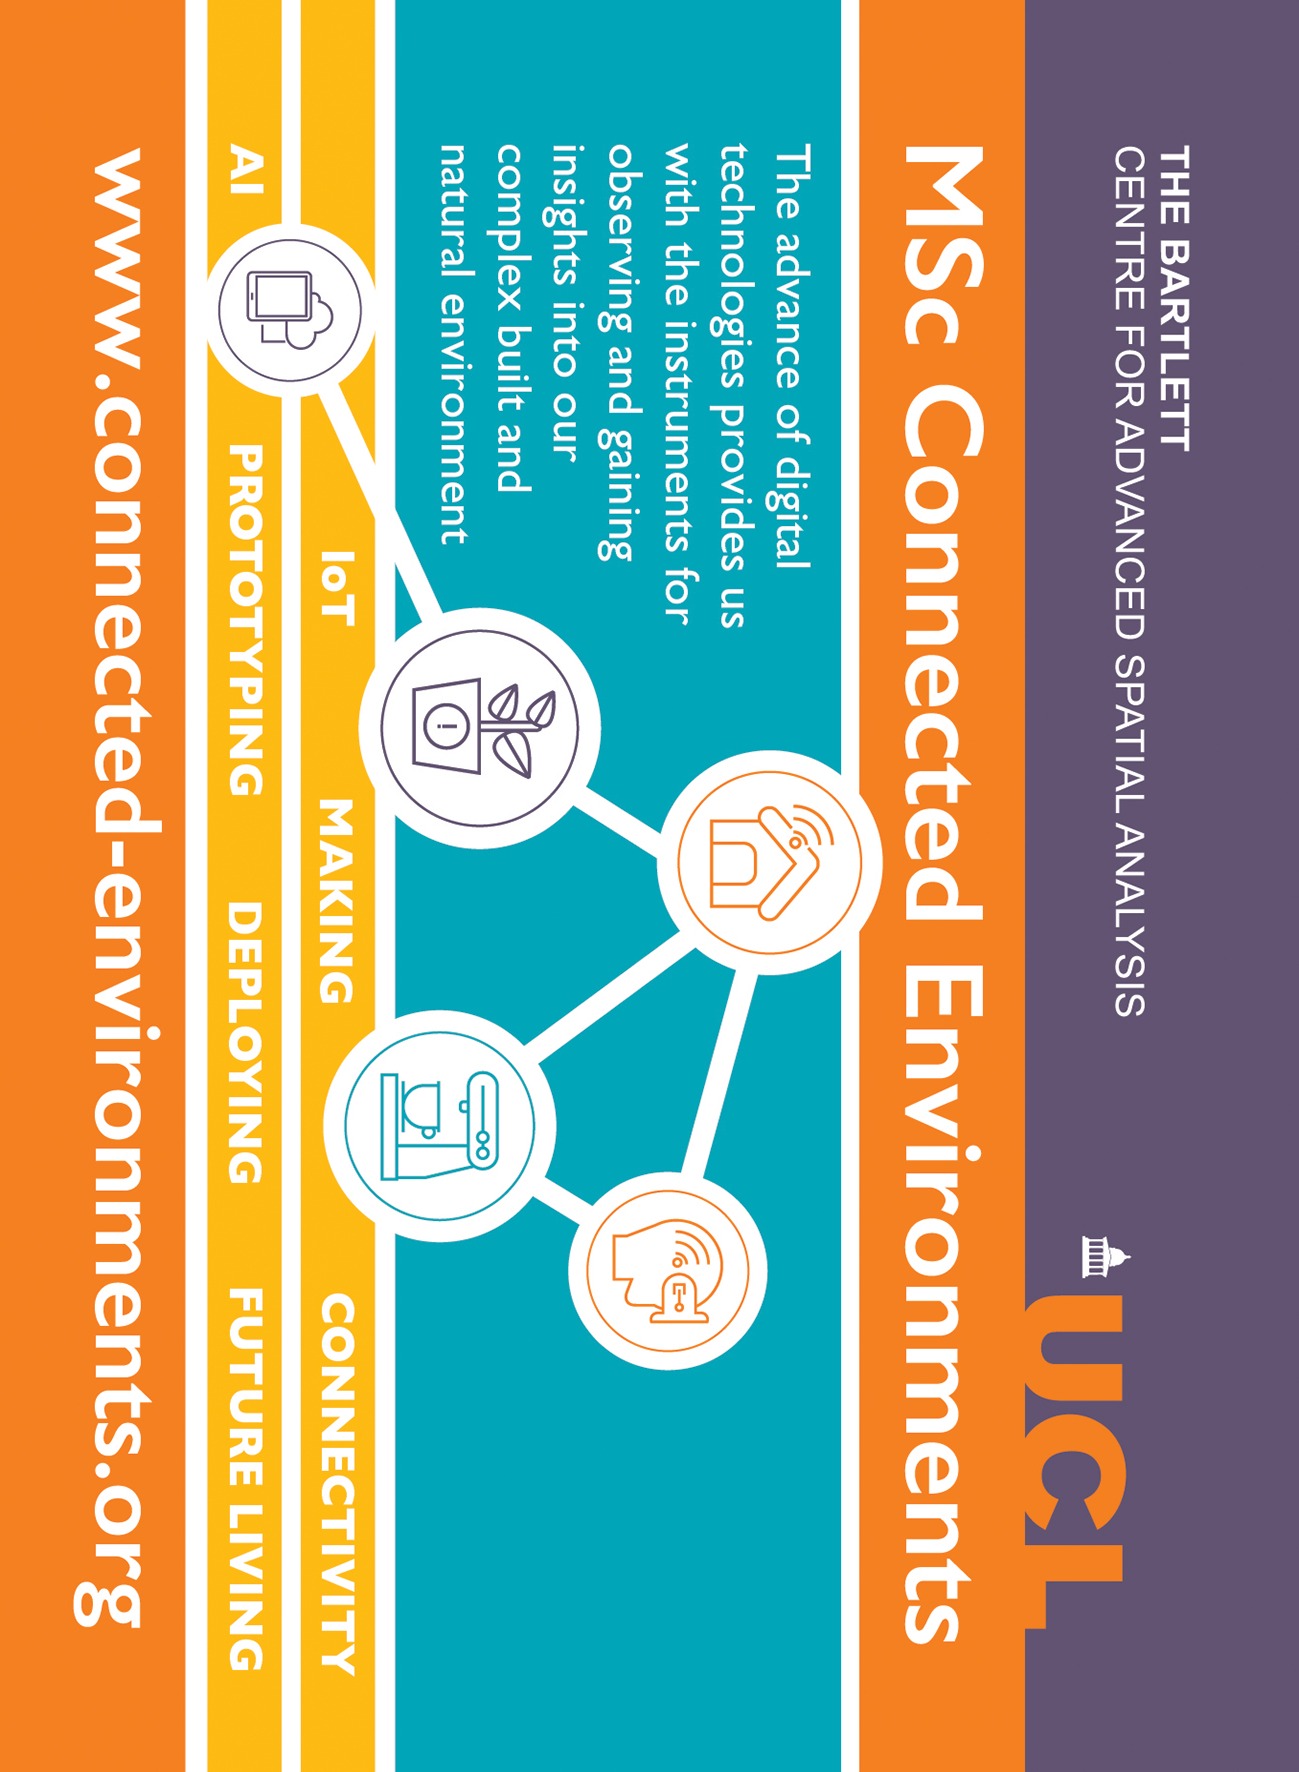
- Connected Environments back

Copy the two images into a targets folder inside the public directory. In this example, the targets use the JPG format.
Create a new file called image-targets.json in the same public/targets folder. This file is used by 8th Wall to register the image targets and make them available to the tracking engine. Each target includes:
imagePath: the location of the target image;
name: a unique identifier used within the application;
type: the type of target, such as PLANAR;
properties: the image dimensions, crop, and orientation used for tracking.
[{
  "imagePath": "/targets/CE-Postcard-Front.jpg",
  "metadata": {},
  "name": "target-image",
  "type": "PLANAR",
  "properties": {
    "left": 0,
    "top": 0,
    "width": 480,
    "height": 640,
    "originalWidth": 480,
    "originalHeight": 640,
    "isRotated": true
  }
},
{
  "imagePath": "/targets/CE-Postcard-Back.jpg",
  "metadata": {},
  "name": "target-image2",
  "type": "PLANAR",
  "properties": {
    "left": 0,
    "top": 0,
    "width": 480,
    "height": 640,
    "originalWidth": 480,
    "originalHeight": 640,
    "isRotated": true
  }
}]
The JSON file is fairly simple. It contains an array of objects, with one object for each image target. Each target requires a unique name, the path to the image, and the target type (for example, PLANAR, CYLINDER, or CONICAL).
There is also an optional metadata field, which can be used to store custom information that may be useful within the experience.
To make the WebAR application easier to manage, we will divide it into separate modules, with each module responsible for a specific part of the experience.
The process begins in index.js, which starts the application. It loads the image-target definitions from the JSON file and passes them to XR8.XrController to configure image tracking.index.js then adds createImageTargetPipeline() to the 8th Wall camera pipeline and starts the XR engine.
When the pipeline starts, its onStart() function calls startScene(). This then calls createScene(), which creates the Babylon.js engine, scene, and camera.
Once the scene is ready, createScene() calls and waits for createContent(scene). This function loads the model and creates the materials, animations, lights, and other scene content.
The returned content is then used by the image-tracking handlers to respond when a target is found, updated, or lost.
Create the following files inside the src folder:
index.js: the application entry point. It loads the image targets, coordinates the modules, configures 8th Wall, and starts the AR experience.utils/imageTargets.js: loads and validates the image-target definitions from the JSON file.utils/imageTargetPipeline.js: manages the image-tracking events that run when a target is found, updated, or lost.utils/createScene.js: creates the Babylon.js engine, scene, camera, and render loop.utils/createContent.js: loads the model and creates the materials, animations, reference geometry, and lights.
index.js
The index.js file is the main entry point of the application. It coordinates and initialises the different modules in the required order before starting 8th Wall. Only the image-target paths need to be changed in this file, unless specific library features need to be added or customised
import { loadImageTargetsFromJson }
    from "./utils/imageTargets.js";

import { createImageTargetPipeline }
    from "./utils/imageTargetPipeline.js";

// Main entry point for the AR application
async function startApplication() {
    try {
        // 1st Load the image-target definitions from the public folder
        const imageTargets =
            await loadImageTargetsFromJson(
                "/targets/LOCATION-IMAGE-TARGETS.json"
            );

        // Configure image tracking before starting the camera pipeline
        XR8.XrController.configure({
            imageTargetData: imageTargets, // Provide the targets that the application can recognise
            disableWorldTracking: true // Disable world tracking because this example only uses images. Also needed on desktop
        });

        // Register the 8th Wall and custom pipeline modules
        XR8.addCameraPipelineModules([
            XR8.XrController.pipelineModule(), // Provide image-target tracking events
            XRExtras.AlmostThere.pipelineModule(), // Display browser compatibility instructions
            XRExtras.FullWindowCanvas.pipelineModule(), // Keep the camera canvas fitted to the browser window
            XRExtras.Loading.pipelineModule(), // Display a loading screen while the experience starts
            XRExtras.RuntimeError.pipelineModule(), // Display an error message if the experience cannot start

            // 2nd pass the imageTargets to the ImageTartgetPipeline (here the Babylon.js scene will be created and target behaviour handleded
            createImageTargetPipeline({
                imageTargets
            })
        ]);

        // Start the 8th Wall camera pipeline
        XR8.run({
            // Get the canvas defined in index.html
            canvas: document.getElementById("renderCanvas"),
            allowedDevices:XR8.XrConfig.device().ANY
        });
    } catch (error) {
        console.error(
            "Failed to start the AR application:",
            error
        );

        XRExtras?.RuntimeError
            ?.showRuntimeError?.();
    }
}

// Start immediately if XR8 is ready
// Otherwise, wait for the 8th Wall library to finish loading
if (window.XR8) {
    startApplication();
} else {
    window.addEventListener(
        "xrloaded",
        startApplication,
        { once: true }
    );
}
imageTargets.js
The imageTargets.js module reads the JSON file containing the image-target definitions and prepares them for 8th Wall. No changes to this file are required.
export async function loadImageTargetsFromJson(url) {
    const response = await fetch(url, {
        cache: "no-store"
    });

    if (!response.ok) {
        throw new Error(
            `Failed to load image target JSON: ${url} (${response.status})`
        );
    }

    const rawData = await response.json();
    const targets = Array.isArray(rawData) ? rawData : [rawData];

    return targets.map(target => {
        const geometry =
            target.properties ??
            target.xrMetadata ??
            undefined;

        return {
            name: target.name,
            type: target.type ?? "PLANAR",
            imagePath: target.imagePath,
            metadata: target.metadata ?? {},
            properties: geometry,
            xrMetadata: geometry,
            resources: target.resources,
            created: target.created,
            updated: target.updated
        };
    });
}
Control that the file image-targets.json exist in the folder public/targets together with the images. Any additional image target need to be stored in public/targets, and its definition need to be added to image-targets.json, the unique name is then use in the imageTargetPipeline.js.
imageTargetPipeline.js
The imageTargetPipeline.js module controls how the application responds when an image target is found (onXrImageFoundObservable), updated (onXrImageUpdatedObservable), or lost (onXrImageLostObservable). Only the target-specific behaviours need to be changed here, such as which models are displayed and tracked or which functions are triggered.
import { Quaternion } from "@babylonjs/core/Maths/math.vector";

import { createScene } from "./createScene.js";

export function createImageTargetPipeline({
    imageTargets
}) {
    // Keep a reference to the running Babylon.js application
    let application = null;
    // Prevent the scene from being created more than once.
    let started = false;

    async function startScene() {
        // Get the canvas defined in index.html
        const canvas =
            document.getElementById("renderCanvas");

        if (!canvas) {
            throw new Error(
                'Canvas with ID "renderCanvas" was not found.'
            );
        }

        // Create the Babylon.js scene and wait for its content to load
        application = await createScene({
            canvas,
            imageTargets
        });

        const {
            scene,
            content
        } = application;

        // Get the scene objects controlled by image tracking
        const {
            origin,
        } = content;

        // Run once when an image target is detected
        scene.onXrImageFoundObservable.add(event => {
            console.log("Image target found:", event.name);

        // Show the model when the first target is found
            if (event.name === "target-image") {
                origin.setEnabled(true);
            }

        });

        // Run continuously while an image target is tracked
        scene.onXrImageUpdatedObservable.add(event => {
            // Only the first target controls the model position
            if (event.name !== "target-image") {
                return;
            }

            // Move the content to the tracked image position
            origin.position.set(
                event.position.x,
                event.position.y,
                event.position.z
            );

            // Create a quaternion before applying the tracked rotation
            origin.rotationQuaternion ??= new Quaternion();

            origin.rotationQuaternion.set(
                event.rotation.x,
                event.rotation.y,
                event.rotation.z,
                event.rotation.w
            );

            // Scale the content relative to the physical image target
            origin.scaling.set(3.5, 3.5, 3.5);
        });

       // Run when an image target is no longer visible
        scene.onXrImageLostObservable.add(event => {
            console.log("Image target lost:", event.name);
        // Hide the model when the first target is lost
            if (event.name === "target-image") {
                origin.setEnabled(false);
            }
        });
    }

    // Called by 8th Wall when the camera pipeline starts
    async function onStart() {
        if (started) {
            return;
        }

        started = true;

        try {
            await startScene();
        } catch (error) {
            console.error(
                "Failed to create the XR scene:",
                error
            );

            // Display the default 8th Wall error screen
            XRExtras?.RuntimeError
                ?.showRuntimeError?.();
        }
    }

    // Return the custom 8th Wall camera pipeline module
    return {
        name: "image-target-babylon",
        onStart
    };
}
Additional image targets can be handled by adding conditions to the relevant observables. In most cases, both onXrImageFoundObservable and onXrImageLostObservable should include target-specific logic, while onXrImageUpdatedObservable is depends on the application. In this example, the image target determines the position of the model, so its position must be updated every frame while the target remains visible.
if (event.name === "target-image2") {
//a model is show
  MODEL.setEnabled(true);
// function is triggered
  customFunction()
}
createScene.js
createScene.js sets up the Babylon.js engine and prepares the 8th Wall modules. It contains application-wide settings that will rarely need to be changed.
import { Engine } from "@babylonjs/core/Engines/engine";
import { Scene } from "@babylonjs/core/scene";
import { FreeCamera } from "@babylonjs/core/Cameras/freeCamera";
import {
    Vector3,
    Quaternion,
    Matrix
} from "@babylonjs/core/Maths/math.vector";
import { Observable } from "@babylonjs/core/Misc/observable";
import * as TWEEN from "@tweenjs/tween.js";
import { createContent } from "./createContent.js";

// 8th Wall expects these classes under the BABYLON namespace
window.BABYLON = {
    Engine,
    Scene,
    FreeCamera,
    Vector3,
    Quaternion,
    Observable,
    Matrix
};

// Create the Babylon.js engine, scene and camera
export async function createScene({
    canvas,
    imageTargets
}) {

  const engine = new Engine(canvas, true);
  const scene = new Scene(engine);
  const camera = new FreeCamera(
        "camera",
        new Vector3(0, 0, 0),
        scene
    );

    // Allow AR content to appear close to the camera
    camera.minZ = 0.01;

    // Configure the camera and image-target tracking
    const runConfig = {
        cameraConfig: XR8.XrConfig.camera().BACK, // Use the rear camera on mobile devices
        allowedDevices: XR8.XrConfig.device().ANY, // Also allow testing with a desktop or laptop webcam
        imageTargetData: imageTargets, // Provide the image-target definitions loaded from the JSON file
        scale: "absolute", // Return tracking positions and target sizes in metres
        verbose: true // Show additional debugging information during development
    };

    // Connect the Babylon.js camera to 8th Wall
    const xrCameraBehaviour =
        XR8.Babylonjs.xrCameraBehavior(runConfig);

    camera.addBehavior(xrCameraBehaviour);

    // Create and Wait until createContent.js models and materials are ready
    const content = await createContent(scene);

    // Render the scene continuously
    engine.runRenderLoop(() => {
        TWEEN.update();
        scene.render();
    });

    // Keep the canvas matched to the browser window size
    const resize = () => engine.resize();

    window.addEventListener("resize", resize);

    // Return the engine, scene, camera and the content to be use by the imageTargetPipeline
    return {
        engine,
        scene,
        camera,
        content,

    // Remove listeners and release Babylon.js resources
        dispose() {
            window.removeEventListener("resize", resize);
            scene.dispose();
            engine.dispose();
        }
    };
}
createContent.js
The createContent.js module loads and configures the virtual content displayed in the scene. Any new models or other scene content should be added here and attached to the tracked origin node linked to the imageTargetPipeline.js .
import { Vector3 } from "@babylonjs/core/Maths/math.vector";
import { Color3 } from "@babylonjs/core/Maths/math.color";
import { MeshBuilder } from "@babylonjs/core/Meshes/meshBuilder";
import { TransformNode } from "@babylonjs/core/Meshes/transformNode";
import { StandardMaterial } from "@babylonjs/core/Materials/standardMaterial";
import { HemisphericLight } from "@babylonjs/core/Lights/hemisphericLight";
import { DirectionalLight } from "@babylonjs/core/Lights/directionalLight";

export async function createContent(scene) {
    // Root node for content attached to the main image target
    const origin = new TransformNode("anchor", scene);
    origin.setEnabled(false);


    const sphere=MeshBuilder.CreateSphere(`sphere`,{segments:10,diameter:0.07})
    const sphereMaterial = new StandardMaterial(
        "sphereMaterial",
        scene
    );

    sphereMaterial.diffuseColor =
        Color3.FromHexString("#50f12f");

    sphere.material = sphereMaterial;
    sphere.parent=origin

    // Reference geometry
    const referenceBox = MeshBuilder.CreateBox(
        "referenceBox",
        {
            width: 0.15,
            height: 0.105,
            depth: 0.01
        },
        scene
    );

    const referenceBoxMaterial = new StandardMaterial(
        "referenceBoxMaterial",
        scene
    );

    referenceBoxMaterial.diffuseColor =
        Color3.FromHexString("#ff6600");

    referenceBoxMaterial.specularColor =
        new Color3(0.1, 0.1, 0.1);

    referenceBoxMaterial.alpha = 0.5;

    referenceBox.material = referenceBoxMaterial;
    referenceBox.parent = origin;

    // Add basic scene lighting
    const hemisphericLight = new HemisphericLight(
        "hemisphericLight",
        new Vector3(0, 1, 0),
        scene
    );

    hemisphericLight.intensity = 1;

    const directionalLight = new DirectionalLight(
        "directionalLight",
        new Vector3(1, -2, -1),
        scene
    );

    directionalLight.intensity = 1;

    // Return the objects needed by the tracking module
    return {
        origin,
    };
}
The app is now ready to be tested, run in the folder of the project npm run dev -- --host
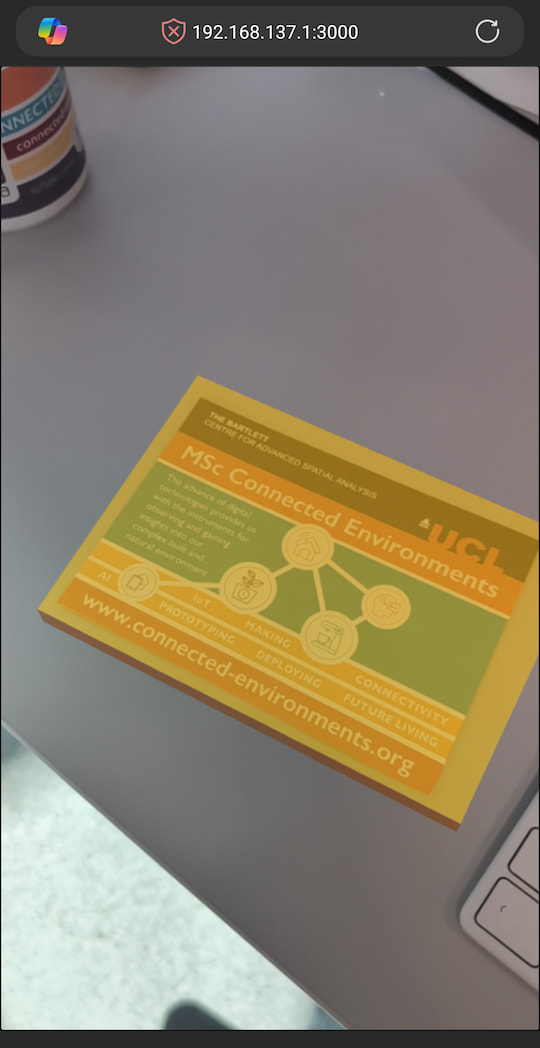
We can easily add new models to the same target by parenting them to the origin anchor created in createContent.js or creating another anchor (as show below).
Add the model to the project's public folder before referencing it in createContent.js.
Add the required packages at the top of the createContent.js
import { LoadAssetContainerAsync } from "@babylonjs/core/Loading/sceneLoader";
import "@babylonjs/loaders/glTF";
- in the main
createContentfunction, remove theorigin,sphereand thereferenceBoxadd the new model inside a new anchor
export async function createContent(scene) {

    // Root node for content attached to the main image target
    const originModel = new TransformNode("anchorModel", scene);
    originModel.setEnabled(false);

    // Load the model without adding its original meshes directly to the scene
    const office = await LoadAssetContainerAsync(
        "/models/NAME-OF-THE-MODEL.glb",
        scene
    );

    const instance = office.instantiateModelsToScene();
    const modelRoot = instance.rootNodes[0];

    if (!modelRoot) {
        throw new Error("The imported model has no root node.");
    }

    // Use Euler rotation for the imported model
    modelRoot.rotationQuaternion = null; ///double check this
    modelRoot.scaling.set(0.003, 0.003, 0.003);
    modelRoot.position.set(-0.04, -0.04, -0.06);
    modelRoot.rotation.set(Math.PI / 2, 0, 0);
    modelRoot.parent = originModel;

    //REST OF THE CODE

    // Add the new originModel to the return for the imageTargetPiplin.js
    return {
        origin,
        originModel
    };
- Finally in the
imageTargetPipeline.js
// Get the scene objects controlled by image tracking
        const {
            originModel
        } = content;

        // Run once when an image target is detected
        scene.onXrImageFoundObservable.add(event => {
            console.log("Image target found:", event.name);

        // Show the model when the first target is found
            if (event.name === "target-image") {
                originModel.setEnabled(true);
            }

        });

        // Run continuously while an image target is tracked
        scene.onXrImageUpdatedObservable.add(event => {
            // Controls the anchor position, rotation and scale
            if (event.name !== "target-image") {
                return;
            }

            // Move the content to the tracked image position
            originModel.position.set(
                event.position.x,
                event.position.y,
                event.position.z
            );

            // Create a quaternion before applying the tracked rotation
            originModel.rotationQuaternion ??= new Quaternion();

            originModel.rotationQuaternion.set(
                event.rotation.x,
                event.rotation.y,
                event.rotation.z,
                event.rotation.w
            );

            // Scale the content relative to the physical image target
            originModel.scaling.set(3.5, 3.5, 3.5);
        });

       // Run when an image target is no longer visible
        scene.onXrImageLostObservable.add(event => {
            console.log("Image target lost:", event.name);
        // Hide the model when the first target is lost
            if (event.name === "target-image") {
                originModel.setEnabled(false);
            }
        });
Add more image targets
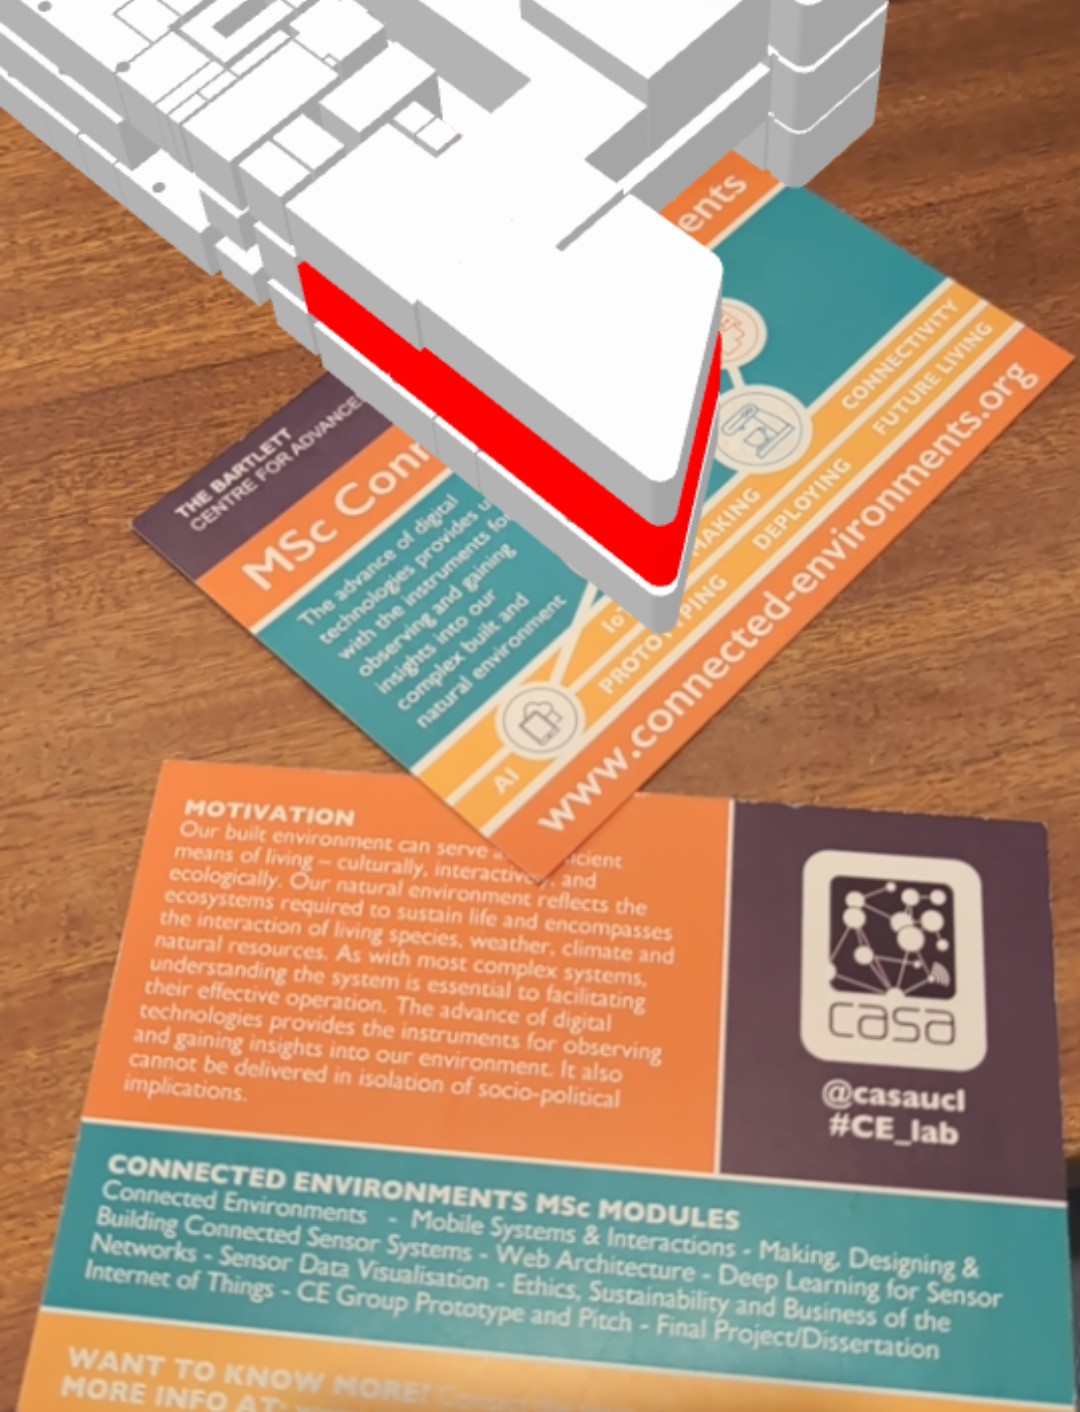
In addition to visualising digital content, an image target can be used to control other aspects of the experience. As a simple example, we can use the back of the card as a second image target to trigger a function that changes the colours of specific meshes in the model.
- In
createContent.js, add a new import for the Animation class
import { Animation } from '@babylonjs/core/Animations/animation'
import "@babylonjs/core/Animations/animatable";
- after
modelRoot.parent = originModel;add
// Find meshes identified by the property contained in the GLB metadata
const selectedMeshes = modelRoot.getChildMeshes().filter(
  mesh => mesh.metadata?.gltf?.extras?.roomType?.toLowerCase() === "teaching"
);

// Store each mesh's original material so it can be restored later
selectedMeshes.forEach(mesh => {
  mesh.metadata ??= {}; //If mesh.metadata is null or undefined, assign an empty object {} to it.
  mesh.metadata.originalMaterial = mesh.material;
});

// Create the shared material used to highlight the selected rooms
const pulseMaterial = new StandardMaterial("pulseRed", scene);
pulseMaterial.diffuseColor = new Color3(0.08, 0, 0);
pulseMaterial.specularColor = Color3.Black();
pulseMaterial.emissiveColor = Color3.Black();

// Animate the material's emissive colour from dark red to bright red
const pulseAnimation = new Animation(
  "redPulse",
  "emissiveColor",
  30,
  Animation.ANIMATIONTYPE_COLOR3,
  Animation.ANIMATIONLOOPMODE_CYCLE
);

pulseAnimation.setKeys([
  { frame: 0, value: Color3.Black() },
  { frame: 15, value: new Color3(1, 0, 0) },
  { frame: 30, value: Color3.Black() },
]);

pulseMaterial.animations = [pulseAnimation];
- and at the bottom of the file, add the new objects to return
selectedMeshesandpulseMaterial
return {
        originModel,
        selectedMeshes,
        pulseMaterial
    };
- In
imageTargetsPipeline.js, add the same objects to theconst { }=content
 // Get the scene objects controlled by image tracking
        const {
            originModel,
            selectedMeshes,
            pulseMaterial
        } = content;
- and add the new behaviour for
image-target2(the back of the postcard) - in the
onXrImageFoundObservable
if (event.name === 'target-image2') {
    selectedMeshes.forEach((mesh) => {
        mesh.material = pulseMaterial
    })
    // Start the animation on the material:
    // - from frame 0 to frame 30
    // - loop continuously (true)
    scene.beginAnimation(
        pulseMaterial,
        0,
        30,
        true
        )
    }
- in the
onXrImageLostObservable
if (event.name === 'target-image2') {

// Stop the pulsing animation.
scene.stopAnimation(pulseMaterial)
// Reset the pulse material ready for the next detection.
pulseMaterial.emissiveColor.set(0.1, 0, 0)

// Restore each teaching mesh's original material.
selectedMeshes.forEach((mesh) => {
mesh.material = mesh.metadata.originalMaterial
})

}
So far, the project has been tested in development mode. Before making it available on GitHub Pages or another web server, we need to create a production build.
The simplest option is to generate a standard deployment package.
- First, stop the local development server by pressing
Ctrl+Con Windows orOption+Con macOS, then run:
npm run build
Vite.js will create a new folder named dist containing all the files required by the application. During this process, dependencies are bundled, unused code is removed where possible, and assets are optimised to improve performance and reduce file size.
An alternative is to package the project as a Progressive Web App (PWA). In addition to the standard website functionality, a PWA can be installed on desktop and mobile devices, work offline by caching assets locally, and provide a more application-like experience. This can be particularly useful for this case, where large assets such as models, textures, and supporting files can be stored locally and reused across sessions.
To function as a Progressive Web App (PWA), a website requires three main components:
- A Web App Manifest (
manifest.json), which describes the application, including its name, icons, theme colours, and how it should behave when installed. - A Service Worker (
sw.js), a background script that can cache files, enable offline access, and manage updates. - A secure deployment (HTTPS), which is required by modern browsers for service workers to operate.
The manifest defines how the application appears to users when installed on a desktop or mobile device.
The service worker runs separately from the main application and intercepts network requests. This allows assets such as JavaScript files, stylesheets, images, and 3D models to be stored locally and reused on subsequent visits, reducing loading times and enabling offline operation.
As we are using Vite.js, the easiest way to add PWA support is by using the Vite PWA Plugin.
As usual, install the package using:
npm i vite-plugin-pwa
If it does not already exist, create a new file named vite.config.js in the root of the project. This file is used to configure Vite and add additional plugins such as PWA support.
import { defineConfig } from "vite";
import { VitePWA } from "vite-plugin-pwa";

export default defineConfig({
    build:{target:"esnext"},  //needed to address just modern browsers
    plugins: [
        VitePWA({
            registerType: "autoUpdate",

            manifest: {
                name: "NAME OF THE PROJECT",
                short_name: "SHORT NAME",
                description: "DESCRIPTION IN ONE SENTENCE",
                theme_color: "#121212",
                background_color: "#121212",
                display: "standalone",

                icons: [
                    {
                        src: "img/icon/ICON.png",
                        sizes: "192x192",
                        type: "image/png"
                    },
                    {
                        src: "img/icon/ICON.png",
                        sizes: "512x512",
                        type: "image/png"
                    }
                ]
            },

            workbox: {
                maximumFileSizeToCacheInBytes: 10 * 1024 * 1024, //for larger built
                globPatterns: [
                    "**/*.{js,css,html,png,svg,glb}" //the filetype to store in the cache
                ]
            }
        })
    ]
});
Add the two icons in size 192x192 pixels and 512x512 pixels in the public/img/icon folder of the project.
Negative
:In order to be installable, a PWA must include at least two icons with the exact dimensions of 192×192px and 512×512px. These icons are declared in the web app manifest and are used by the operating system when the application is installed. If the icons are missing, inaccessible, or their actual dimensions do not match the sizes specified in the manifest, the browser may prevent the application from being installed.
In index.js, add the following import at the very top of the file:
import { registerSW } from "virtual:pwa-register";
registerSW({
    immediate: true
});
Finally, to build the webApp,as before, run
npm run build
and after few minutes, to view the result run
npm run preview
Vite.js will start a local server (note that the port number may be different from the one used during development).
If the PWA has been configured correctly, an Install App icon should appear next to the browser address bar. Alternatively, the installation option can usually be found under the browser menu (often under More Tools or Install App).

Add More Models
Extend createContent.js by loading additional GLB models and attaching them to different anchor nodes.
Create Additional Image Targets
Add new images to the public/targets folder and register them in image-targets.json.
For each new target, implement a different behaviour inside imageTargetPipeline.js.