This workshop will show you how to
- Import and use external library and C# scripts
- Create and customise a dynamic Graphic User Interface using uGUI
- Visualise real-time data using MQTT feeds
- Use REST APIs and working with JSON data to interact with the GameObjects
To complete this workshop you will need
- Unity 2022.3 LTS
- VS Code
- M2MQTT library
- MQTT broker
- CE Studio model, based on Gallery Showroom Environment
Additional resources
This section shows how to set up an MQTT client in Unity, using a modified version of the M2MQTT .Net library.
Download the modified M2MQTT library and copy the folders M2Mqtt and M2MqttUnity, located in the Assets folder inside M2MqttUnity-Master inside the Assets folder of your Unity project (e.g. _Unity project of workshop 1)
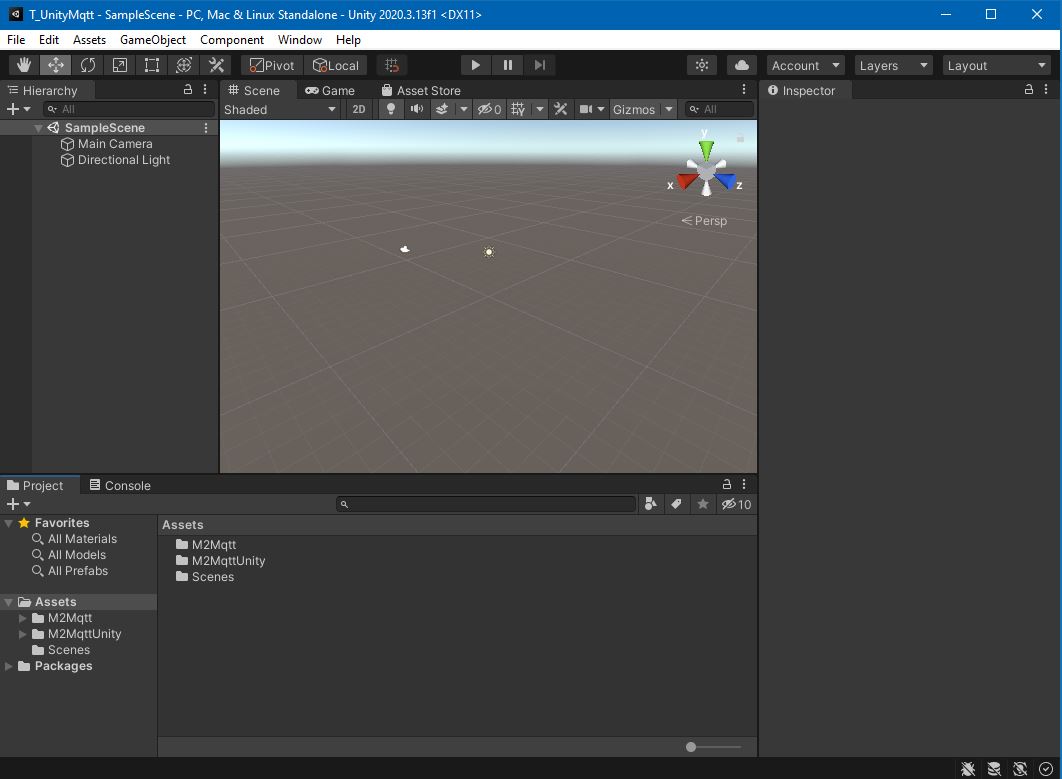
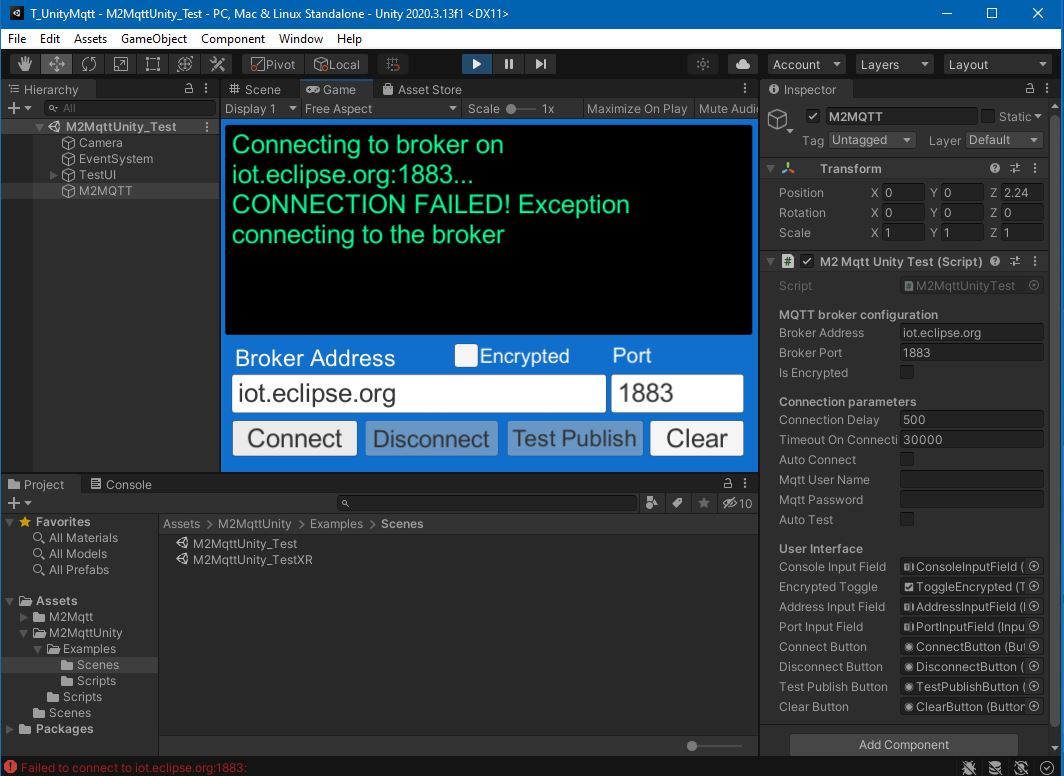
Open the example scene named M2MqttUnity_Test from the folder M2MqttUnity -> Examples -> Scenes
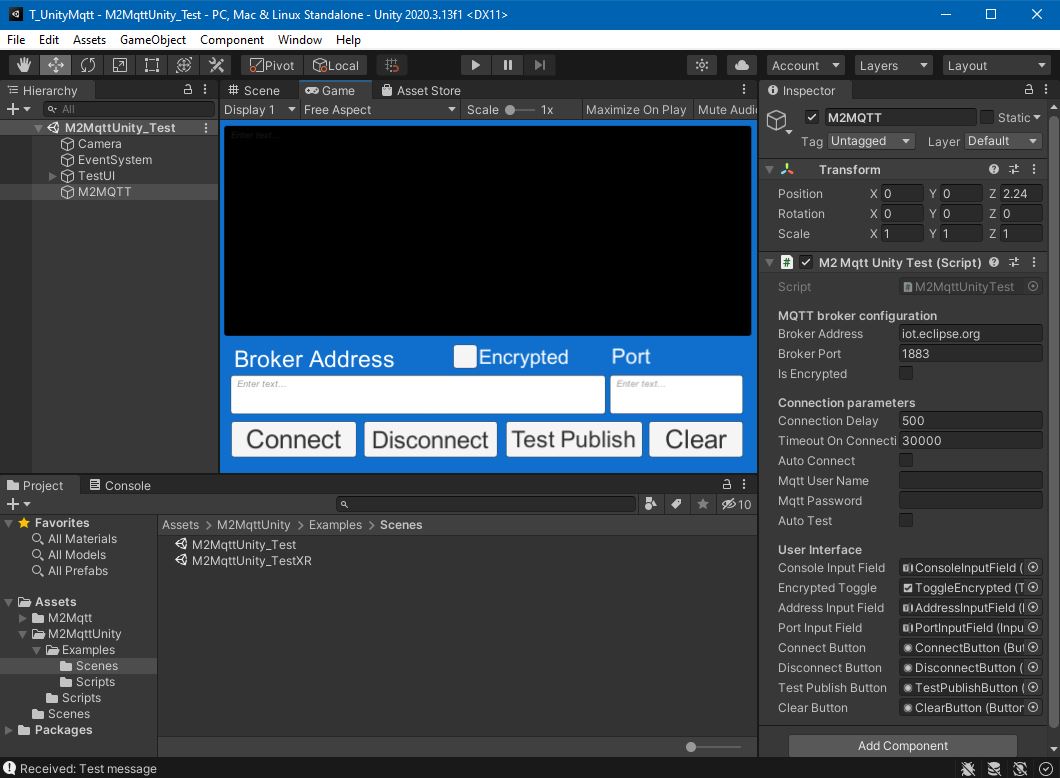
Press Play to test the library and, in the Game tab, press Connect to establish a connection with the default broker iot.eclipse.org using the port 1883.
In this case, the connection has failed, there could be various reasons for this e.g. the MQTT broker is offline
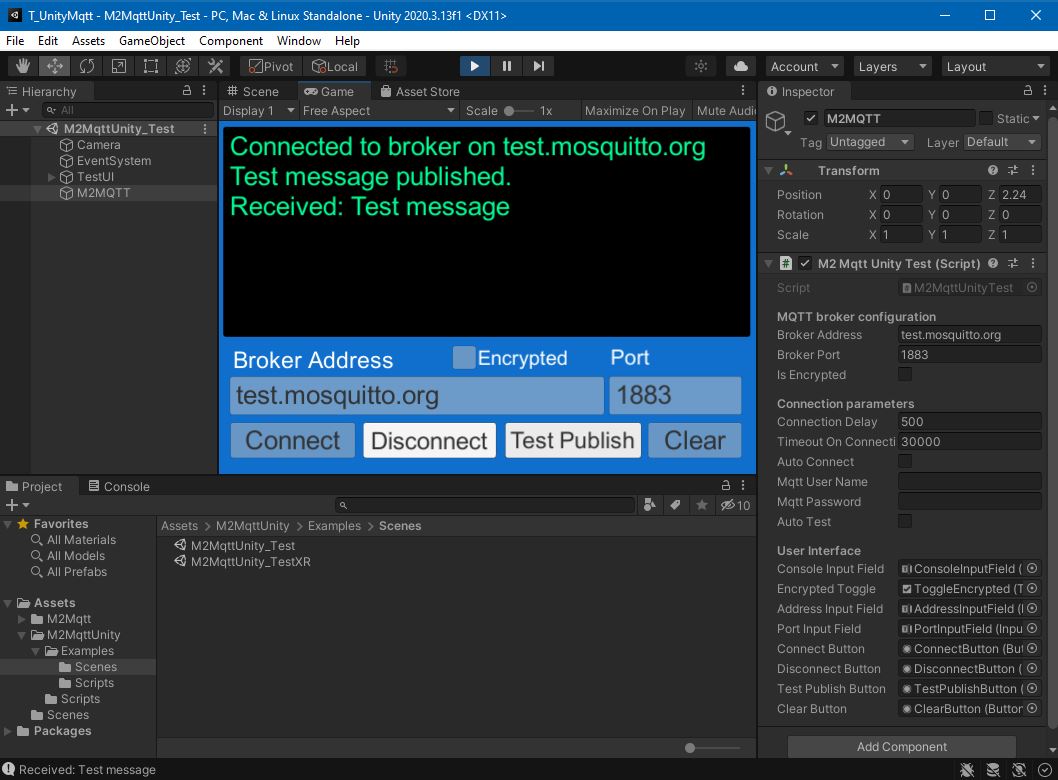
Without stopping Unity, we can change the MQTT Broker address to test.mosquitto.org, press again Connect and, once connected, press Test Publish to check if the library is able to send and receive any message
By inspecting the scene, we can see that the only script used to set up the MQTT Client is M2MqttUnityTest.cs, attached to the M2MQTT GameObject in the scene, however, this script is linked with other classes of the main folder M2Mqtt.
We need to write two custom scripts based on the original M2MqttUnityTest.cs used in the example scene.
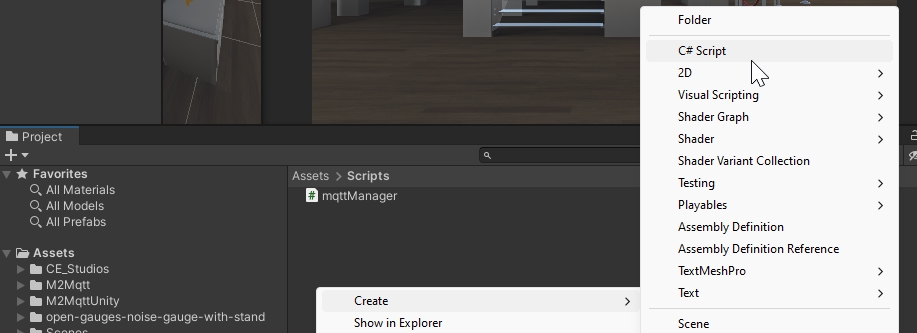
Using the Gallery scene previously built. Create a new folder in Assets (e.g. Assets\Gallery\scripts) and create two new C# Script named:
mqttManager(no need to add the extension .cs)mqttController(no need to add the extension .cs)
Open the mqttManager.cs in VSCode, remove the existing content
using System.Collections;
using System.Collections.Generic;
using UnityEngine;

public class mqttManager : MonoBehaviour
{
    // Start is called before the first frame update
    void Start()
    {

    }
    // Update is called once per frame
    void Update()
    {

    }
}
And paste the script from the GitHub Gist
How the mqttManager works
- the first part of text is the licence, it tell us what we can and cannot do with the code and the Author of the code itself;
- the
usingstatements allows us to import theM2MqttUnity, the twouPLibraryandUnityEnginenamespaces, to access the methods and functions from those scripts;
using System.Collections.Generic;
using UnityEngine;
using M2MqttUnity;
using uPLibrary.Networking.M2Mqtt.Messages;
- the
mqttObjclass is used to store the message and topic received by the MQTT broker and send it to the controller - the public class
mqttManagerneeds to derive from the main classM2MqttUnityClient(that is part of the above importedusing M2MqttUnity) instead of the standardMonoBehaviour;
//the mqttObj is use to store the message received and topic subscribed, so we can select the right object from the controller
//C# Property GET/SET and event listener is used to reduce Update overhead in the controlled objects
public class mqttObj{
    private string m_msg;
    public string msg
    {
        get{return m_msg;}
        set{
            if (m_msg == value) return;
            m_msg = value;
        }
    }
    private string m_topic;
    public string topic
    {
        get
        {
            return m_topic;
        }
        set
        {
            if (m_topic == value) return;
            m_topic = value;
        }
    }
}

public class mqttManager : M2MqttUnityClient
{
    [Header("MQTT topics")]
    [Tooltip("Set the topic to subscribe. !!!ATTENTION!!! multi-level wildcard # subscribes to all topics")]
    //public string topicSubscribe = "#"; // topic to subscribe. !!! The multi-level wildcard # is used to subscribe to all the topics. Attention i if #, subscribe to all topics. Attention if MQTT is on data plan
    public List<string> topicSubscribe = new List<string>(); //list of topics to subscribe

    [Tooltip("Set the topic to publish (optional)")]
    public string topicPublish = ""; // topic to publish

    public string messagePublish = ""; // message to publish

    [Tooltip("Set this to true to perform a testing cycle automatically on startup")]
    public bool autoTest = false;

    //new mqttObj is created to store message received and topic subscribed
    mqttObj mqttObject = new mqttObj();

    public event OnMessageArrivedDelegate OnMessageArrived;
    public delegate void OnMessageArrivedDelegate(mqttObj mqttObject);

    //using C# Property GET/SET and event listener to expose the connection status
    private bool m_isConnected;

    public bool isConnected
    {
        get
        {
            return m_isConnected;
        }
        set
        {
            if (m_isConnected == value) return;
            m_isConnected = value;
            if (OnConnectionSucceeded != null)
            {
                OnConnectionSucceeded(isConnected);
            }
        }
    }
    public event OnConnectionSucceededDelegate OnConnectionSucceeded;
    public delegate void OnConnectionSucceededDelegate(bool isConnected);

    // a list to store the mqttObj received
    private List<mqttObj> eventMessages = new List<mqttObj>();
These are all the variable that we need. The public class mqttObj and the public bool variable isConnected use the C# properties GET/SET. Instead of using an Update function or a Coroutine, by using these properties it is possible to create a more efficient event system.
the following functions, after the variables, and within the public class mqttManager derive from the original M2MqttUnityTest.cs and they have been already modified to make them more suitable for our need
public void Publish()
    {
        client.Publish(topicPublish, System.Text.Encoding.UTF8.GetBytes(messagePublish), MqttMsgBase.QOS_LEVEL_EXACTLY_ONCE, false);
        Debug.Log("Test message published");
    }
    public void SetEncrypted(bool isEncrypted)
    {
        this.isEncrypted = isEncrypted;
    }

    protected override void OnConnecting()
    {
        base.OnConnecting();
    }

    protected override void OnConnected()
    {
        base.OnConnected();
        isConnected = true;

        if (autoTest)
        {
            Publish();
        }
    }

    protected override void OnConnectionFailed(string errorMessage)
    {
        Debug.Log("CONNECTION FAILED! " + errorMessage);
    }

    protected override void OnDisconnected()
    {
        Debug.Log("Disconnected.");
        isConnected = false;
    }

    protected override void OnConnectionLost()
    {
        Debug.Log("CONNECTION LOST!");
    }

    protected override void SubscribeTopics()
    {
        foreach (string item in topicSubscribe) //subscribe to all the topics of the Public List topicSubscribe, not most efficient way (e.g. JSON object works better), but it might be useful in certain circumstances
        {
         client.Subscribe(new string[] { item }, new byte[] { MqttMsgBase.QOS_LEVEL_EXACTLY_ONCE });
        }
    }

    protected override void UnsubscribeTopics()
    {
        foreach (string item in topicSubscribe)
        {
            client.Unsubscribe(new string[] { item });
        }
    }

    protected override void Start()
    {
        base.Start();
    }

    protected override void DecodeMessage(string topicReceived, byte[] message)
    {
        //The message is decoded and stored into the mqttObj (defined at the lines 40-63)

        mqttObject.msg = System.Text.Encoding.UTF8.GetString(message);
        mqttObject.topic=topicReceived;

        Debug.Log("Received: " + mqttObject.msg + "from topic: " + mqttObject.topic);

        StoreMessage(mqttObject);

        if(OnMessageArrived !=null){
        OnMessageArrived(mqttObject);
        }
    }

    private void StoreMessage(mqttObj eventMsg)
    {
        if (eventMessages.Count > 50)
        {
            eventMessages.Clear();
        }
        eventMessages.Add(eventMsg);
    }

    protected override void Update()
    {
        base.Update(); // call ProcessMqttEvents()

    }

    private void OnDestroy()
    {
        Disconnect();
    }

    private void OnValidate()
    {
        if (autoTest)
        {
            autoConnect = true;
        }
    }//End of the Class
From the original scripts, all the references and functions based on the UI panel have been removed.
The message is received and decoded by the function DecodeMessage() that is used also to store a copy of the received message and topic. The Debug.Log function is used to print the received message and topic in the console, it can be commented out in production.
We can now save the script and go back to the Unity Editor. Create a new empty GameObject in the Hierarchy window named MQTT_Manager and add the script mqttManager.cs using Add component or dragging the script on the GameObject.
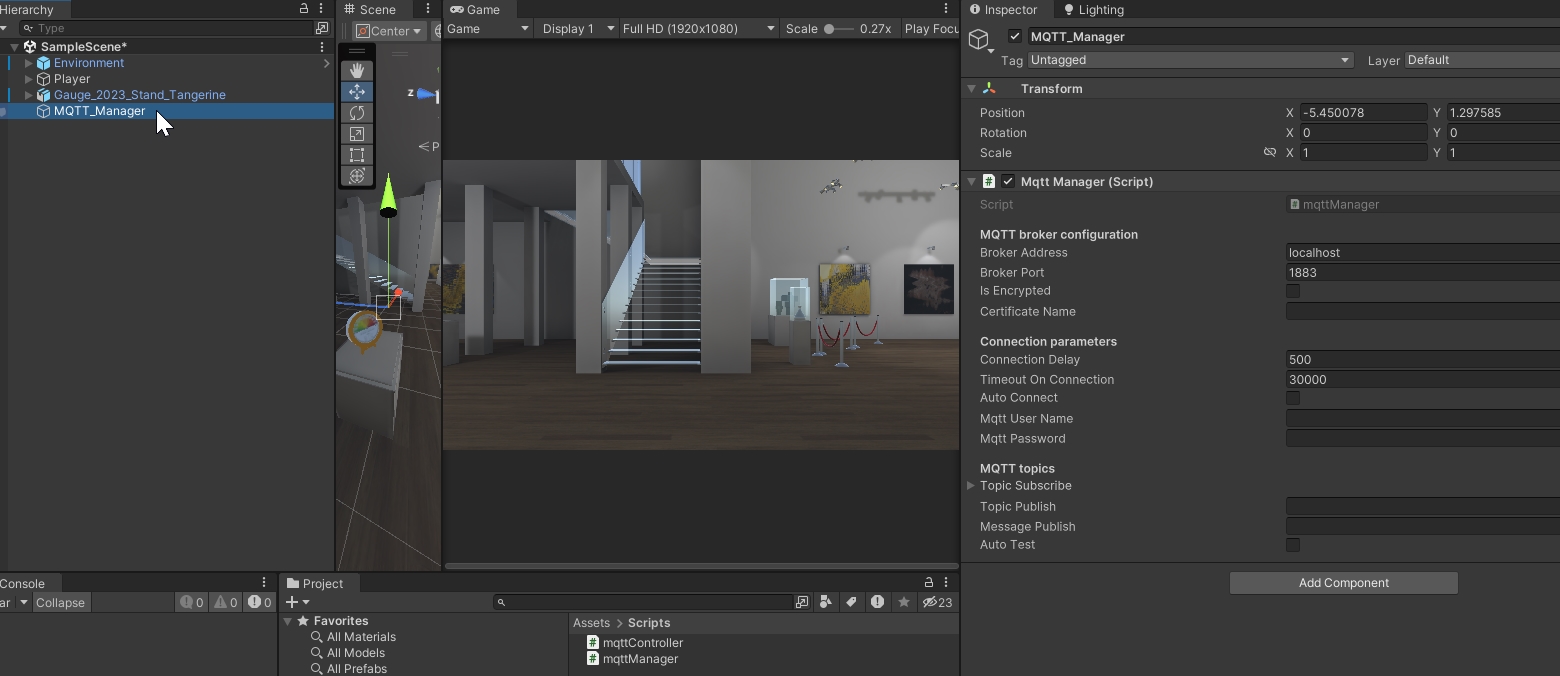
With the MQTT_Manager still selected, in the Inspector window fill the Broker Address, Broker Port and some Topic Subscribe and enable Auto Connect.
Press Play to control, in the Unity console the status of the connection, the received messages and the subscribed topic.
To identify the MQTT_Manager in the scene from other scripts, we have to set its Tag from the Inspector window (default value is Untagged). Select the Tag dropdown and select Add Tag... (e.g. energy). Select again the GameObject set the Tag just created.
The mqttController.cs script can be customised to control any GameObject in the scene. For the purpose of this tutorial, we are going to visualise the value received from the MQTT Broker using a TextMeshPro (TMP) GameObject.
- right-click in the
Hierarchy windowand--> 3D Object --> Text-TextMeshPro, or from the top menuGameObject --> 3D Object --> Text-TextMeshPro
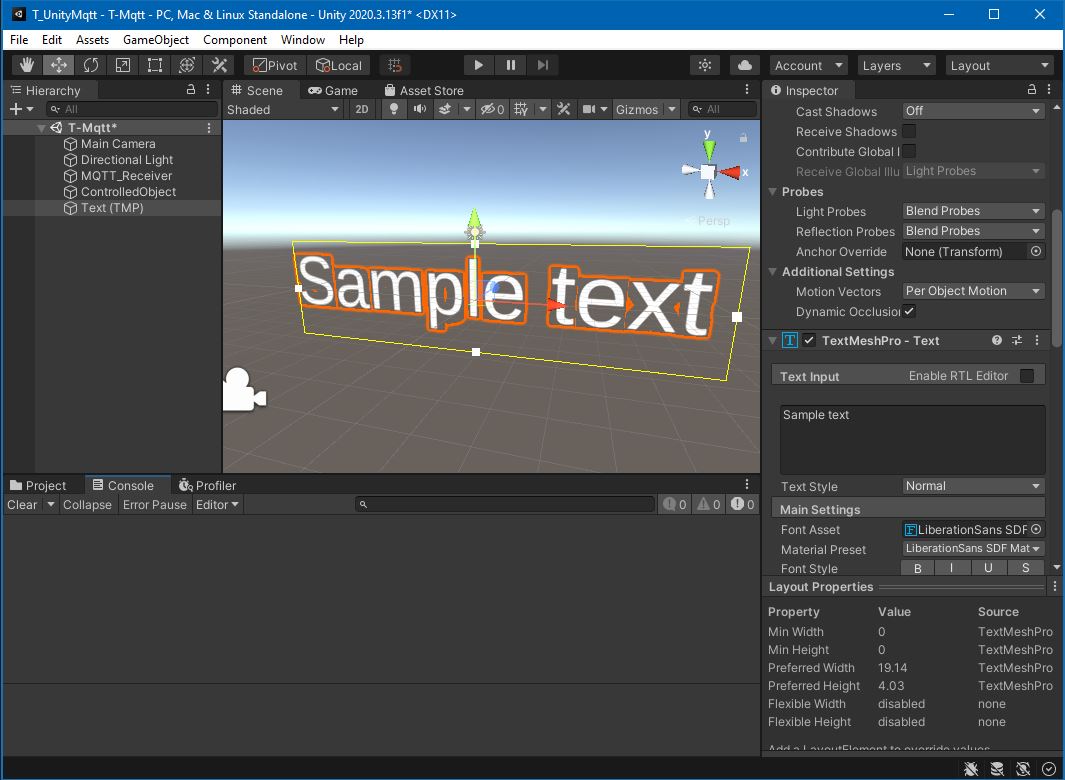
- with the
TextMeshProGameObject selected, in theInspector windowchange position and Font Size - add the
mqttController.csscript to theTextMeshProGameObject selected - open the
mqttController.csscript in VSCode to add:using TMProstatement- and the reference to the text field in the
OnMessageArrivedHandlerfunction
using System.Collections;
using System.Collections.Generic;
using UnityEngine;
using TMPro;
public class mqttController : MonoBehaviour
{
public string nameController = "Controller 1";
public string tag_mqttManager = "";
public mqttManager _eventSender;
void Start()
{
if (GameObject.FindGameObjectsWithTag(tag_mqttManager).Length > 0)
{
_eventSender = GameObject.FindGameObjectsWithTag(tag_mqttManager)[0].gameObject.GetComponent<mqttManager>();
}
else
{
Debug.LogError("At least one GameObject with mqttManager component and Tag == tag_mqttManager needs to be provided");
}
_eventSender.OnMessageArrived += OnMessageArrivedHandler;
}
private void OnMessageArrivedHandler(mqttObj mqttObject) //the mqttObj is defined in the mqttManager.cs
{
//We need to check the topic of the message to know where to use it
if (mqttObject.topic.Contains("Entire topic or part of it"))
{
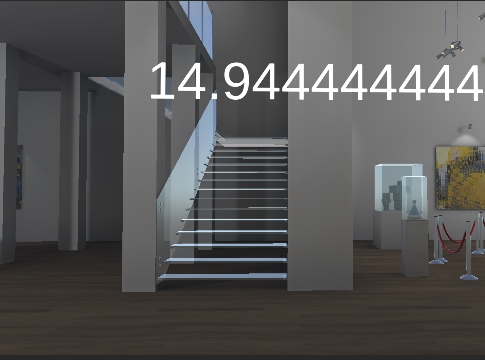
this.GetComponent<TextMeshPro>().text = mqttObject.msg;
Debug.Log("Message, from Topic " + mqttObject.topic + " is = " + mqttObject.msg);
}
}
}
The variable tag_mqttManager is configured by the user in the Inspector window. It must match the tag of one of the GameObjects in the scene that has the mqttManager script attached. In this example, the GameObject MQTT_Manager has tag energy.
The variable _eventSender is automatically assigned based on the Tag and is used to establish a connection between the manager and the controller. Whenever the MQTT Client receives a message, it triggers an event that is detected by this controller script.
This setup allows for flexibility in managing MQTT communication: It is possible to create multiple instances of mqttManager if you need to connect to multiple MQTT Brokers, and you can also connect multiple controllers to a specific mqttManager for handling the received messages.
The Start function is used to select the right manager, based on its Tag, and to subscribe to the OnMessageArrived event defined in the mqttManager.
When the message is received by the mqttManager, mqttController check if the topic is the right one and updates the text field of the TextMeshPro GameObject.
TextMeshPro is a powerful add-on that can be used to create effective Graphic User Interfaces (GUI) in combination with the Unity uGUI system.
A GUI in Unity can use two main Render Mode:
- Screen Space: the UI overlays the camera view
- World Space: the UI is an actual object spatially located in the digital environment
The first mode is generally used to create input menus, mini-maps, pop-ups and splash screens or to develop entire 2D applications. The World Space mode is used to create digital screens, as well as buttons and other interactable elements that are blended with the digital environment, as we are going to see in this example.
UI structure
The GUI in Unity is based on a series of components that needs to be created and used in a specific order. The first element is the main parent of the GUI, the Canvas. The Canvas is used to control the Render mode used for the GUI, as well as the position and dimensions of the entire GUI.
The Canvas is an empty GameObject that contains the various components (children) of the GUI. The children by default inherit Canvas properties, but it is possible to override them if needed on an object-by-object basis.
The GUI elements can be passive and used to display information (e.g. text, images) or they can be interactive (e.g. buttons, slider) to control GameObjects in the scene using an EventSystem.
- create a new
UI -> Canvasand name it MQTT_Screen - in the
Inspector windowchange- Rect Transform
- width=6 - height=4
- position
PosX: -19.8; PosY: 3.6; PosZ: 4; rotation0 -90 0
- CanvasRender mode from ScreenSpace to World Space
- Rect Transform
- create a new
UI -> Panelas child of the _MQTTScreenCanvas - in the
Inspector windowchange the colour of the panel and remove the default Source Image - add a component
Vertical Layout Groupto the Panel and change the Child Alignment toMiddle Center
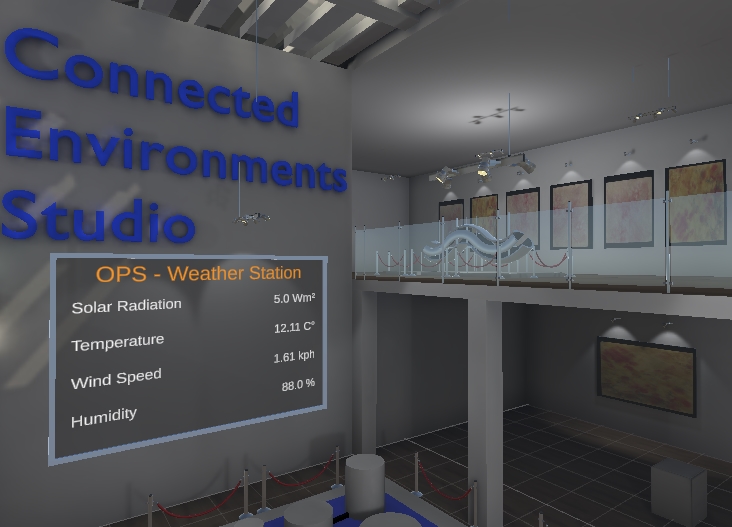
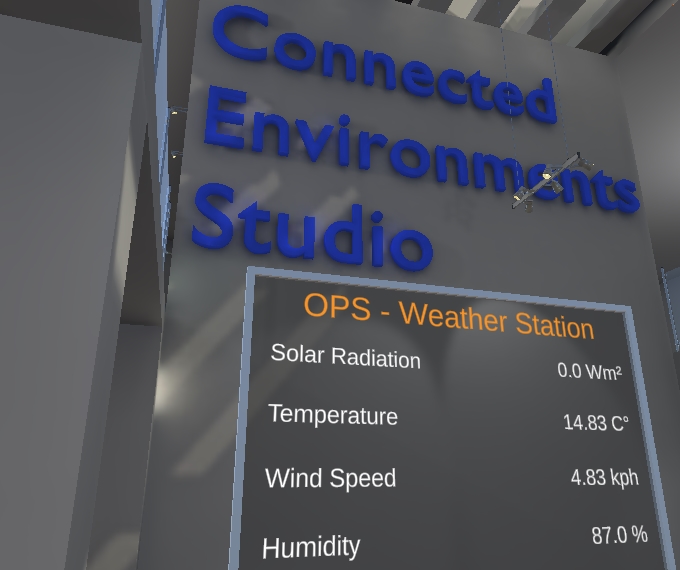
It is possible now to change the position, rotation and size of the parent object MQTT_Screen. The position provided places the canvas just below the Connected Environments Studio text (but feel free to choose other locations). Be sure to select the right GameObject, the Canvas, from the Hierarchy window and not the child Panel.

The next step is to add the TextMeshPro GameObjects for the description texts and the placeholder texts, the latter will be dynamically updated by the MQTT_Manager.
create a new UI -> Text - TextMeshPro as a child of the Panel GameObject and name it Title
- in the
Inspector windowchange the width=5.8 - height=0.5 and Font Size= 0.45. Change also theTextfrom New Text to OPS - Weather Station. Have a look at the other parameters of the TextMeshPro Component (i.e. alignments; colours; font style...) to familiarise yourself with the various properties
create a new empty GameObject named _mqttValues as a child of the Panel and add a component Vertical Layout Group and change width=5.4 - height=3
create 4UI -> Text - TextMeshPro (e.g. SolarRadiation, Temperature, WindSpeed, Humidity) as children of the just created GameObject (i.e. _mqttValues), change their width= 5.4 - height= 0.5, Font Size = 0.3 and add a Vertical Layout Group to each of them. Change the New Text accordingly
finally, inside each of the 4 TextMeshPro create another UI -> Text - TextMeshPro. These are going to be the placeholder for the MQTT values. Change width=5.4 - height=0.5, Font Size = 0.3, and alignment right, the placeholders are ready to be used

Update the MQTT screen using JSON response
The mqttController can now be used to associate each TextMeshPro GameObject with its corresponding MQTT value. Since we require updates for four distinct values, we have the option to subscribe to multiple topics or to deserialize a JSON response containing all the necessary values, provided the MQTT Broker offers this response format
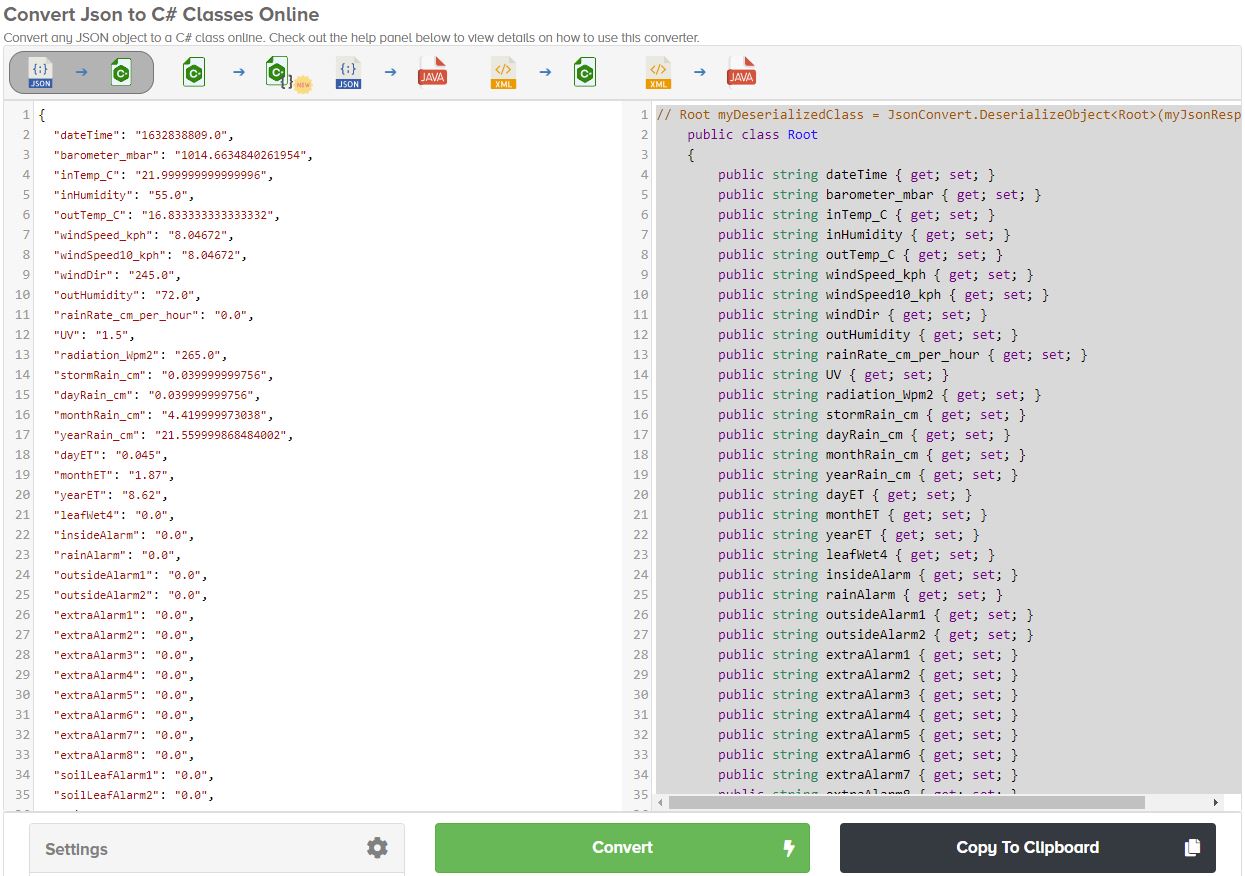
In C# the deserialization of a JSON response requires a class representation (the structure of the JSON itself, generally defined by the owner of the MQTT Broker). The easiest way to convert a JSON in C# classes is to use an online tool such as https://json2csharp.com/
- copy the text of the JSON response (for example using an external tool such as MQTT Explorer)
- paste the JSON response in https://json2csharp.com/ and Copy To Clipboard the result.
- in the
mqttControllerscript, after the OnMessageArriveHandler, and inside the last bracket of the mainpublic class mqttController, paste the public class from the clipboard - add at its top
[System.Serializable]and remove all the{ get; set; }value (use the Find and Replace feature of VSCode)
    [System.Serializable]
    public class Root
    {
        public string dayRain_cm ;
        public string monthRain_cm ;
        public string yearRain_cm ;
        public string dayET ;
        public string monthET ;
        public string yearET ;
        public string leafWet4 ;
        public string insideAlarm ;
        public string rainAlarm ;
        public string outsideAlarm1 ;
        public string outsideAlarm2 ;

        more...
    }
finally, we can deserialize the JSON response and access the various values by adding into the OnMessageArriveHandler function the following lines
private void OnMessageArrivedHandler(mqttObj mqttObject)
{
    if (mqttObject.topic.Contains("TOPIC or part of it"))
    {
    var weatherJson = JsonUtility.FromJson<Root>(mqttObject.msg);
    Debug.Log(weatherJson.outTemp_C);
    Debug.Log("Message, from Topic " + mqttObject.topic + " is = " + mqttObject.msg);
    }
}
The last step is to link the values with the TextMeshPro GameObjects.There are several solutions available, with one straightforward option being to create four public TextMeshProUGUI variables in the mqttController script."
public TextMeshProUGUI value_Temperature;
public TextMeshProUGUI value_SolarRadiation;
public TextMeshProUGUI value_WindSpeed;
public TextMeshProUGUI value_Humidity;
and in the OnMessageArriveHandler set the text value of each TextMeshProUGUI to the relative JSON key just after the Debug.Log
if (mqttObject.topic.Contains("TOPIC or part of it"))
{
var weatherJson = JsonUtility.FromJson<Root>(mqttObject.msg);
    value_Temperature.text = System.Math.Round(float.Parse(weatherJson.outTemp_C), 2).ToString() + " C\u00b0";
    value_SolarRadiation.text = weatherJson.radiation_Wpm2 + " Wm\u00b2";
    value_WindSpeed.text = System.Math.Round(float.Parse(weatherJson.windSpeed_kph), 2).ToString() + " kph";
    value_Humidity.text = weatherJson.outHumidity + " %";
    Debug.Log("Message, from Topic " + mqttObject.topic + " is = " + mqttObject.msg);
}
Save the script and add it to the MQTT_Screen GameObject (the UI Canvas). Now link the correct TextMeshProUGUI GameObject from the Hierarchy window (MQTT_Screen -> Panel -> mqtt_Values -> value_xxxx) with the relative field in the Inspector window
The final script for the mqttController should be similar to this one:
using System.Collections.Generic;
using UnityEngine;
using TMPro;
public class mqttController : MonoBehaviour
{
public string nameController = "Controller 1";
public string tag_mqttManager = "";
public mqttManager _eventSender;
public TextMeshProUGUI value_Temperature;
public TextMeshProUGUI value_SolarRadiation;
public TextMeshProUGUI value_WindSpeed;
public TextMeshProUGUI value_Humidity;

void Start()
{
    if (GameObject.FindGameObjectsWithTag(tag_mqttManager).Length > 0)
    {
    _eventSender = GameObject.FindGameObjectsWithTag(tag_mqttManager)[0].gameObject.GetComponent<mqttManager>();
    }
    else
    {
    Debug.LogError("At least one GameObject with mqttManager component and Tag == tag_mqttManager needs to be provided");
    }
    _eventSender.OnMessageArrived += OnMessageArrivedHandler;
}

private void OnMessageArrivedHandler(mqttObj mqttObject) //the mqttObj is defined in the mqttManager.cs
{
    //We need to check the topic of the message to know where to use it. ATTENTION CASE SENSITIVE temp != Temp
    if (mqttObject.topic.Contains("loop"))
    {
        var weatherJson = JsonUtility.FromJson<Root>(mqttObject.msg);
        value_Temperature.text = System.Math.Round(float.Parse(weatherJson.outTemp_C), 2).ToString() + " C\u00b0";
        value_SolarRadiation.text = weatherJson.radiation_Wpm2 + " Wm\u00b2";
        value_WindSpeed.text = System.Math.Round(float.Parse(weatherJson.windSpeed_kph), 2).ToString() + " kph";
        value_Humidity.text = weatherJson.outHumidity + " %";
        Debug.Log("Message, from Topic " + mqttObject.topic + " is = " + mqttObject.msg);
    }
}

[System.Serializable]
public class Root
{
    public string dateTime;
    public string barometer_mbar;
    public string inTemp_C;
    public string inHumidity;
    public string outTemp_C;
    public string windSpeed_kph;
    public string windSpeed10_kph;
    public string windDir;
    public string outHumidity;
    public string rainRate_cm_per_hour;
    public string UV;
    public string radiation_Wpm2;
    public string stormRain_cm;
    public string dayRain_cm;
    public string monthRain_cm;
    public string yearRain_cm;
    public string dayET;
    public string monthET;
    public string yearET;
    public string insideAlarm;
    public string rainAlarm;
    public string outsideAlarm1;
    public string outsideAlarm2;
    public string extraAlarm1;
    public string extraAlarm2;
    public string extraAlarm3;
    public string extraAlarm4;
    public string extraAlarm5;
    public string extraAlarm6;
    public string extraAlarm7;
    public string extraAlarm8;
    public string soilLeafAlarm1;
    public string soilLeafAlarm2;
    public string soilLeafAlarm3;
    public string soilLeafAlarm4;
    public string txBatteryStatus;
    public string consBatteryVoltage_volt;
    public string forecastIcon;
    public string forecastRule;
    public string sunrise;
    public string sunset;
    public string rain_cm;
    public string windGust_kph;
    public string windGustDir;
    public string pressure_mbar;
    public string altimeter_mbar;
    public string appTemp_C;
    public string cloudbase_meter;
    public string dewpoint_C;
    public string heatindex_C;
    public string humidex_C;
    public string inDewpoint_C;
    public string maxSolarRad_Wpm2;
    public string windchill_C;
    public string hourRain_cm;
    public string rain24_cm;
    public string usUnits;
    public string stormStart;
}

}
MQTT feeds are not the sole technique for incorporating real-time data into Unity. Another effective approach is to utilise REST APIs.
REST APIs are not limited to provide data as string and float. References to images, sounds and videos can be collected as well. In this example we are going to use the REST APIs of the Victoria & Albert Museum to dynamically change the paintings of the virtual Gallery.
The API is documented at https://api.vam.ac.uk/docs. If we are interested in changing the textures of our gallery with the objects of the museum in which the primary place is London we need to use add a query to the API call and specify the id_place=x28980. To further filter the records and obtain just the objects that contain at least one image, we need to add a second query _&imagesexist=1
If we open this URL, the browser will return the relative JSON string. This can be copied and used, as we did before with https://json2csharp.com/, to create the C# classes.
- In the folder
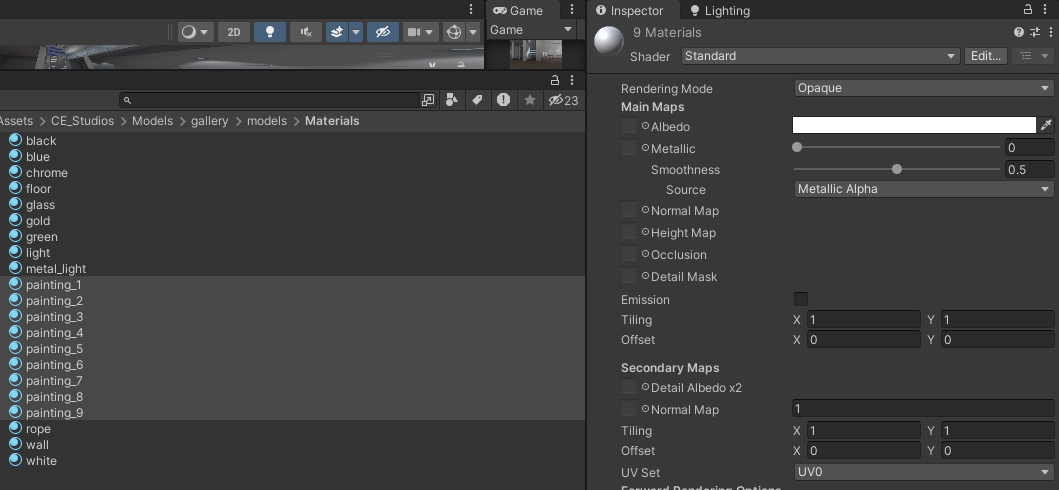
CE_Studios -> Models -> gallery -> models -> Materialsselect all nine _paintingn (create additional if less than 9). Remove the existing texture (from the small square next to Albedo click on it and press delete key) and change the colour to white.
- create a new C# script named
museumAPIand open it in VSCode - inside the
public class museumAPI, after theUpdate(){}, create apublic class museumva { }and inside this one paste the classes generated using the online tool https://json2csharp.com/ the result of the API URL above (i.e.https://api.vam.ac.uk/v2/objects/search?id_place=x28980&images_exist=1).
public class museumva
    {
        [System.Serializable]
        public class Parameters
        {
        }

        [System.Serializable]
        public class Info
        {
            public string version;
            public int record_count;
            public bool record_count_exact;
            public Parameters parameters;
            public int page_size;
            public int pages;
            public int page;
            public int image_count;
        }
    [ ....... ]
        [System.Serializable]
        public class Root
        {
            public Info info;
            public List<Record> records;
            public Clusters clusters;
        }


    }
at the top of the museumAPI.cs add the UnityEngine.Networking namespace, this will give us access to the methods we need to use to call the REST APIs
using System.Collections;
using System.Collections.Generic;
using UnityEngine;

using UnityEngine.Networking;
- in the public class
museumAPI, add the public variable wwwRequest (the URL of the API) and an array of Materials (the nine paintings)
public string wwwRequest = " ";
public Material[] paintings_mat;
Instead of using the Update() method for the WebRequest, we are going to use another solution called Coroutine. The reason is that every function inside the Update() need to be completed before the end of the frame, if the function is not complete Unity will likely drop the frame rate leading to a not satisfactory user experience. From the Unity manual: A coroutine is like a function that has the ability to pause execution and return control to Unity but then to continue where it left off on the following frame
A coroutine is created using the IEnumerator Interface and executed using the function StartCoroutine(IEnumerator routine). In our example
void Start()
    {
        StartCoroutine(museumRequest());
    }

IEnumerator museumRequest()
    {
        [...]
        yield ...
    }
 IEnumerator museumRequest()
    {
        yield return new WaitForSeconds(5); //wait 5sec before running
        UnityWebRequest www = UnityWebRequest.Get(wwwRequest);

        yield return www.SendWebRequest(); //wait to receive the JSON
        Debug.Log(www.downloadHandler.text);
        var response = JsonUtility.FromJson<museumva.Root>(www.downloadHandler.text); //deserialize the JSON using the public class museumva

        for (int i = 0; i < paintings_mat.Length; i++)
        {
            string MediaUrl = "https://framemark.vam.ac.uk/collections/" + response.records[i]._primaryImageId + "/full/!500,500/0/default.jpg";

            UnityWebRequest request = UnityWebRequestTexture.GetTexture(MediaUrl);
            yield return request.SendWebRequest();
            if (request.result == UnityWebRequest.Result.ConnectionError || request.result == UnityWebRequest.Result.ProtocolError)
                Debug.Log(request.error);
            else
               paintings_mat[i].mainTexture= ((DownloadHandlerTexture)request.downloadHandler).texture;

        }

    }
This are the various steps processed by the coroutine:
- wait 5 seconds
- send the request using the URL provided by the user in the public field wwwRequest
- wait to receive a valid JSON object
- deserialize the object using the C# classes
- create a new URL for each record using the standard IIIF API
- send a new WebRequest, but this time targeting specifically a Texture as response (
UnityWebRequestTexture.GetTexture(MediaUrl)) - wait to receive a valid texture
- apply the texture to the Materials of the public array set by the user in the
Inspector window
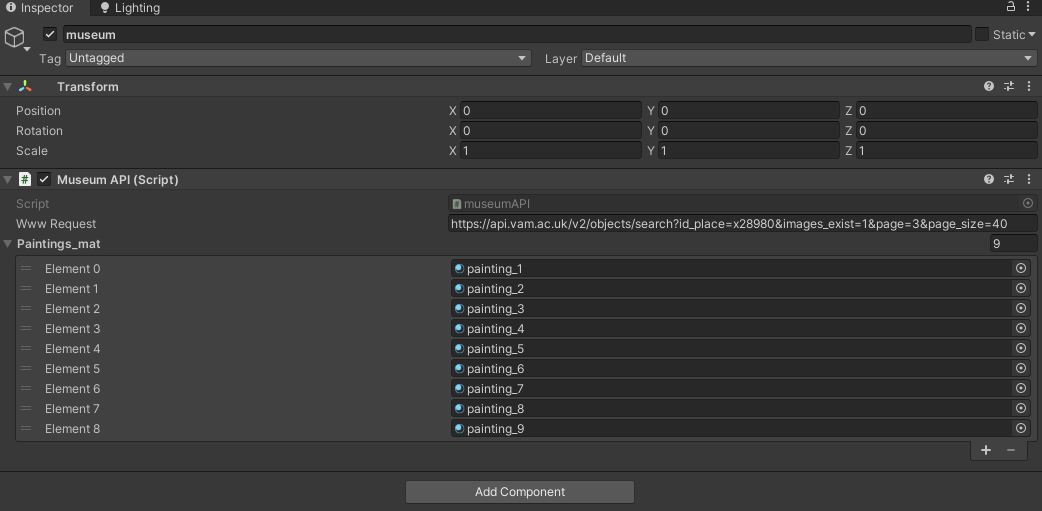
The final step is to create an empty GameObject (named e.g. MuseumAPI) and add the script to it, add the URL for the web-request, and populate the Materials array with the 9 _paintingn from the folder CE_Studios -> Models -> gallery -> models -> Materials.

Build the project to test it. If the mobile build is chosen (Android or iOS) remember to enable the child UI_Canvas_StarterAssetsInputs_Joysticks of the Player GameObject to have the touch controller.
The final museumAPI.cs
using System.Collections;
using System.Collections.Generic;
using UnityEngine;
using UnityEngine.Networking;

public class museumAPI : MonoBehaviour
{
public string wwwRequest = " ";
public Material[] paintings_mat;
// Start is called before the first frame update
void Start()
{
    StartCoroutine(museumRequest());
}
IEnumerator museumRequest()
{
yield return new WaitForSeconds(5); //wait 5sec before running
UnityWebRequest www = UnityWebRequest.Get(wwwRequest);

yield return www.SendWebRequest(); //wait to receive the JSON
Debug.Log(www.downloadHandler.text);
var response = JsonUtility.FromJson<museumva.Root>(www.downloadHandler.text); //deserialize the JSON using the public class museumva

for (int i = 0; i < paintings_mat.Length; i++)
{
    string MediaUrl = "https://framemark.vam.ac.uk/collections/" + response.records[i]._primaryImageId + "/full/!500,500/0/default.jpg";

    UnityWebRequest request = UnityWebRequestTexture.GetTexture(MediaUrl);
    yield return request.SendWebRequest();
    if (request.result == UnityWebRequest.Result.ConnectionError || request.result == UnityWebRequest.Result.ProtocolError)
        Debug.Log(request.error);
    else
        paintings_mat[i].mainTexture = ((DownloadHandlerTexture)request.downloadHandler).texture;
}
}

    public class museumva
    {
        [System.Serializable]
        public class Category
        {
            public int other_terms_record_count;
            public List<Term> terms;
        }

        [System.Serializable]
        public class Clusters
        {
            public Category category;
            public Person person;
            public Organisation organisation;
            public Collection collection;
            public Gallery gallery;
            public Style style;
            public Place place;
            public ObjectType object_type;
            public Technique technique;
            public Material material;
        }
        [System.Serializable]
        public class Collection
        {
            public int other_terms_record_count;
            public List<Term> terms;
        }
        [System.Serializable]
        public class CurrentLocation
        {
            public string id;
            public string displayName;
            public string type;
            public string site;
            public bool onDisplay;
            public Detail detail;
        }
        [System.Serializable]
        public class Detail
        {
            public string free;
            public string @case;
            public string shelf;
            public string box;
        }
        [System.Serializable]
        public class Gallery
        {
            public int other_terms_record_count;
            public List<Term> terms;
        }
        [System.Serializable]
        public class Images
        {
            public string _primary_thumbnail;
            public string _iiif_image_base_url;
            public string _iiif_presentation_url;
            public string imageResolution;
        }
        [System.Serializable]
        public class Info
        {
            public string version;
            public int record_count;
            public bool record_count_exact;
            public Parameters parameters;
            public int page_size;
            public int pages;
            public int page;
            public int image_count;
        }
        [System.Serializable]
        public class Material
        {
            public int other_terms_record_count;
            public List<Term> terms;
        }
        [System.Serializable]
        public class ObjectType
        {
            public int other_terms_record_count;
            public List<Term> terms;
        }
        [System.Serializable]
        public class Organisation
        {
            public int other_terms_record_count;
            public List<Term> terms;
        }
        [System.Serializable]
        public class Parameters
        {
        }
        [System.Serializable]
        public class Person
        {
            public int other_terms_record_count;
            public List<Term> terms;
        }
        [System.Serializable]
        public class Place
        {
            public int other_terms_record_count;
            public List<Term> terms;
        }
        [System.Serializable]
        public class PrimaryMaker
        {
            public string name;
            public string association;
        }
        [System.Serializable]
        public class Record
        {
            public string systemNumber;
            public string accessionNumber;
            public string objectType;
            public CurrentLocation _currentLocation;
            public string _primaryTitle;
            public PrimaryMaker _primaryMaker;
            public string _primaryImageId;
            public string _primaryDate;
            public string _primaryPlace;
            public List<object> _warningTypes;
            public Images _images;
        }
        [System.Serializable]
        public class Root
        {
            public Info info;
            public List<Record> records;
            public Clusters clusters;
        }
        [System.Serializable]
        public class Style
        {
            public int other_terms_record_count;
            public List<Term> terms;
        }
        [System.Serializable]
        public class Technique
        {
            public int other_terms_record_count;
            public List<Term> terms;
        }
        [System.Serializable]
        public class Term
        {
            public string id;
            public string value;
            public int count;
            public int count_max_error;
        }
    }
}