This workshop will show you how to:
- Recreate a previous Babylon.js project
- Connect the project to an MQTT data stream
- Visualise MQTT data using Apache ECharts
To complete this workshop you will need:
- Visual Studio Code
- Node.js LTS and NPM
- Digital model in GLB format
- Workshop 1 completed
Languages used:
- HTML
- JavaScript
Additional resources
When sharing a Babylon.js project, as with many other development projects, not every file and folder needs to be included. Environment files, such as .env, should not be shared because they may contain sensitive information, including API keys or access credentials. The node_modules folder can also be excluded because it contains installed dependencies that can be downloaded again using package.json and the lock file. Similarly, the dist folder contains generated build output and can usually be recreated from the source files.
create a new folder for this Workshop and add the previous project avoiding .env, node_modules, and dist folders
navigate to the folder of the project cd [name of your project]
Run npm install to install all the dependencies listed in package.json
Once you launch the local development server by running npm run dev, the project should appear exactly as it did at the end of the previous workshop.
To receive real-time data from sensors, we will use the MQTT protocol. MQTT is a lightweight messaging protocol designed for Internet of Things applications. It follows a publish-and-subscribe model: sensors publish data to named topics through an MQTT broker, while applications subscribe to the topics containing the data they need. To connect our Babylon.js application to the MQTT broker, we will use MQTT.js. MQTT.js provides the browser-based client needed to connect to the broker, subscribe to sensor topics, and handle incoming messages. The received values can then be used to update the scene and its data visualisations.
- In the project folder, install the MQTT.js library by running:
npm install mqtt
- Create a new file named
mqttManager.jsinsidesrc/utils. If necessary, create the utils folder first
import mqtt from "mqtt";

/**
* Creates an MQTT manager.
*
* onConnect() Called when the broker connection opens.
* onDisconnect() Called when the broker connection closes.
* onError(error) Called when an MQTT error occurs.
*/

export function createMQTTManager(
    brokerAddress,
    username,
    password,
    {
        onConnect,
        onDisconnect,
        onError
    } = {}
) {

// Select the WebSocket protocol that matches the page protocol.
const WS_PROTOCOL = location.protocol === "https:" ? "wss" : "ws";

// Use the authenticated broker ports only when
// username and password have been provided.
const authenticated = Boolean(username && password);

const PORT = authenticated ? (WS_PROTOCOL === "wss" ? "8091" : "8090") : (WS_PROTOCOL === "wss" ? "8081" : "8080");

// Build the complete MQTT broker URL using the address
// received from the mqttController.

const BROKER_URL =`${WS_PROTOCOL}://${brokerAddress}:${PORT}`;

const OPTIONS = {
    keepalive: 60,
    reconnectPeriod: 2000,
    connectTimeout: 30_000,
    clean: true,
    username,
    password
};

// Create the MQTT client and connect it to the broker.
const client = mqtt.connect(
    BROKER_URL,
    OPTIONS
);

// When the connection is established...
client.on("connect", () => {
    onConnect?.();
    console.log(
        `[MQTT] connected to ${BROKER_URL}`
    );
});

client.on("reconnect", () => {
    console.log("[MQTT] reconnecting...");
});

client.on("error", error => {
    onError?.(error);
    console.error("[MQTT] error", error);
});

client.on("close", () => {
    console.log("[MQTT] disconnected");
    onDisconnect?.();
});

/**
 * Subscribe to one or more MQTT topic filters.
 *
 * Example filter:
 * TOPIC/TO/SUBSCRIBE/../SENSOR
 *
 * The # wildcard subscribes to every child topic:
 * TOPIC/TO/SUBSCRIBE/../DEVICE/#
 *
 * When a message arrives, the callback receives:
 * onMessage(topic, payload)
 *
 * topic   -> The full MQTT topic that published the message
 * payload -> The message content converted to text
 **/
function subscribe(topicFilters, onMessage) {
    // Allow the function to receive either one topic filter
    // or an array.
    if (!Array.isArray(topicFilters)) {
        topicFilters = [topicFilters];
    }

    // Subscribe to each supplied topic filter
    topicFilters.forEach(filter => {
        const wildcard = `${filter}/#`;

        client.subscribe(wildcard, error => {
            if (error) {
                console.error(
                    "[MQTT] subscribe error",
                    error
                );
            } else {
                console.log(
                    `[MQTT] subscribed to ${wildcard}`
                );
            }
        });
    });

    // Handle every message received by the MQTT client
    const messageHandler = (
        topic,
        payload
    ) => {
        // Pass the full MQTT topic and payload
        // to the supplied callback
        onMessage(
            topic,
            payload.toString()
        );
    };

    // Register the message handler with the MQTT client
    client.on("message", messageHandler);

    // Return a function that stops receiving messages
    // from these topic filters
    return function unsubscribeController() {
        client.off("message", messageHandler);

        topicFilters.forEach(filter => {
            client.unsubscribe(`${filter}/#`);
        });
    };
}

function publish(topic, payload, options = {}) {
    if (!client.connected) {
        console.warn(
            "[MQTT] publish failed - not connected"
        );
        return;
    }

    client.publish(
        topic,
        typeof payload === "string"
            ? payload
            : JSON.stringify(payload),
        options,
        error => {
            if (error) {
                console.error(
                    "[MQTT] publish error",
                    error
                );
            }
        }
    );
}

function disconnect() {
    if (client) {
        client.end(true);

        console.log(
            "[MQTT] disconnected"
        );
    }
}

    // Make the subscribe function available to the controller.
    return {
        subscribe,
        publish,
        disconnect
    };
}
The sole purpose of mqttManager.js is to manage MQTT communication. It connects to the broker, subscribes to the required topics, receives messages, and passes the data to other parts of the application.
To control how the application uses the incoming data, we will create a second script called mqttController.js.
- Create a new file named
mqttController.jsinsidesrc/utils
import { createMQTTManager } from "./mqttManager.js";

/**
 * Creates an MQTT controller.
 *
 * @param {Object} config
 * @param {string} [config.brokerAddress]
 * MQTT broker hostname or IP.
 *
 * @param {string} [config.username]
 * MQTT username.
 *
 * @param {string} [config.password]
 * MQTT password.
 *
 * @param {boolean} [config.autoConnect=true]
 * If true, the controller connects immediately.
 * If false, a connection must be established
 * via connect().
 *
 * @example
 * // Auto-connect (current behaviour)
 * const mqttController = createMQTTController({
 *     brokerAddress: "example.broker.org"
 * });
 *
 * @example
 * // Manual connection from UI
 * const mqttController = createMQTTController({
 *     autoConnect: false
 * });
 */
export function createMQTTController({
    brokerAddress,
    username,
    password,
    autoConnect = true
} = {}) {

    let mqttManager = null;
    let unsubscribe = null;

    // Optional automatic connection
    if (autoConnect && brokerAddress) {
        mqttManager = createMQTTManager(
            brokerAddress,
            username,
            password
        )
    }

    /**
     * Create a new MQTT connection.
     */
    function connect(
        brokerAddress,
        username,
        password,
        callbacks={}
    ) {

        if (mqttManager) {
            mqttManager.disconnect();
        }

        mqttManager = createMQTTManager(
            brokerAddress,
            username,
            password,
            callbacks
        );
        console.log(
            `[MQTT Controller] Connecting to ${brokerAddress}`
        );
    }

    function isConnected() {
    return mqttManager !== null;
}
    /**
     * Disconnect from the broker.
     */
    function disconnect() {

        if (unsubscribe) {
            unsubscribe();
            unsubscribe = null;
        }
        mqttManager?.disconnect();
        mqttManager = null;

        console.log(
            "[MQTT Controller] Disconnected"
        );
    }

    /**
     * Subscribe to a topic filter.
     */
    function subscribeToTopic(
        topic,
        onMessage
    ) {

        if (!mqttManager) {
            console.warn(
                "[MQTT Controller] Not connected"
            );
            return;
        }

        if (unsubscribe) {
            unsubscribe();
        }

        unsubscribe = mqttManager.subscribe(
            topic,
            (topic, payload) => {

                console.log(
                    `[MQTT MESSAGE] From: ${topic} | Payload: ${payload}`
                );

                onMessage?.(
                    topic,
                    payload
                );
            }
        );
    }

    /**
     * Publish a message.
     */
    function publish(
        topic,
        payload,
        options = {}
    ) {
        console.log(
            "[MQTT Controller] Publishing",
            topic,
            payload
            );

        if (!mqttManager) {
            console.warn(
                "[MQTT Controller] Not connected"
            );
            return;
        }

        mqttManager.publish(
            topic,
            payload,
            options
        );
    }

    /**
     * Remove the current subscription.
     */
    function clearSubscription() {

        if (unsubscribe) {

            unsubscribe();

            unsubscribe = null;

            console.log(
                "[MQTT Controller] Unsubscribed"
            );
        }
    }


    return {
        connect,
        disconnect,
        subscribeToTopic,
        publish,
        clearSubscription,
        isConnected,
        destroy: disconnect
    };
}
The createMQTTController() function subscribes to the MQTT topics listed in the configuration. Whenever a message arrives, the MQTT manager passes its prefix, topic, and payload to the controller. For now, the controller displays this information in the browser console, allowing us to check that messages are being received correctly before using the data elsewhere in the application.
- To use it in our application, as usual, we need to import the exported function
createMQTTControllerintoindex.js
import { createMQTTController } from "./utils/mqttController.js";
- Add the
createMQTTControllercall inside thecreateScene()function, alongside the raycasting setup and before theengine.runRenderLoop(). Pass the broker address
const mqttController=createMQTTController({
    brokerAddress:"ADDRESS.BROKER.org"
    })
If a valid broker is provided, you should see a message in the browser console confirming that the connection has been established.
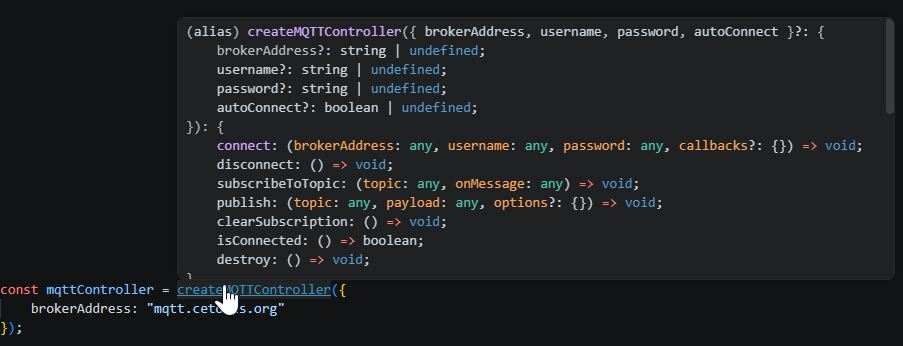
- To subscribe to one or more topics, we can invoke the
subscribeToTopicmethod just after theconst mqttController
mqttController.subscribeToTopic(
    [
        'FIRST/TOPIC/SENSOR',
        'OTHER/TOPIC/DEVICE'])
At the moment, if multiple topics are subscribed to, several MQTT messages will be printed in the console. To react to specific messages and process the payload from a particular MQTT topic, it is possible to use the onMessage callback provided by the mqttController.
- Update the
subscribeToTopicmethod just created to include theonMessagecallback. Whenever themqttManagerreceives a message on any of the subscribed topics, it invokes the callback and send back to themqttControllerthe topic and payload as arguments
mqttController.subscribeToTopic(
    [
    'FIRST/TOPIC/SENSOR',
    'OTHER/TOPIC/DEVICE'],
        (topic,payload)=>{
            if(topic.includes("any-part-of-the-topic"))
            {
                console.log(payload); //the content of the message
            }
        }
)
So far, MQTT messages are simply printed to the console and require a configuration that is defined before the application starts. However, the subscribe() function in the mqttController can also be called while the application is running. This means that information stored in the model can be used to determine which topics should be subscribed to dynamically.
Prepare the model
First, prepare the model by adding MQTT metadata to the GLB file using the Babylon.js Sandbox.
- Load the GLB file into the Babylon.js Sandbox
- Enable the tools by clicking the Display Inspector button in the bottom-right corner
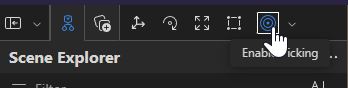
- From the top-left toolbar, enable Picking
- Select the mesh you want to add MQTT metadata to
- In the right-hand panel, scroll down to Metadata. Add a property named
topicand provide an array containing the MQTT topic, or topics, to subscribe to using the following minimum structure:
{
  "gltf": {
    "extras": {
      "topic": [
        "TOPIC/TO/SUBSCRIBE/DEVICE",
        "TOPIC/TO/SUBSCRIBE/DEVICE2",
      ]
    }
  }
}
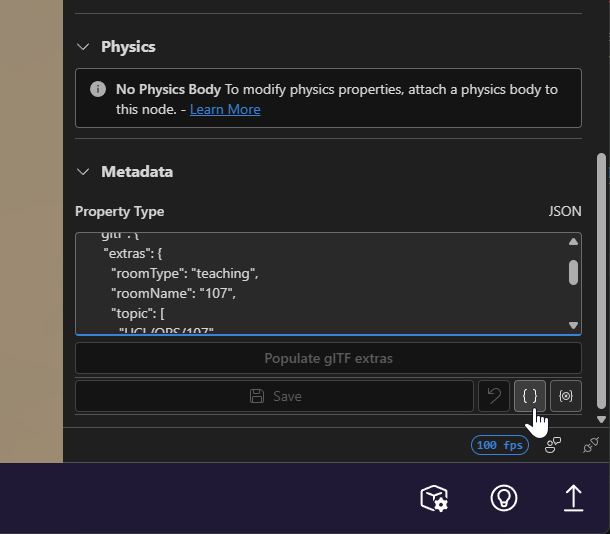
Click Save
From the top menu tabs, select Tools
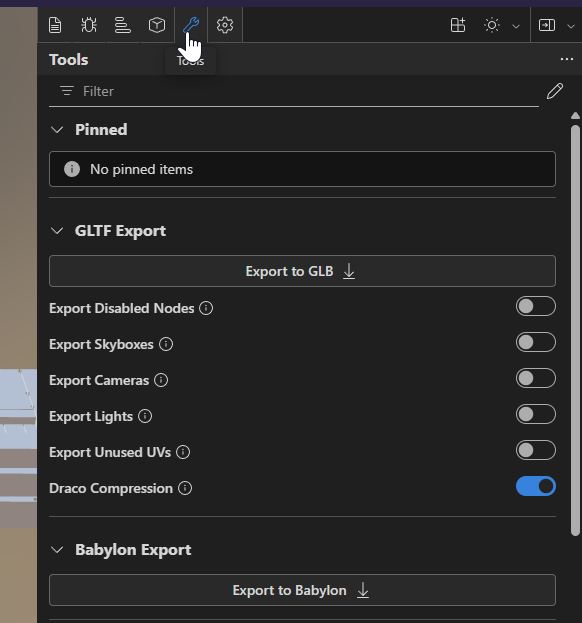
- Ensure
Draco Compressionis enabled. - Click Export to GLB
- Save the exported file into your project folder
Customise the raycasting
We want to change the behaviour of the application so that it establishes a connection to the MQTT broker when it starts and keeps that connection open for the lifetime of the application. After the connection is established, MQTT subscriptions are managed dynamically based on the mesh selected by the user.
- Application starts and connects to the MQTT broker.
- User selects Mesh A → subscribe to Mesh A topics.
- User selects Mesh B → unsubscribe from Mesh A topics and subscribe to Mesh B topics.
- User selects a mesh without MQTT metadata → unsubscribe from all active topics.
- User selects Mesh C → subscribe to Mesh C topics.
- In the
index.jsfile, the existingconst mqttControllerwill remain unchanged and will continue to be used to pass the broker address. - The
subscribeToTopicwill change and it will be implemented within theenableRaycasting()function
enableRaycasting(scene, (pickResult) => {

    // if no space is selected clear the data and close the drawer
    if (!pickResult.hit) {
        mqttController.clearSubscription();
        focusMesh(
            scene,
            null
        );
    return;
    }

 const extras = pickResult.pickedMesh?.metadata?.gltf?.extras;

// If the room contains an MQTT topic,
// open the drawer and start listening
if (extras?.topic) {
    console.log(extras.topic);

mqttController.subscribeToTopic(
    extras.topic
);

} else {
    mqttController.clearSubscription();
}

updateInfoPanel(pickResult);

focusMesh(
    scene,
    pickResult.pickedMesh
    );
});
Additional libraries can be added to visualise the data received from MQTT. There are several data visualisation libraries available, each with its own advantages and disadvantages.
In this workshop, we are using Apache ECharts, a powerful and flexible JavaScript charting library that enables the creation of interactive and responsive data visualisations with minimal code.
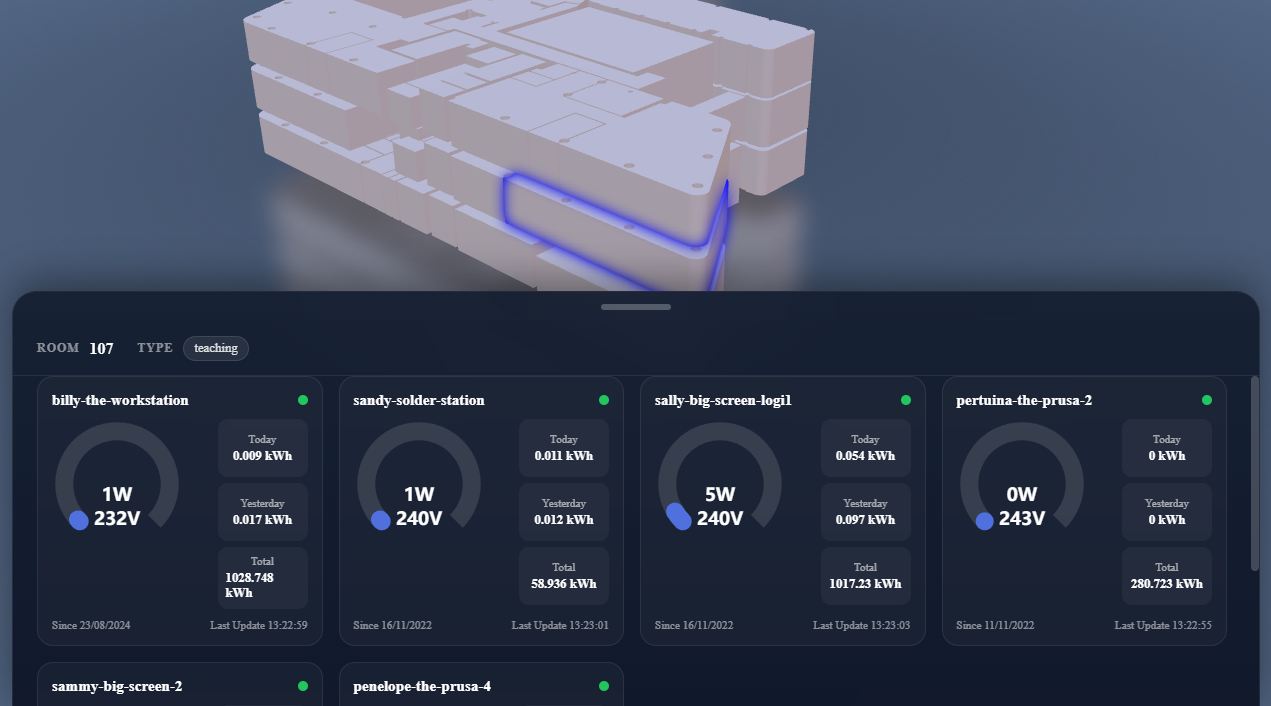
We are going to add a drawer that remains hidden until a room with live data is selected. When MQTT messages are received, a device card template is instantiated and added to the drawer.
- Install the ECharts library using:
npm install echarts
Next step is to provide space in the info panel to accommodate the cards.
- Update the HTML, replacing everything inside the info panel
<div id="info-panel">

        <div class="drawer-handle"></div>

        <div class="room-header">

            <div class="room-meta">
                <span class="room-label">Room</span>
                <span id="room-name" class="room-value">Select a room</span>
            </div>

            <div class="room-meta">
                <span class="room-label">Type</span>
                <span id="room-type" class="room-pill">-</span>
            </div>

        </div>

        <div id="monitor-cards"></div>

    </div>
And update the CSS. Here we need to completely change the info panel and all the additional styles for its elements
/* ---------- INFO PANEL ---------- */

#info-panel {
    position: absolute;
    left: 16px;
    right: 16px;
    bottom: 0;

    height: 420px;

    display: flex;
    flex-direction: column;

    background: linear-gradient(
        180deg,
        rgba(20, 30, 48, 0.95),
        rgba(15, 23, 42, 0.98)
    );

    backdrop-filter: blur(20px);

    border: 1px solid rgba(255,255,255,0.08);
    border-radius: 24px 24px 0 0;

    box-shadow: 0 -10px 40px rgba(0,0,0,.4);

    overflow: hidden;

    transform: translateY(calc(100% - 48px));
    transition: transform .35s ease;

    z-index: 100;
}

#info-panel.open {
    transform: translateY(0);
}

.drawer-handle {
    width: 70px;
    height: 6px;

    margin: 12px auto;

    border-radius: 999px;
    background: rgba(255,255,255,.25);

    flex-shrink: 0;
}

.room-header {
    display: flex;
    align-items: center;
    gap: 24px;

    padding: 14px 24px;

    border-bottom: 1px solid rgba(255,255,255,.08);

    flex-shrink: 0;
}

.room-meta {
    display: flex;
    align-items: center;
    gap: 10px;
}

.room-label {
    font-size: .75rem;
    font-weight: 600;
    letter-spacing: .08em;
    text-transform: uppercase;

    color: rgba(255,255,255,.5);
}

.room-value {
    font-size: 1rem;
    font-weight: 600;
    color: white;
}

.room-pill {
    display: inline-flex;
    align-items: center;

    padding: 4px 10px;

    border-radius: 999px;

    background: rgba(255,255,255,.08);
    border: 1px solid rgba(255,255,255,.1);

    color: rgba(255,255,255,.85);

    font-size: .8rem;
}

/* ---------- CARD GRID ---------- */

#monitor-cards {
    flex: 1;

    padding: 0 24px 24px;

    display: grid;
    grid-template-columns: repeat(auto-fill, minmax(280px, 1fr));

    gap: 16px;

    overflow-y: auto;
    overflow-x: hidden;
}

#monitor-cards::-webkit-scrollbar {
    width: 8px;
}

#monitor-cards::-webkit-scrollbar-thumb {
    background: rgba(255,255,255,.2);
    border-radius: 999px;
}

/* ---------- CARD ---------- */

.monitor-card {
    min-height: 240px;

    padding: 14px;

    display: flex;
    flex-direction: column;

    background: rgba(255,255,255,0.04);

    border: 1px solid rgba(255,255,255,0.08);
    border-radius: 16px;

    backdrop-filter: blur(12px);
}

.monitor-header {
    display: flex;
    justify-content: space-between;
    align-items: center;

    margin-bottom: 10px;
}

.monitor-title {
    color: white;
    font-size: 0.95rem;
    font-weight: 600;
}

.status-dot {
    width: 10px;
    height: 10px;

    border-radius: 50%;
    background: #22c55e;
}

.status-dot.flash {
    animation: mqttPulse .4s ease;
}

@keyframes mqttPulse {
    0% {
        box-shadow: 0 0 0 0 rgba(34,197,94,.8);
    }

    100% {
        box-shadow: 0 0 0 14px rgba(34,197,94,0);
    }
}

/* ---------- CHART AREA ---------- */

.monitor-main {
    display: grid;
    grid-template-columns: 1fr 90px;
    gap: 12px;
    flex: 1;
    min-height: 120px;
}

.chart-container {
    flex: 1;
    min-width: 0;
}

.gauge-container {
    width: 130px;
    height: 130px;
    flex-shrink: 0;
}

.monitor-visuals {
    display: flex;
    align-items: center;
    justify-content: center;
    gap: 2px;
}

/* ---------- STATS ---------- */

.monitor-stats {
    display: flex;
    flex-direction: column;
    gap: 6px;
}

.stat {
    padding: 8px;
    border-radius: 10px;
    background: rgba(255,255,255,.04);

    display: flex;
    flex-direction: column;
    align-items: center;
    justify-content: center;

    min-height: 42px;
}

.stat span {
    display: block;

    color: rgba(255,255,255,.6);
    font-size: .7rem;
}

.stat strong {
    display: block;

    margin-top: 4px;

    color: white;
    font-size: .8rem;
}

.monitor-footer {
    margin-top: 8px;

    display: flex;
    justify-content: space-between;

    font-size: .7rem;
    color: rgba(255,255,255,.5);
}

/* ---------- RESPONSIVE ---------- */

@media (max-width: 900px) {
    #monitor-cards {
        grid-template-columns: repeat(2, 1fr);
    }
}

@media (max-width: 600px) {
    #monitor-cards {
        grid-template-columns: 1fr;
    }
}
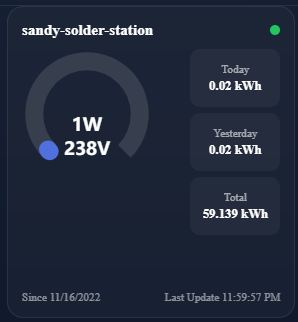
We can now create the chartManager.js script, which is responsible for creating and managing the device cards displayed in the drawer. When a room is selected, index.js subscribes to the relevant MQTT topic through the mqttController.js. As messages arrive, the mqttController.js receives the data and passes it back to index.js through the callback function onMessage. The data is then forwarded to chartManager.js, which checks whether a card already exists for the device. If not, a new card is created and added to the panel. If the card already exists, its charts, gauges, and statistics are updated with the latest values.
- In the
src/utilsfolder, create a new file calledchartManager.js
import * as echarts from "echarts";

/*
* Stores all active device cards.
* Key = name of the device or sensor form the topic
* Value = card DOM references + chart instance
*/
const cards = new Map();

/*
* Container in the index.html that holds all monitor cards
* inside the room information drawer.
*/
const container =
    document.getElementById(
        "monitor-cards"
    );

/**
 * Remove all cards/charts
 */
export function clearCharts() {
    cards.forEach(card => {
        card.ringChart.dispose();
    });
    cards.clear();
    container.innerHTML = "";
}


/**
 * Creates a new monitor card for a device.
 *
 * Each card contains:
 * - Device title
 * - MQTT activity indicator
 * - Live power ring chart (Gauge)
 * - Energy statistics
 * - Metadata footer
 */

export function createChart(
    id,
    title
) {

/** If the card already exists it is returned
* instead of creating a duplicate.
*/
    if (cards.has(id)) {
        return cards.get(id);
    }

/*
 * Build the card UI.
 * Values are populated later by updateChart().
 */
    const card =
        document.createElement("div");

    card.className =
        "monitor-card";

    card.innerHTML = `

        <div class="monitor-header">

            <div class="monitor-title">
                ${title}
            </div>

            <div class="status-dot"></div>

        </div>

        <div class="monitor-main">

            <div class="gauge-container"></div>

            <div class="monitor-stats">

                <div class="stat">
                    <span>Today</span>
                    <strong class="today-value">
                        --
                    </strong>
                </div>

                <div class="stat">
                    <span>Yesterday</span>
                    <strong class="yesterday-value">
                        --
                    </strong>
                </div>

                <div class="stat">
                    <span>Total</span>
                    <strong class="total-value">
                        --
                    </strong>
                </div>

            </div>

        </div>

        <div class="monitor-footer">

            <div class="footer-item">

                <span class="footer-label">
                    Since
                </span>

                <span class="since-date">
                    --
                </span>

            </div>

            <div class="footer-item">

                <span class="footer-label">
                    Last Update
                </span>

                <span class="last-update">
                    --
                </span>

            </div>

        </div>
    `;

    container.appendChild(card);


 //ECharts gauge component as a ring chart
    const ringChart =
        echarts.init(
            card.querySelector(
                ".gauge-container"
            )
        );

    ringChart.setOption({
        series: [
            {
                type: "gauge",
                min: 0,
                max: 100,

                radius: "95%",

                progress: {
                    show: true,
                    width: 18,
                    roundCap: true
                },

                axisLine: {
                    lineStyle: {
                        width: 18,
                        color: [
                            [1, "rgba(255,255,255,.12)"]
                        ]
                    }
                },

                pointer: {
                    show: false
                },

                axisTick: {
                    show: false
                },

                splitLine: {
                    show: false
                },

                axisLabel: {
                    show: false
                },

                detail: {

                    color: "#ffffff",

                    fontSize: 18,

                    lineHeight: 24,

                    formatter: value =>
                        `${Math.round(value)}W`
                },

                data: [
                    {
                        value: 0
                    }
                ]
            }
        ]
    });

 /*
 * Cache DOM elements so
 * we don't repeatedly query the DOM
 * when MQTT messages arrive
 */
    const chartObject = {

        ringChart,

        dot:
            card.querySelector(
                ".status-dot"
            ),

        todayElement:
            card.querySelector(
                ".today-value"
            ),

        yesterdayElement:
            card.querySelector(
                ".yesterday-value"
            ),

        totalElement:
            card.querySelector(
                ".total-value"
            ),

        sinceElement:
            card.querySelector(
                ".since-date"
            ),

        lastUpdateElement:
            card.querySelector(
                ".last-update"
            )
    };

    cards.set(
        id,
        chartObject
    );

    return chartObject;
}

/**
 * Updates a monitor card using data
 * received from MQTT
 * {
 *   ENERGY: {
 *     Power,
 *     Voltage,
 *     Today,
 *     Yesterday,
 *     Total,
 *     TotalStartTime
 *   },
 *   Time
 * }
 */
export function updateChart(
    id,
    mqttData
) {

    const card =
        cards.get(id);

    if (!card) {
        return;
    }
console.log(cards);
    const energy =
        mqttData?.ENERGY;

    if (!energy) {
        return;
    }

/* Update ring chart value */
    card.ringChart.setOption({
        series: [
            {
                data: [
                    {
                        value:
                            energy.Power
                    }
                ],

                detail: {
                formatter:
                    `${Math.round(energy.Power)}W\n${energy.Voltage}V`
                }
            }
        ]
    });

/* Update cumulative energy statistics */
    card.todayElement.textContent =
        `${energy.Today} kWh`;

    card.yesterdayElement.textContent =
        `${energy.Yesterday} kWh`;

    card.totalElement.textContent =
        `${energy.Total} kWh`;

    card.sinceElement.textContent =
        new Date(
            energy.TotalStartTime
        ).toLocaleDateString();

    card.lastUpdateElement.textContent =
        new Date(
            mqttData.Time
        ).toLocaleTimeString();


        /*
 * Flash the status indicator whenever a
 * new MQTT message is received so the user
 * can see that the device is still active.
 */
``
  card.dot.classList.remove("flash");

requestAnimationFrame(() => {
    card.dot.classList.add("flash");
});
}
The chart manager provides three main functions:
createChart(), which generates a new chart card;updateChart(), which updates the chart values whenever an MQTT message is received;clearCharts(), which disposes of all charts and associated data when they are no longer needed.
- In
index.jsimport the three functions
import {
    createChart,
    updateChart,
    clearCharts
}
from "./utils/chartManager.js";
- full logic for handling incoming MQTT data is implemented within
enableRaycasting()
enableRaycasting(scene, (pickResult) => {

    // if no space is selected clear the data and close the drawer
    if (!pickResult.hit) {
        mqttController.clearSubscription();
        infoPanel.classList.remove("open");

        focusMesh(
            scene,
            null
        );
    return;
    }


const extras =pickResult.pickedMesh?.metadata?.gltf?.extras;

// If the room contains an MQTT topic,
// open the drawer and start listening
if (extras?.topic) {
    console.log(extras.topic);

    clearCharts();
    infoPanel.classList.add("open");

mqttController.subscribeToTopic(
    `${extras.topic}`, (topic, payload) => {

        /*
        * The devices used in this example publish telemetry
        * on topics ending with "/SENSOR". Other MQTT messages
        * are ignored.
        */
            if (!topic.endsWith("/SENSOR")) {
                return;
            }

        const data = JSON.parse(payload);

        /*
        * The device name is extracted from the MQTT topic
        * hierarchy in the case of this workshop
        *
        * Topic/Topic/Topic/Topic/device-name/SENSOR
        *
        * The device name is the segment
        * immediately before "SENSOR" (-2 positions)
        */
        const deviceName = topic.split("/").at(-2);

        createChart(
            deviceName,
            deviceName
        );

        updateChart(
            deviceName,
            data
        );
    }
);

} else {
    mqttController.clearSubscription();
    infoPanel.classList.remove("open");
}

updateInfoPanel(pickResult);

focusMesh(
    scene,
    pickResult.pickedMesh
    );
});
Extend the Model Metadata
Using the Babylon.js Sandbox, add additional MQTT topics to the metadata of different rooms, devices, or assets within the model.
Experiment with different topic structures and assign unique topics to multiple rooms.
Consider:
- Environmental sensors (temperature, humidity, CO₂)
- Energy monitoring devices
- Occupancy sensors
- Lighting systems
and how to visualise them.
Create and Modify Additional Device Cards
Use the chartManager.js to add different MQTT topics and generate new card layouts or visualisations.
Examples:
- Temperature sensors displayed using a line chart
- Occupancy sensors displayed using a gauge
- Air quality sensors displayed using a coloured indicator
- Energy sensors displayed using the existing power monitor card