This workshop will show you how to:
- Install Unity and setup the DEV environment
- Use the Unity Editor interface
- Import Assets and unity packages
- Import and use Character Controllers
- Build the project as standalone and mobile app
- [Optional] Bake lights to optimise the scene
- [Optional] Share your Unity project on GitHub
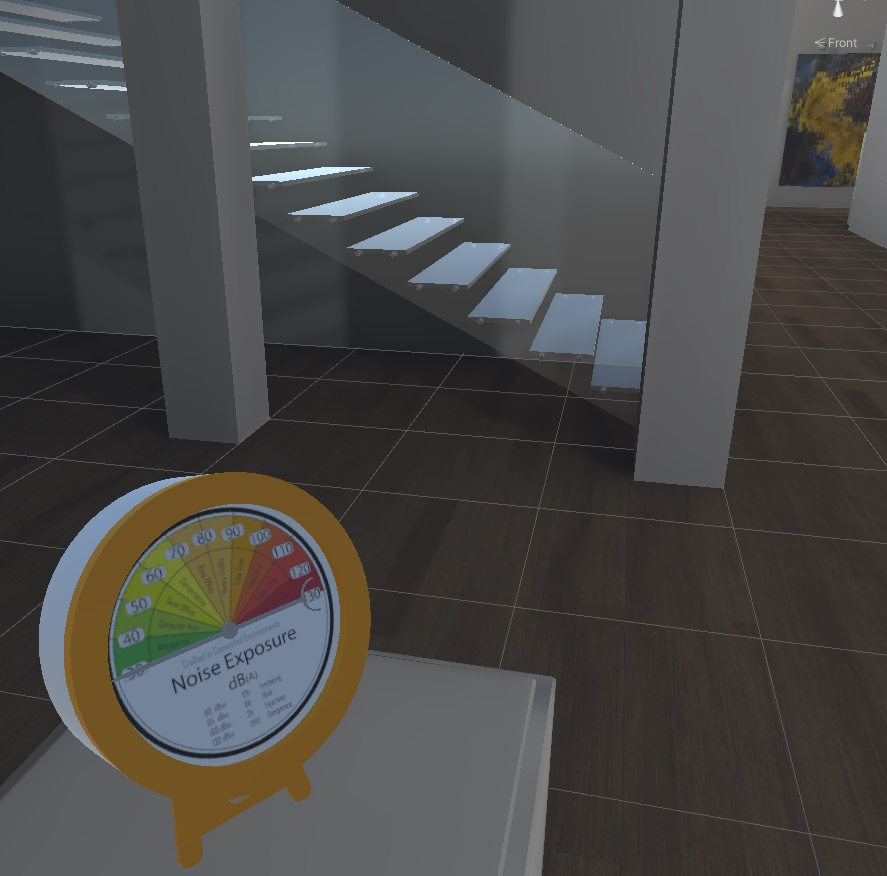
Open Gauges - Noise Gauge with Stand by vsigno is licensed under Creative Commons Attribution.
To complete this workshop you will need
- Unity 6000.0 LTS
- Unity Student Plan
- [Optional] Unity Student Plan
- VS Code
- Sketchfab Account
- CE Studio model, based on Gallery Showroom Environment
- Noise Gauge
- GitHub Account
To build on iOS
- XCode
- Apple Developer account
Hardware
- Android > 7.0 phone in developer mode
- iOS device
- USB cable
Additional resources
Unity is a powerful cross-platform Game Engine System. While it was originally developed as a general-purpose engine to create videogames, in the last 15 years Unity has become widely used also outside the gaming industry and it is now an effective tool to develop high-quality architectural and urban visualisations and virtual tours, advanced simulations using machine learning, real-time exhibitions and art installations, to cite some.
Depending on the type of application intended to develop, the use of Unity requires a diverse set of skills that goes beyond the programming ones. Nevertheless, thanks to the flexibility of the system, and an extremely active community, it is possible to access an incredible number of tutorials, plug-ins, extensions and ready-made projects and assets that make the system accessible and the learning curve less steep compare to other similar software systems.
Unity can be installed on Windows, macOS and Linux, and it can be used to create applications for PC, Mac, Web, Mobile systems, VR headsets and Consoles.
The preferred and easiest way to install Unity, and to manage multiple projects, is through the UnityHub
Once UnityHub is installed, log in with your student account and activate the licence.
During the module, we will use the version Unity 6000.0 LTS.
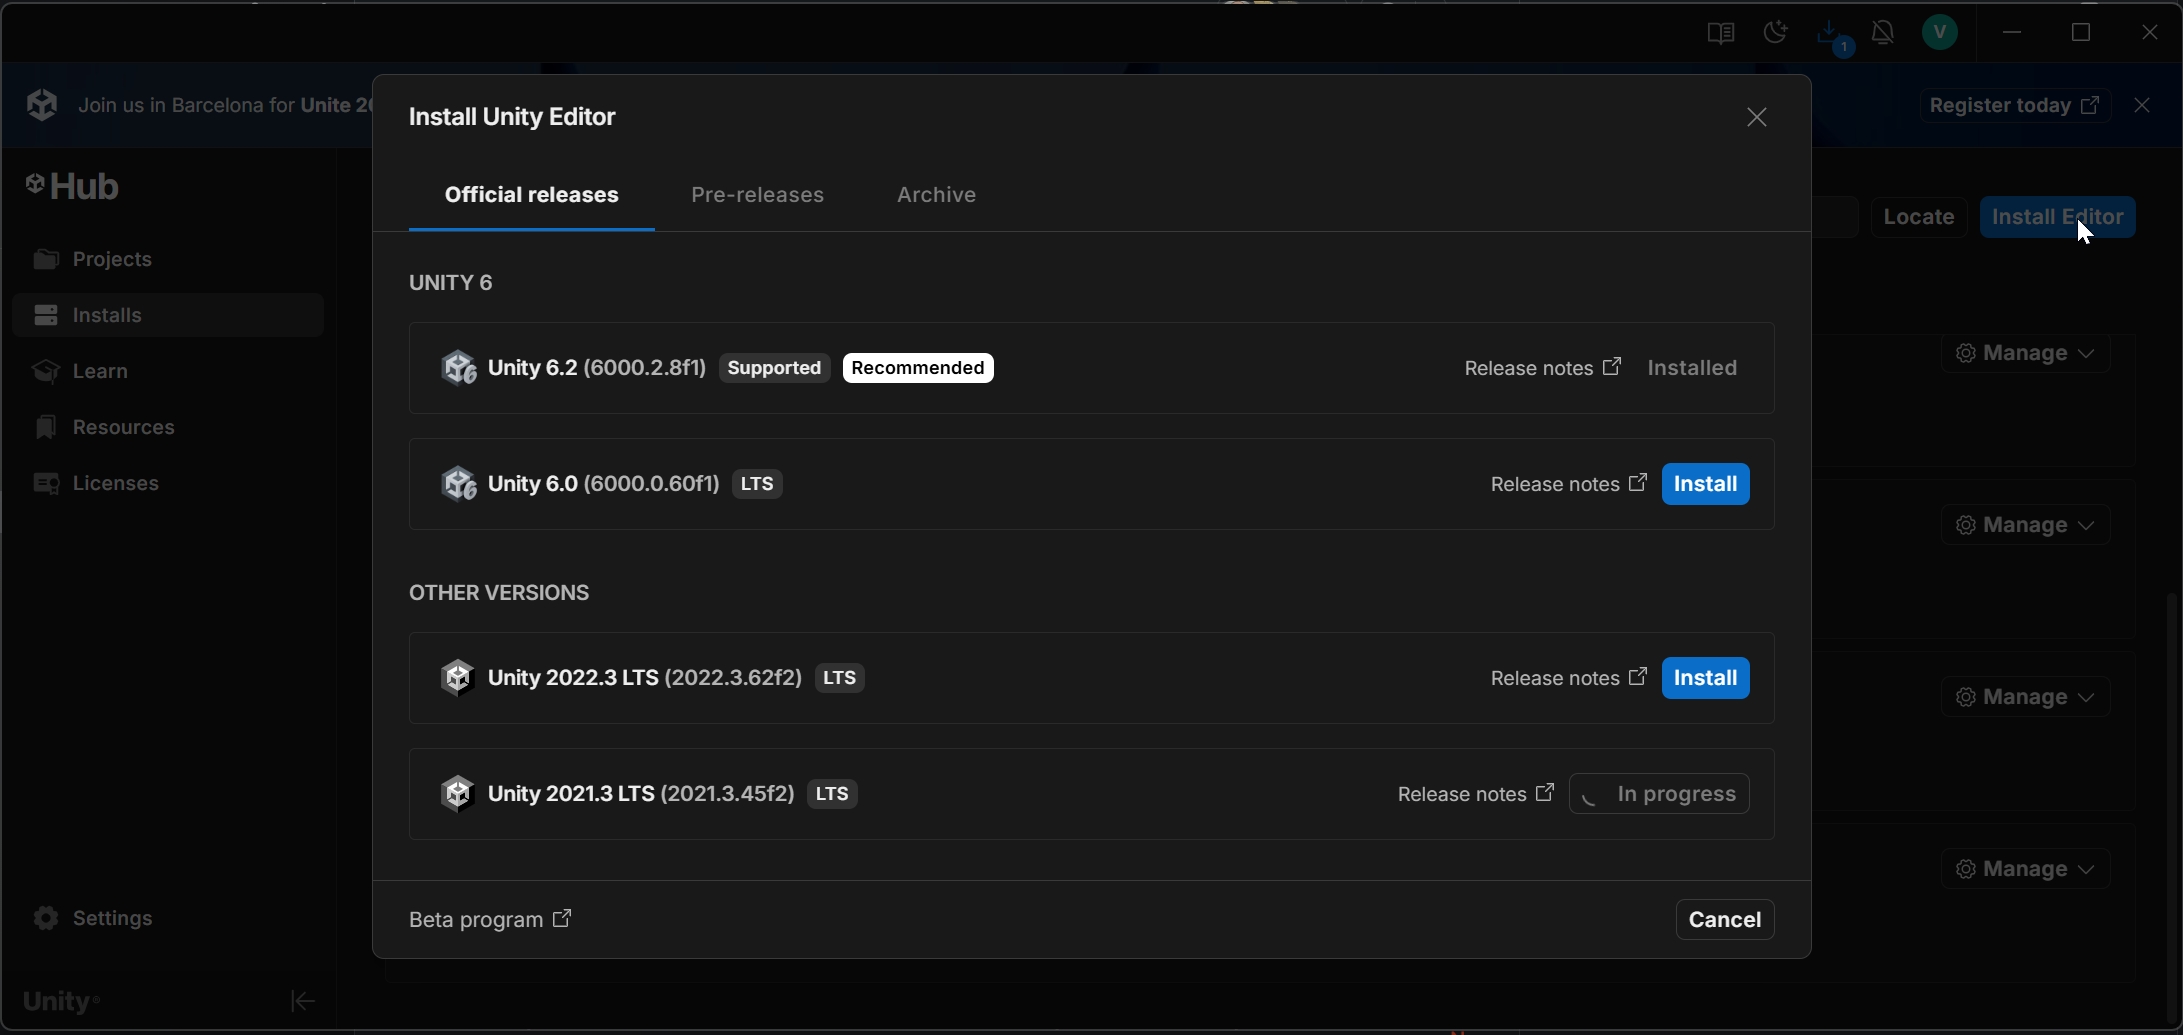
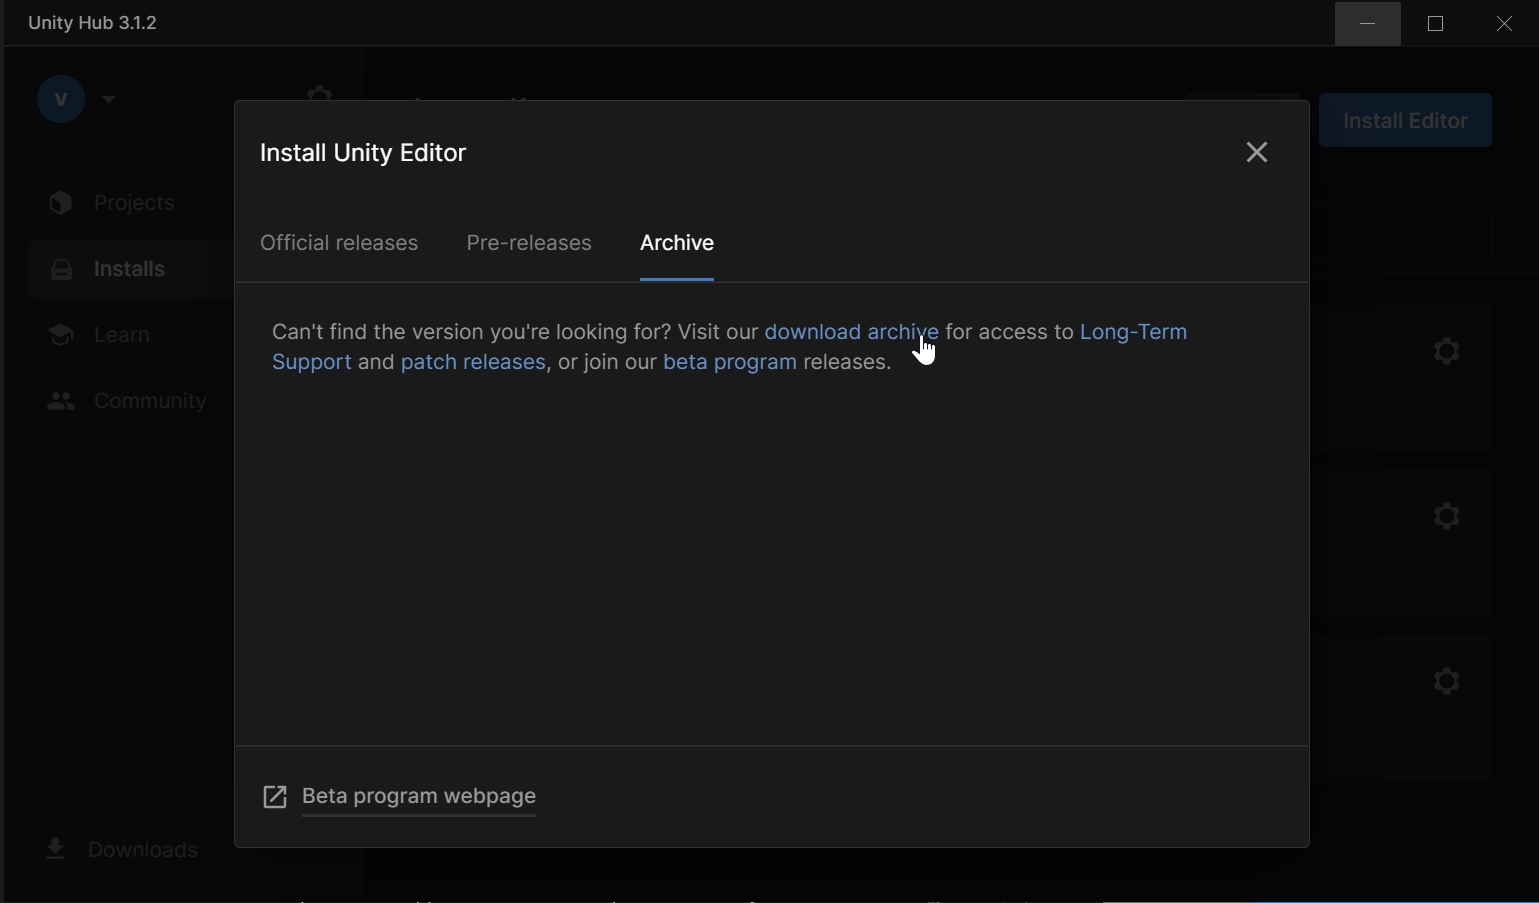
The Recommended Release is the most recent one. It is generally safe to install latest minor release (i.e. 6000.0.xxf). In case a previous version is needed, it is possible to download it from the download archive
Platforms
Before beginning the installation process, we need to select the platforms we intend to use for compiling our applications. Unity Hub will suggest the installation of the latest version when it first run with some default settings (e.g. Visual Studio Community and modules), it is better to skip the installation, but it is also possible to add any additional platform at a later stage.
Now is time to install!
From the Unity Hub select Installs from the left hand menu and press Install Editor. Select the Unity version 6000.0.xxf LTS (at time of writing 6000.0.60f LTS) and then select the modules:
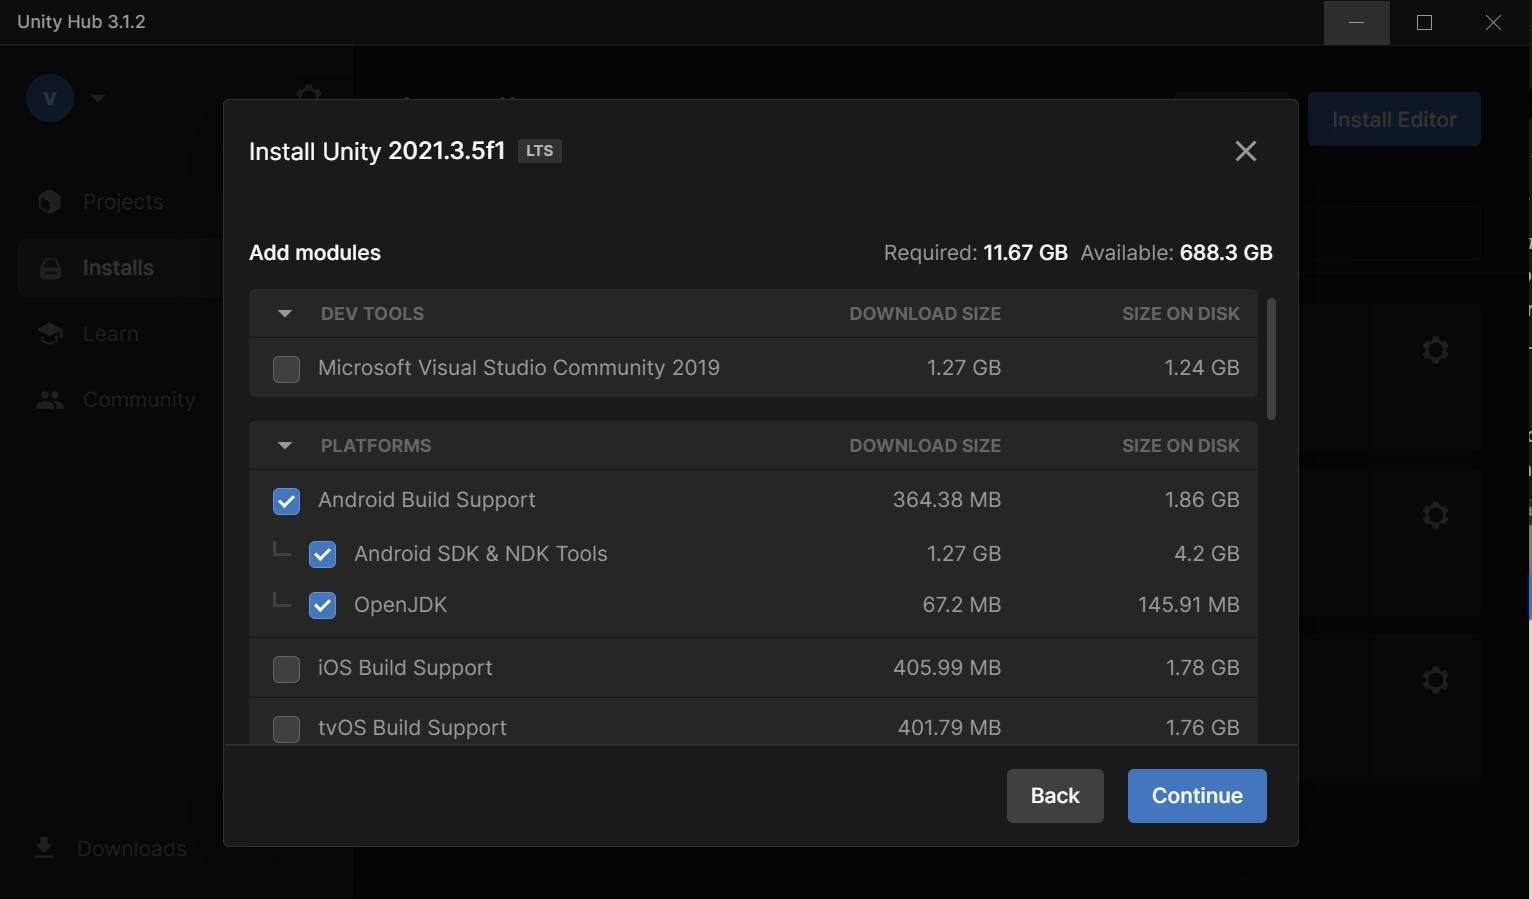
Deselect Microsoft Visual Studio Community. While it is possible to use Visual Studio as Dev tool, we recommend using VSCode as it is a lighter and faster solution, and fully supported in Unity on Windows and macOS.
Depending on your operative system, install the following platforms:
Mac Build SupportWindows Build Support
Select also the mobile platform that you intend to use:
Android Build Support(as well as the Android SDK & NDK Tools and OpenJDK)iOS Build Support
Setting up the Dev environment
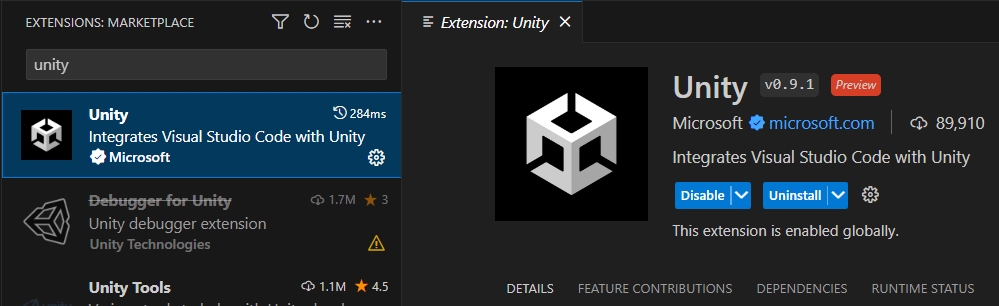
Once Unity is installed we can set up the Dev tool, VSCode.
First of all, we need to install the VSCode Unity Extension from Microsoft and .NET SDK 8.0. VSCode will tell us, once a Unity C# script is open, if .NET SDK is missing or not.
New Project
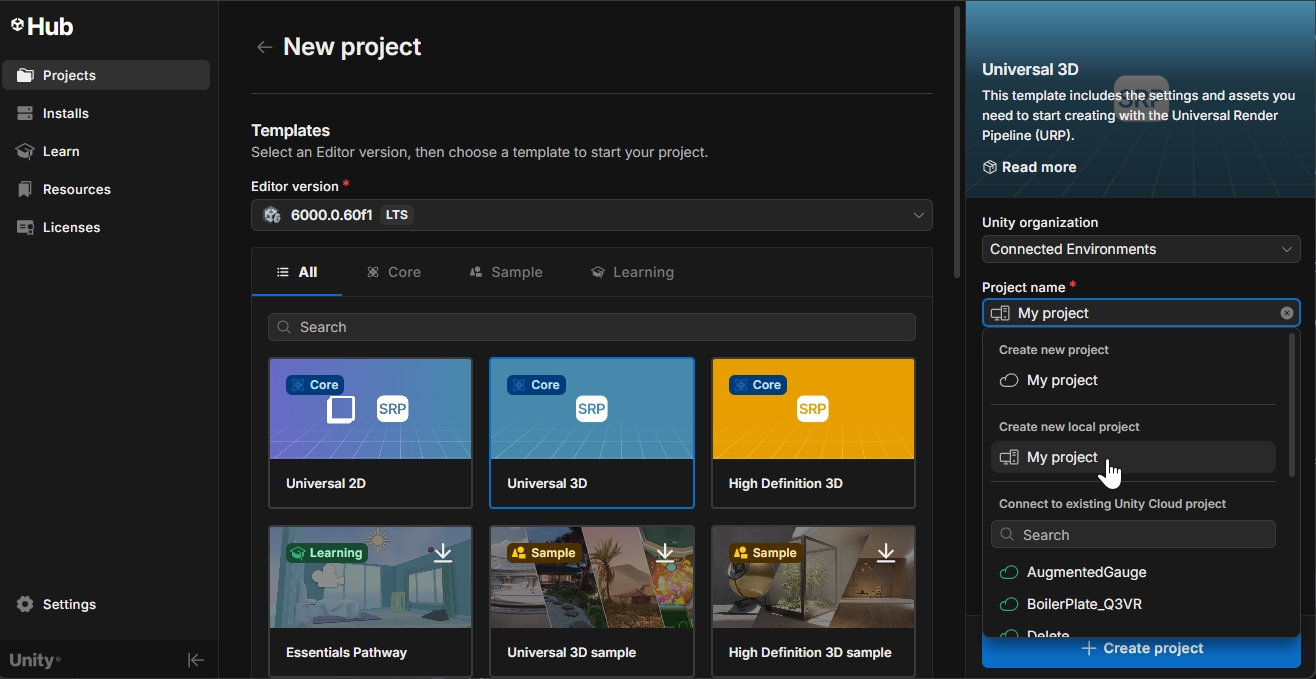
Create a New project using Unity Hub, be sure to use the right Editor Unity version if multiple installations are present. Unity provides different Templates that helps to setup the interface and install the essential packages. In this example select Universal 3D template. From Project name, select Create new local project and change the name My Project (e.g. SDV01) and set its location
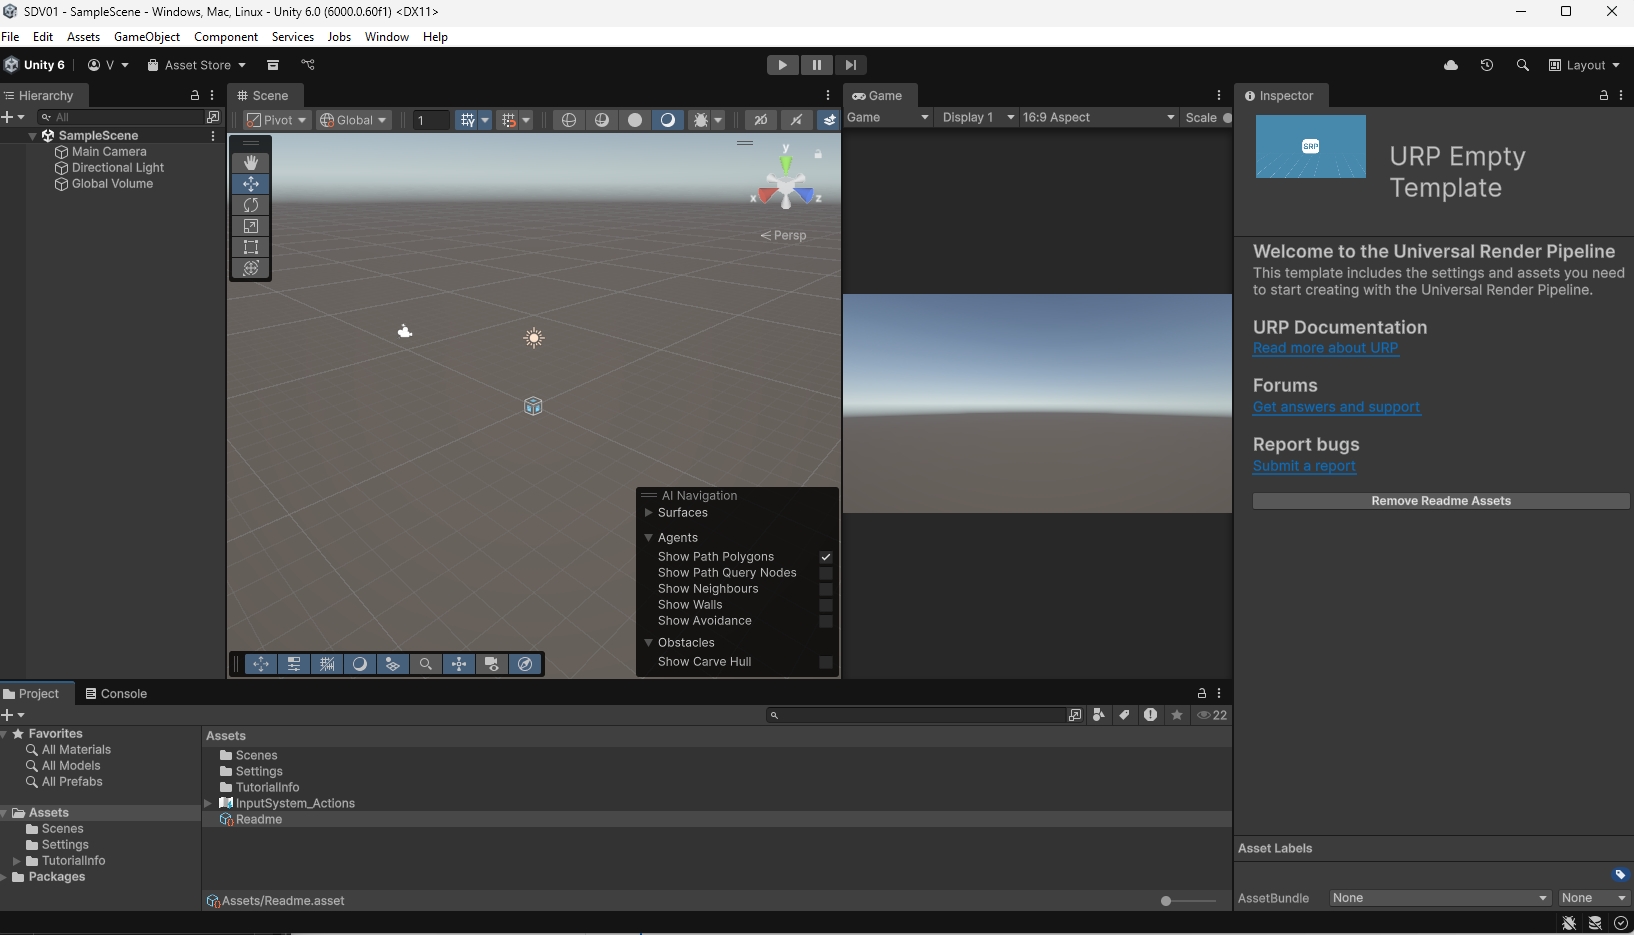
It will take few minutes to create the project and you should see this interface when is done... Welcome to Unity!
Let's finish the setup of the DEV environment:
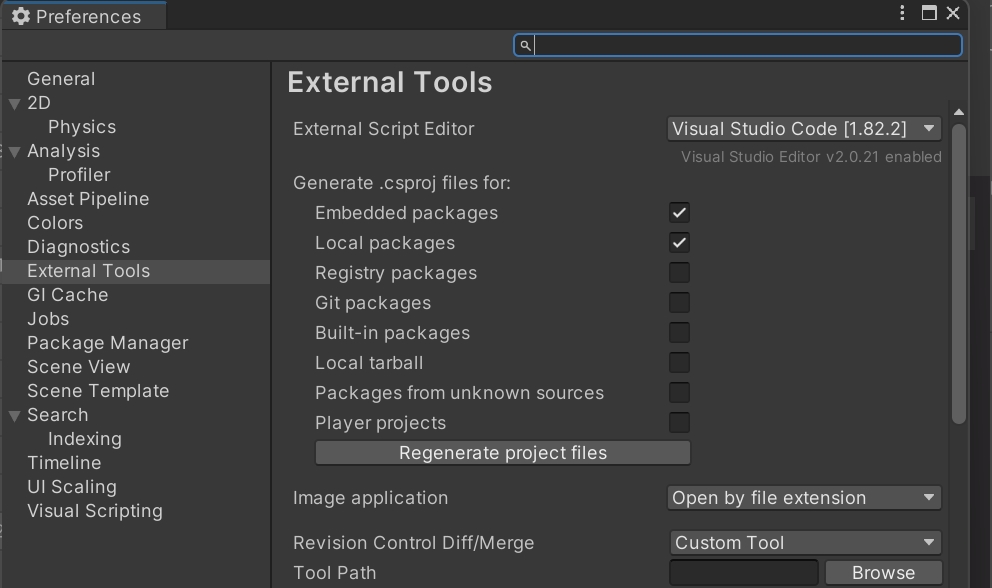
Open Edit -> Preferences (on MacOS, Unity -> Settings) and in External Tools control that Visual Studio Code is selected in External Script Editor
If you installed correctly the Android SDK and NDK, on the same screen you should see their location paths.
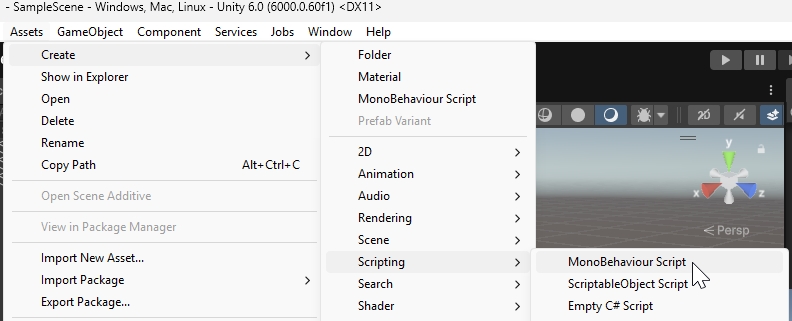
To test if VSCode is installed correctly, create a new MonoBehaviour Script from Assets - > Create -> Scripting -> MonoBehaviour Script
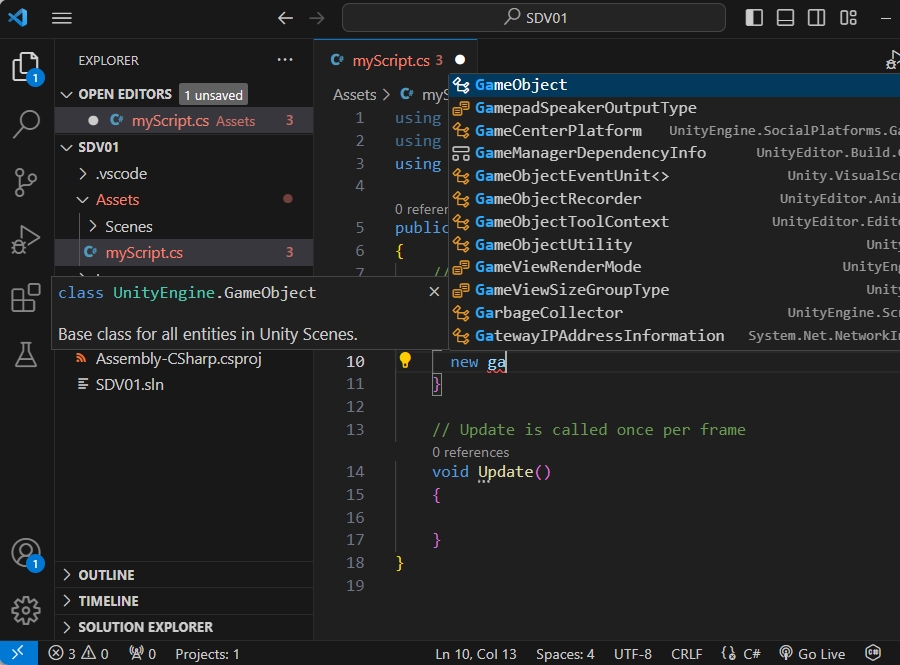
Give the name myScript or keep the default name and double click on it. VScode should open automatically.
After few seconds the project will be loaded and IntelliSense will be ready to use
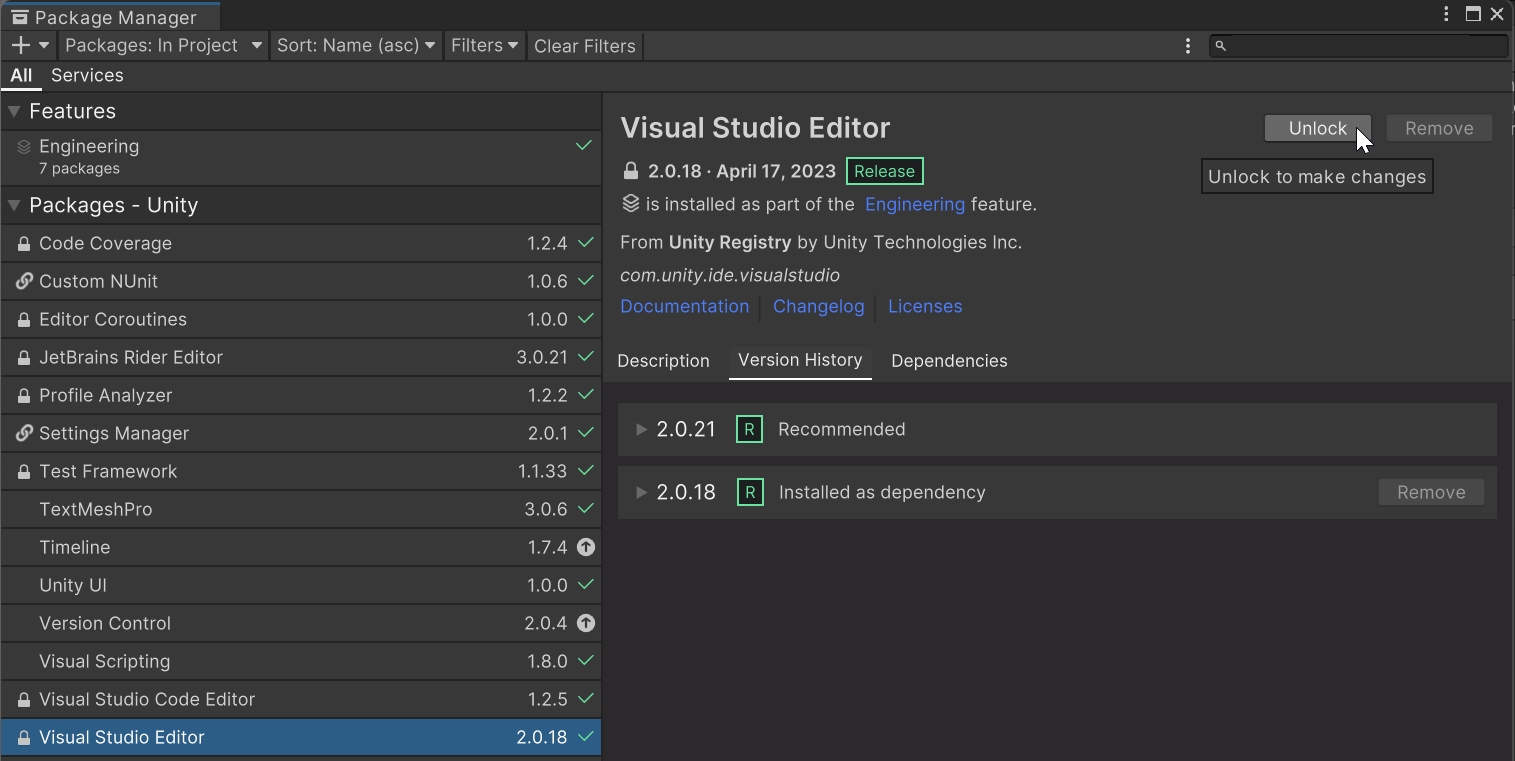
If the installed version of Unity is 2022.3.20 or below you'll need to update also this package
- Open the
Package ManagerfromWindow -> Package Manager - select
Visual Studio Editor(not theVisual Studio Code Editor), unlock the package if needed and update the package to the latest version (e.g.2.0.21)
The purpose of this section is to introduce you to the basics of Unity Editor interface and the main concepts used by the game engine.
Open the Unity project. The layout of the Unity Editor can be customised using the default templates from the top-right dropdown menu, or personalised by dragging the tabs around the screen. This is just one of the suggested layouts
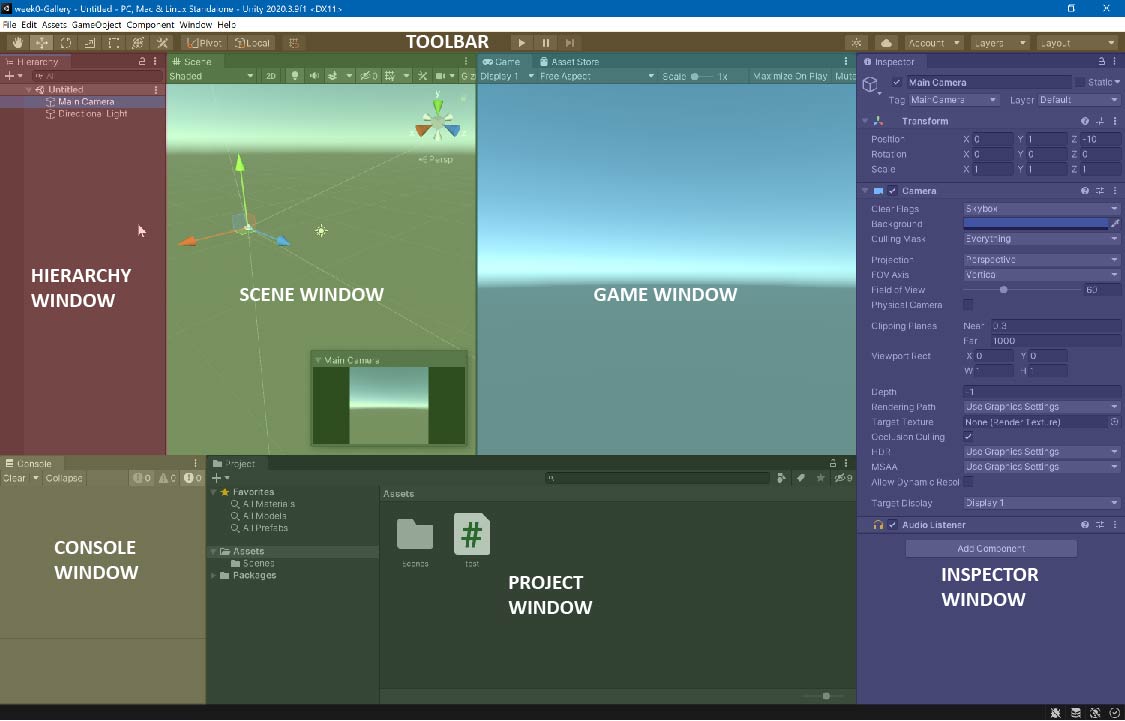
Scene view and Game view
This is the interactive window of your project. The Scene view is used to manipulate objects and view them from various angles. A selected object will appear highlighted and with the 3 axis gizmo apply to it. Next to the Scene view is the Game view. The Game view displays the main camera view (if present). In this view you can preview your application.
Hierarchy window
The Hierarchy is where you organize all the elements that are part of the Scene. These elements are called GameObjects. If you add a GameObject to your project in Scene view, it will be listed in the Hierarchy. If you delete a GameObject from the Scene, it will no longer be listed.
Project window
The Project window is where you can find all the files (assets) available for use in your project, whether you use them or not. The Project window works like a file explorer, organized in folders. You can drag assets directly from the Project window into the Scene view to add them to the Scene.
Inspector window
The Inspector is where you'll find and configure detailed information about all the components attached to the GameObjects. When you select a GameObject in Scene view or the Hierarchy, you'll see its components in the Inspector.
Console window
The console is used to control the status of the project. All errors in the scripts, or debug messages, will be logged here.
Toolbar
The Toolbar is both at the top of the Unity Editor interface and floating in the Scene View. Use the toolbar buttons to select and adjust GameObjects, change your point of view in the Scene, and start and stop Play Mode.
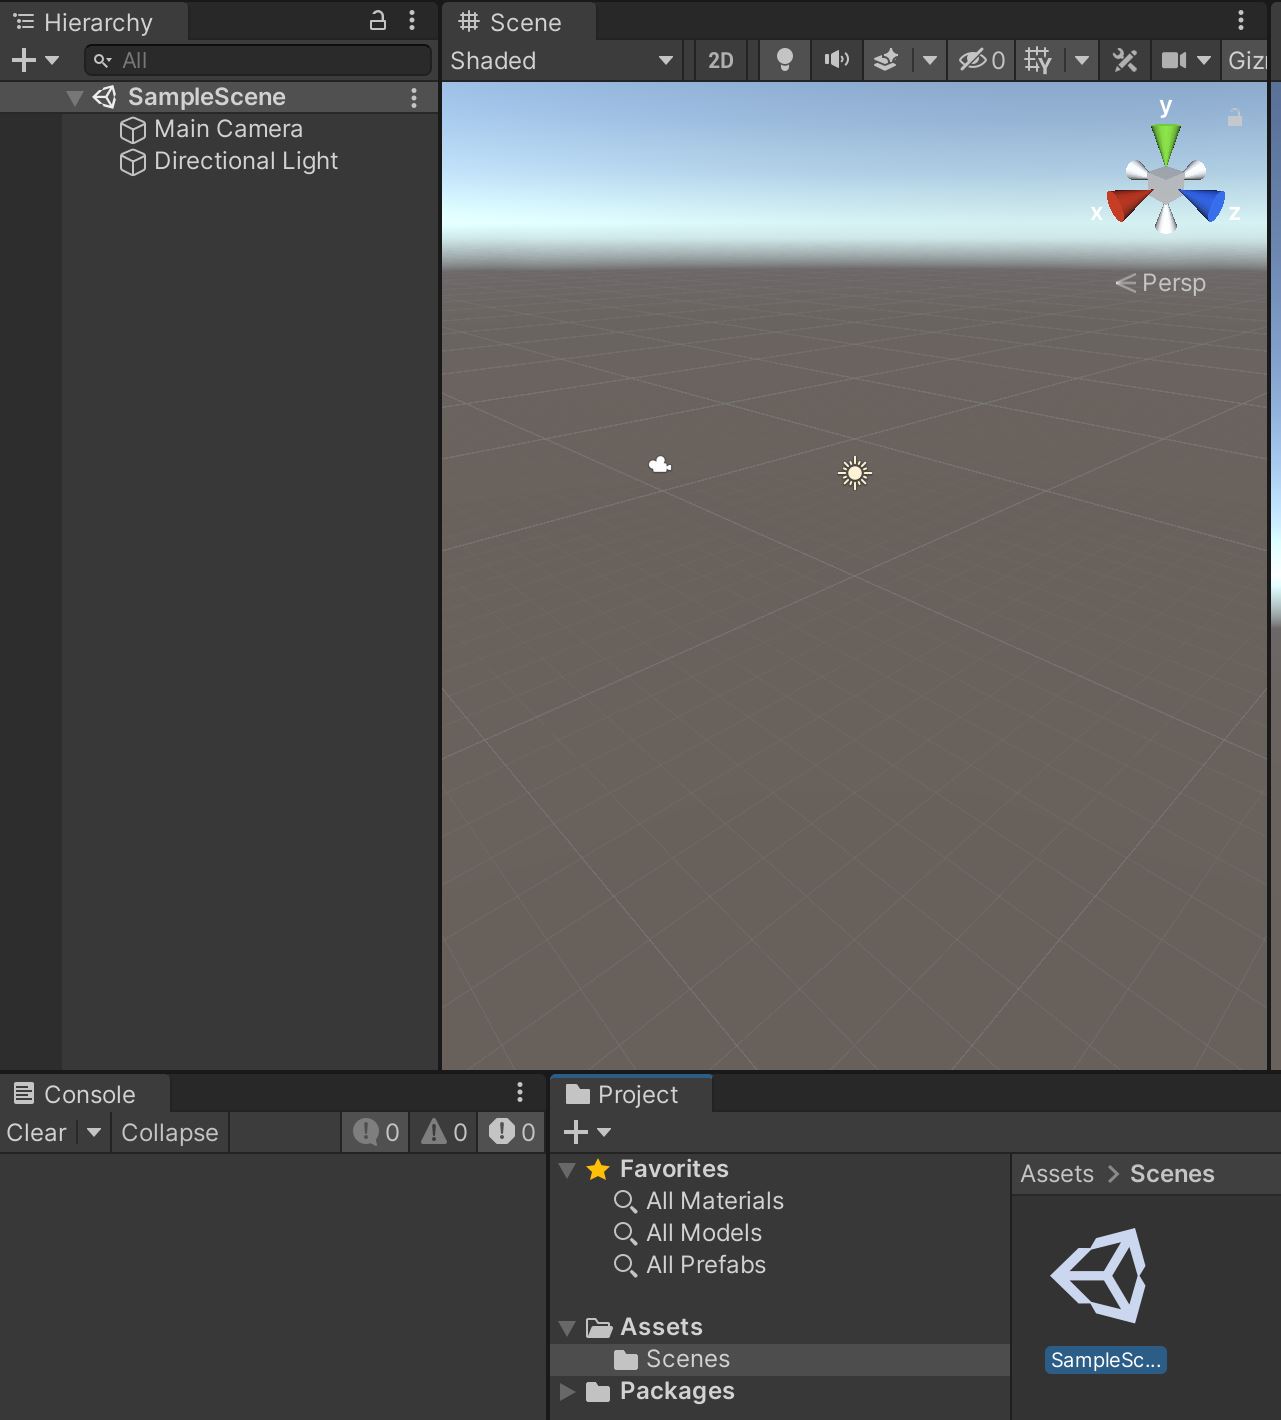
Unity Scene
Unity Projects are organized into scenes. Scenes are containers for everything in the experience you are creating. Every Unity project must have at least one scene, but there is no limit to how many scenes it can have. A new project generally has a SampleScene saved in Assets->Scenes with two GameObjects: Main Camera and Directional Light.
The navigation inside the scene is similar to other 3D modelling software:
- Pan: Select the Hand tool in the Toolbar, and click and drag in the Scene view to move your view, or use the central-wheel mouse button.
- Zoom: Holding Alt (Windows) or Option (macOS), right-click and drag in the Scene view to zoom, or use the mouse wheel.
- Orbit: Holding Alt (Windows) or Option (macOS), left-click and drag to orbit around the current pivot point. Note: this option is not available in 2D mode.
- Focus (Frame Select): When a GameObject is selected, with your cursor in the Scene view, press
Fkey on your keyboard to focus your view on that GameObject. If your cursor is not in the Scene view, Frame Select will not work.
Unity Packages
The Unity Package is another important feature to learn. Packages are used to add various enhancements to the project: for example, XR Plugin, FBX Exporter, but also 3D models, textures, sounds, ready-made scenes etc. The packages can be accessed and managed from Window -> Package Manager.
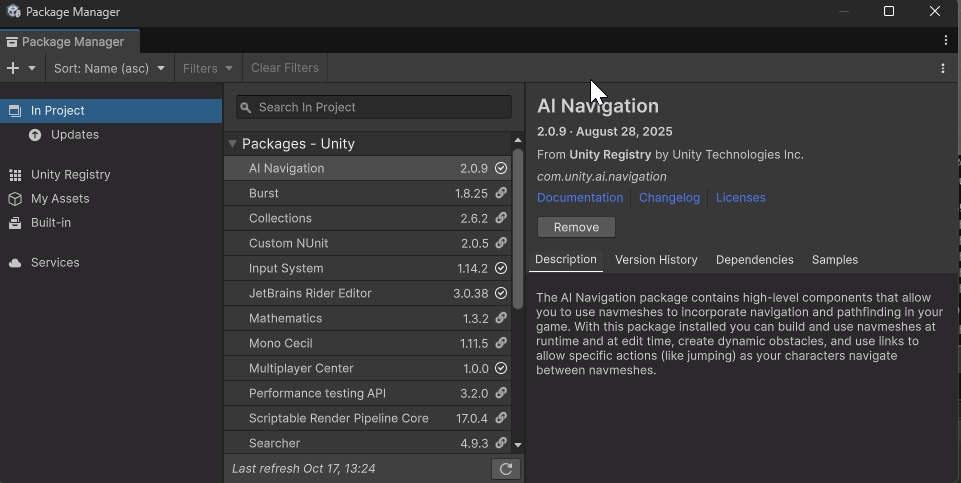
From Package Manager it is possible to see the packages that are currently in the project (and update them if needed); the ones collected in the Unity Registry (e.g. Oculus integration); as well as the one downloaded from the Asset Store. In addition, it is possible to add packages that are stored locally or part of a Git repository.
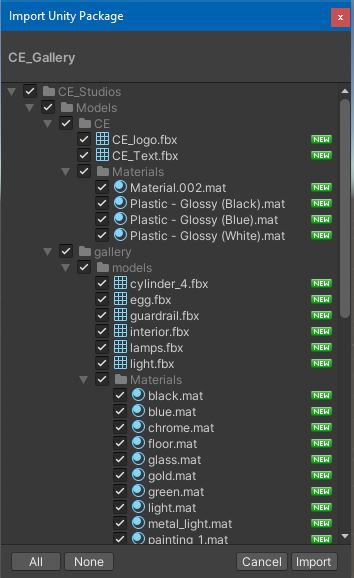
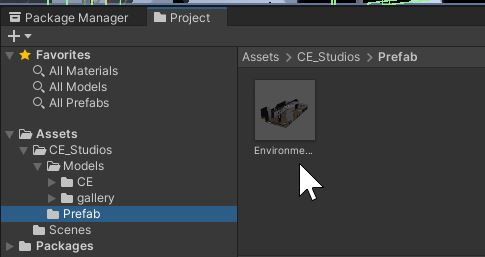
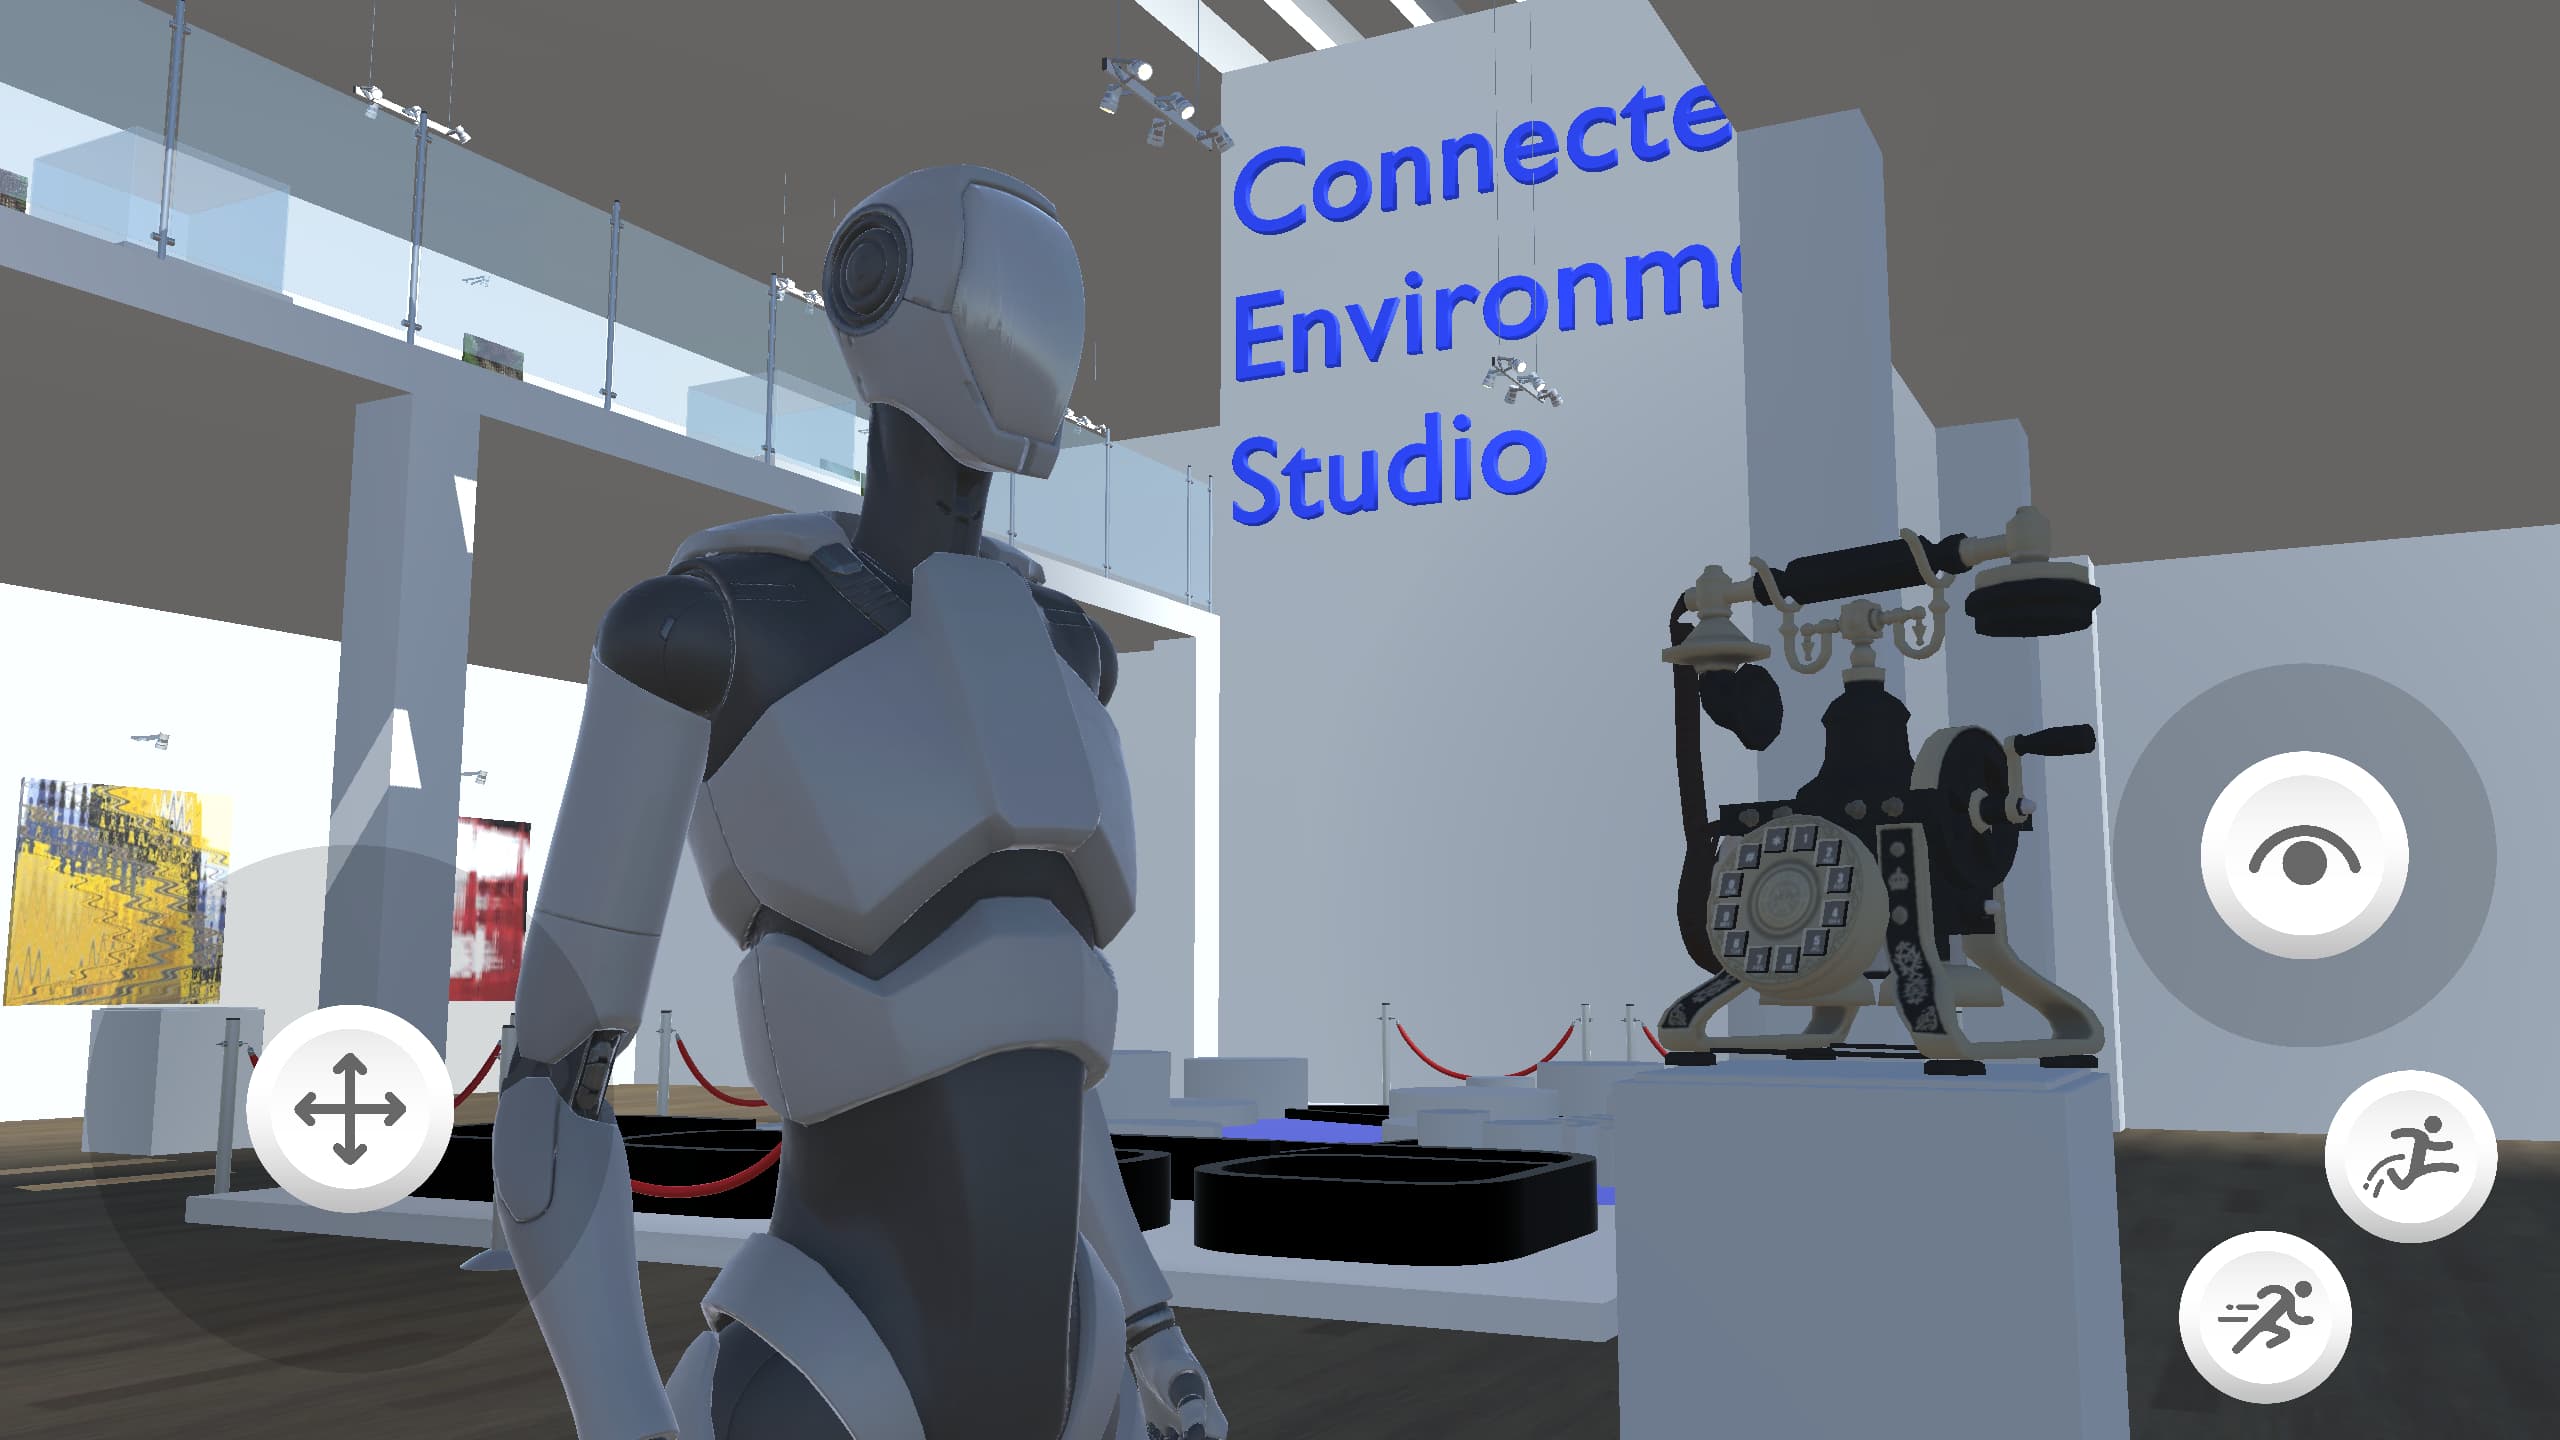
Download the CE Studio Model. The file itself is a Unity package that contains a ready-made Unity Scene.
In Unity open the package using Assets -> Import Package -> Custom Package. A new window will show the files that will be imported
Once imported, in the Project window go to the folder CE_Studios -> Prefab and drag and drop the object Environment in the Hierarchy window
A new complete environment should be now visible in your scene. Remove, from the Hierarchy window the Directional Light as the Gallery model already contains one
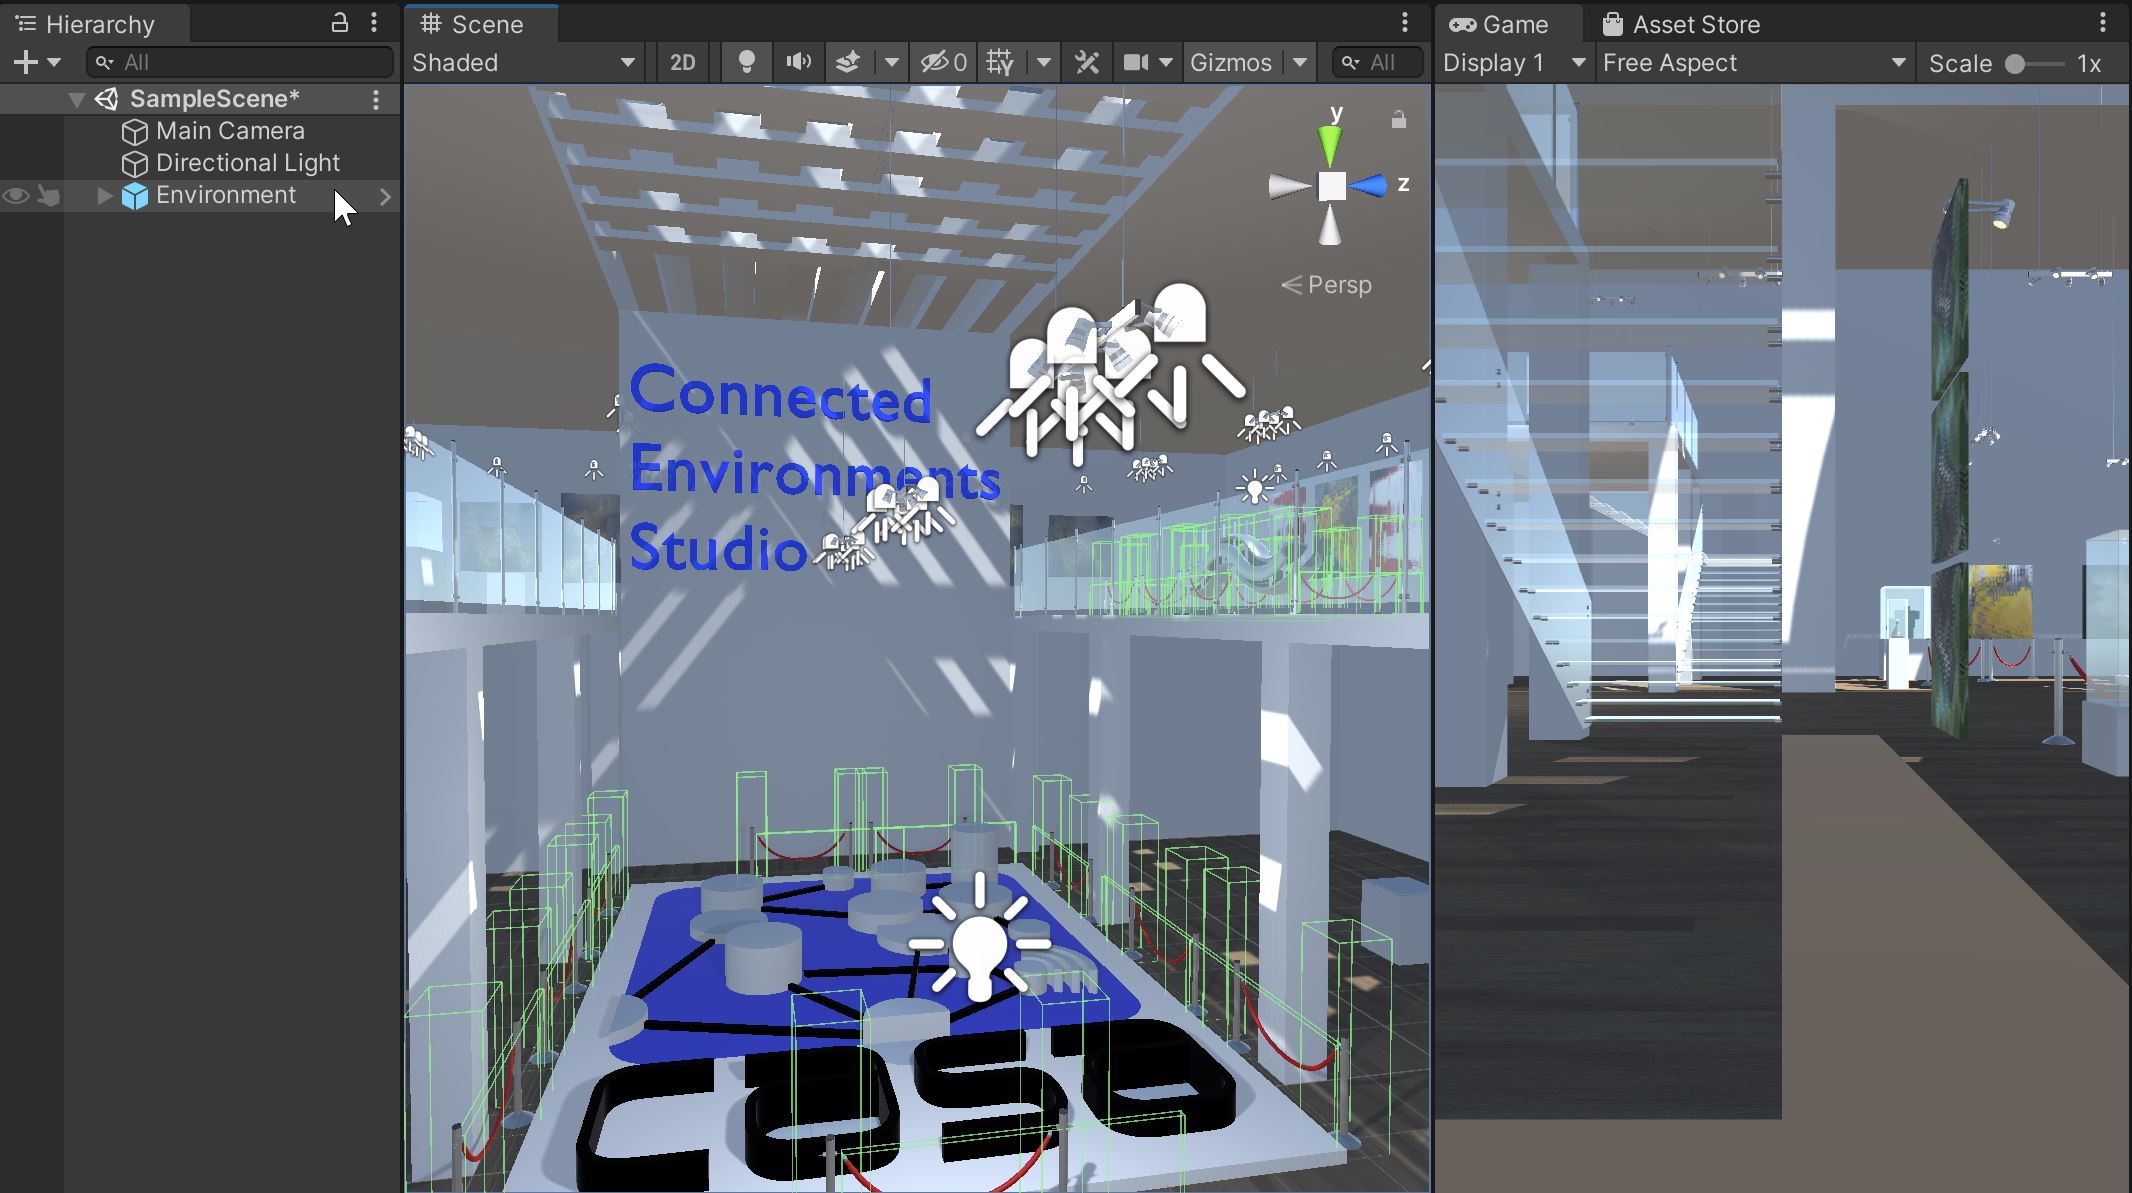
Press the Play button from the Toolbar to enter in the Game window, however, nothing is really playing as the environment does not have any animation and the Main Camera does not have any controller attached. Exist the Play mode and save the scene
Camera Controllers
In order to explore the gallery scene, we need to control a camera. For doing so, we need to add a Character Controller. While it is possible to build a controller from scratch using few lines of code, Unity already provides, through the Asset Store a free asset for a First Person Character Controller and for a Third Person Character Controller that also provide multiple settings from the GUI
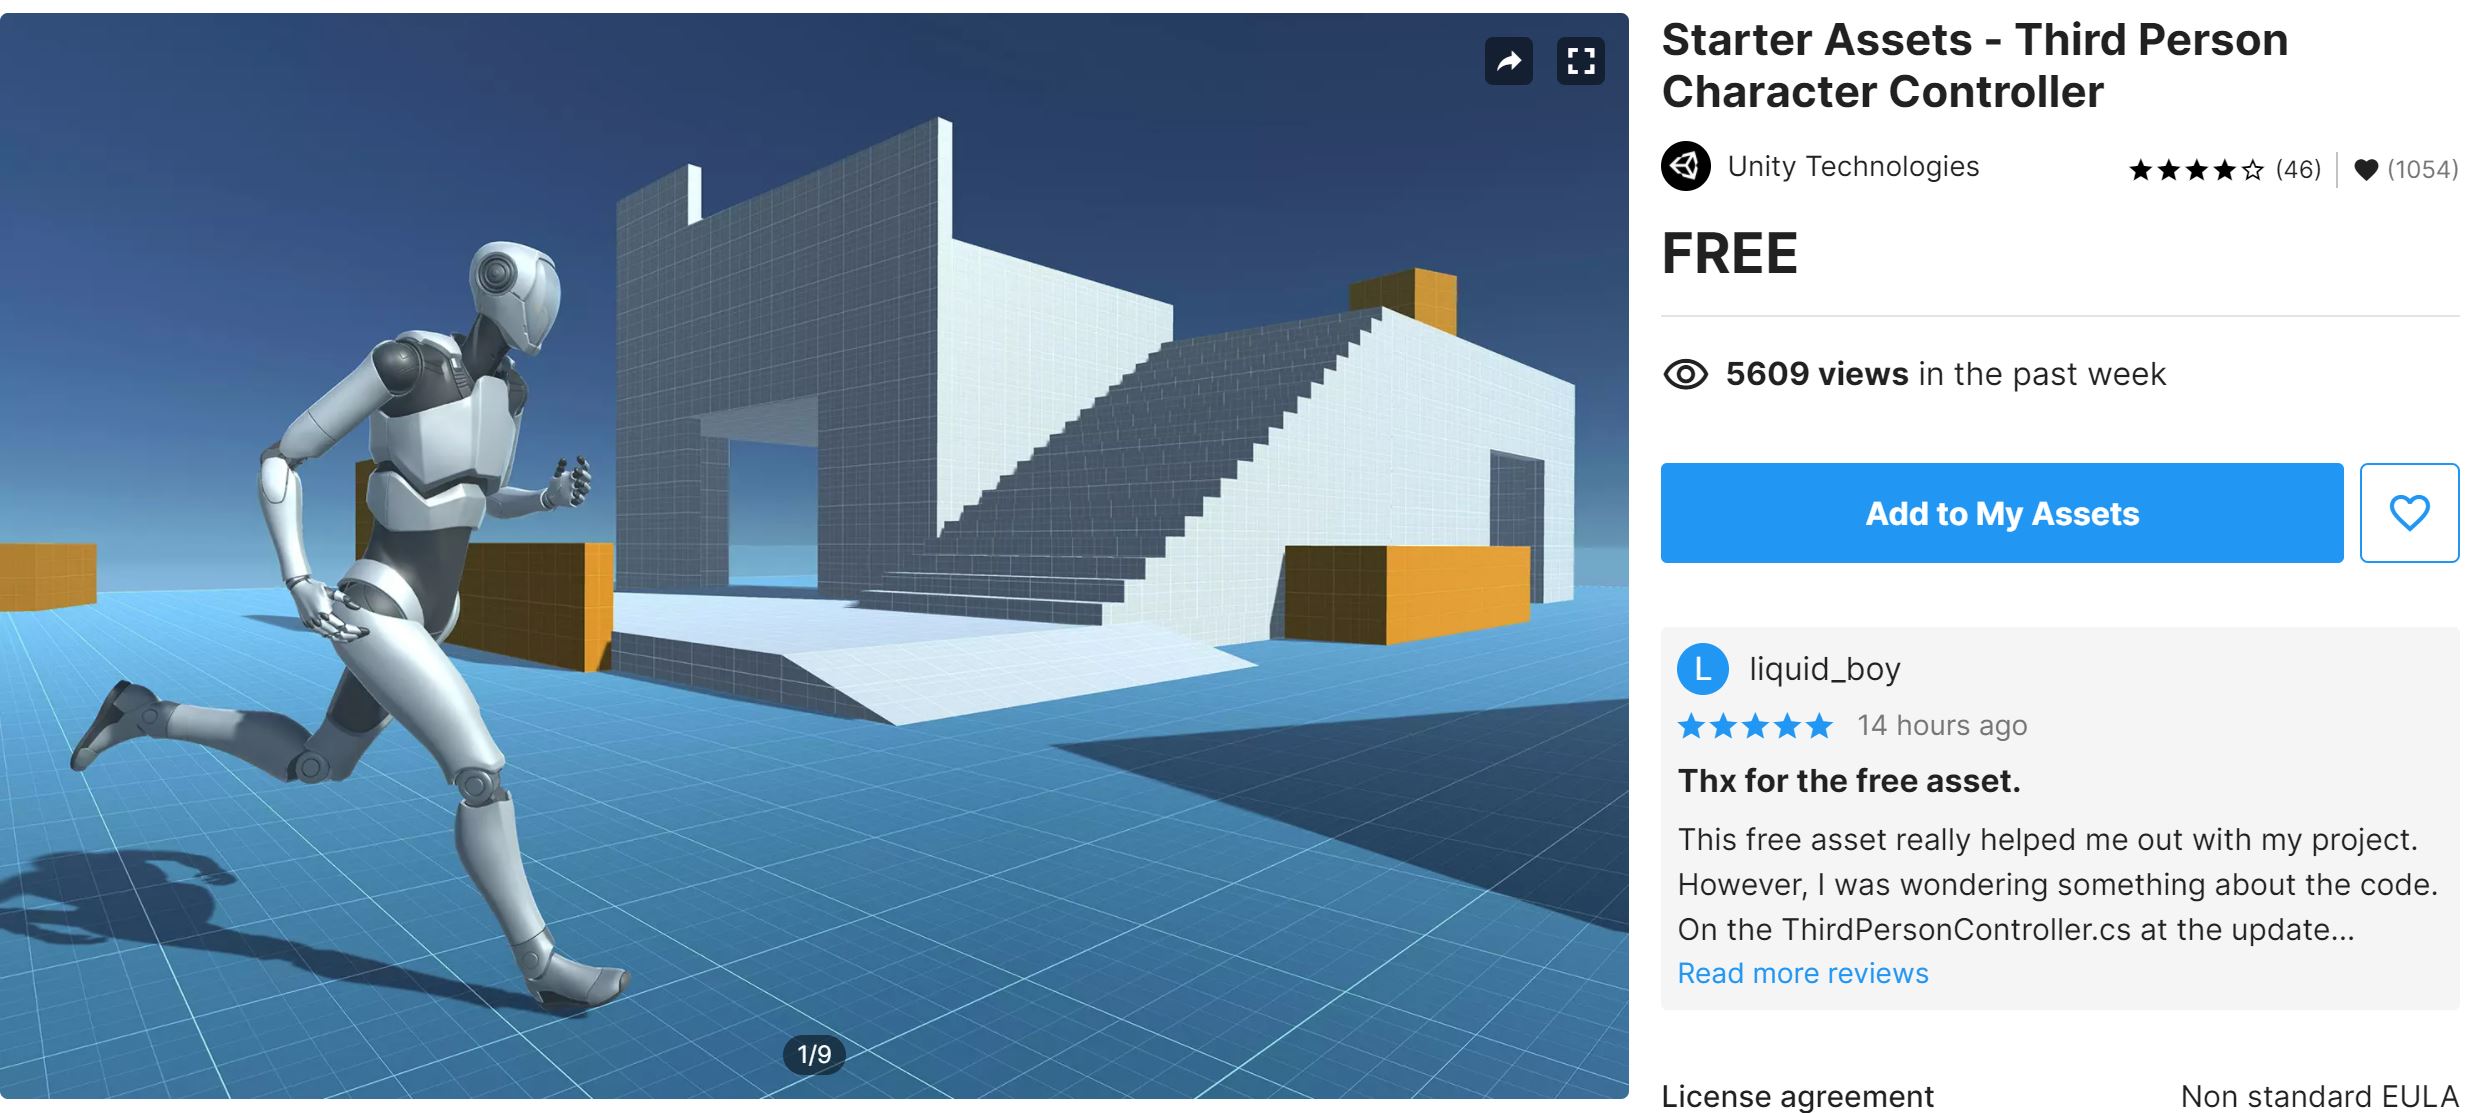
From the Asset Store webpage, select Add to My Assets for each controller. The two assets can be installed directly from the webpage. Otherwise, in Unity Editor, on the Package Manager window, change the view to My Assets. Both Starter Assets should be there, ready to be updated, downloaded and imported (if not, check the Last update time and press the refresh button).
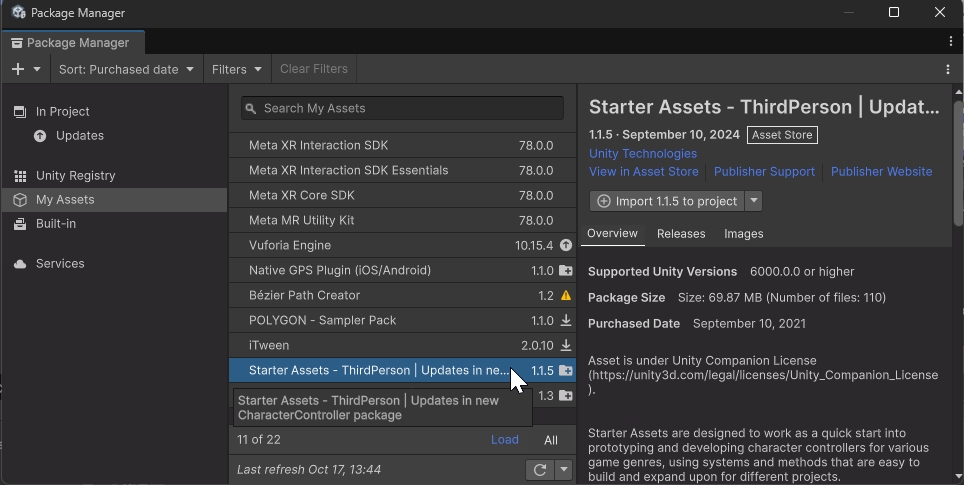
Download and import each of them (it could take some minutes to do so). Accept any dependencies asked to be installed. Once imported, a new folder StarterAssets will be part of your Assets
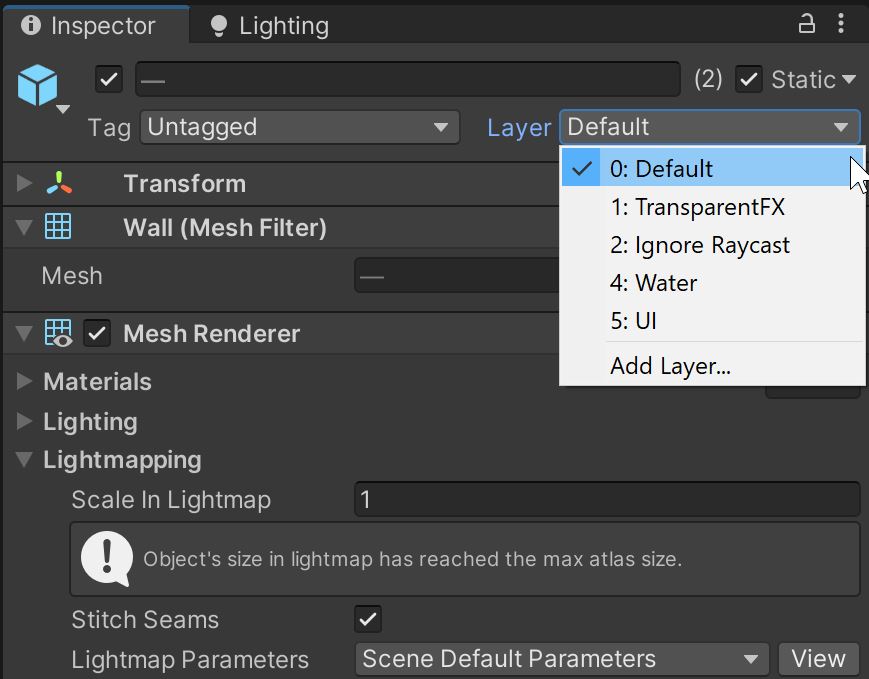
Before importing the new camera, we need to remove the existing Main Camera from the Hierarchy window (right-click and delete) and to change the layer of the GameObjectsstair and wall to 0:Default:
- From the
Hierarchy window, expand the GameObjectEnvironmentand its childinteriorand select bothstairandwall(hold CTRL on Windows or Shift on Mac). On theInspector windowfrom theLayerdropdown menu, select0:Default.
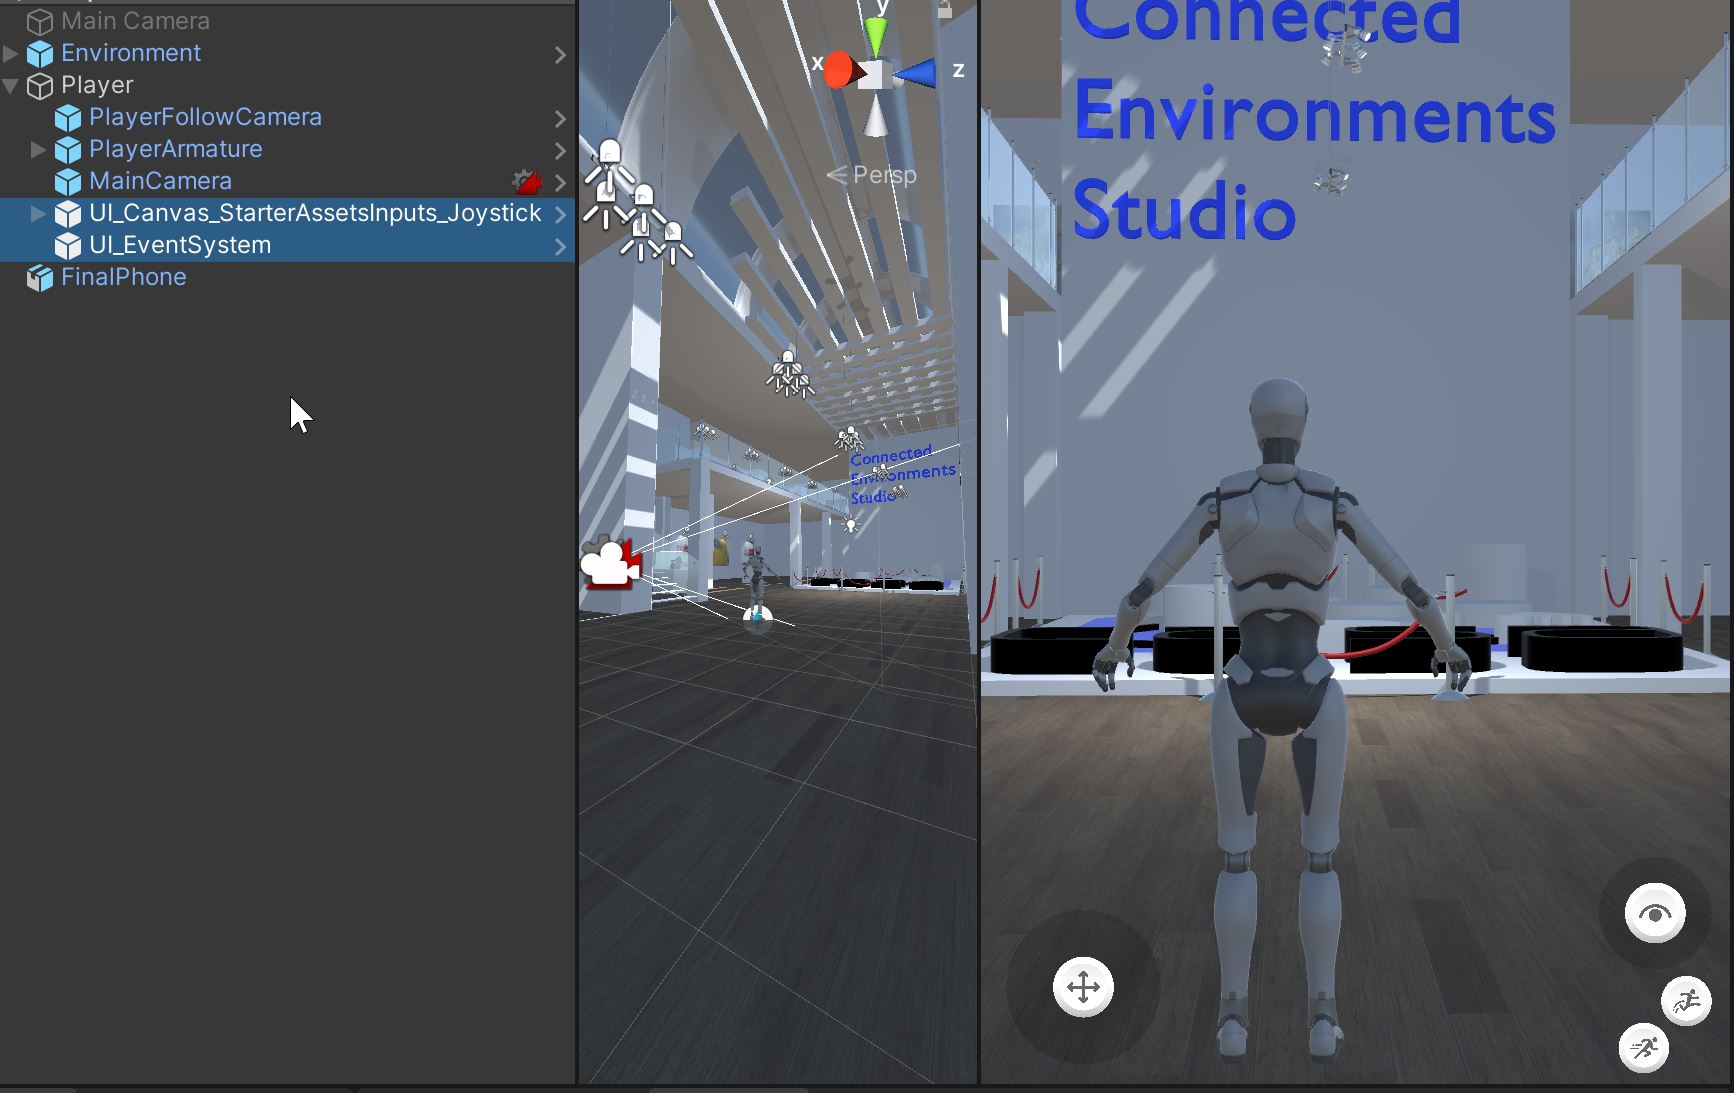
Create a new empty GameObject in the Hierarchy window named Player. From the folder StarterAssets -> ThirdPersonController -> Prefab, drag and drop in the GameObjectPlayer the following Prefab:
- MainCamera
- PlayerArmature
- PlayerFollowCamera
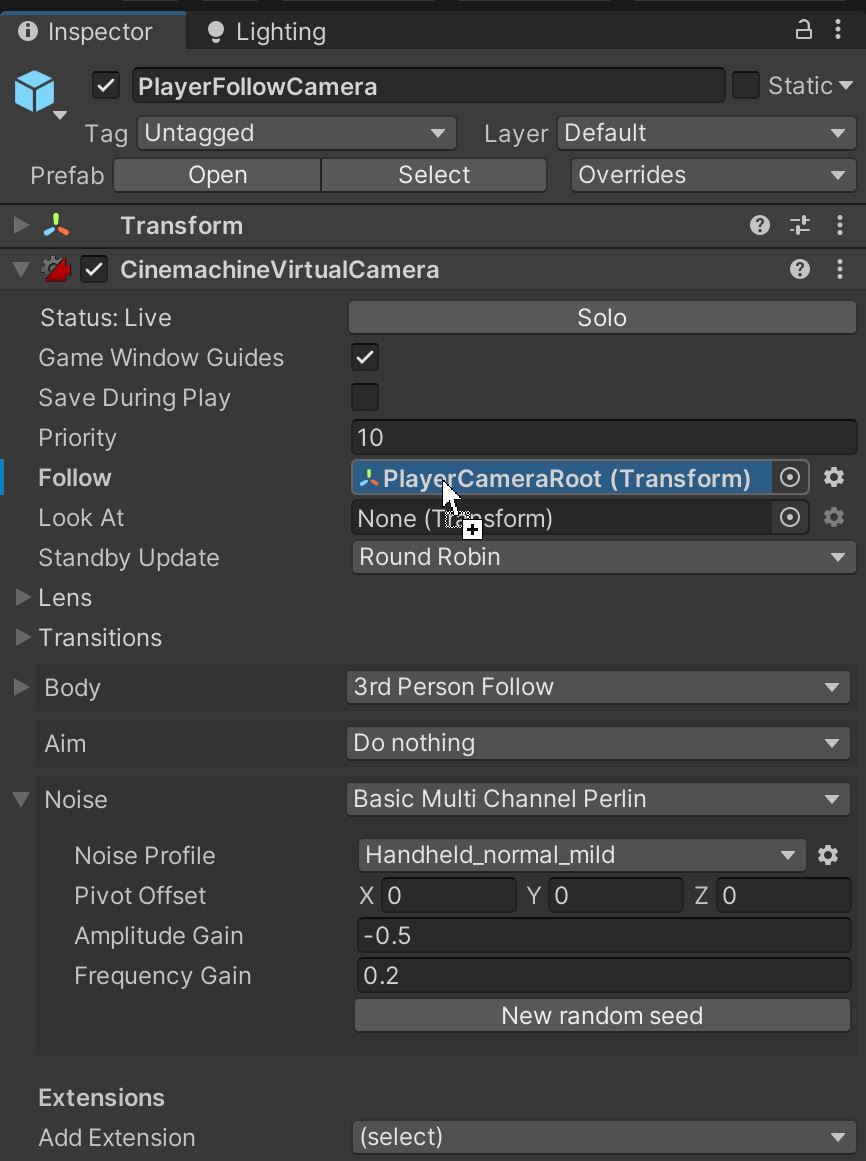
Finally, expand the PlayArmature, inside the Player GameObject, from the Hierarchy window, you should have a GameObject named PlayerCameraRoot.
Now, select the GameObject named PlayerFollowCamera and in the Inspector window, under the component CinemachineVirtualCamera click on the small target icon (a circle with a dot in it) next to the empty field Follow.
On the popup window search for the GameObject named PlayerCameraRoot.
Press Play on the Toolbar to explore the gallery: The mouse is used to rotate the camera and WASD control the character (spacebar to jump, shift to run)

In the same way, it is possible to import a First Person Character Controller. The prefabs to use are:
- MainCamera;
- PlayerFollowCamera;
- PlayerCapsule;
The PlayerCapsule GameObject will have the child PlayerCameraRoot to add in the Follow field of the PlayerFollowCamera. On the same component, CinemachineVirtualCamera set also the Body -> Shoulder Offset to 0,0,0
The Packages is just one of the ways to import new assets in Unity . Original file formats such as .fbx, .dae and .obj for 3D models, .jpg and .png for images, .wav and .mp3 for sounds etc. are natively supported by Unity. Other formats can be imported using additional plugins from the Assets Store or from the Unity community.
select the + button on the top-left side of the Package Manager window and chose Add package by name..
use com.unity.cloud.gltfast as name and press Add, the package will be install automatically
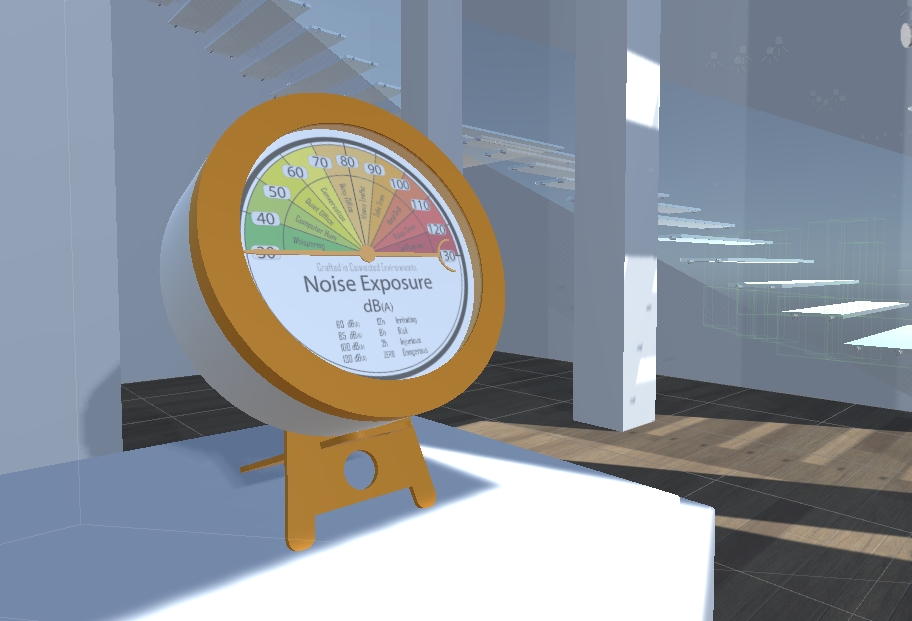
Sketchfab is a great service to share and download 3D models. Choose one model to add to the gallery and download the fbx format. For example, use our Noise Gauge
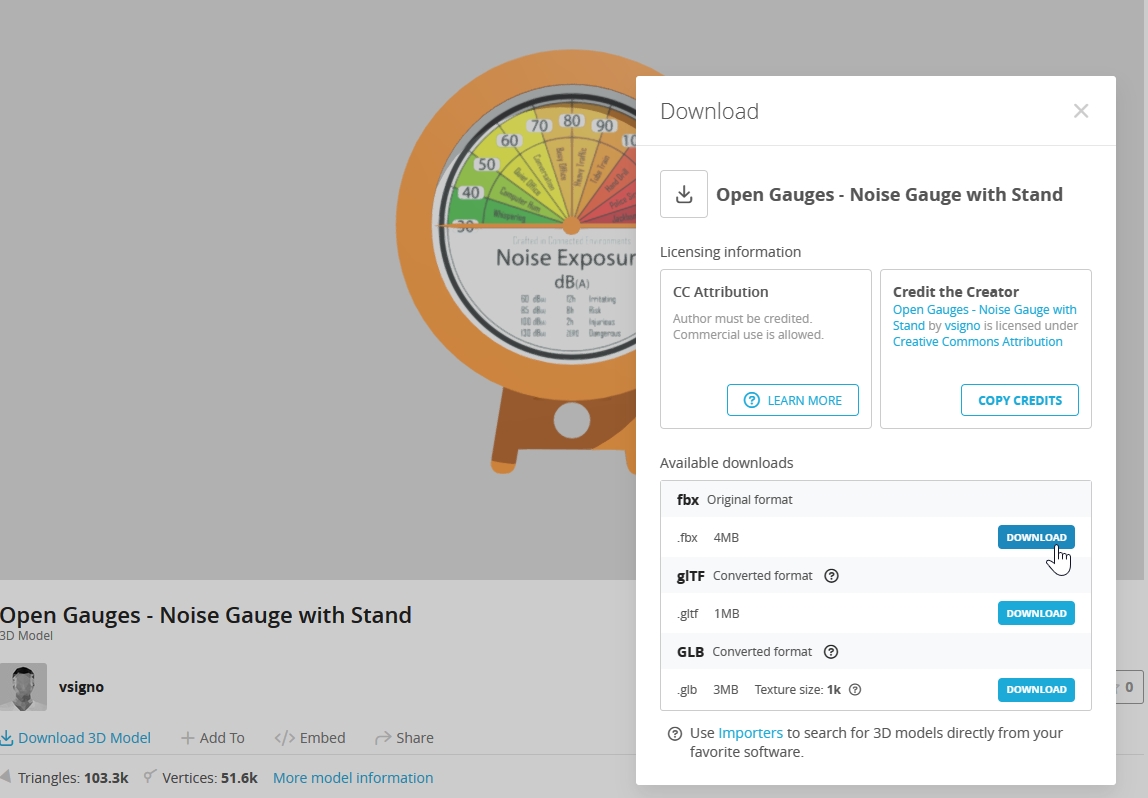
Create a new folder in the Project window and copy the model in there.
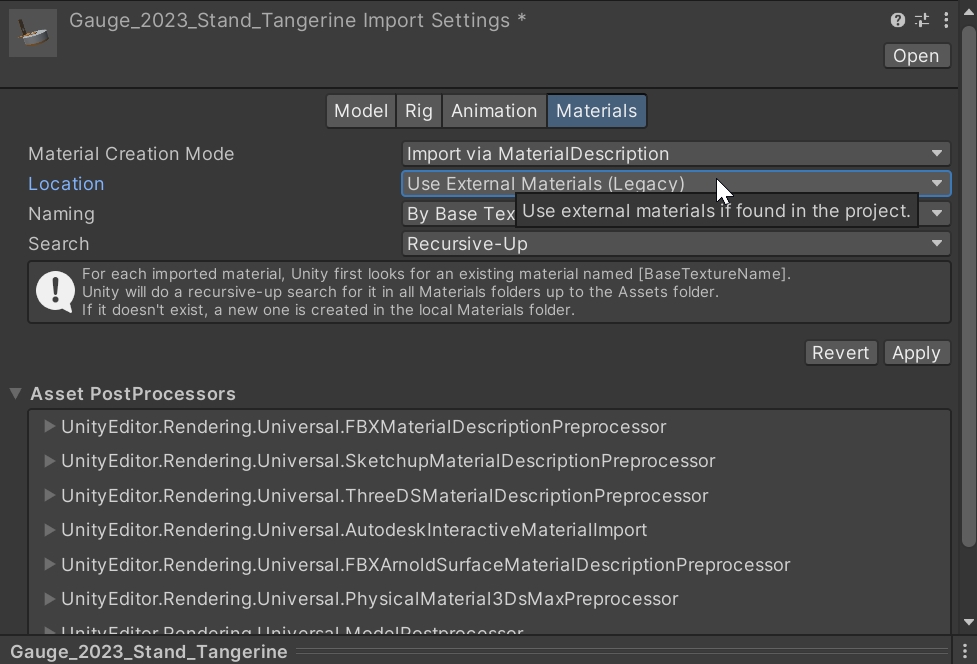
From the Inspector window we can change the importing settings of the assets (e.g. scale factor, animation, uv mapping). Select the Materials tab and change the Location field to Use External Materials (Legacy), in this way the materials will be extracted from the model in the same folder of the asset as Unity Materials, easier to modify them.
We can now drag the 3d model in the scene, change is position using the Transform component in the inspector window or directly the gizmo axis in the Scene window
In case we need to change the texture of the dial, or if the texture is not embedded in the FBX file, we can add it via the Inspector window:
- Select the mesh of the dial, which is inside the GameObject
Gauge_2023and it is namedDial.003. - In the
Inspector Window, under theMesh Renderercomponent, click onMaterials. - A mesh can have multiple materials attached, in this case, there is just one reference under
Element 0that is namedDial-Noise_120mm. - click on it, this will highlight the material in the
Project Window(i.e.Dial-Noise_120mm). - Click on that material in the
Project Window, and in the Inspector, next to theBase MapunderSurface Inputs, click the target icon (small circle with a dot in it) and search for the texturedial-noise_120mm.
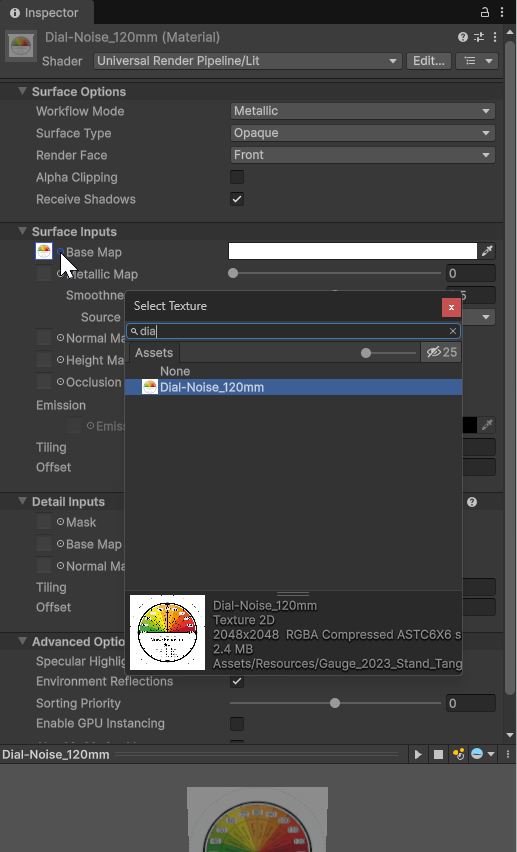
Alternatively, it is possible to simply drag and drop the texture into the empty box next to Base Map.
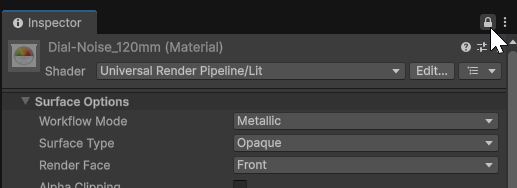
To avoid accidentally changing properties of another object while doing this, click the small lock icon at the top right of the Inspector Window to lock the current view.
PC & Mac Standalone
There are several settings and optimisation that can be added to the project, but for now let's build our first application. Open the Build Settings form File -> Build Profiles. Be sure that the Scene List contains the scene you are working on (in this case SampleScene), if not, Click Open Scene List and add the right one (and delete the existing one). Control that the right platform is active (Windows in this case)
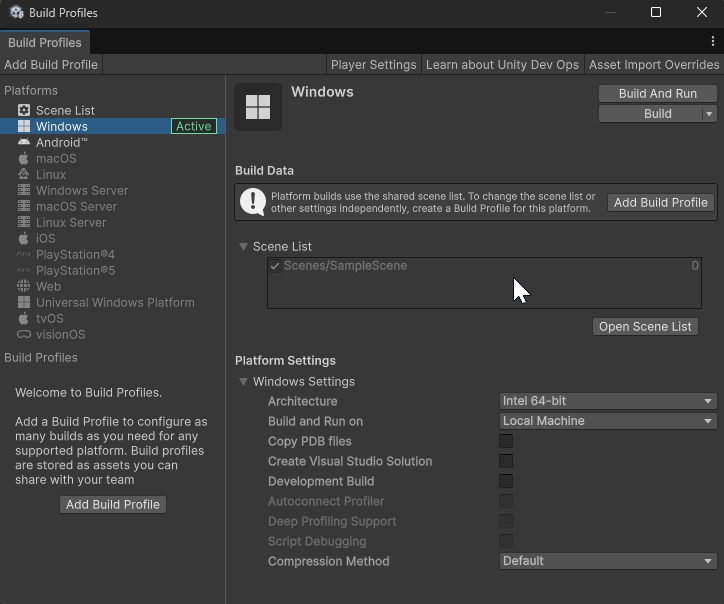
Before building the project, we can change the name of the application, the icon to show and if it will run full screen or in a window, from the Player Settings in the top bar of the Build Profiles and, if needed, change the quality of the built from the left side menu Quality
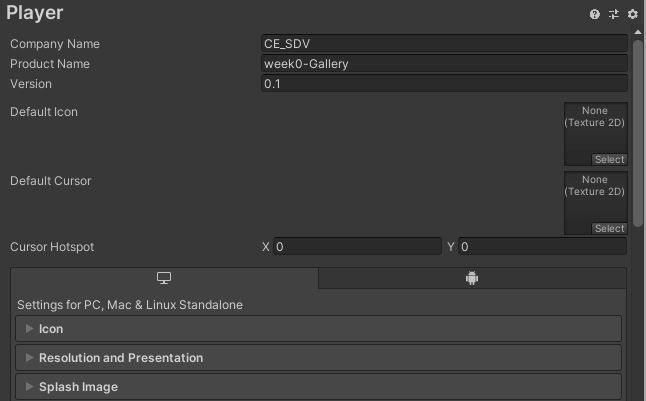
Back in the Build Setting window, press Build and select a folder where to save the build.
Build for Mobile [OPTIONAL]
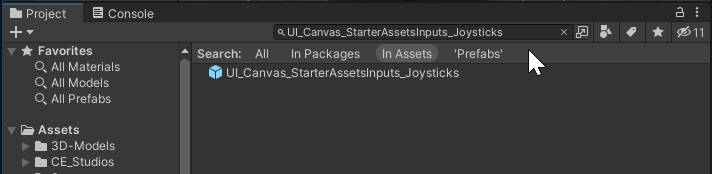
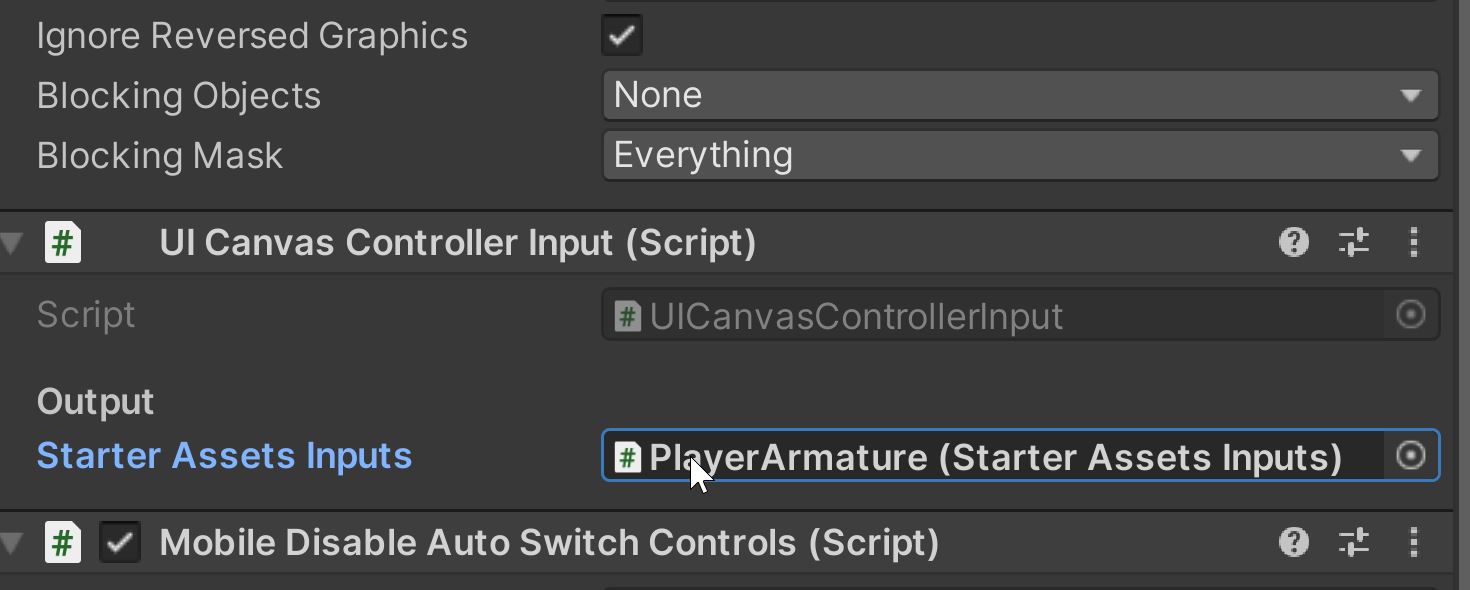
The Third Camera Controller supports mobile inputs out-of-the-box. From the Project window search and add (drag and drop) to the Player GameObject the UI_Canvas_StarterAssetsInputs_Joysticks and UI_EventSystem prefabs:
- UI_Canvas_StarterAssetsInputs_Joysticks
- in the
Inspector windowdrag thePlayArmatureGameObject to the Starter Assets Inputs of the component UI Canvas Controller Input (Script) (or thePlayerCapsulein case of theFirstPersonControl)
- UI_EventSystem
Inspector windowchange Pointer Behaviour to All Pointers As Is
Build Android
Open the Build Settings form File -> Build Profiles and select Android as a new platform and then Switch Platform
All the default settings will be fine for now. The quality of the project is automatically set to Mobile, due to the performance of the mobile system.
Press the Build button to build the project and create an apk file that can be moved to an Android Phone to be installed
Build iOS
Open the Build Settings form File -> Build Settings and select iOS as a new platform and then Switch Platform
All the default settings will be fine for now. The quality of the project is automatically set to Medium, due to the performance of the mobile system.
To build a Unity App on iOS we need to have Apple Developer Team ID. It is possible to get a Free iOS Developer Account to test our App this guide will describe in detail the steps to follow to add your Apple ID to Xcode:
Xcode -> Preferences -> Accounts -> Apple IDs, in the lower-left corner, click the Add button (+)
In the sheet that appears, choose Apple ID, then click Continue.
In the next sheet, enter your Apple ID, click Next, enter your password, then click Next.
If successful, the Apple ID appears in the column on the left and the teams that the Apple ID belong to appear on the right. The table displays the team name and your program role. If you are an individual who doesn't belong to the Apple Developer Program, your team name is your first and last name appended by "Personal Team" in parentheses—for example, "Mei Chen (Personal Team)".
It is possible to add your Apple Developer Team ID in Unity to authorize your app during the build Unity -> Preferences -> External Tools under Xcode Default SettingsSigning Team id (check also Automatically Sign). This step is useful if you are building iOS apps on Windows.
A Unity scene can grow easily and faster in terms of complexity due to the number of digital models, materials, textures, scripts. While a powerful system can easily cope with these elements (within a certain limit), outdated systems, mobile devices and VR headsets could provide an annoying and even unpleasant experience for the user.
There are several ways to optimise a Unity scene. One of the most effective, which also has a great impact on the quality and performance of the entire application, is to limit the number of real-time lights and shadows and prefer, if possible, to bake the light in the textures of the digital models. This process is particularly important in VR.
It is possible to create a lightmap also from external 3D modelling software, like Blender, however, last releases of Unity the lightmapping system has become easy to use and extremely effective (especially if a discrete Nvidia GPU with more than 4GB is available).
Baked lights work just on static objects (for obvious reasons), which are objects that do not move or the user does not interact with. To define a GameObject as static:
- In the Gallery scene, select the Environment GameObject from the
Hierarchy windowand in theInspector window, next to its name, tick the Static checkbox (or be sure that is active). - in
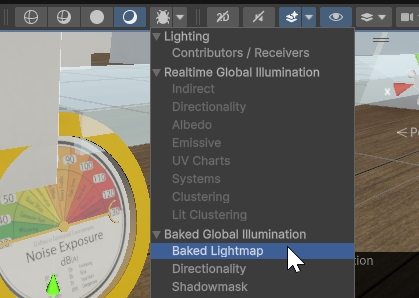
Scene windowchange Shaded view to Baked Lightmap. As there are no lightmaps, the model will look grey and divided by a pattern of squares. If one model is not visible in this view, it means that it has not been marked as Static.
- we need now to select all the lights in the scene and change their mode from Realtime to Baked. The easiest way to select all the lights in the scene is from the
Hierarchy window. Change the filter of the search box to Type by clicking on the magnifier and search for light. The `Hierarchy window will show know just the light GameObjects.
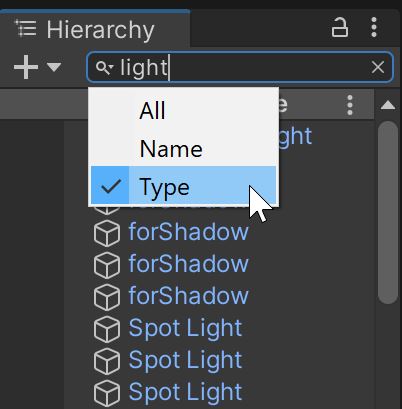
- select all of them for a batch editing and in the
Inspector windowchange the Mode from Realtime to Baked
We are now ready to set up and generate the lightmaps. Open the Lighting panel from Window -> Rendering -> Lighting.
The first step is to create a new Lighting Settings Asset and to disable the Auto Generate if active.
The important parameters to setup are:
- Lightmapper. Set to Progressive GPU(Preview). Unity uses the GPU to bake the light, much faster than the CPU.
- Lightmap Resolution. This is the main parameter that defines the quality of the lightmap and will be visible in the
Scene view, the higher the number, the smaller the pattern. As this value will influence the time of baking, it is better to test the other parameters first with a low-resolution value (e.g. between 5 and 10) and use a large value (e.g. 40⁄80) just for the final Lightmap. - Direct and Indirect samples. The default values of 32 and 512 are generally fine. Higher numbers could improve the quality of the lightmaps but they will impact on the time of the baking process.
- Max and Min Bounces. Similar to Direct and Indirect samples, default values are generally fine.
- Max Lightmap Size. this value defines the size of the lightmap texture a value of 2048 or 4096 is fine for large environments like the gallery, however, a value of 4096 could be too big for the GPU memory to handle and Unity will fall back to the slower Progressive CPU (during the process, Unity will inform us in the
Consoleif the lightmap we are trying to create is too big for the GPU memory) - Compress Lightmap. Use High Quality setting. In certain cases Manual compression produces better results
- Ambient Occlusion. Set to active with default values
- Lightmap Parameters. Default-Medium is generally fine for testing
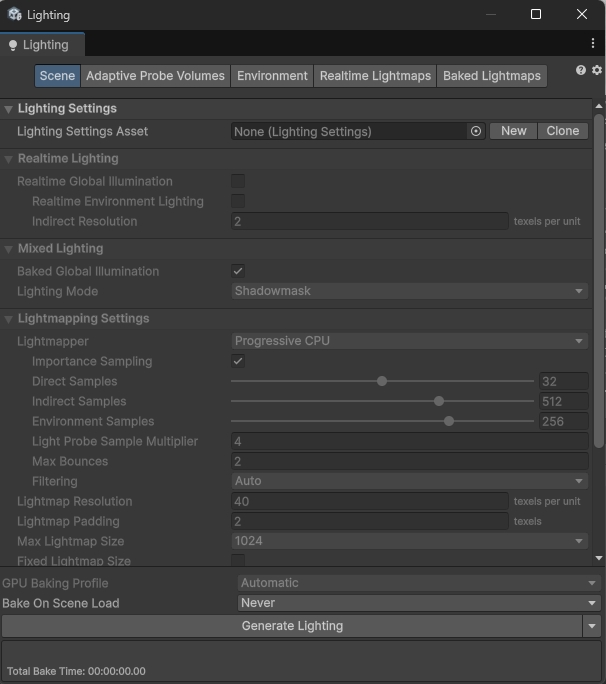
Press Generate Lighting to start the process. On fast GPU and medium-size scenes, it could take less than 5 minutes. On larger scenes, or using the Progressive CPU, it could take also several hours.
In the Scene view we can see Unity computing the lightmaps in real-time
Press Play to explore the gallery in a more realistic environment with softer shadows. If Generate Lighting button was used, the lightmaps will be automatically saved in a new folder named after the Scene. This folder will be created in the same directory as the scene file itself.
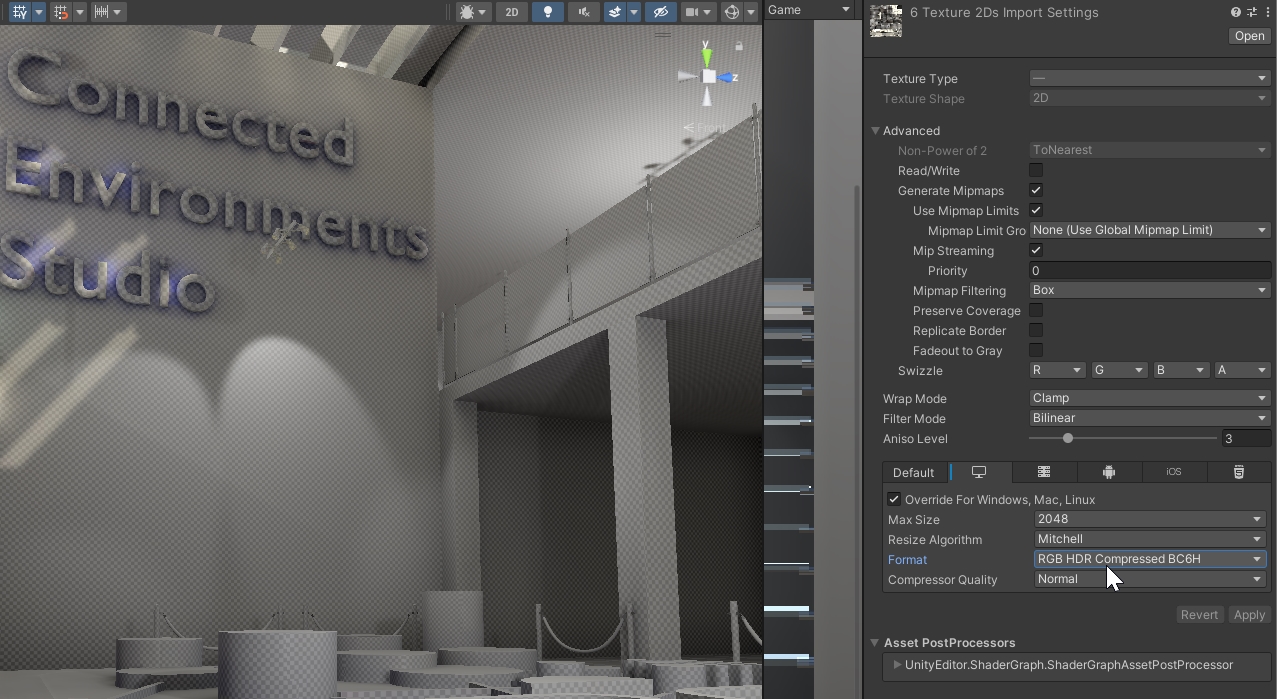
As high-resolution lightmaps could reach considerable large file size, it is possible to compress them directly in Unity:
- open the folder containing the lightmaps and select all the images
- in the
Inspector windowselect the platform and activate theOverridecheckbox - different platforms support different compression formats with different performances, e.g. Standalone high-quality compression is obtained using the algorithm
Mitchelland formatRGB HDR Compressed BC6H(Unity compression formats).
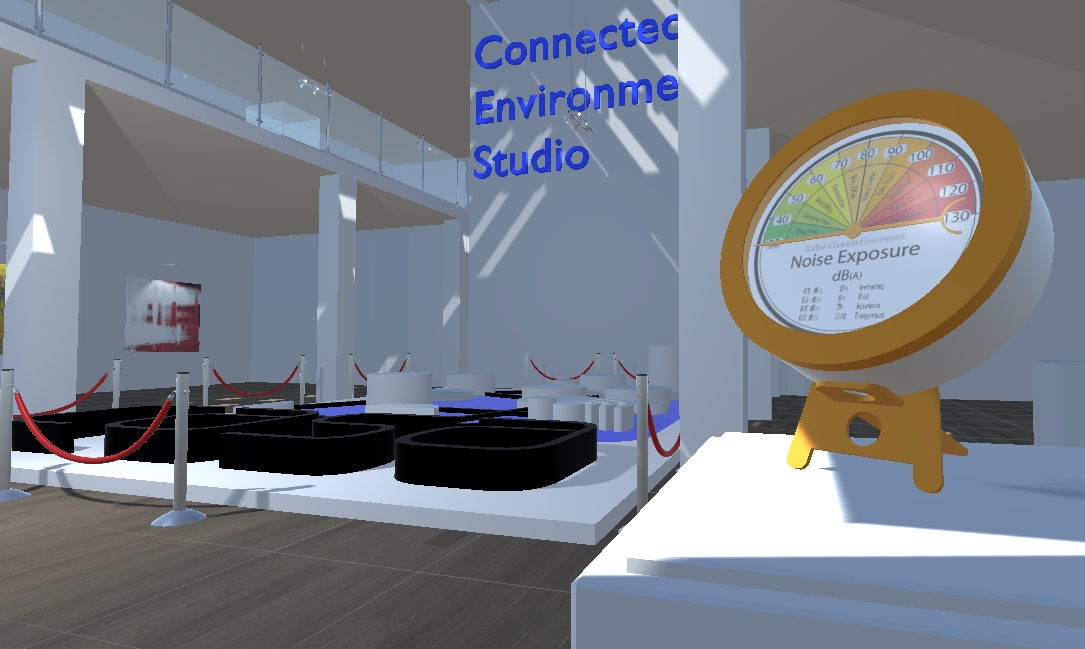
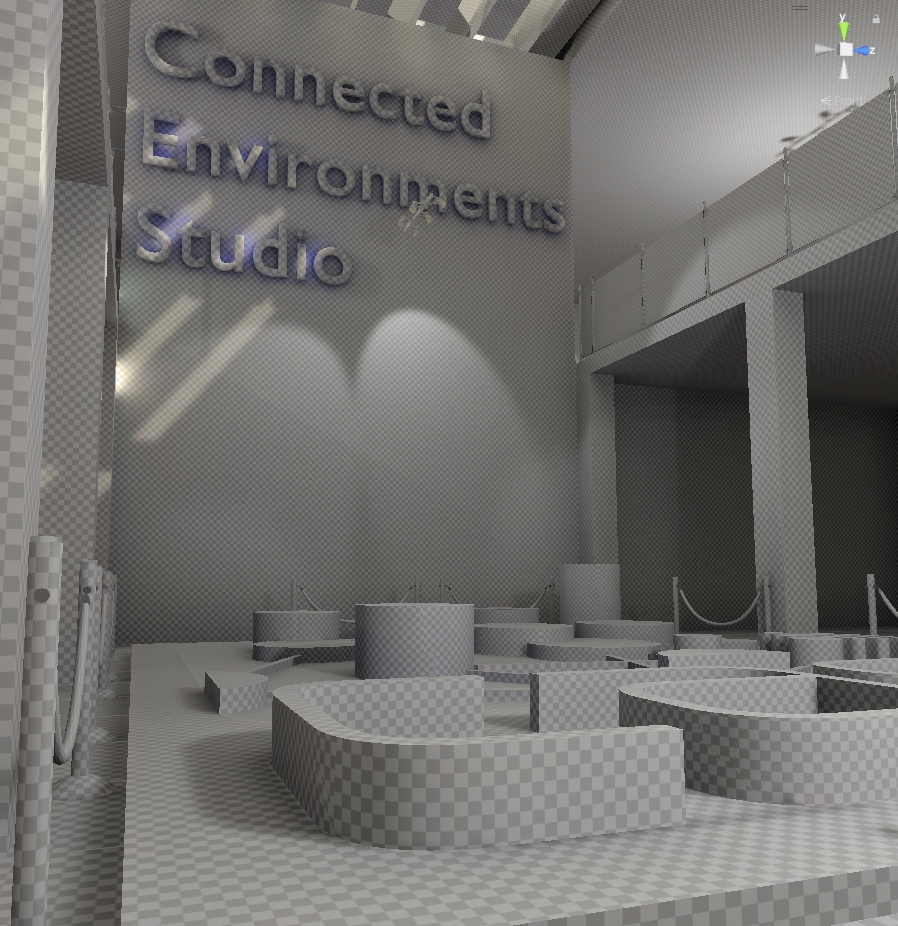
The final result of the gallery, ready to be enriched with real time data installations
The use of a version control system in Unity is optional, but highly recommended for collaborative projects, but also to keep a regular backup of the Unity project itself and to share the project over different systems. In this example, we are going to use GitHub and GitHub Desktop as interface.
The easiest way to create a new GitHub repository is from the GitHub website
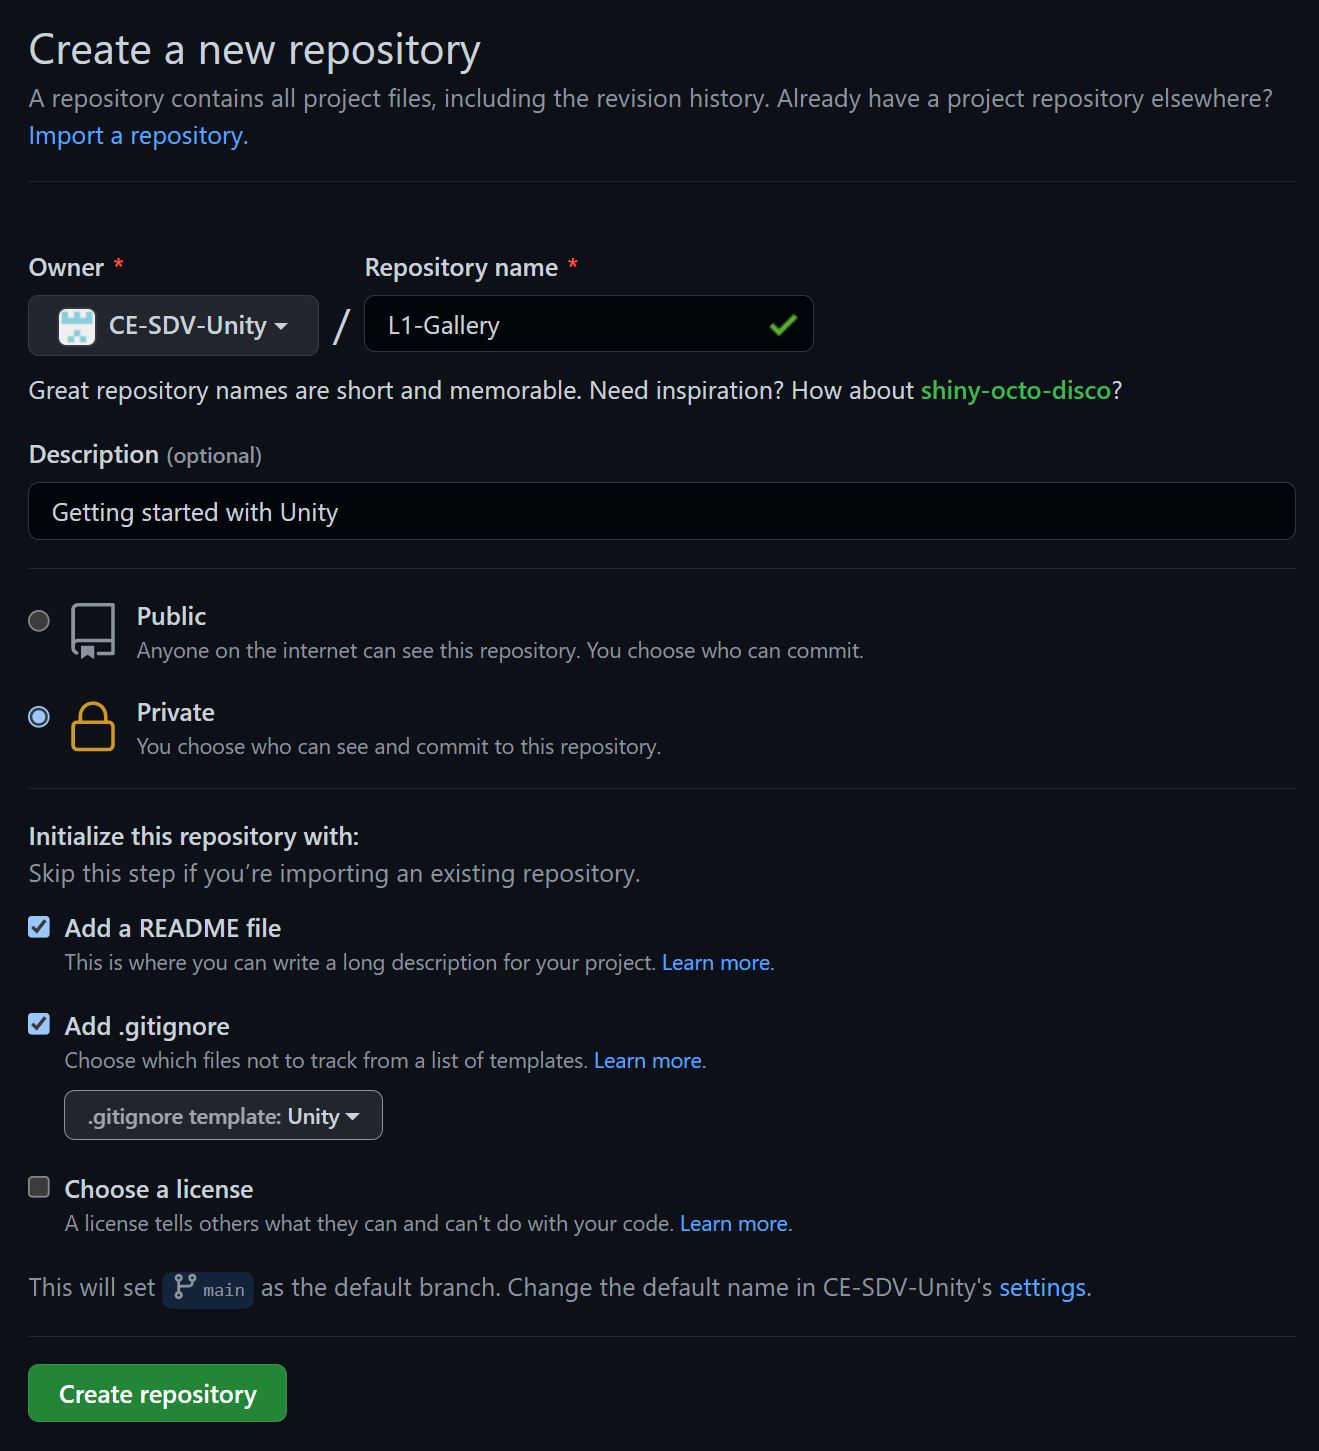
- provide a unique name for the repository and a brief description of the project
- set the repository Public or Private depending on the project
- add a README file
- add a .gitignore this is particularly important to avoid the upload of local settings and other files that are not part of the project
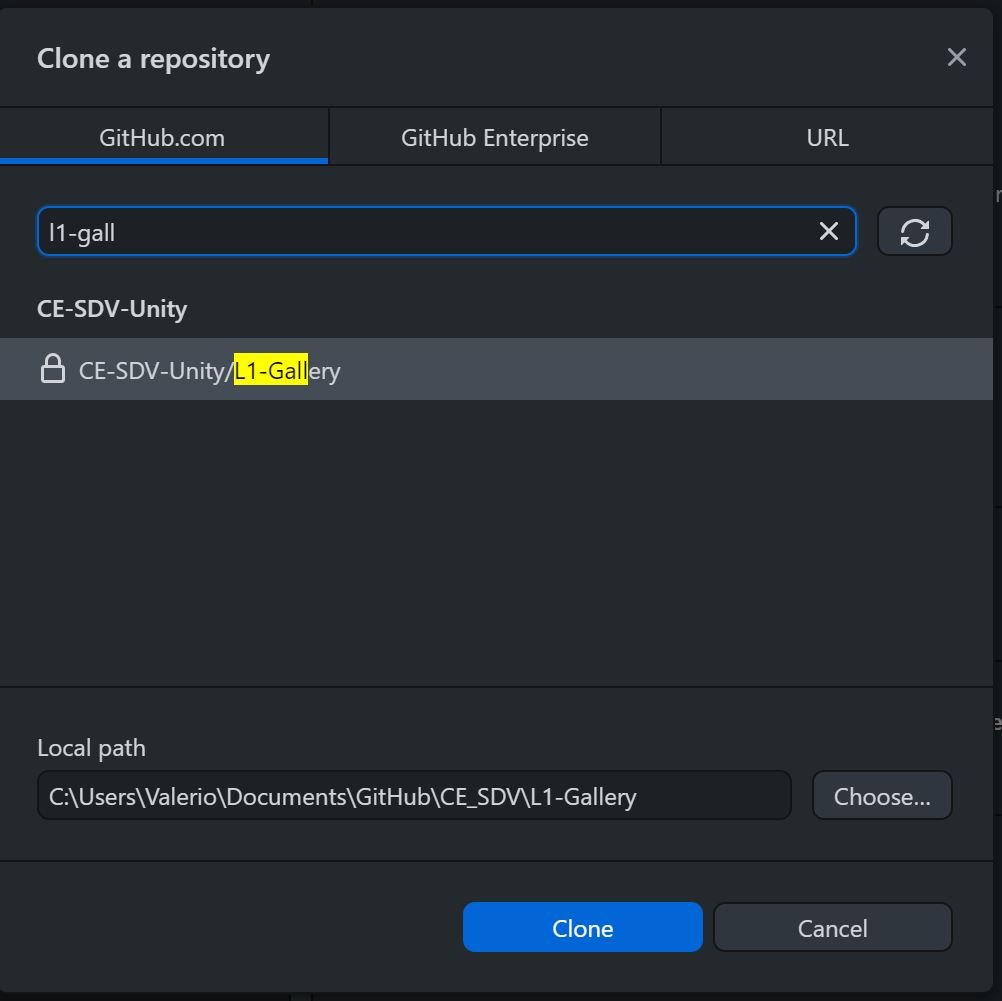
In GitHub DesktopFile -> Clone a repository and search for the repository just created and the local path to clone the repository.
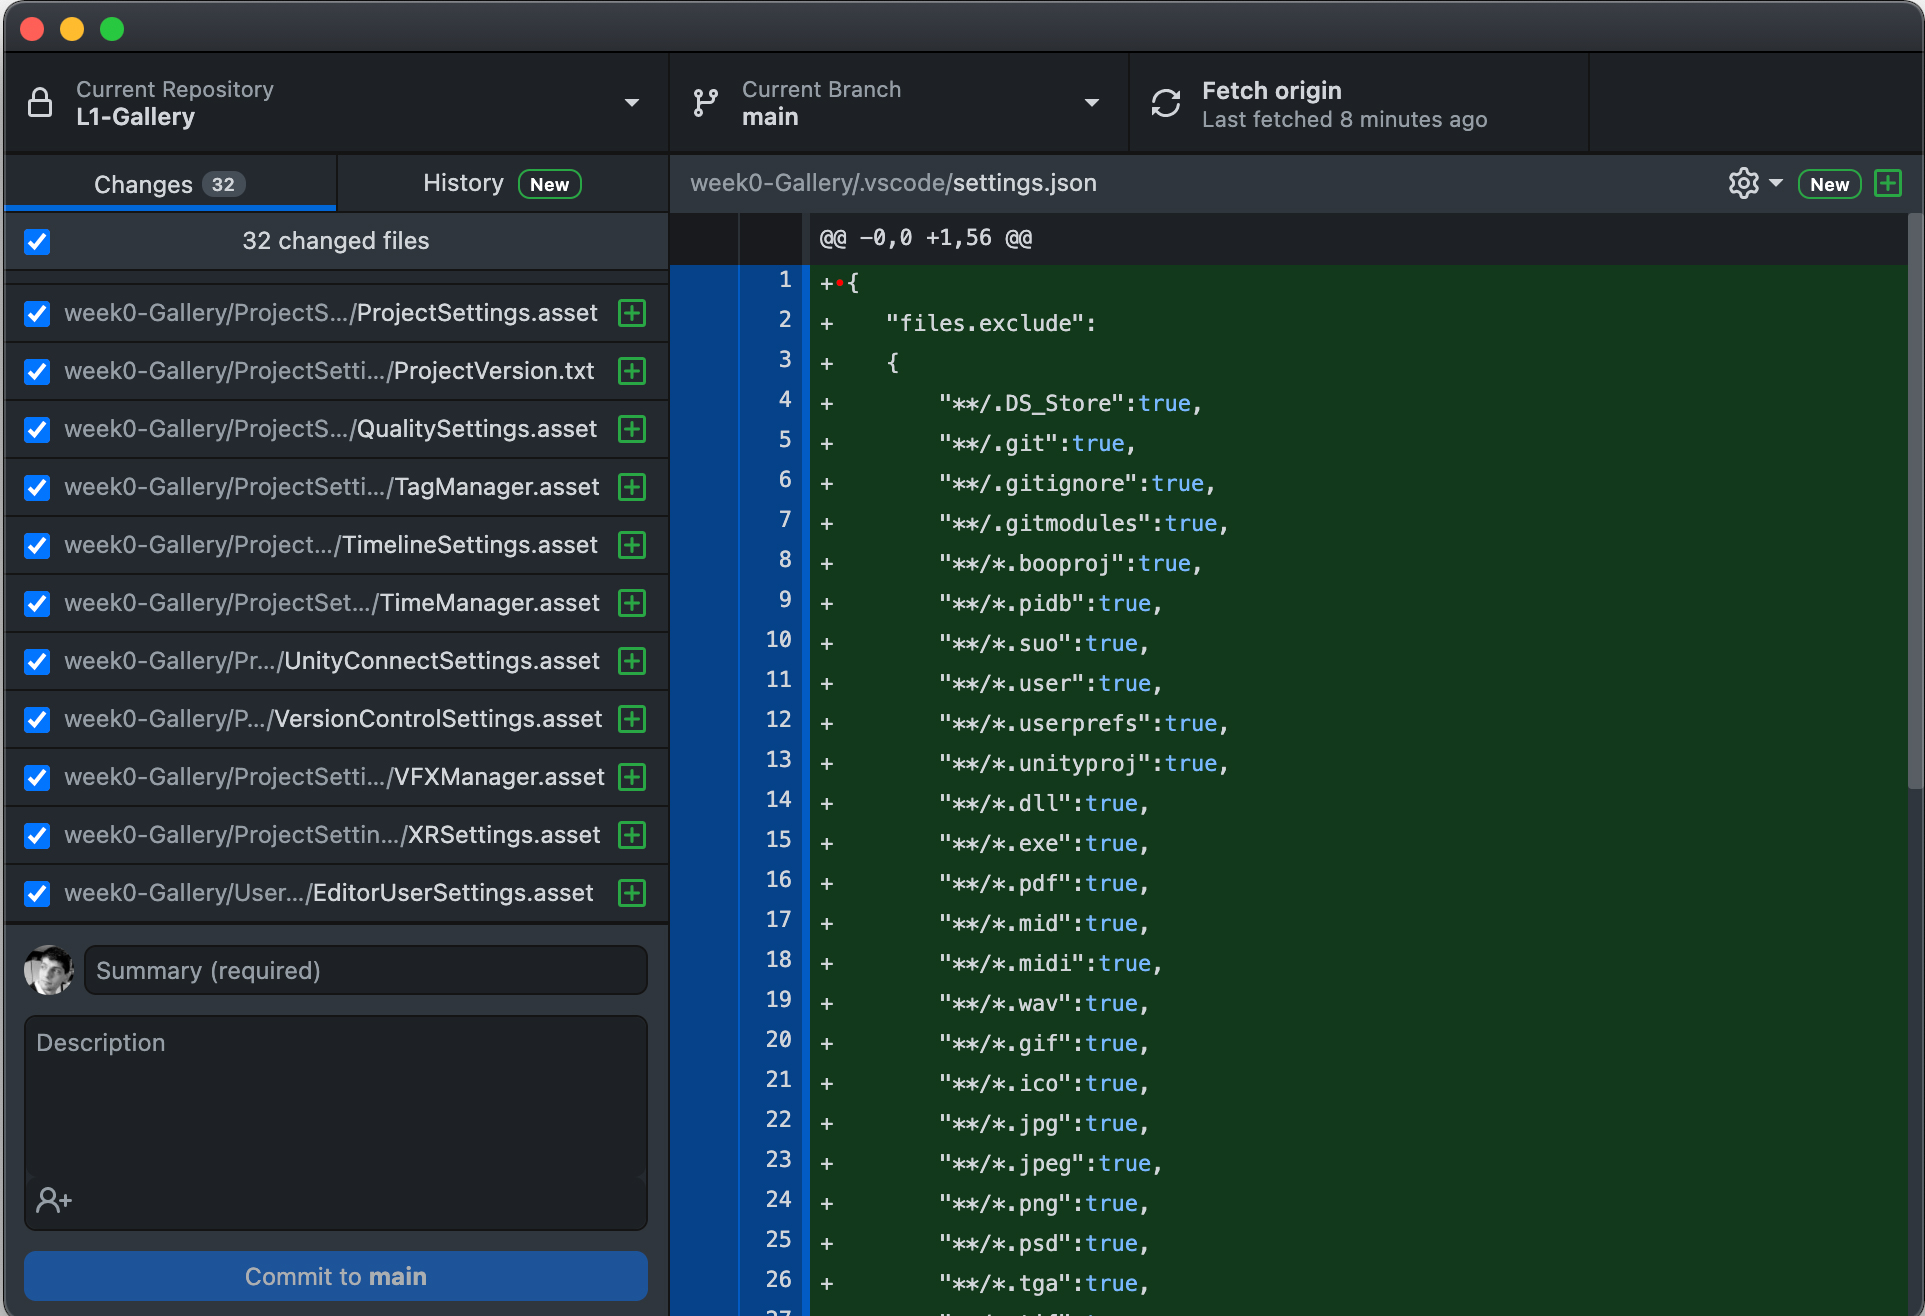
It is possible to create a new Unity project directly in the cloned repository, or we can move the one that we just created in it (close Unity before moving the project).
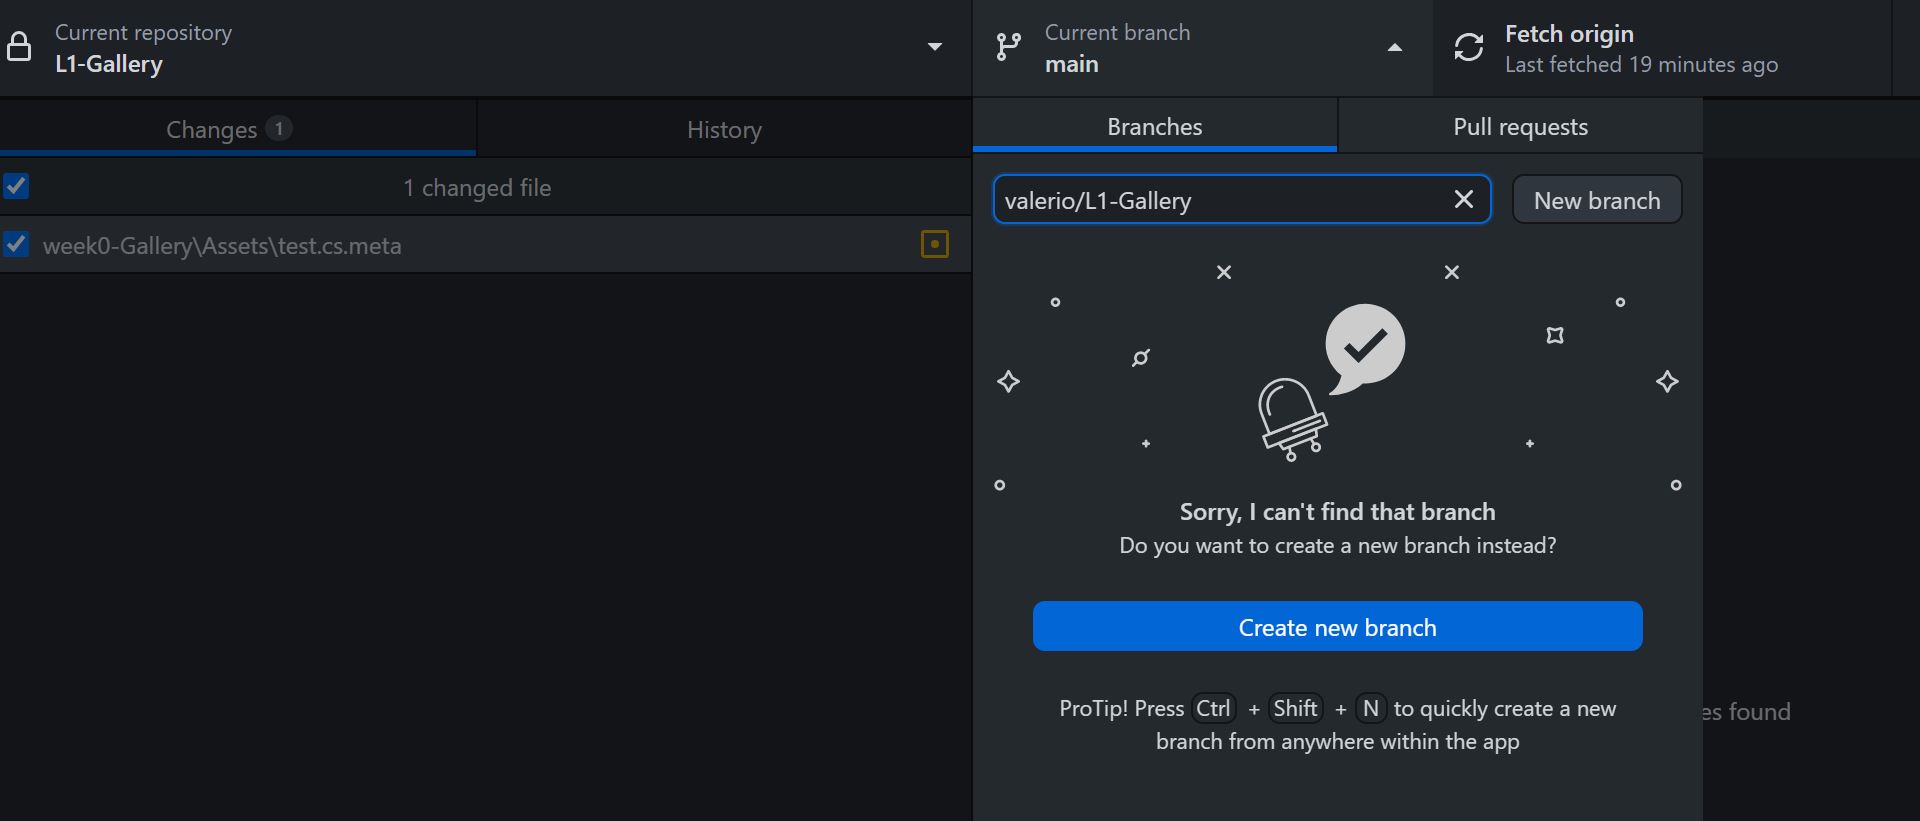
To upload the project, we need to push the first commit from GitHub Desktop to the cloud repository.
We can now clone the repository on other systems. In the case of a collaborative project, it is possible to create a branch for each team member. In GitHub Desktop select the Current branch and give a name to the new one