This Workshop is OUTDATED
To complete this workshop you will need:
- MQTT broker publishing over a secure WebSocket
- RaspberryPi
- Unity3D with WebGL build support (version used in this tutorial LTS 2022.3.2f1)
Languages used:
- HTML
- JavaScript
- Python
- C#
This workshop will show you how to:
- set up, publish and subscribe to Beebotte MQTT Cloud Platform [Optional]
- build a MQTT client on RaspberryPi [Optional]
- consume MQTT data stream in Unity WebGL
Sign in on Beebotte;
- From the menu choose the tab Channels and, in My Channels select Create New:

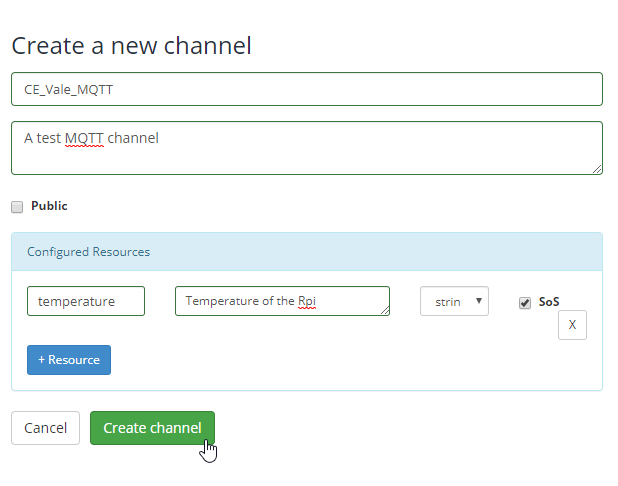
In the new screen Create a new channel:
- provide a unique name and a description for the channel
- set the channel to Public
- define the name of the resource (the topic to subscribe to), a description of the resource and the type of data
- enable SoS, Send on Subscribe, if you want to receive the most recent persistent value
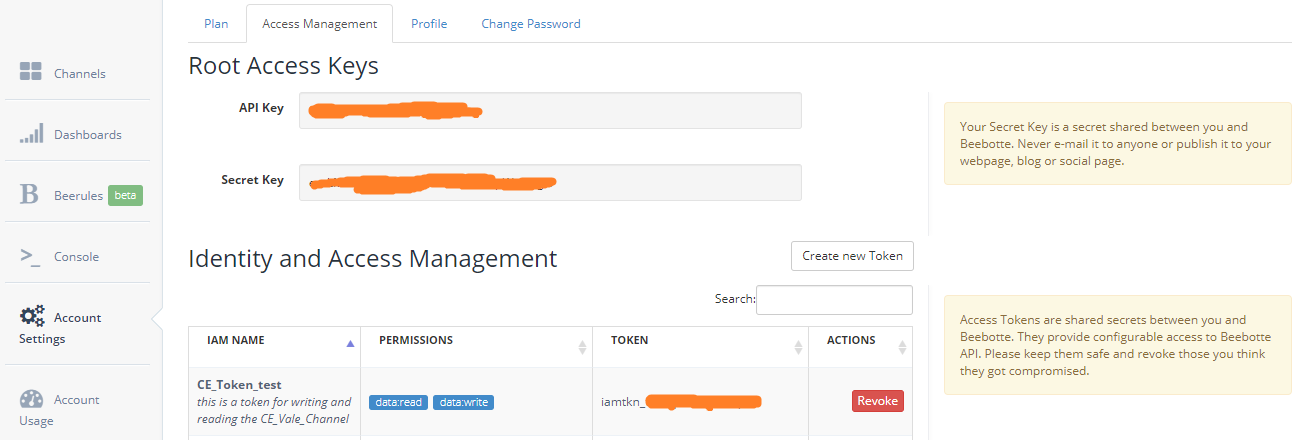
From the menu choose the tab Account Settings, select the tab Access Management and then Create new Token.
In Create an IAM Token:
- provide a friendly label and a description for the new Token
- in the Access Control Scopes select:
- data:read
- data:write
From the menu choose the tab Dashboards and select Create Dashboard:
- provide a name and description for the new Dashboard
- select Add Widget -> Basic Value
- provide a Title for the widget
- set the Channel and the Resource to visualise
In this workshop, the data stream that will be published to the Beebotte channel is the CPU temperature's value of the RaspberryPi.
- Install the Beebotte library on RaspberryPi using pip
pip install beebotte
- Create a new file mqttBBtemp.py. Import the libraries os, time and beebotte
import os
import time
from beebotte import *
- Create a Beebotte client using the IAMToken for authorization
###Replace iamtkn_TOKEN_CONTENT with the token created in your Beebotte account
bbt=BBT(token='iamtkn_TOKEN_CONTENT')
- Define the channel and the topic to subscribe to
## Resource(bbt,'CHANNEL','TOPIC')
temperature_resource=Resource(bbt,'MY_CHANNEL','MY_RESOURCE_TOPIC')
- Add a function to return the system temperature of the RaspberryPi
def measure_temp():
	temp=os.popen("vcgencmd measure_temp").readline()
	temp_string=temp.replace("temp=","").replace("'C","")
	print temp_string
	return temp_string
- Finally, run a loop where, every 5 seconds, the MQTT client is used to publish (write) the system temperature to the topic subscribed
while True:
	try:
		temperature_resource.write(measure_temp())
		time.sleep(5)
	except KeyboardInterrupt:
		break
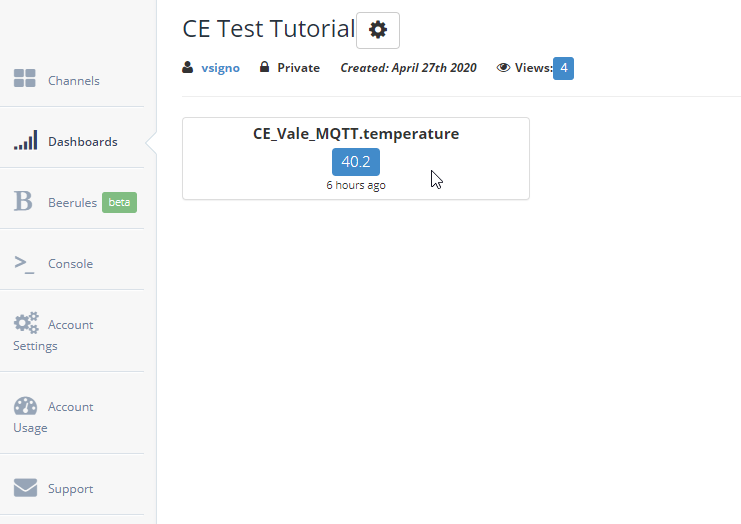
While the script is running, the Beebotte Dashboard will display the current temperature of the RaspberryPi.
Create an empty HTML file index.html in VSCode. The JavaScript client uses Beebotte and Socket.IO libraries (more information on the Beebotte GitHub repository).
The unique API Key can be found on the Beebotte platform, from the menu choose the tab Account Settings and select the tab Access Management.
Change also the channel and the resource to match the ones created on the Beebotte platform.
<!DOCTYPE html>
<html lang="en" dir="ltr">
  <head>
    <title>Test Beebotte Broker</title>
    <script src="https://cdnjs.cloudflare.com/ajax/libs/socket.io/2.3.0/socket.io.js" type="text/Javascript"></script>

<!--Beebotte js library can be downloaded from https://github.com/beebotte/bbt_client_js-->
    <script src="js/bbt.min.js"></script>
  </head>

  <body>
    <p>Test Beebotte MQTT Cloud Platform. See console logs for more information...</p>

<script type="text/Javascript">
    console.log('Setup...');
    var API_KEY='YOUR_BEEBOTTE_API_KEY'; //be aware of what data you are sharing and publishing https://www.freecodecamp.org/news/how-to-securely-store-api-keys-4ff3ea19ebda/

    var bbt = new BBT(API_KEY, {server: 'beebotte.com'});
    console.log('Connecting...');

    bbt.connect();

    bbt.subscribe({channel: 'MY_CHANNEL', resource: 'MY_RESOURCE_OR_TOPIC', read: true, write: true}, function(msg)
    {
      console.log(msg);
      console.log(msg.data); //to display just the data stream
    });
</script>
</body>
</html>
Unity3D cannot directly execute JavaScript files, however, it is possible to use an external JavaScript library in Unity through the plugin interface. The plugin is used to bridge the external JavaScript library with Unity MonoBehaviour, using regular C# scripts.
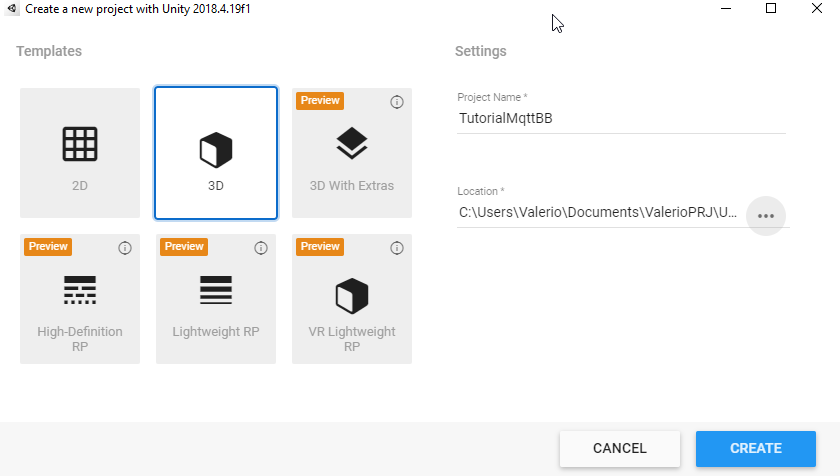
Create a new Unity project and in File -> Build Settings switch platform to WebGL
- In VSCode create a new JavaScript file mqttBBpluginUnity.js. The JavaScript plugin need to have a specific syntax to be recognised and used by Unity
- Create an initial variable to enclose the plugin. Declare the global variables and the settings to connect to Beebotte
var bbmqttplugin={

  $DataBB:
        {
          //Settings
          server:"beebotte.com",
          channel:"MY_CHANNEL",
          resource:"MY_RESOURCE_TOPIC",
          API_KEY:"MY_API_KEY",

        //Variables
          bbt:"",
          out_msg:"0",
        },
}
autoAddDeps(bbmqttplugin, '$DataBB');
mergeInto(LibraryManager.library, bbmqttplugin);
The function MQTTconnectBB is used:
- to connect to Beebotte MQTT cloud platform
- to subscribe to the provided channel and resource
- to retrieve the MQTT data stream
var bbmqttplugin={

  $DataBB:
        {
          //Settings
          server:"beebotte.com",
          channel:"MY_CHANNEL",
          resource:"MY_RESOURCE_TOPIC",
          API_KEY:"MY_API_KEY",

        //Variables
          bbt:"",
          out_msg:"0",
        },
MQTTconnectBB: function ()
      {
      console.log("Connecting to BeeBotte");
      DataBB.bbt=new BBT(DataBB.API_KEY, {server: DataBB.server});

      DataBB.bbt.subscribe({channel: DataBB.channel, resource: DataBB.resource, read: true, write: false}, function(msg)
      {
            console.log(msg.data);
            DataBB.out_msg=msg.data;
      }
      );
      },

}
autoAddDeps(bbmqttplugin, '$DataBB');
mergeInto(LibraryManager.library, bbmqttplugin);
Final step is to expose the data stream to Unity. While numerical data can be expose directly to Unity, any other data type, in this case string, need to be converted (more information on Unity Manual interact with browser scripting). The function responseBB takes care of this conversion:
var bbmqttplugin={
      $DataBB:
        {
          //Settings
          server:"beebotte.com",
          channel:"MY_CHANNEL",
          resource:"MY_RESOURCE_TOPIC",
          API_KEY:"MY_API_KEY",

        //Variables
          bbt:"",
          out_msg:"0",
        },

 MQTTconnectBB: function ()
      {
      console.log("Connecting to BeeBotte");

      DataBB.bbt=new BBT(DataBB.API_KEY, {server: DataBB.server});

      DataBB.bbt.subscribe({channel: DataBB.channel, resource: DataBB.resource, read: true, write: false}, function(msg)
      {
            console.log(msg.data);
            DataBB.out_msg=msg.data;
      }
      );
      },
responseBB: function()
{
    var bufferSize = lengthBytesUTF8(DataBB.out_msg) + 1;
    var buffer = _malloc(bufferSize);
    stringToUTF8(DataBB.out_msg, buffer, bufferSize);
    return buffer;
},
}
autoAddDeps(bbmqttplugin, '$DataBB');
mergeInto(LibraryManager.library, bbmqttplugin);
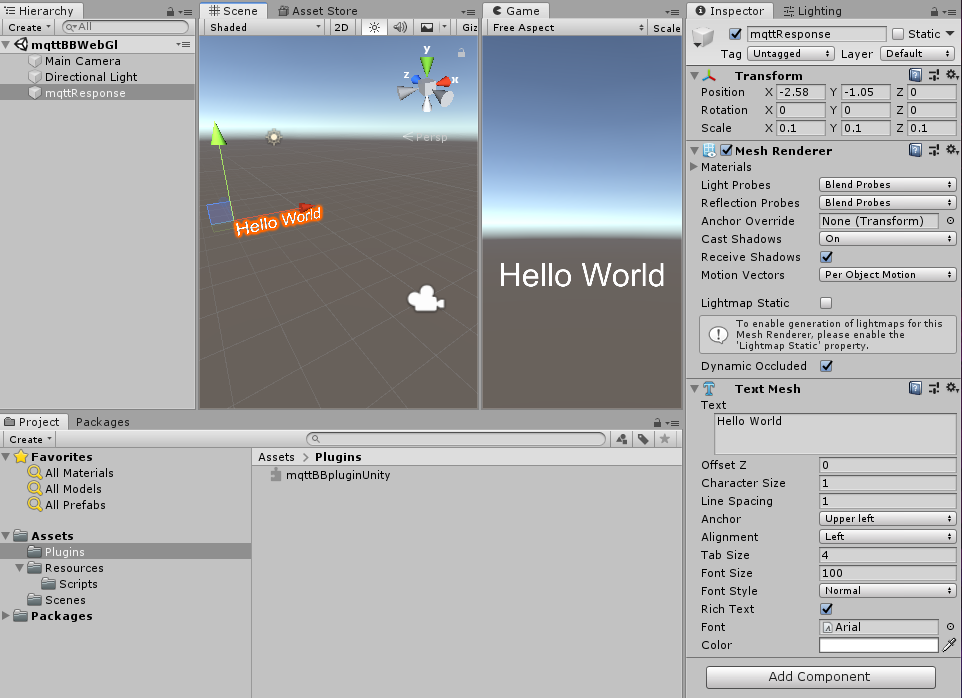
- Create a new folder Plugin in the Assets folder of the Unity project. Rename the JavaScript file as .jslib and move the file in the Plugin folder
- To use the JavaScript library with Unity, create a new C# script mqttBB_Response.cs
using System.Collections;
using System.Collections.Generic;
using UnityEngine;
using System.Runtime.InteropServices;

public class mqttBB_Response : MonoBehaviour
{
    [DllImport("__Internal")] private static extern void  MQTTconnectBB();
    [DllImport("__Internal")] private static extern string  responseBB(); //Attention to the data type: jslib returns a string

    public string response_mqtt; //the response string from the mqttBBpluginUnity.jslib exposed by responseBB();

    void Start()
    {
        response_mqtt=" ";
        StartCoroutine(incomingMsg());
    }

    IEnumerator incomingMsg ()
    {
        MQTTconnectBB();
            while(true)
            {
            response_mqtt=responseBB();
               Debug.Log(response_mqtt);
               yield return null;
            }
    }
}
A simple way to visualise the MQTT data stream is to create a Text mesh object in Unity and update the field text every time a new MQTT message is retrieved.
- Create a new GameObject -> 3D Object -> 3D Text
- right-click on it from the Hierarchy panel and rename it from New GameObject to mqttResponse
- with the object selected, in the panel Inspector set the scale X, Y, Z to 0.1 and Font Size to 100 (this is to keep the text sharp)
- change the position of the mqttResponse Object to make it visible to the camera
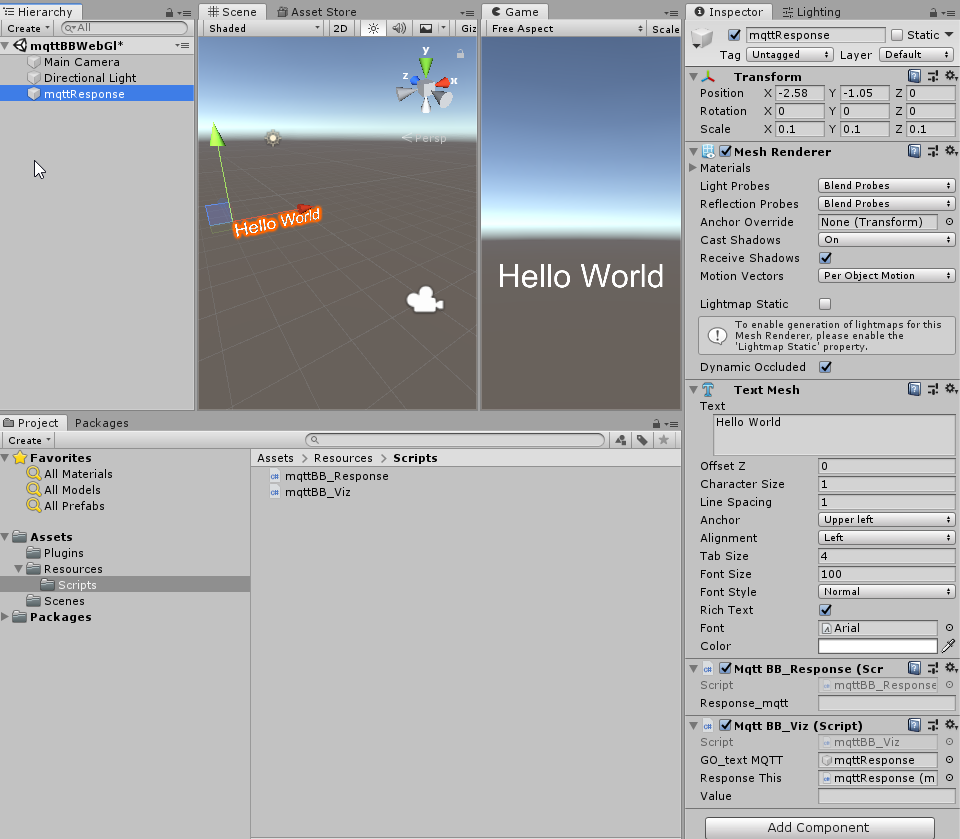
- Create a new C# script mqttBB_Viz.cs. The script updates the text value, of the TextMesh component, using the MQTT data retrieved by the JavaScript plugin
using System.Collections;
using System.Collections.Generic;
using UnityEngine;

public class mqttBB_Viz : MonoBehaviour
{
     public GameObject GO_textMQTT;
     public mqttBB_Response responseThis;
     public string value;

    void Update()
    {
        value = responseThis.response_mqtt;
        GO_textMQTT.GetComponent<TextMesh>().text=value;
    }
}
- Attach both mqttBB_Response.cs and mqttBB_Viz.cs to the mqttResponse Object as new Components
- drag and drop, from the Hierarchy panel, the mqttResponse Object to the field GO_textMQTT and the field responseThis of the component MqttBB_Viz (itself)
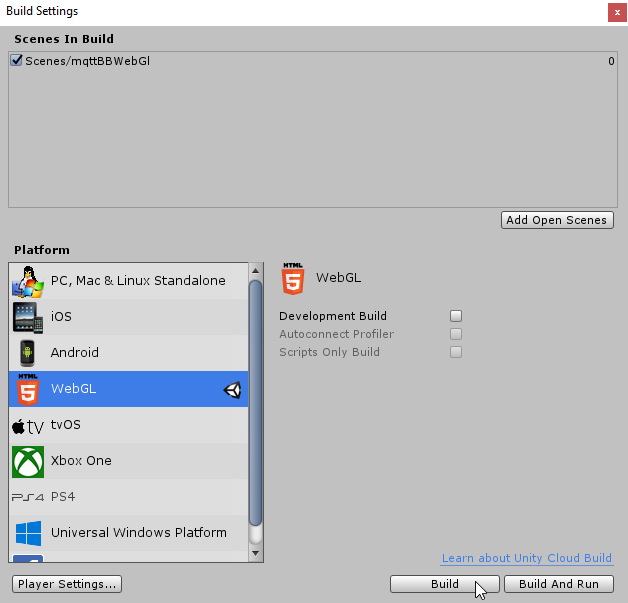
- Build the scene from File -> Build Settings
Final step is to add, to the index.html created by Unity, the Beebotte JavaScript library called by the JavaScript plugin. The library can be downloaded from https://github.com/beebotte/bbt_client_js.
- Create a folder named js in the same folder of the index.html and copy in it the Beebotte library bbt.min.js
<script src="js/bbt.min.js" type="text/javascript"></script>
- Beebotte JavaScript client library uses Socket.io, that can be included using CDN (as in this example) or store locally as the Beebotte library
<script src="https://cdnjs.cloudflare.com/ajax/libs/socket.io/2.3.0/socket.io.js" type="text/javascript"></script>
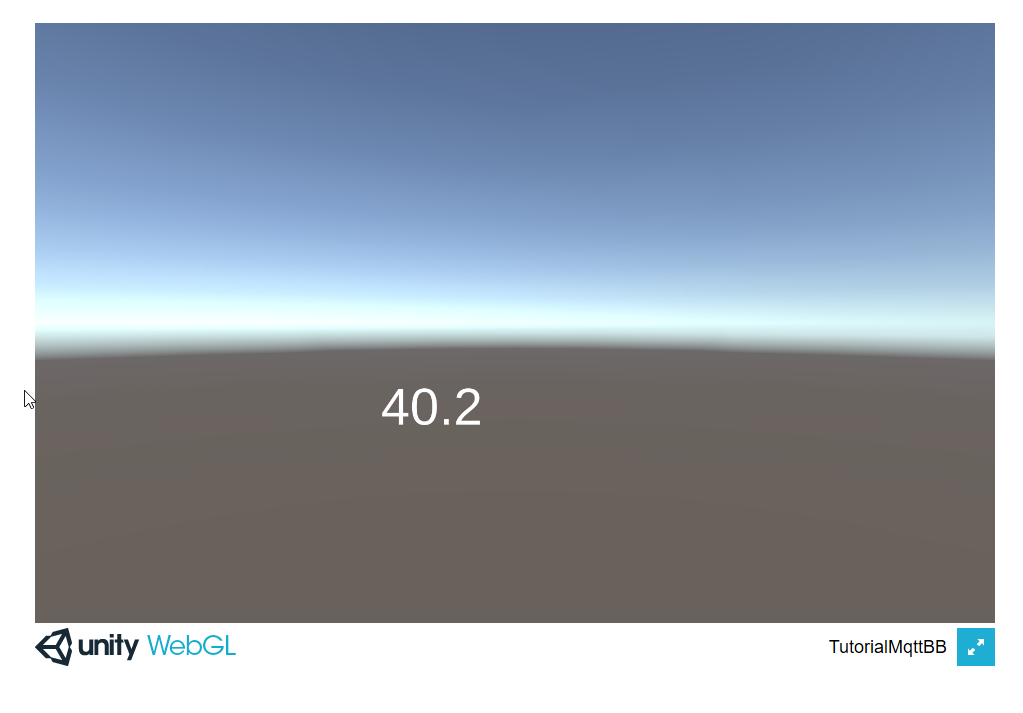
The index.html will run the Unity WebGL application that displays, and update in real time, the value of the RaspberryPi temperature: