To complete this workshop you will need:
- VSCode
- Local secure webserver (e.g. the Node.js local-web-server)
- Digital models of the Wind Meter
- A-Frame Hello World introductory workshop
Hardware:
- Android / iOS smartphones (recommended)
- Webcam
Languages used:
- HTML
- JavaScript
This workshop will show you how to:
- create a WebAR marker based experience using AFrame and AR.js
- use gestures to interact with the AR 3D model
- receive and visualise data from MQTT Websocket connection
Create a new index.html in VSCode. AR.Js is built on the top AFrame, and like AFrame, its Hello World scene requires just few lines of HTML to run.
Since version 3.0.0, AR.js has two different sources: one using NFT Image tracking, and a second one using Marker Based Tracking. The latter one is used in this workshop.
- First step is to load AFrame and AR.js libraries
<script src="https://aframe.io/releases/1.0.4/aframe.min.js"></script>
<script src="https://raw.githack.com/AR-js-org/AR.js/master/aframe/build/aframe-ar.js"></script>
Add to the
embeddedarjswith the properties:debugUIEnabled: false;sourceType: webcam;trackingMethod: best;
vr-mode-ui="enabled: false;to remove the VR buttonrendererof the scene, with the properties:logarithmicDepthBuffer: true;physicallyCorrectLights: true;
Add a camera entity
<a-entity camera> </a-entity>
and the
<a-marker preset="hiro"> </a-marker>
AR.js has two embedded markers: Hiro, the image can be download here, and Kanji, the image can be download here.
When AR.js detects the marker, the entities within
- To add a blue box at the centre of the Hiro marker
<a-marker preset="hiro">
          <a-box position='0 0 0' material='color: blue;'></a-box>
</a-marker>
Here the complete index.html for the Hello WebAR scene
<!DOCTYPE html>
<html>
  <head>
    <script src="https://aframe.io/releases/1.0.4/aframe.min.js"></script>
    <script src="https://raw.githack.com/AR-js-org/AR.js/master/aframe/build/aframe-ar.js"></script>
  </head>
  <body style='margin : 0px; overflow: hidden;'>
    <a-scene
      embedded
      arjs='debugUIEnabled: false; sourceType: webcam; trackingMethod: best;'
      vr-mode-ui="enabled: false;"
      renderer="
          logarithmicDepthBuffer: true;
          physicallyCorrectLights: true;"
      >

      <a-marker preset="hiro">
          <a-box position='0 0.5 0' material='color: blue;'></a-box>
      </a-marker>

      <a-entity camera></a-entity>

    </a-scene>
  </body>
</html>
The renderer component in 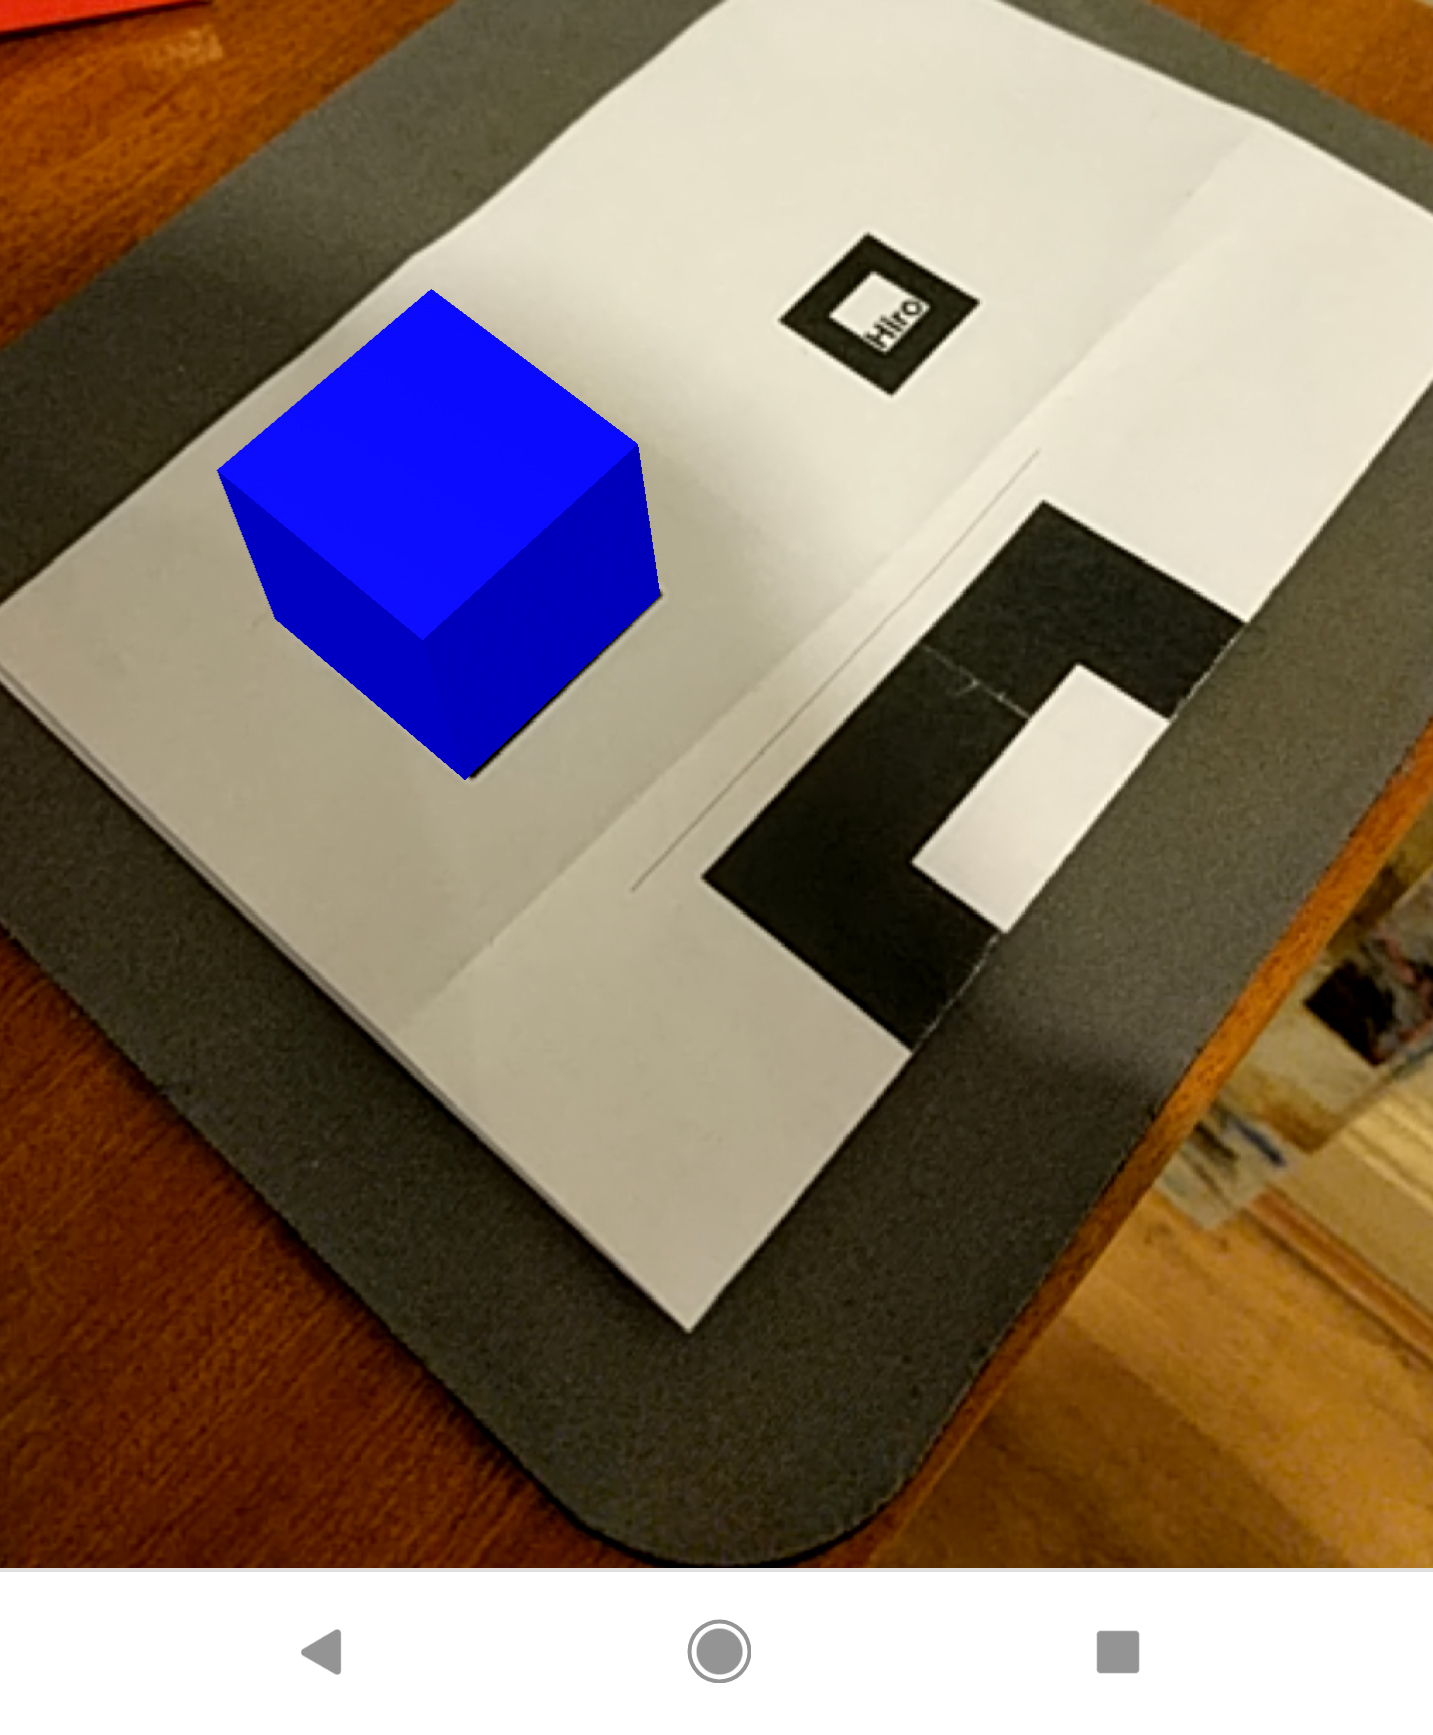
...and with physically correct lighting 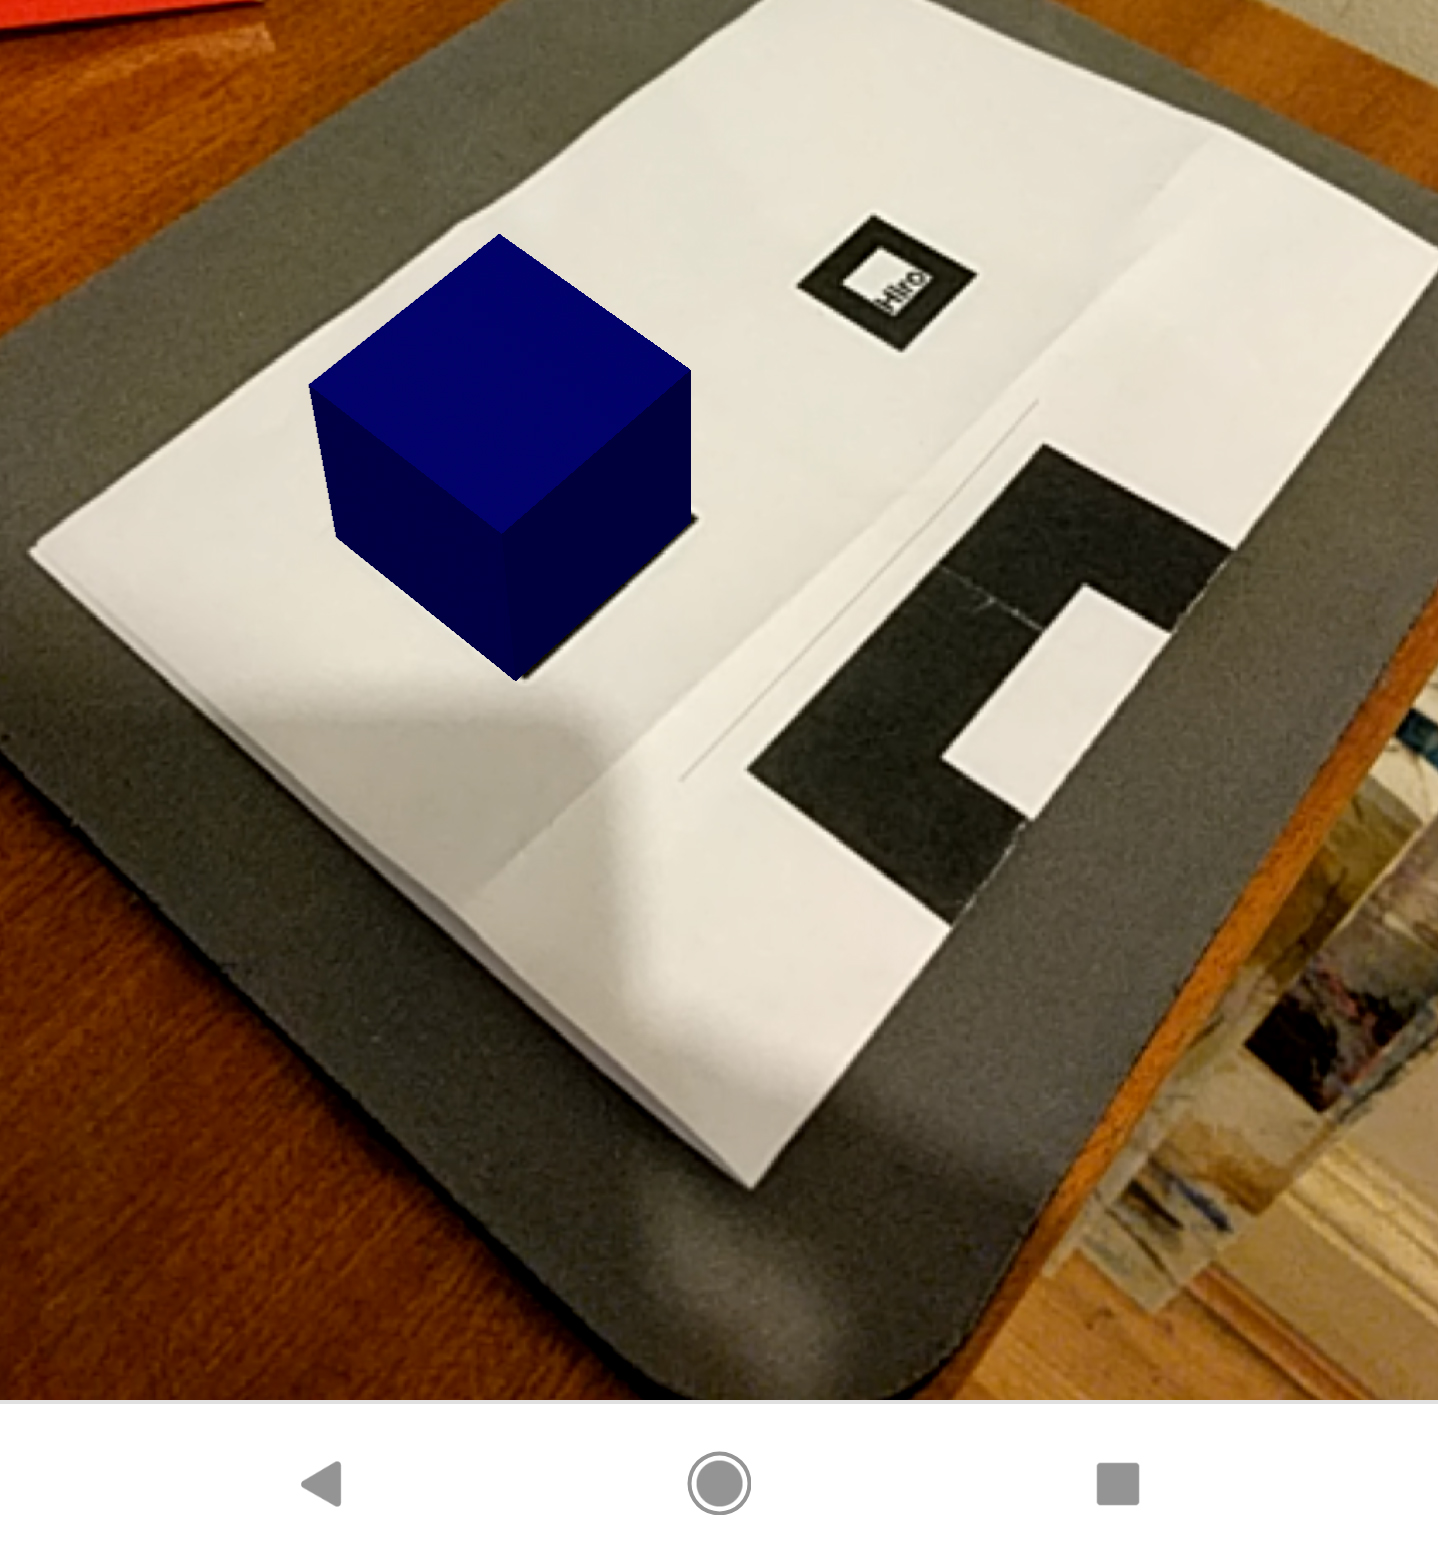
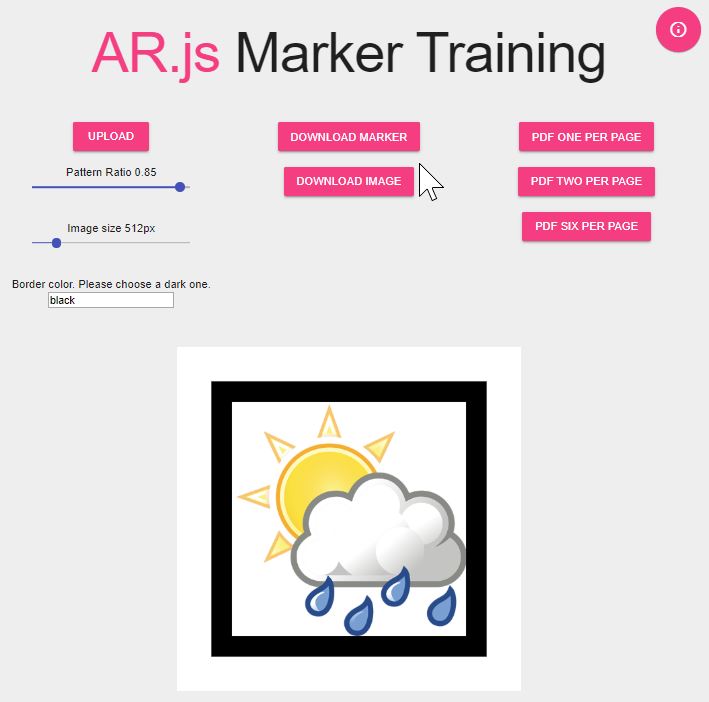
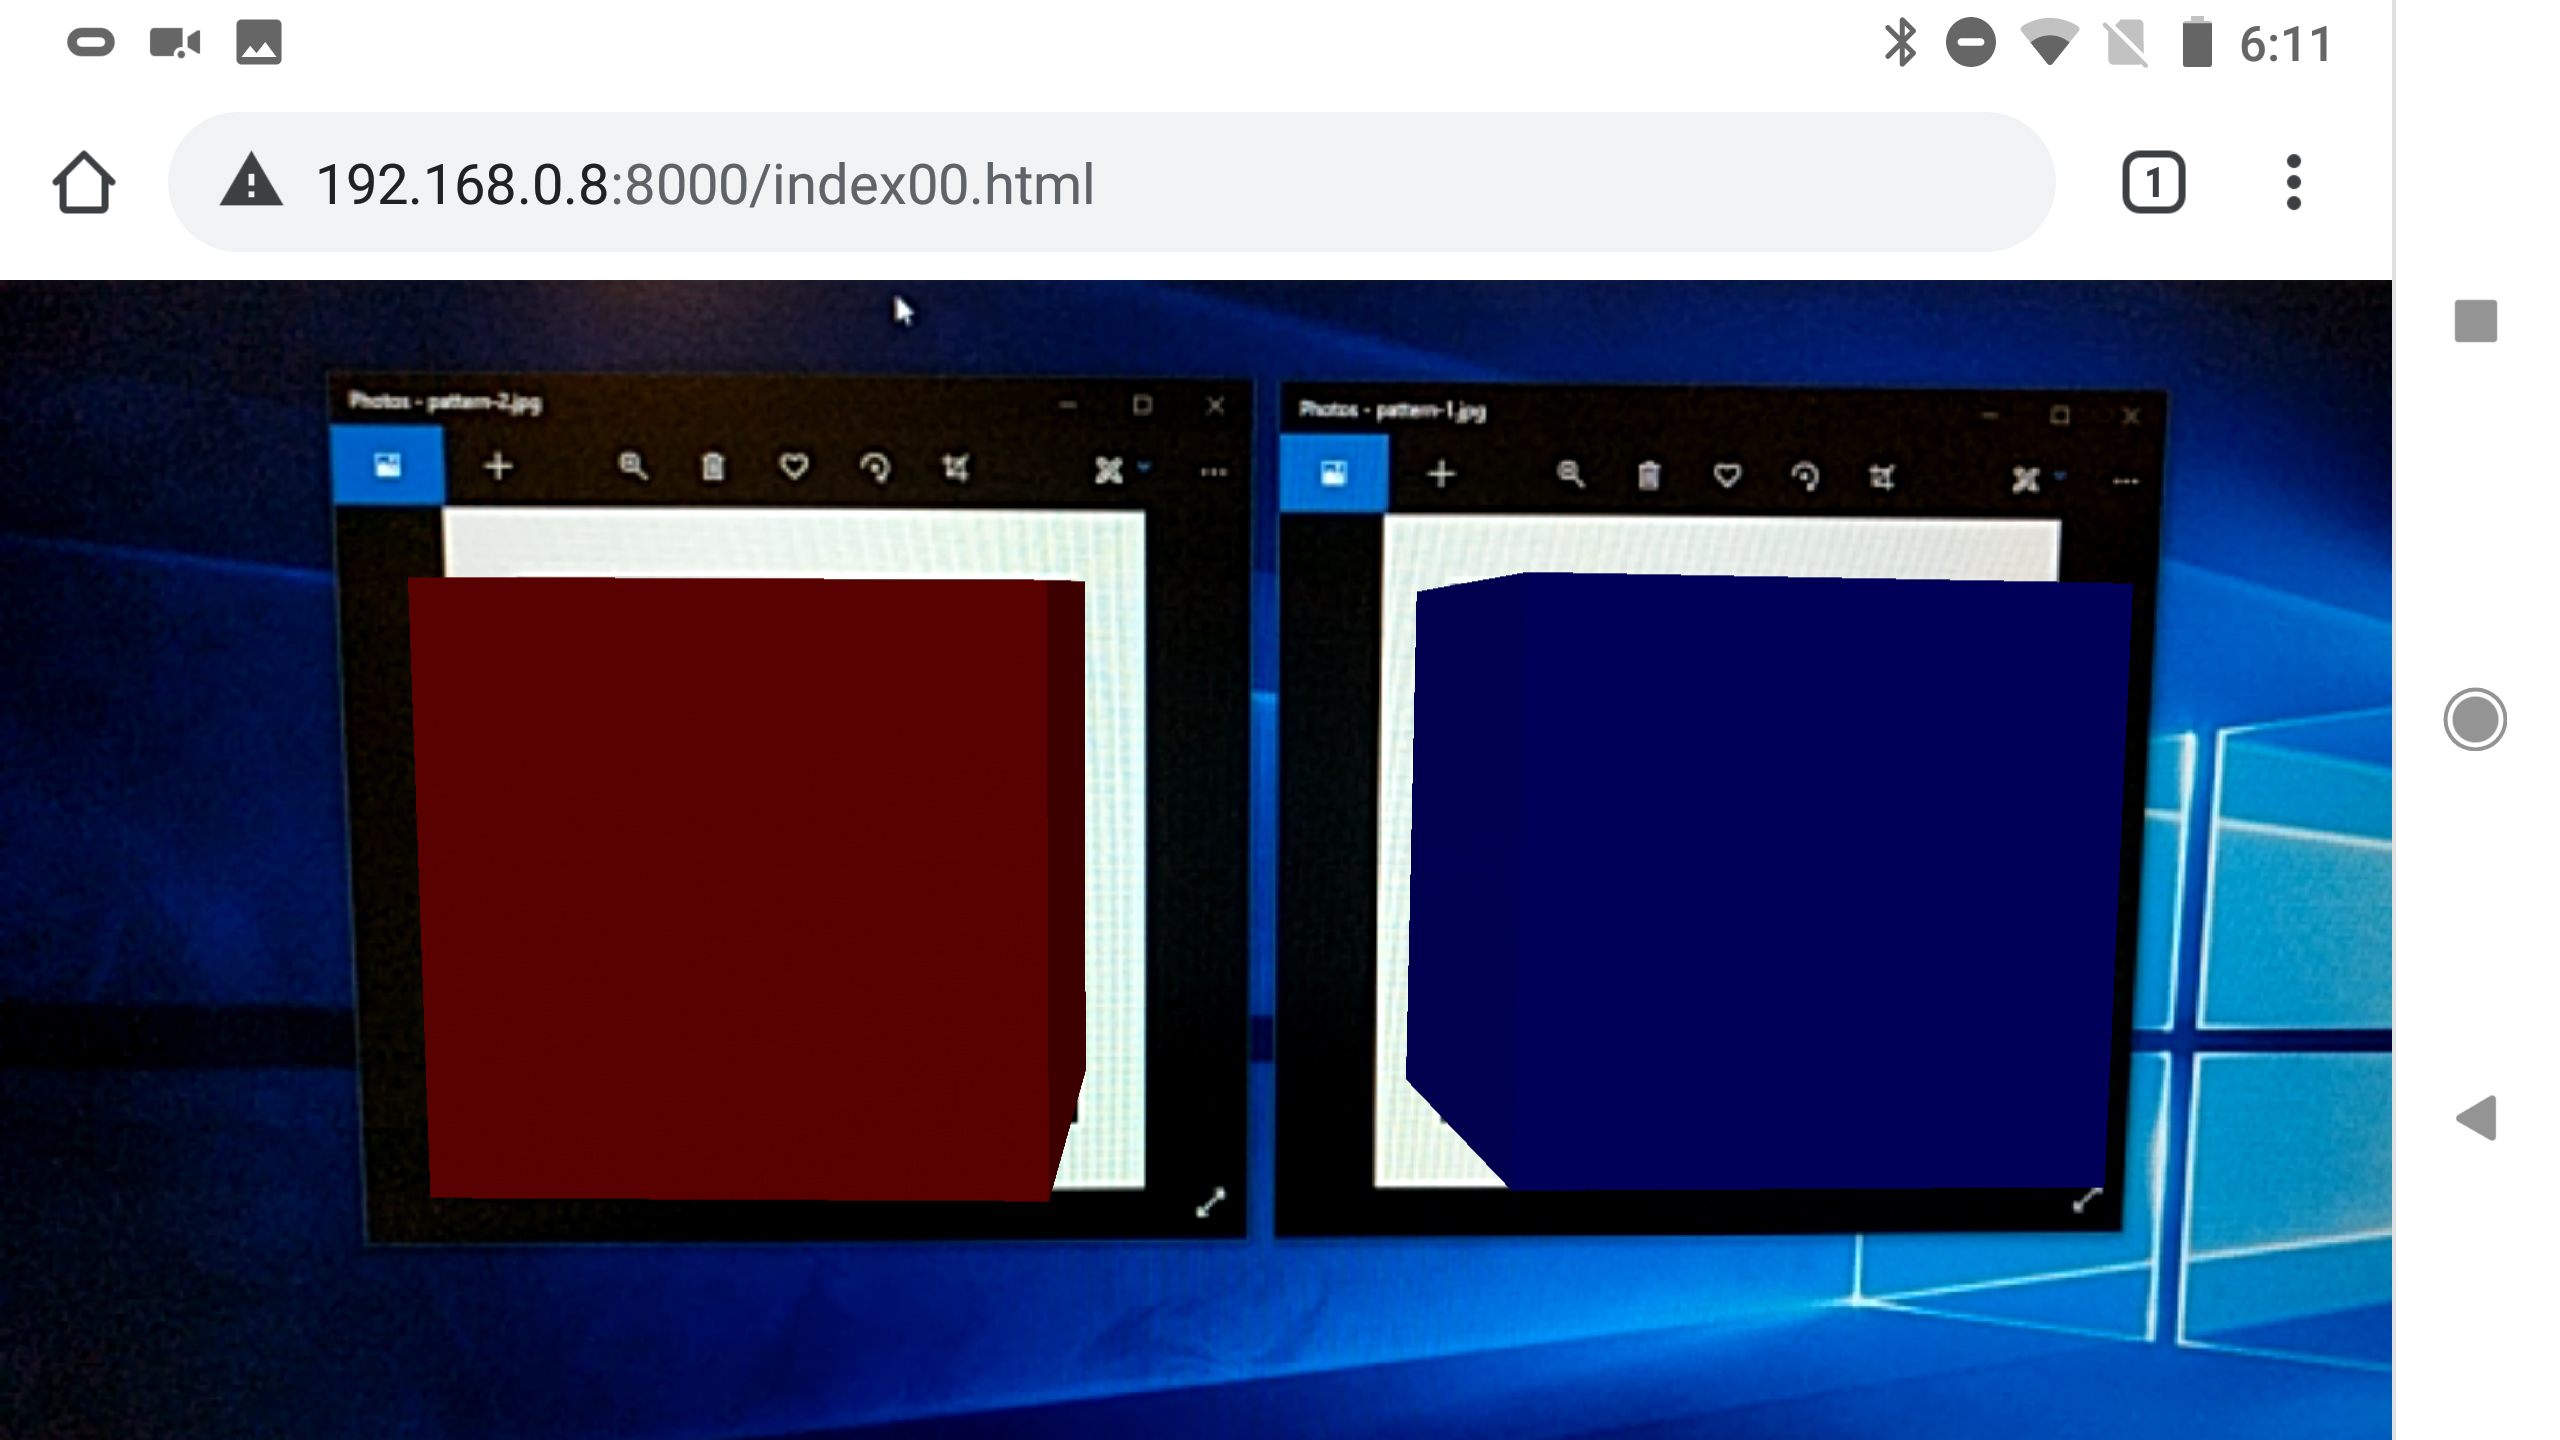
The online Marker Training tool is used to easily create a custom marker for AR.js.
- to be used as marker, the image:
- needs a continuous black border (since AR.js version 1.7.1 also coloured borders are accepted). A thick border makes recognition process easier and faster but reduces the area available for the image. 85% pattern ratio is a good threshold
- the pattern ratio needs to be set in the
ar.jscomponent of the - an external white or high contrasted area helps the marker recognition. Image, border and surrounding area need to avoid overlapping and blending
- the source image needs to be square
- the image should be rotationally asymmetric in order to detect the orientation of the marker
- The image can be black and white or coloured, but no alpha channel
- JPG is the preferred file format
- the material of the markers should not be too reflective and the colours as close as possible to the RGB values. Printed markers are easier to recognized, but they can be also projected or visualise on a screen
- upload the image to the online Marker Training tool
- set the pattern ratio and download the
PATTfile (the pattern recognised by the source camera), and the original image with the black border (the actual marker used to trigger the AR experience)
- change the component and property of the marker from
preset="hiro"totype="pattern"and add the location of the.pattfile
From:
<a-marker preset="hiro">
  <a-box position='0 0.5 0' material='color: blue;'></a-box>
</a-marker>
To:
<a-marker id="marker1" type="pattern" url="resources/pattern/pattern-1.patt">
  <a-box position='0 0 0' material='color: blue;'></a-box>
</a-marker>

<a-marker id="marker2" type="pattern" url="resources/pattern/pattern-2.patt">
  <a-box position='0 0 0' material='color: red;'></a-box>
</a-marker>
- Add as property of
arjsthepatternRatio(e.g. 85% pattern ratio, 15% black border => 0.85).
<a-scene
      embedded
      arjs='debugUIEnabled: false; sourceType: webcam; trackingMethod: best; patternRatio: 0.85;'
      vr-mode-ui="enabled: false;"
      renderer="
          logarithmicDepthBuffer: true;
          physicallyCorrectLights: true;"
      >
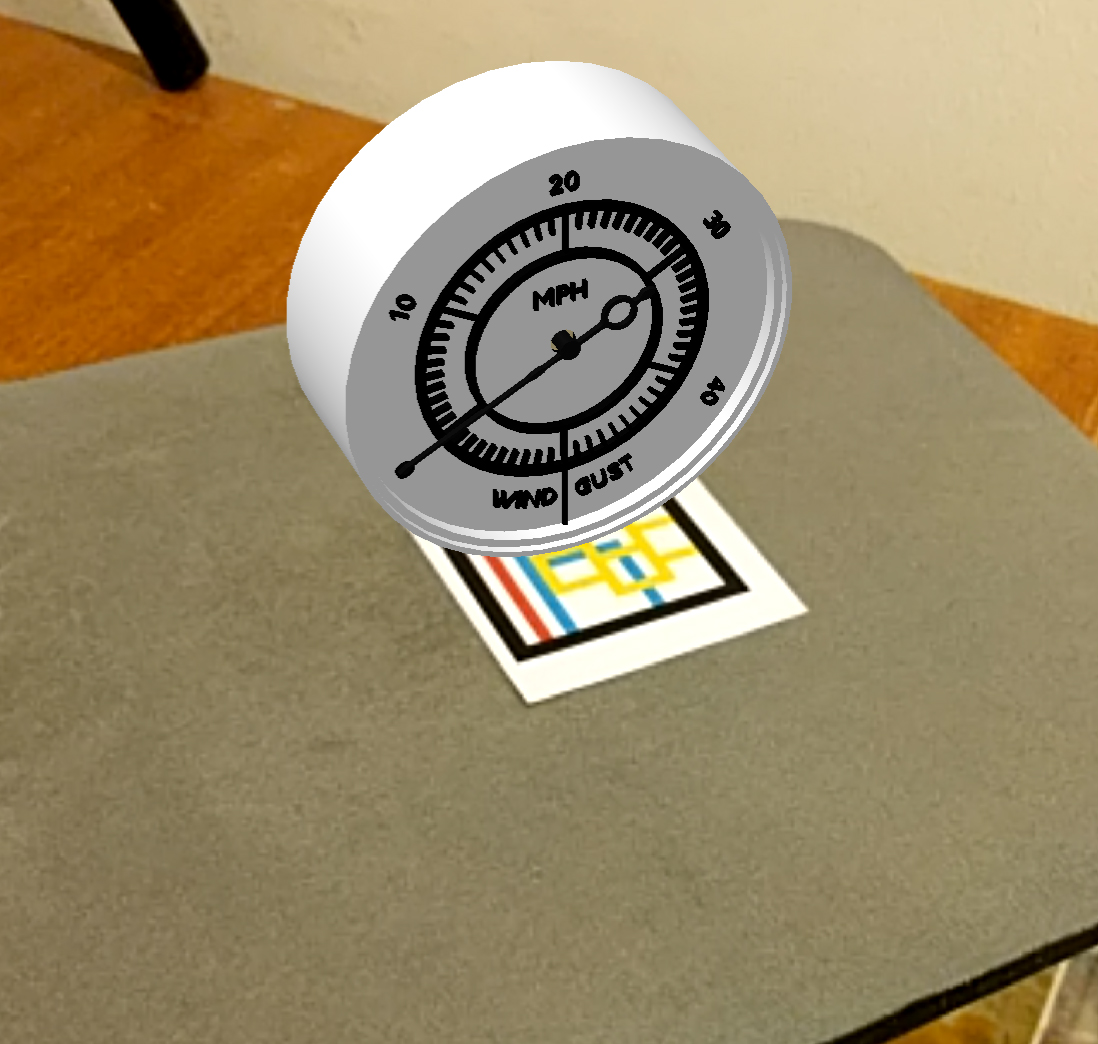
The markers can be used to display any kind of AFrame entity, as well as external assets.
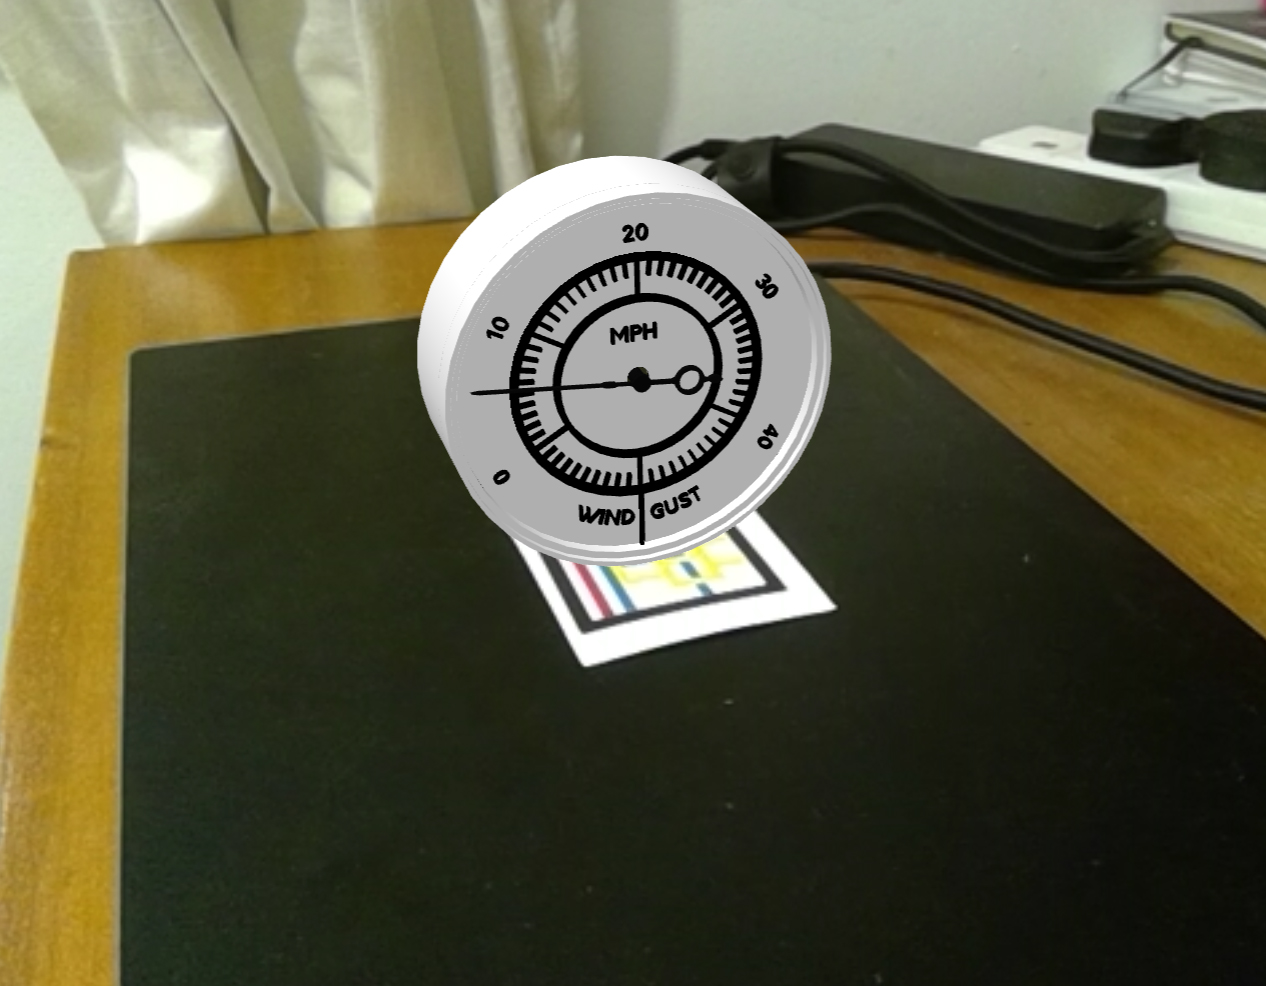
- preload the two 3D models of the Wind Meter using the Asset Management System
  <assets>
      <a-asset-item
          id="windbody"
          src="resources/models/windmeterBody.glb"
          response-type="arraybuffer" >
      </a-asset-item>

      <a-asset-item
          id="windneedle"
          src="resources/models/windmeterNeedle.glb"
          response-type="arraybuffer" >
      </a-asset-item>
    </assets>
- replace the content of the marker (one of the two boxes) with the 3D models of the wind meter. The entities to visualise can have nested elements.
      <a-marker id="marker1" type="pattern" url="resources/pattern/pattern-1.patt">
          <a-entity id="windMeter" scale="5 5 5" position="0 0 0" rotation="0 0 0">
              <a-entity
                    id="WBody"
                    gltf-model="#windbody"
                    scale="1 1 1"
                    position="0 0 0"
                    rotation="0 0 0">
              </a-entity>
              <a-entity id="WNeedleContainer" position="0 0.1875 0">
                  <a-entity
                        id="WNeedle"
                        gltf-model="#windneedle"
                        scale="1 1 1"
                        position="0 -0.1875 0"
                        rotation="0 0 0">
                  </a-entity>
              </a-entity>
            </a-entity>
      </a-marker>
Using standard touch events it is possible to interact with the AR digital model. Hammer.js is a library that can be used to add gestures on any WebApp.
- Add the library on top of the AFrame and AR.js libraries
<script src="resources/js/hammer.min.js"></script>
A custom AFrame component is used to listen to pan and pinch events.
- create a new
rotatescale.js, set the name of the component and create theinitfunction
AFRAME.registerComponent("rotatescale",{
    init:function() {    } )
- in the
init:functioncreate anHammerelement
      var element = document.querySelector('body');
      var hammerEl = new Hammer(element);
the component is applied to the
- declare the two variables marker and model
  this.marker = document.querySelector('a-marker')
  var model = this.marker.querySelector('a-entity');
- the
panevent is built in the library as a default event. Thepinchevent has to be declared
var pinch = new Hammer.Pinch(); // Pinch is not default
hammerEl.add(pinch); // add it to the Manager instance
- Add the
panfunction
hammerEl.on('pan', (ev) => {
        let rotation = model.getAttribute("rotation")
        switch(ev.direction) {
          case 2: //DIRECTION_LEFT from https://hammerjs.github.io/api/
            rotation.y = rotation.y - 4
            break;
          case 4: //DIRECTION_RIGHT from https://hammerjs.github.io/api/
            rotation.y = rotation.y + 4
            break;
          case 8: //DIRECTION_UP from https://hammerjs.github.io/api/
            rotation.x = rotation.x - 4
            break;
          case 16: //DIRECTION_DOWN from https://hammerjs.github.io/api/
            rotation.x = rotation.x + 4
            break;
          default:
            break;
        }
        model.setAttribute("rotation", rotation)
      });
- and the
pinchfunction
hammerEl.on("pinch", (ev) => {
        let scale = {x:ev.scale/1, y:ev.scale/1, z:ev.scale/1}
        model.setAttribute("scale", scale);
    });
the complete rotatescale.js looks like
AFRAME.registerComponent("rotatescale",{
    init:function() {
      var element = document.querySelector('body');
      var hammerEl = new Hammer(element);

      this.marker = document.querySelector('a-marker') //the component rotatescale need to be apply on the a-marker tag
      var model = this.marker.querySelector('a-entity');

      var pinch = new Hammer.Pinch(); // Pinch is not by default in the recognisers
      hammerEl.add(pinch); // add it to the Manager instance

      hammerEl.on('pan', (ev) => {
        let rotation = model.getAttribute("rotation")
        switch(ev.direction) {
          case 2: //DIRECTION_LEFT from https://hammerjs.github.io/api/
            rotation.y = rotation.y - 2
            break;
          case 4: //DIRECTION_RIGHT from https://hammerjs.github.io/api/
            rotation.y = rotation.y + 2
            break;
          case 8: //DIRECTION_UP from https://hammerjs.github.io/api/
            rotation.x = rotation.x - 2
            break;
          case 16: //DIRECTION_DOWN from https://hammerjs.github.io/api/
            rotation.x = rotation.x + 2
            break;
          default:
            break;
        }
        model.setAttribute("rotation", rotation)
      });

     hammerEl.on("pinch", (ev) => {
        let scale = {x:ev.scale/1, y:ev.scale/1, z:ev.scale/1}
        model.setAttribute("scale", scale);
    });
  }
});
- Add the
rotatescale.jsto the HTML document
<script src="resources/js/rotatescale.js"></script>
- and the component
rotatescaleto the
<a-marker rotatescale id="marker1" type="pattern" url="resources/pattern/pattern-1.patt">
The Paho JavaScript Client is used to receive the data from the MQTT Broker.
- Add the library on top of the AFrame and AR.js libraries
<script src="resources/js/paho-mqtt-min.js"></script>
A custom AFrame component is used to read the data from the MQTT Broker
- create a new
mqtt.jsand set the name of the component and create theinitfunction
AFRAME.registerComponent('mqttreader', {

  init:function (){
  		console.log('MQTT Reader');
In this example the MQTT data is used to control, in real time, the pointer of the digital wind meter.
- declare the variables and the MQTT broker address and port.
      const sceneEl = document.querySelector('a-scene');
      const windNeedle=sceneEl.querySelector('#WNeedleContainer');
      let mqtt;
      let reconnectedTimeout=5000;
      let hostname="ADDRESS.OF.THE.MQTT.BROKER";
      let port=PORT;
- define the functions
MQTTconnect(),onConnectandonFailure
      function onConnect()
      {
        console.log("Connected...");

        mqtt.subscribe("TOPIC/TO/SUBSCRIBE");

      }

      function MQTTconnect()
      {
        console.log("Connected to "+hostname+": "+ port);

        //works but in ws not wss
        mqtt=new Paho.MQTT.Client(hostname,port,"clientjs");

        let options={
          timeout:3,
          onSuccess:onConnect,
          onFailure:onFailure,
        };

        mqtt.onMessageArrived=onMessageArrived;

        mqtt.connect(options);
      }

      function onFailure(message)
      {
      console.log("Connection to "+hostname+" failed");
      setTimeout(MQTTconnect,reconnectedTimeout);
      }
the function onMessageArrived is used to control the rotation of the pointer on the body of the wind meter. In this case the playloadString is the MPH value that need to be transform to a rotation value
      function onMessageArrived(msg)
      {
        out_msg="msg is "+msg.destinationName+"  --  "+msg.payloadString+"<br>";
        console.log(out_msg);
        let valueWRot=(((msg.payloadString*6)*Math.PI)/180);
          console.log(valueWRot);
        windNeedle.object3D.rotation.z = -valueWRot;

      }
- remember to initialise the MQTTconnect function
MQTTconnect();
}
})
- and to add the component
mqttreaderto the
<a-entity mqttreader
                    id="WBody"
                    gltf-model="#windbody"
                    scale="1 1 1"
                    position="0 0 0"
                    rotation="0 0 0">
              </a-entity>