This workshop will show you how to:
- set up a Hello World scene with AFrame
- import a custom 3D model using GLTF file format
- create a custom AFrame component (ray-casting)
To complete this workshop you will need:
- Visual Studio Code
- Live Server for VS Code (or other local server)
- Digital model of Russell Square
Languages used:
- HTML
- JavaScript
Setup a Visual Studio Code work space by adding your project's folder, and ensure that Live Server extension is installed, View -> Extensions or Ctrl+Shift+X.
The AFrame Hello World scene requires just few HTML lines to run. Behind the scene, it is Three.js doing all the heavy lifting
<!DOCTYPE html>
<html>
  <head>
  <!--AFrame version 1.2.0-->
  <script src="https://aframe.io/releases/1.2.0/aframe.min.js"></script>
  </head>
    <body>
    <a-scene>
      <a-box position="-1 0.5 -3" rotation="0 45 0" color="#4CC3D9"></a-box>
      <a-entity geometry="primitive: box;  width: 1; height: 1; depth: 1"
          material="color: red; shader: standard;"
          rotation="0 45 0" position="-1 1.7 -3"></a-entity>
      <a-sphere position="0 1.25 -5" radius="1.25" color="#EF2D5E"></a-sphere>
      <a-cylinder position="1 0.75 -3" radius="0.5" height="1.5" color="#FFC65D"></a-cylinder>
      <a-plane position="0 0 -4" rotation="-90 0 0" width="4" height="4" color="#7BC8A4"></a-plane>
      <a-sky color="#ECECEC"></a-sky>
    </a-scene>
  </body>
</html>
In VSCode create a new file named index.html with the above HTML.
At the top of the file the AFrame library is loaded. In the body of the page, the HTML tag <a-scene> ... </a-scene> defines the AFrame scene. AFrame is based on a entity-component system: the scene contains a series of objects, called entities<a-entity></a-entity>. They could be generic or based on primitives (e.g. box, sphere, cylinder, plane and sky).
An <a-entity> by itself does not display anything. It is just a placeholder object. To define it we need to attach components that provides: appearance (e.g. geometry, position, rotation, colour); behaviour (e.g. animation, event listeners), and/or other functionality. For example, the primitive <a-box> can be written also as <a-entity geometry="primitive: box">.
In VSCode press Go Live of the Live Server (bottom-right corner) to see the Hello World AFrame scene in the default browser. During the development it is a good practice to regularly check the Inspect Console of your browser for any error (right-click Inspect or Ctrl+Shift+i).
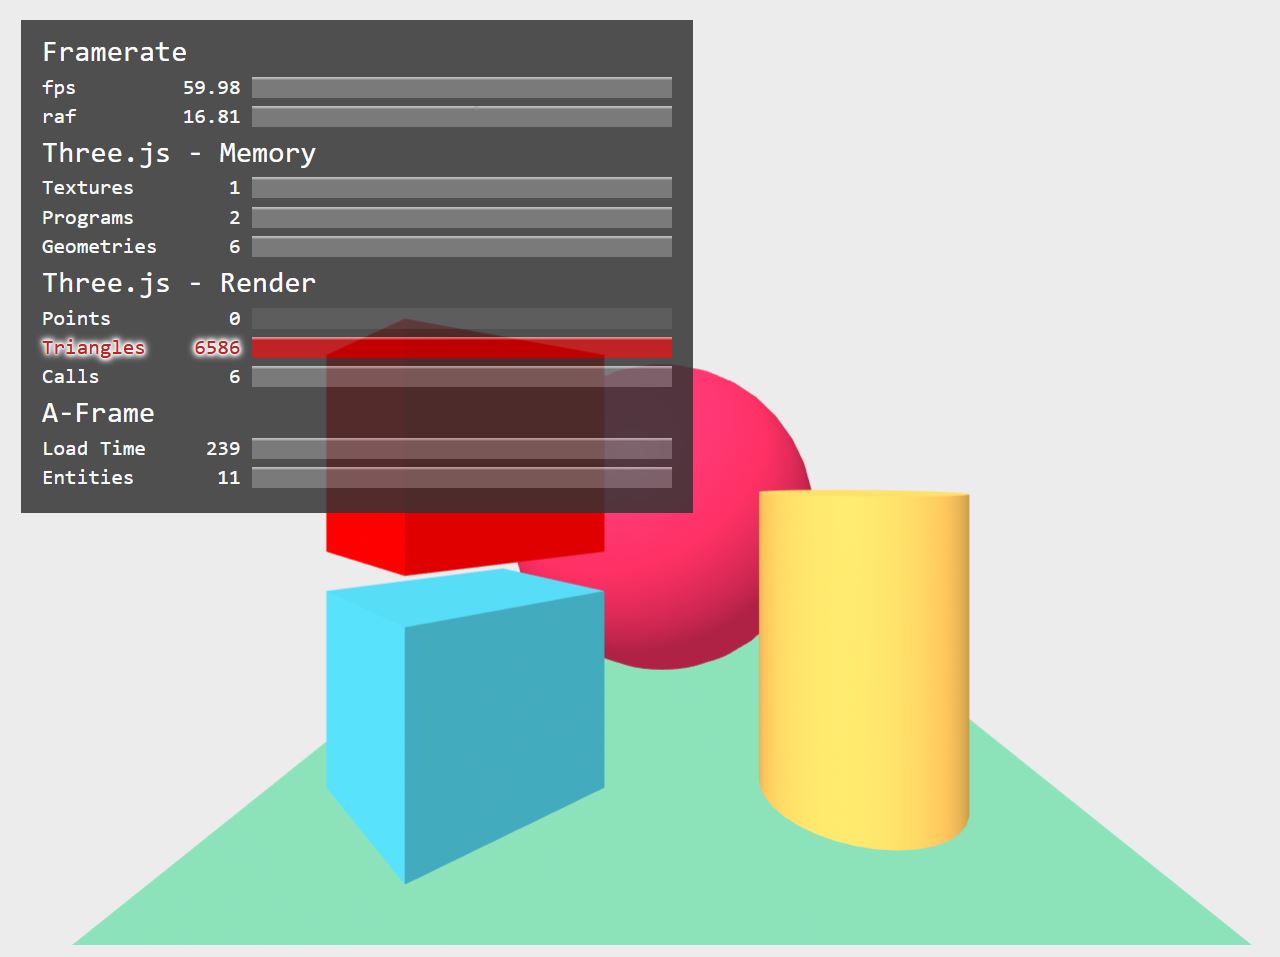
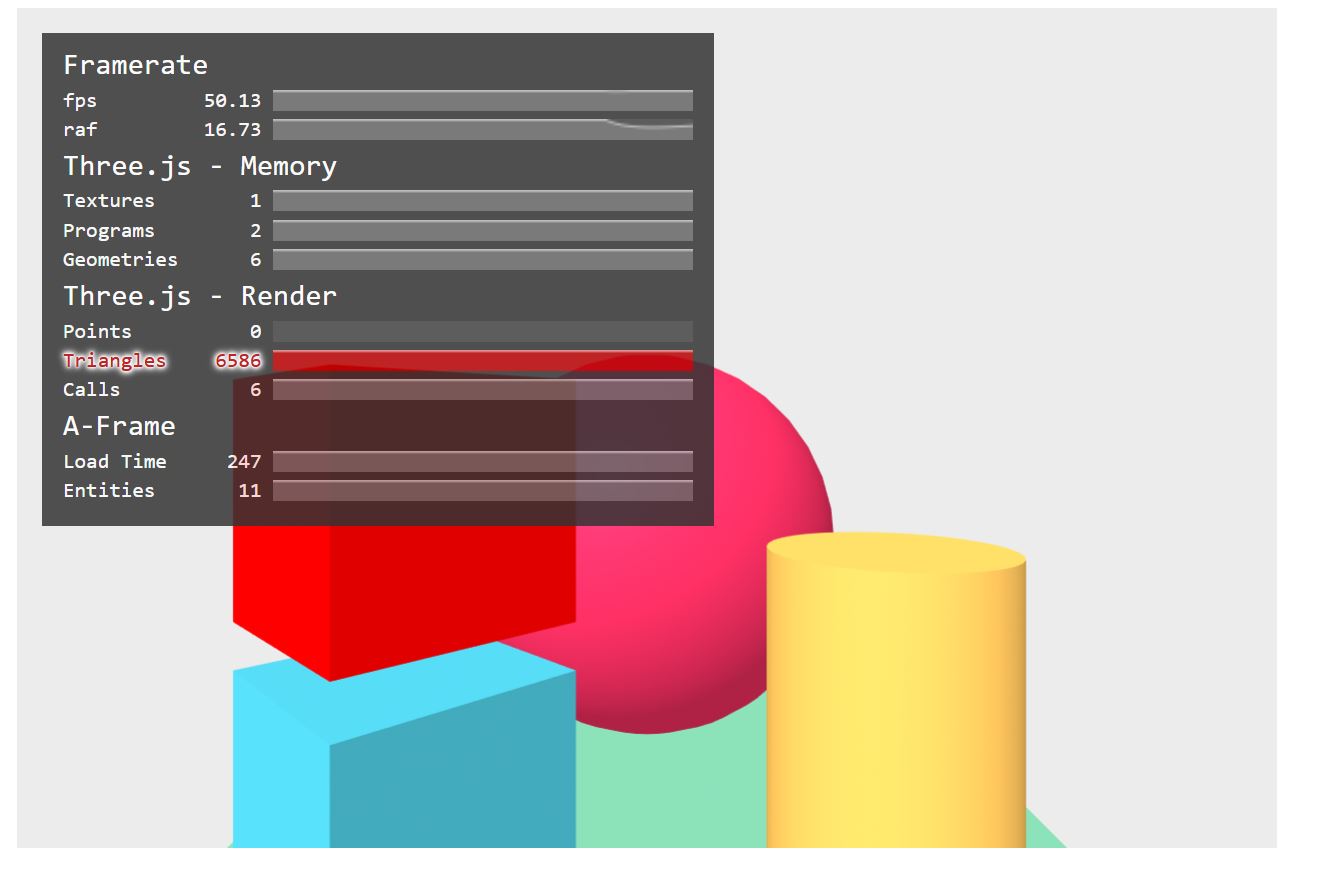
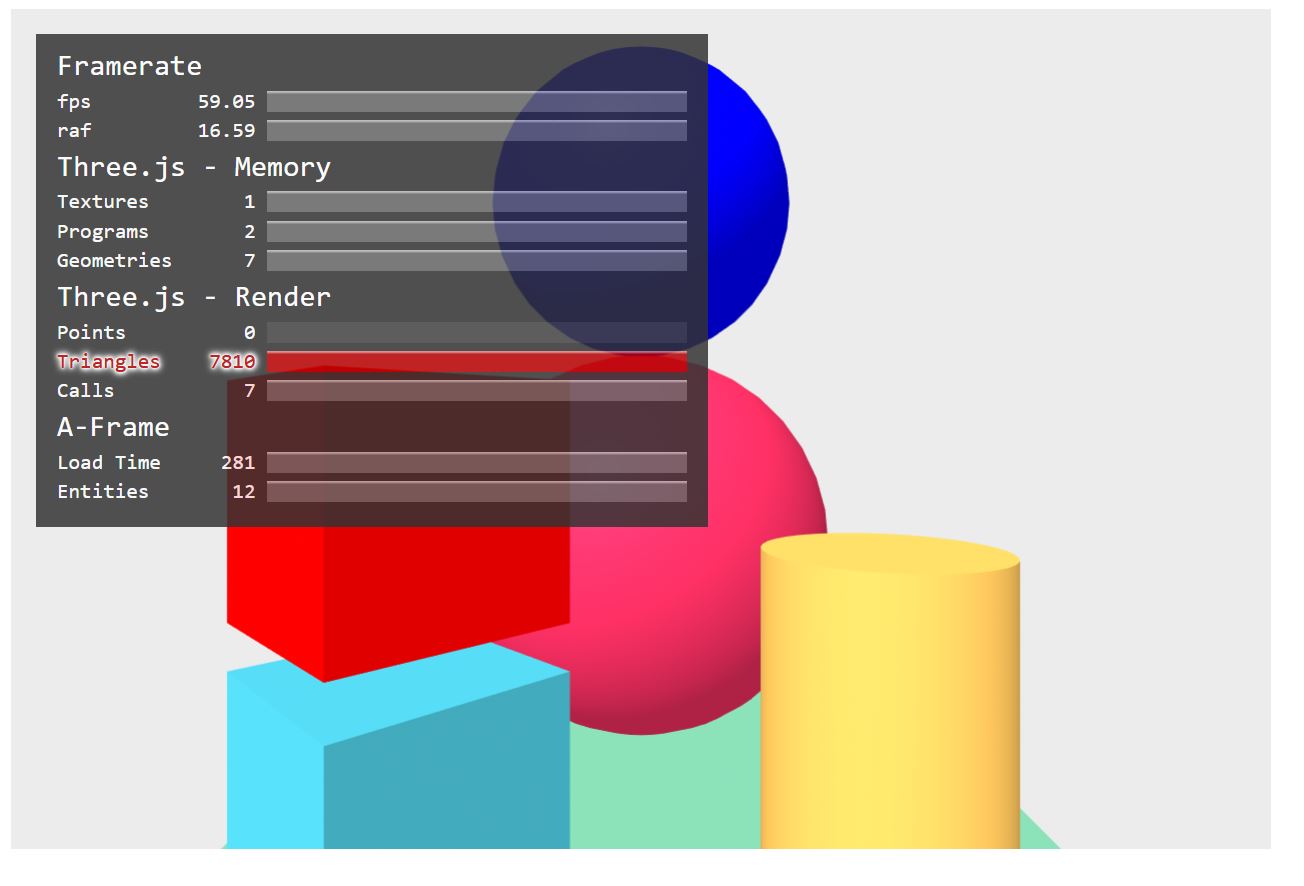
HTML attributes (or components in AFrame) are used to extended AFrame functionalities. For example, by adding the inbuilt component stats to the <a-scene> it is possible to overlay some useful information about the scene, such as frames per second, number of textures and triangles and other performance's values. The component vr-mode-ui="enabled: false" is used to disable the VR button on the bottom right corner of the scene.
<a-scene stats vr-mode-ui="enabled: false" >
An AFrame scene does not need to be full screen. It can be embedded in any web page using the component embedded. We just need to set the size of the a-scene in a <style> </style> tag in the <head> </head> of the page, or we can use an external CSS style sheet
<style media="screen">
    a-scene {
        height: 400px;
        width: 600px;
            }
    </style>
The embedded component need to be added to the <a-scene>. It is possible to wrap the entire <a-scene> </a-scene> in a DIV element if we need more control on the composition of the web page
<body>
  <div id="myEmbeddedScene">
    <a-scene embedded stats vr-mode-ui="enabled: false" >
      <!-- ... -->
    </a-scene>
  </div>
</body>
To control the FOV (field of view) and height of the point of view we need to define a <a-camera>.
- Just before the end of the AFrame
<a-scene>add a<a-camera> - add the components
fov=60position="0 2 0
<!-- ... -->
<a-camera fov="60" position="0 2 0"></a-camera>
<!-- ... -->
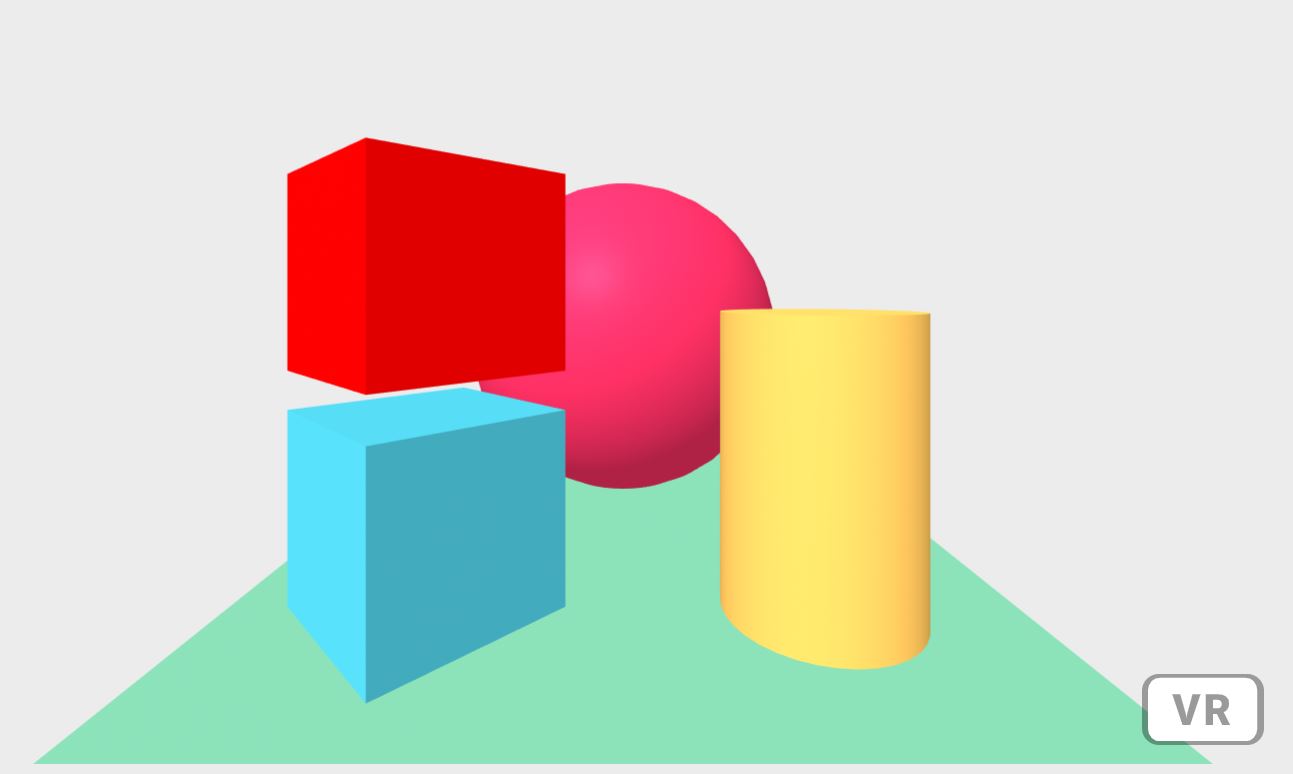
An AFrame scene can be modified just using HTML. To add a blue sphere on the top of the existing one:
- add a new
<a-sphere>within the<a-scene></a-scene> - add the components:
position="0 3.5 -5"radius="1"color="blue"
<a-scene embedded stats vr-mode-ui="enabled: false">
      <a-sphere
          position="0 3.5 -5"
          radius="1"
          color="blue">
      </a-sphere>
      <a-box position="-1 0.5 -3" rotation="0 45 0" color="#4CC3D9"></a-box>
More complex geometries can be added as GLTF model. Good practice is to add the models to the Asset Management System<a-assets> of the scene. The Asset Management System is used to preload 3D models, sounds, images, videos etc. that will be used in the scene.
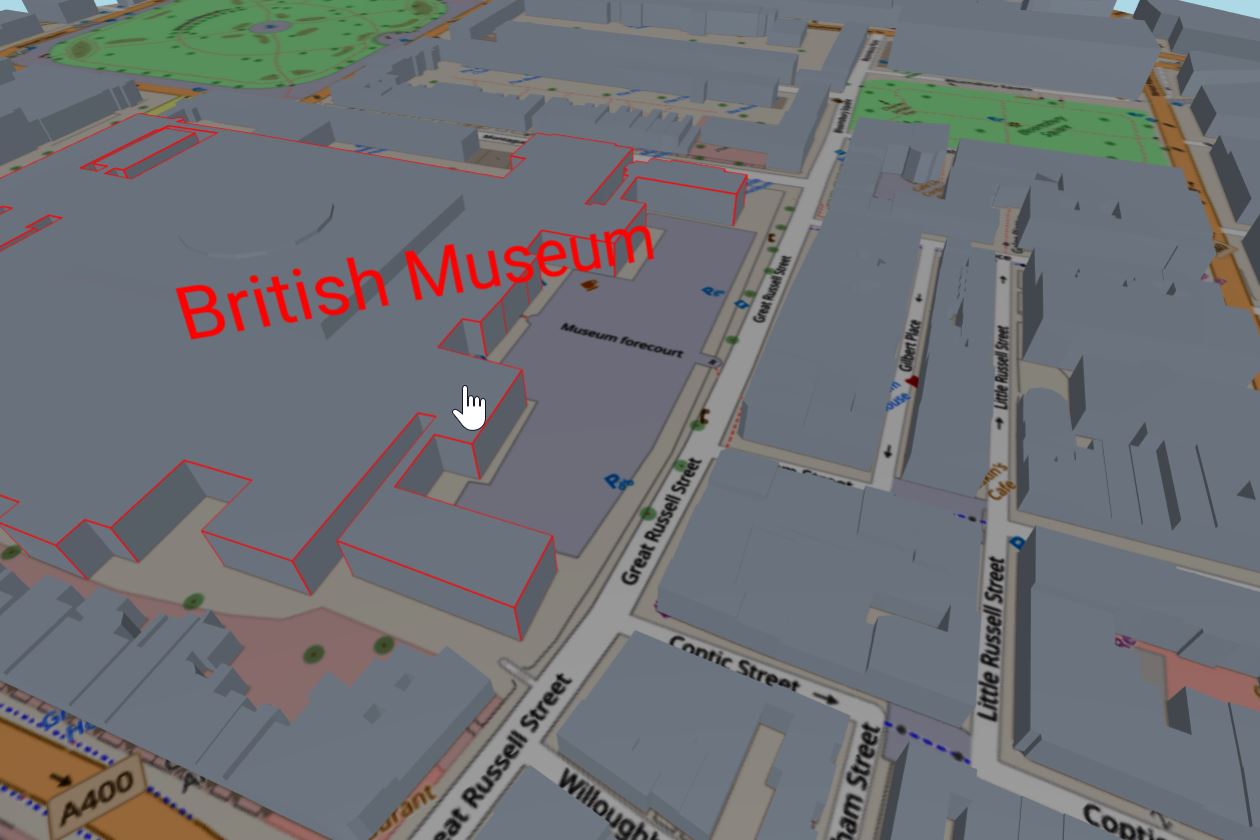
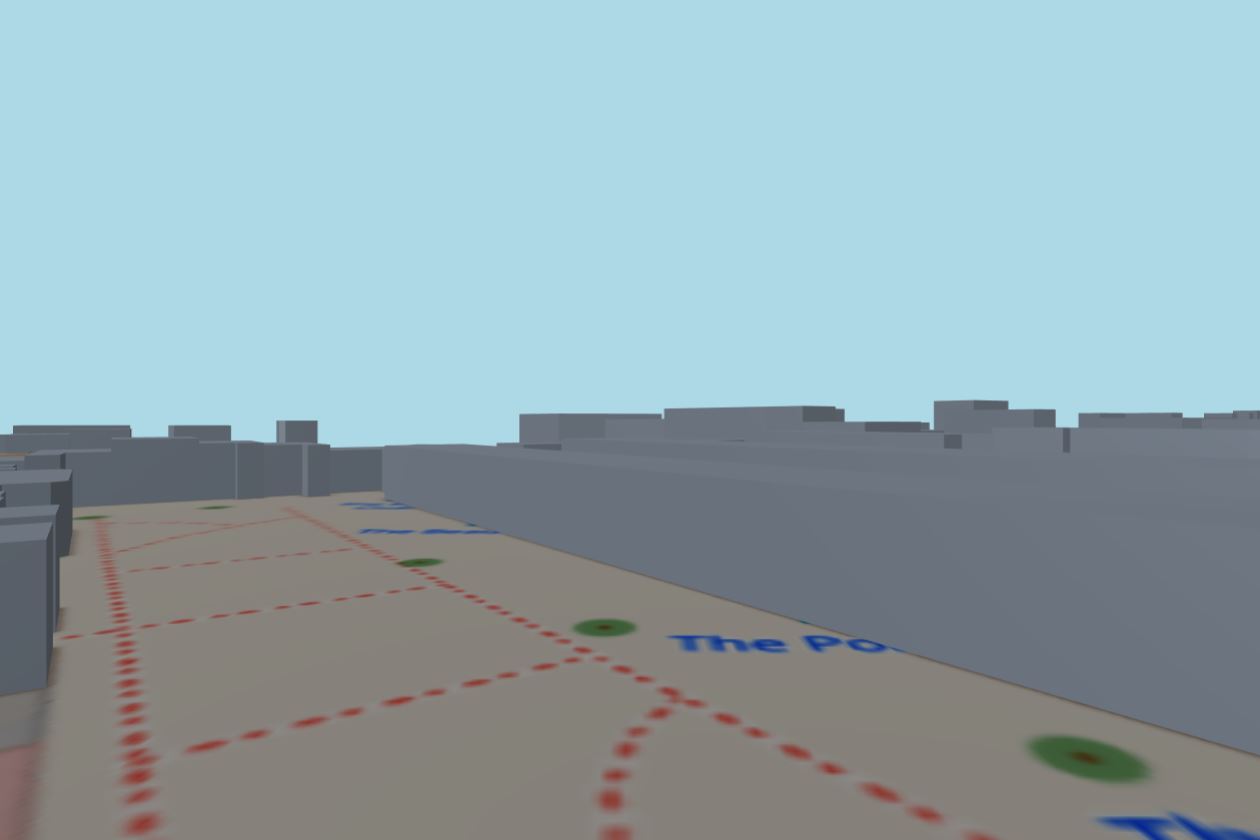
In this example the asset is the 3D model of Russell Square in GLB format.
- remove the geometry entities within the
<a-scene> </a-scene> - create the Asset Management System using
<a-assets>after the<a-scene>tag - create an
<a-asset-item>within the<a-assets> </a-assets>. Set the unique IDid="russellsquare"and its locationsrc="resources/RussellSq_Qgis.glb" - GLB model is a binary file format, therefore, the
<a-asset-item>requires the attributeresponse-type="arraybuffer" - load the model in the
<a-scene>using a new<a-entity>and the componentgltf-model="#ID"where ID is the unique name provided in the<a-asset-item> - set the components:
scale="1 1 1"position="0 0 0"rotation="0 0 0"
<a-scene  stats vr-mode-ui="enabled: false" >
  <a-assets>
    <a-asset-item
      id="russellsquare"
      src="resources/RussellSq_Qgis.glb"
      response-type="arraybuffer">
    </a-asset-item>
  </a-assets>

  <a-entity
      id="Rsquare"
      gltf-model="#russellsquare"
      scale="1 1 1"
      position="0 0 0"
      rotation="0 0 0">
  </a-entity>

  <a-sky color="lightblue"></a-sky>
  <a-camera fov="60" position="0 2 0"></a-camera>
</a-scene>
The current camera does not allow us to see the full extension of the model, to the existing <a-camera>:
- add the components:
look-controls(it provides orbit control using the mouse)wasd-controls="acceleration:500; fly: true;"(it provides the control using WASD keys and, with the propertyfly: true, the possibility to move freely on the three axes)position="0 10 0"
  <a-scene  stats vr-mode-ui="enabled: false" >
  <a-assets>
       <a-asset-item id="russellsquare" src="resources/RussellSq_Qgis.glb" response-type="arraybuffer" ></a-asset-item>
  </a-assets>
  <a-entity
    id="Rsquare"
    gltf-model="#russellsquare"
    scale="1 1 1"
    position="0 0 0"
    rotation="0 0 0">
  </a-entity>
  <a-sky color="lightblue"></a-sky>
  <a-camera
    look-controls
    wasd-controls="acceleration: 500; fly: true;"
    fov="60"
    position="0 10 0">
  </a-camera>
</a-scene>
The camera is located at coordinate (x:0, y:10, z:0). The rotation is controlled by pressing and holding the left mouse button and the movement using W A S D keys.

AFrame components are used to further extend the functionalities of the scene. The components are written in JavaScript.
Before its use, a component need to be registered using a specific syntax:
AFRAME.registerComponent('name-of-the-component', {
   init: function(){ myFunction } })
This is an example of a basic ray-cast component.
- create a new file raycast-mouse.js and save it in a new folder js inside your project (same folder of the index.html)
AFRAME.registerComponent('raycast-mouse', {
  //The function run when the scene is loaded
  init: function () {
  var tempLine; //temporary edge geometry to highlights mesh edges

//Add an EventListener of type mouse 'click' to this entity (this.el)
  this.el.addEventListener('click', function (evt) {
//print the name of the object intersected by the ray
       console.log('I am: ', evt.detail.intersection.object);

  if(evt.detail.intersection.object.children.length>0)
  {
    //if the intersected 3d object has children[] >0 it means that there is already an EdgesGeometry and we can remove it
    evt.detail.intersection.object.children=[];
  }

  else
  {
        //Otherwise, create a edge geometry on the top of the current geometry
        var geometry=evt.detail.intersection.object.geometry;
        var edges = new THREE.EdgesGeometry( geometry);
        tempLine = new THREE.LineSegments( edges, new THREE.LineBasicMaterial( { color: 0xff0000 } ) );

        //Add the EdgesGeometry as child of the object.children[] when clicked, so we can check if the mesh has already the highlighted edges
        evt.detail.intersection.object.add(tempLine);
      }
      });
    }
  });
The this.el.addEventListener is used to listen an event fired by this component applied to the element el (e.g. if we apply the component to the <a-entity> that contain the gltf-model, this will be that <a-entity>). In this case the event is a mouse click event. The evt.detail.intersection.object return the intersected object.
The if-else is used to check if the intersected geometry already has a THREE.EdgesGeometry, created using a red THREE.LineSegments, if not, the THREE.EdgesGeometry is added as child of the intersected geometry.
- add the script to the
index.htmljust after the AFrame library. The order is important as the component is using theAFRAMElibrary.
<script src="https://aframe.io/releases/1.2.0/aframe.min.js"></script>

<script src="js/raycast-mouse.js"></script>
- add the component
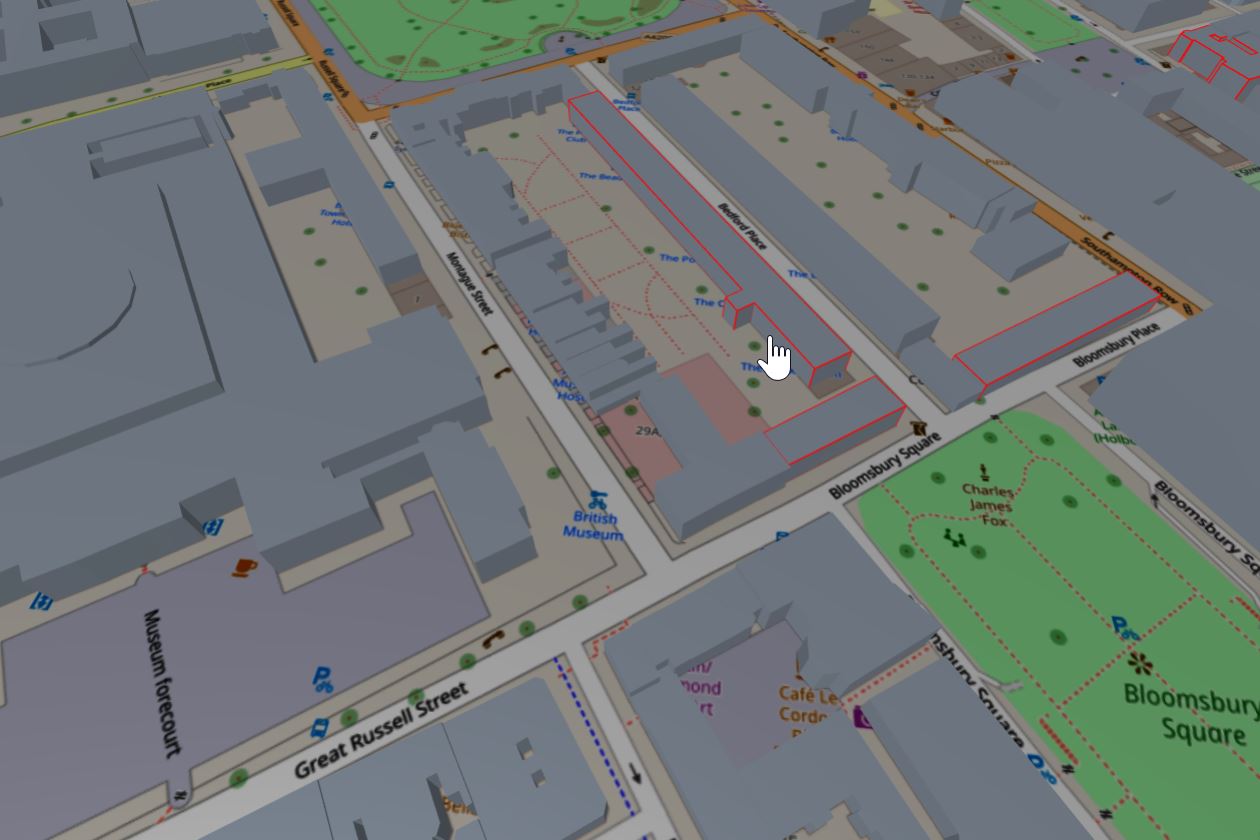
raycast-mouseto the<a-entity>that contains the 3D model, together with an attributeclass="collidable". A specific class is used to enable intersection on a limited number of object, thus improve the performance of ray-casting.
<a-entity raycast-mouse class="collidable" id="Rsquare" gltf-model="#russellsquare" scale="1 1 1" position="0 0 0" rotation="0 0 0" ></a-entity>
- finally inform AFrame that the origin of the rays is the cursor mouse position
cursor="rayOrigin: mouse", and the object we want to intersect have the classcollidableraycaster="objects: .collidable"
<a-scene stats vr-mode-ui="enabled: false" cursor="rayOrigin: mouse" raycaster="objects: .collidable">
The if-else statement of the raycast-mouse.js is used to add the <a-text> (or any other entity) at the position of the hit point. Create the new variables in the raycast-mouse.js component:
sceneEl(used to select the entity<a-scene>)textContainer(to store all the<a-text>entities)textEl(the actual<a-text>entity)scaleModel(variable used to scale the<a-text>entity with the model)
    var tempLine; //it stores a temporary edge geometry that highlights the borders of the mesh

    //textContainer is an empty <a-entity>, appended to the main <a-scene>, used to store the <a-text> entities
    var sceneEl = document.querySelector('a-scene');
    var textContainer = document.createElement('a-entity');
        textContainer.setAttribute('id','textContainer');

    sceneEl.appendChild(textContainer);

    var textEl; //the <a-text> used to display the name of the object
    var scaleModel=this.el.object3D.scale.x; //scale the text with the model
- in the
elsestatement, together with the THREE.EdgesGeometry, add
    //create a <a-text> with the name of the object selected

        var prevText = document.querySelector('#text'); //check if the <a-text> already exists...

        if(prevText===null){ //...if not
          textEl   = document.createElement('a-entity');
          textEl.setAttribute('id','text');
          textContainer.appendChild(textEl);
        }
          else
          {
            textEl=prevText;
          }
          //position of the <a-text> is the hit point of the ray cast, scaled on the Y to avoid to place the texEl inside the object3D
          textEl.object3D.position.set(evt.detail.intersection.point.x,evt.detail.intersection.point.y+(scaleModel*5),evt.detail.intersection.point.z);

          //textEl uses the scale of the object3D
          textEl.object3D.scale.set(scaleModel*1,scaleModel*1,scaleModel*1);

          // the text to visualise is the name of the object and it is applied as property `value` of the <a-text>
          var textToViz="";
          if(evt.detail.intersection.object.userData.properties!==undefined)
          {
          textToViz=evt.detail.intersection.object.userData.properties[17]; //the field properties has been created by QGis and contain the attribute table. The name of the column is lost but from QGis we know that _name_ is the column 17
          }
          if(textToViz==='NULL') //some buildings do not have name, instead of visualise NULL just left the text empty
            {
              textToViz="";
            }

          textEl.setAttribute('text',{color: 'red', align: 'center', value:textToViz, height:'50', width: '50'});
The evt.detail.intersection is used to set the position of the entity, using the node .point. The model used in this example has been exported using the QGis2Threejs plugin of QGis. The properties of each building have been automatically stored in the userData field in an array named properties. In this example the value name is the 17th field of the attribute table. The result is a 3D text floating over the point hit by the ray.
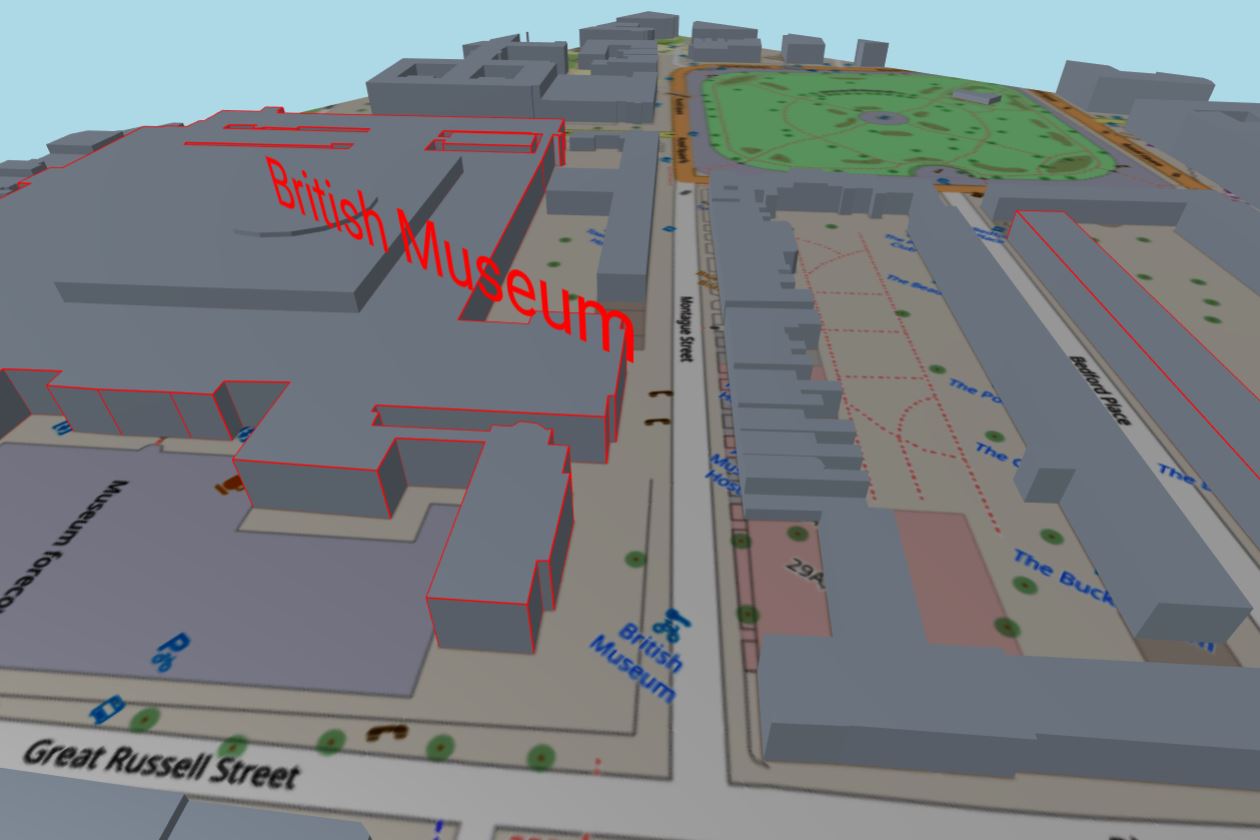
The text created has a fix rotation="0 0 0". The external component aframe-look-at-component, forces the text to always face the user's camera. The aframe-look-at-component is one of the many created by the AFrame community.
<script src="https://unpkg.com/aframe-look-at-component@1.0.0/dist/aframe-look-at-component.min.js"></script>
- Add a unique name to the camera
<a-entity
    camera
    id="user"
    look-controls
    wasd-controls="acceleration:100; fly: true;"
    fov="60"
    position="0 10 0">
  </a-entity>
- add the attribute
look-atto the textEl in theraycast-mouse.jscomponent
var textToViz="";
if (typeof evt.detail.intersection.object.userData.properties !== "undefined" && evt.detail.intersection.object.userData.properties[17] != "NULL") {
          textToViz = evt.detail.intersection.object.userData.properties[17];
        }
textEl.setAttribute('text',{color: 'red', align: 'center', value:textToViz, height:'50', width: '50'});

textEl.setAttribute('look-at',"#user");