This workshop will show you how to:
- use the AFrame Globe Component for data visualisation
- add custom CSV and GeoJson data using D3
To complete this workshop you will need:
- Visual Studio Code
- Live Server for VS Code (or other local server)
Resources and Geodata
Textures
- World Map from Solar System Scope
- Night World Map from Solar System Scope
- Stars from Solar System Scope
- Bathymetric World Map
- Normal Map
Data
Languages used:
- HTML
- JavaScript
This workshop shows the use of AFrame for data visualisation. The Globe Component is used as support to visualise both CSV and GeoJson data through the D3 library.
Setup a Visual Studio Code work space by adding your project's folder, and ensure that the Live Server extension is installed, View -> Extensions or Ctrl+Shift+X.
In VSCode create a new file named index.html
- add the AFrame library
- add the Globe Component library
<script src="https://aframe.io/releases/1.2.0/aframe.min.js"></script>

<script src="https://unpkg.com/aframe-globe-component/dist/aframe-globe-component.min.js"></script>
- and a
<a-entity>with the attributeglobe.
 <a-entity id="globeID" scale="0.1 0.1 0.1" globe="
   globe-image-url: https://upload.wikimedia.org/wikipedia/commons/0/04/Solarsystemscope_texture_8k_earth_daymap.jpg;
   bump-image-url: https://upload.wikimedia.org/wikipedia/commons/f/fb/Solarsystemscope_texture_8k_earth_normal_map.tif;">
 </a-entity>
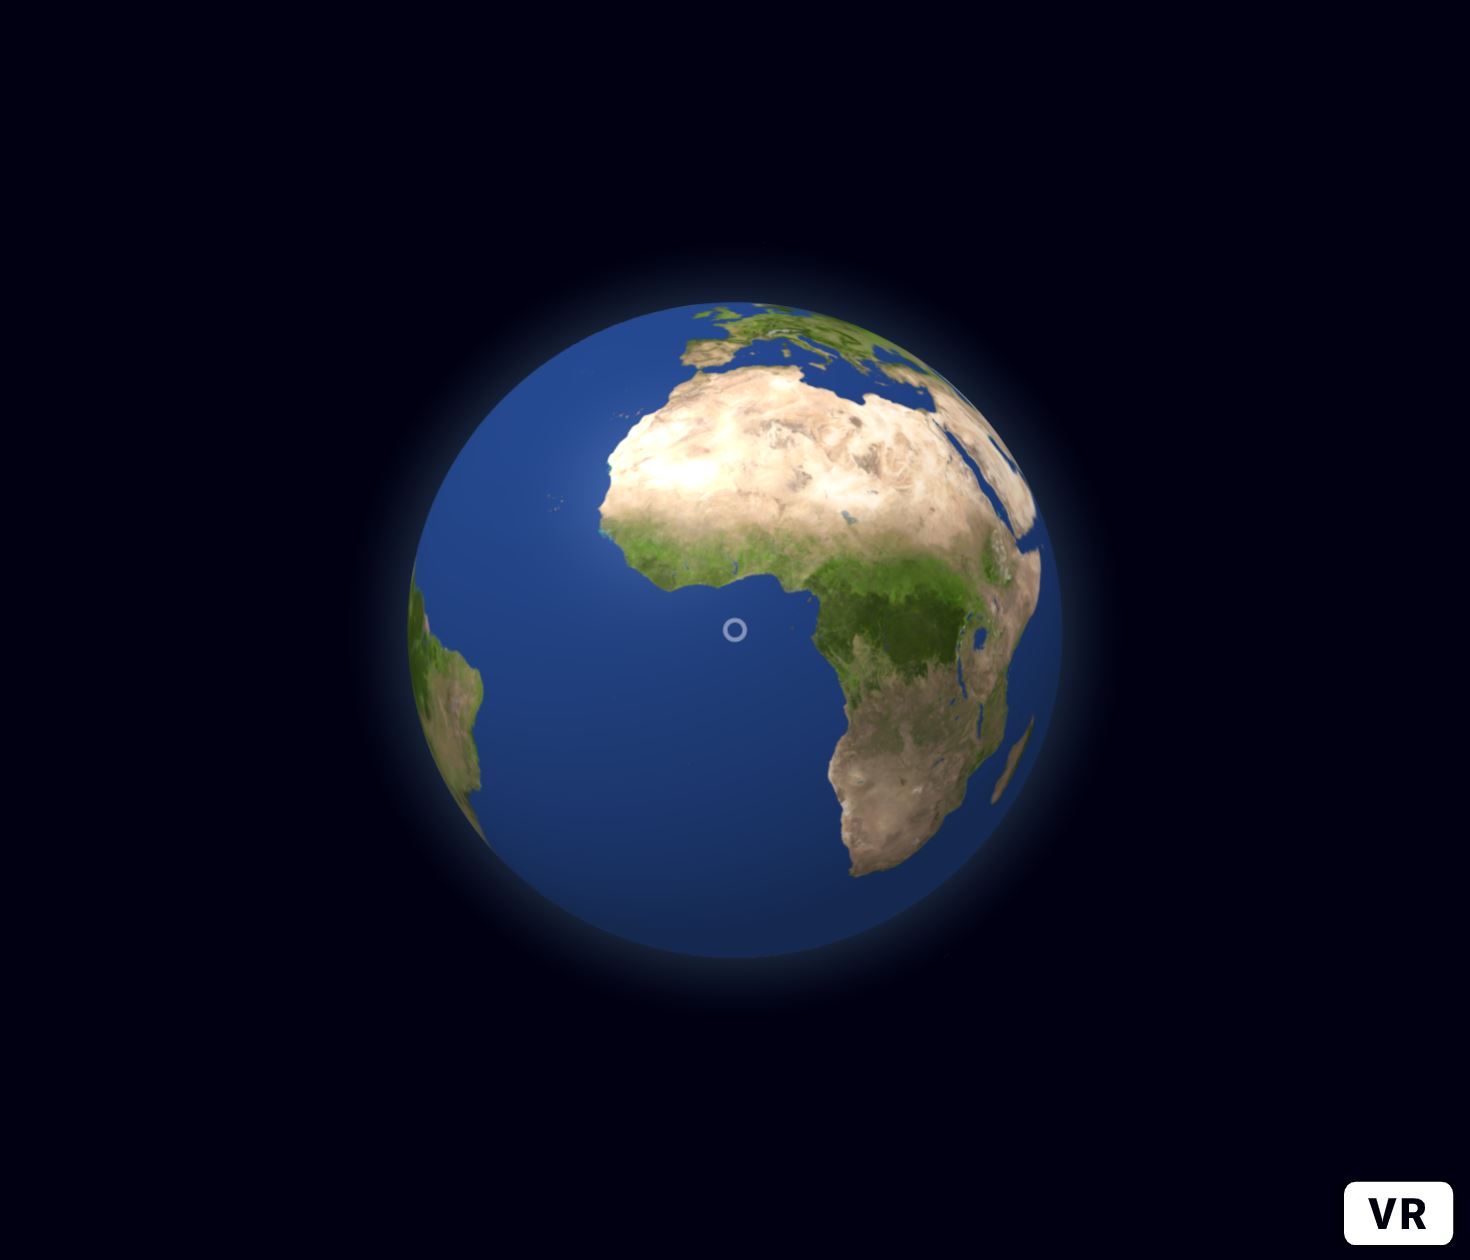
The component globe has two additional properties globe-image-url and bump-image-url, they are used to apply a texture map, and a bump map, on the surface of the 3D sphere. Custom equirectangular images can be used to change the appearance of the globe or to overlay additional information. A collection of Earth and other planets textures, license CC 4.0, can be found here.
<!DOCTYPE html>
<html>
  <head>
    <title>A-Frame 3D Globe Component Example</title>
    <meta name="description" content="Example for 3D Globe component.">
    <!--AFrame version 1.2.0-->
    <script src="https://aframe.io/releases/1.2.0/aframe.min.js"></script>
    <!--Globe Component https://github.com/vasturiano/aframe-globe-component-->
    <script src="https://unpkg.com/aframe-globe-component/dist/aframe-globe-component.min.js"></script>
    <style>
      a-scene {
      height: 600px;
      width: 700px;
       }
      </style>
  </head>
  <body>
    <a-scene embedded>
      <a-entity id="globeID" scale="0.1 0.1 0.1" globe="
        globe-image-url: https://upload.wikimedia.org/wikipedia/commons/0/04/Solarsystemscope_texture_8k_earth_daymap.jpg;
        bump-image-url: https://upload.wikimedia.org/wikipedia/commons/f/fb/Solarsystemscope_texture_8k_earth_normal_map.tif">
      </a-entity>
      <a-entity camera position="0 0 25">
          <a-cursor color="lavender" opacity="0.5" raycaster="objects: .collidable"></a-cursor>
      </a-entity>
      <a-sky color="#001"></a-sky>
    </a-scene>
  </body>
</html>
By changing the property globe-image-url with a different url,
and adding a texture to the <a-sky> entity, it is possible to customise the visualisation of the globe
<a-assets>
        <img id="stars" src="resources/2k_stars_milky_way.jpg"/>
</a-assets>


<a-sky src="#stars"></a-sky>
Multiple instances of the Globe can be created with their own texture, scale and position
<a-entity id="moon" class="collidable" position="0 0 50" scale="0.05 0.05 0.05" globe="globe-image-url: resources/2k_moon.jpg;">
 </a-entity>

The current scene uses the standard AFrame control system (WASD and mouse to control and orbit the camera). We can improve the user experience and the usability of the visualisation by using a more efficient OrbitControls system.
The following component develop by the AFrame Community provides a highly customisable control system based on the Three.JS OrbitControls. The component needs to be loaded after the AFrame library
<script src="https://aframe.io/releases/1.2.0/aframe.min.js"></script>

    <!--Globe Component https://github.com/vasturiano/aframe-globe-component-->
<script src="js/aframe-globe-component.min.js"></script>

    <!--Orbit control based on ThreeJs OrbitControls-->
  <!--https://github.com/tizzle/aframe-orbit-controls-component-->
  <script src="https://cdn.rawgit.com/tizzle/aframe-orbit-controls-component/v0.1.14/dist/aframe-orbit-controls-component.min.js"></script>
The component is applied to the camera
<a-camera position="0 0 25"
      orbit-controls="
              target: #globeID;
              enableDamping: true;
              dampingFactor: 0.225;
              rotateSpeed:0.05;
              minDistance:2;
              maxDistance:35;
              "
      >
        <a-cursor color="lavender" opacity="0.5" raycaster="objects: .collidable"></a-cursor>
      </a-camera>
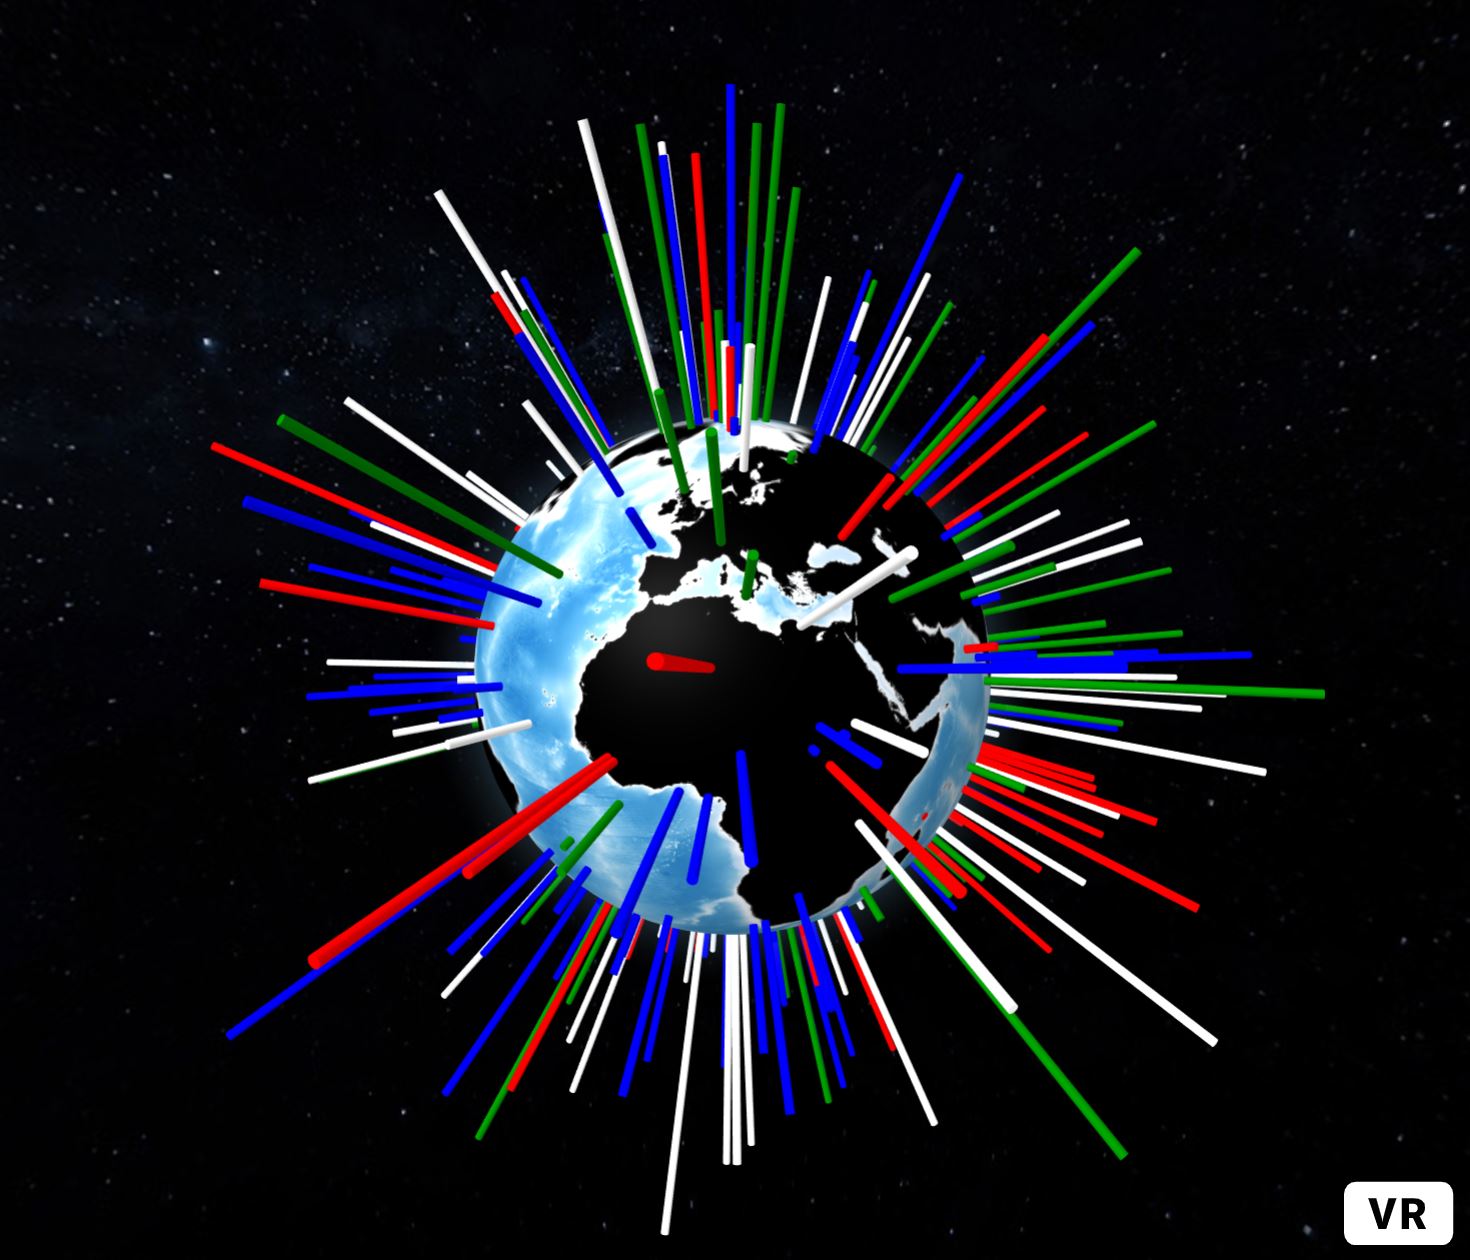
To visualise a dataset on the surface of the globe we need to use an array of features with the geographic information stored as latitude and longitude.
The following script create an array (gData) of 300 random values that are used to generate red, white, blue and green bars from the surface of the globe.
The script set the attributes pointsData, pointAltitude and pointColor on the globe component using the AFrame function .setAttribute().
The script can be added after the </a-scene>, or (best practice) it can be used to create a separate AFrame component.
<script>
    // Gen random data
    const N = 300;
    const gData = [...Array(N).keys()].map(() => ({
      lat: (Math.random() - 0.5) * 180,
      lng: (Math.random() - 0.5) * 360,
      size: Math.random() / 1,
      color: ['red', 'white', 'blue', 'green'][Math.round(Math.random() * 3)]
    }));

    const globeEntity = document.getElementById('globeID');
    globeEntity.setAttribute('globe', {
      pointsData: gData,
      pointAltitude: 'size',
      pointColor: 'color'
    });
</script>
Using external library such as D3 it is possible to provide additional control on the data to visualise.
- add the D3 library within the
<head></head>of the HTML file.
<!--AFrame version 1.2.0-->
  <script src="https://aframe.io/releases/1.2.0/aframe.min.js"></script>
<!--Globe Component https://github.com/vasturiano/aframe-globe-component-->
  <script src="https://unpkg.com/aframe-globe-component/dist/aframe-globe-component.min.js"></script>
<!--Orbit control based on ThreeJs OrbitControls-->
  <!--https://github.com/tizzle/aframe-orbit-controls-component-->
  <script src="https://cdn.rawgit.com/tizzle/aframe-orbit-controls-component/v0.1.14/dist/aframe-orbit-controls-component.min.js"></script>
<!--D3 Library https://d3js.org/-->
  <script src="https://d3js.org/d3.v6.min.js"></script>
  <!--module to parse CSV and fetch data-->
  <script src="https://d3js.org/d3-dsv.v2.min.js"></script>
  <script src="https://d3js.org/d3-fetch.v2.min.js"></script>
The first dataset is a CSV file, we need to load also the additional module d3-dsv.
We can comment out the code used to generate the random data in the <script></script> using the block comments /* */ and fetch the new dataset
const weightColor = d3.scaleSequentialLog().domain([11097, 1378665000]).range(["yellow", "red"]);

const globeEntity = document.getElementById('globeID');
The constant weightColor uses a built-in D3 function to compute the colour of the bars considering the domain (minimum and maximum value) of the dataset.
The Globe is selected using its unique ID globeID.
function getWorldPopulation() {
      d3.csv("resources/WorldPopulation2020.csv").then(function (data) {
        console.log(data);
        globeEntity.setAttribute('globe', {
          pointsData: data,
          pointLat: d => d.Latitude,
          pointLng: d => d.Longitude,
          pointColor: data => weightColor(data.Year_2016),
          pointAltitude: data => Math.sqrt(data.Year_2016) * 1e-5,
          pointRadius: 0.5,
        });
      });
    }
    getWorldPopulation();
The function getWorldPopulation() is used to wrap the d3.csv function
- the CSV dataset is fetched, parsed, and passed as variable
data - the
console.log(data)is useful to see how the data is formatted (e.g. name of the variables that we need to use) - the array is passed to the globe component using the AFrame function setAttribute
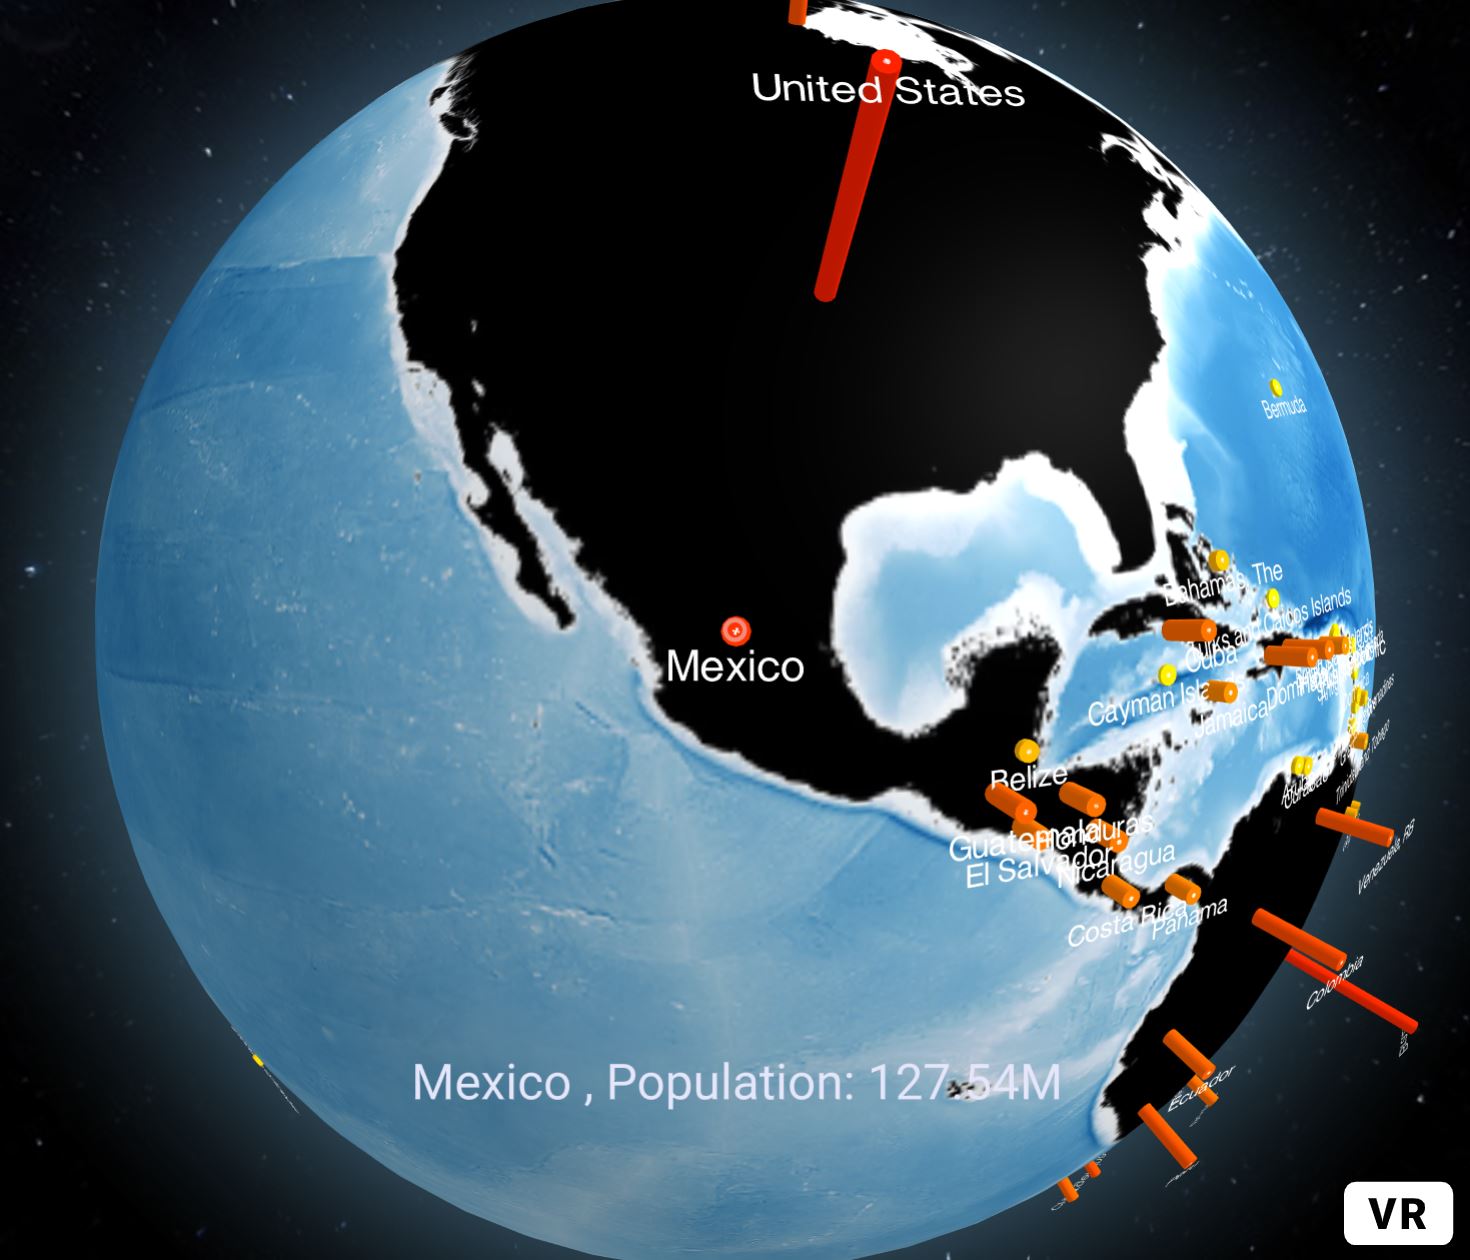
The globe component can have multiple parameters. To visualise a label with the name of the country
globeEntity.setAttribute('globe', {
          pointsData: data,
          pointLat: data => data.Latitude,
          pointLng: data => data.Longitude,
          pointColor: data => weightColor(data.Year_2016),
          pointAltitude: data => Math.sqrt(data.Year_2016) * 1e-5,
          pointRadius: 0.5,

          labelsData: data,
          labelLat: data => data.Latitude,
          labelLng: data => data.Longitude,
          labelAltitude: data => Math.sqrt(data.Year_2016) * 1e-5,
          labelDotRadius: 0.12,
          labelDotOrientation: () => 'bottom',
          labelColor: () => 'rgba(255,255,255,1)',
          labelText: data => data.CountryB,
          labelSize: 1,
          labelResolution: 4,
          desc: ({ data: data }) => `${data.CountryB} , Population: ${(data.Year_2016 / 1000000).toFixed(2)}M`,
        });
The property desc displays name and population when the cursor hover the bar
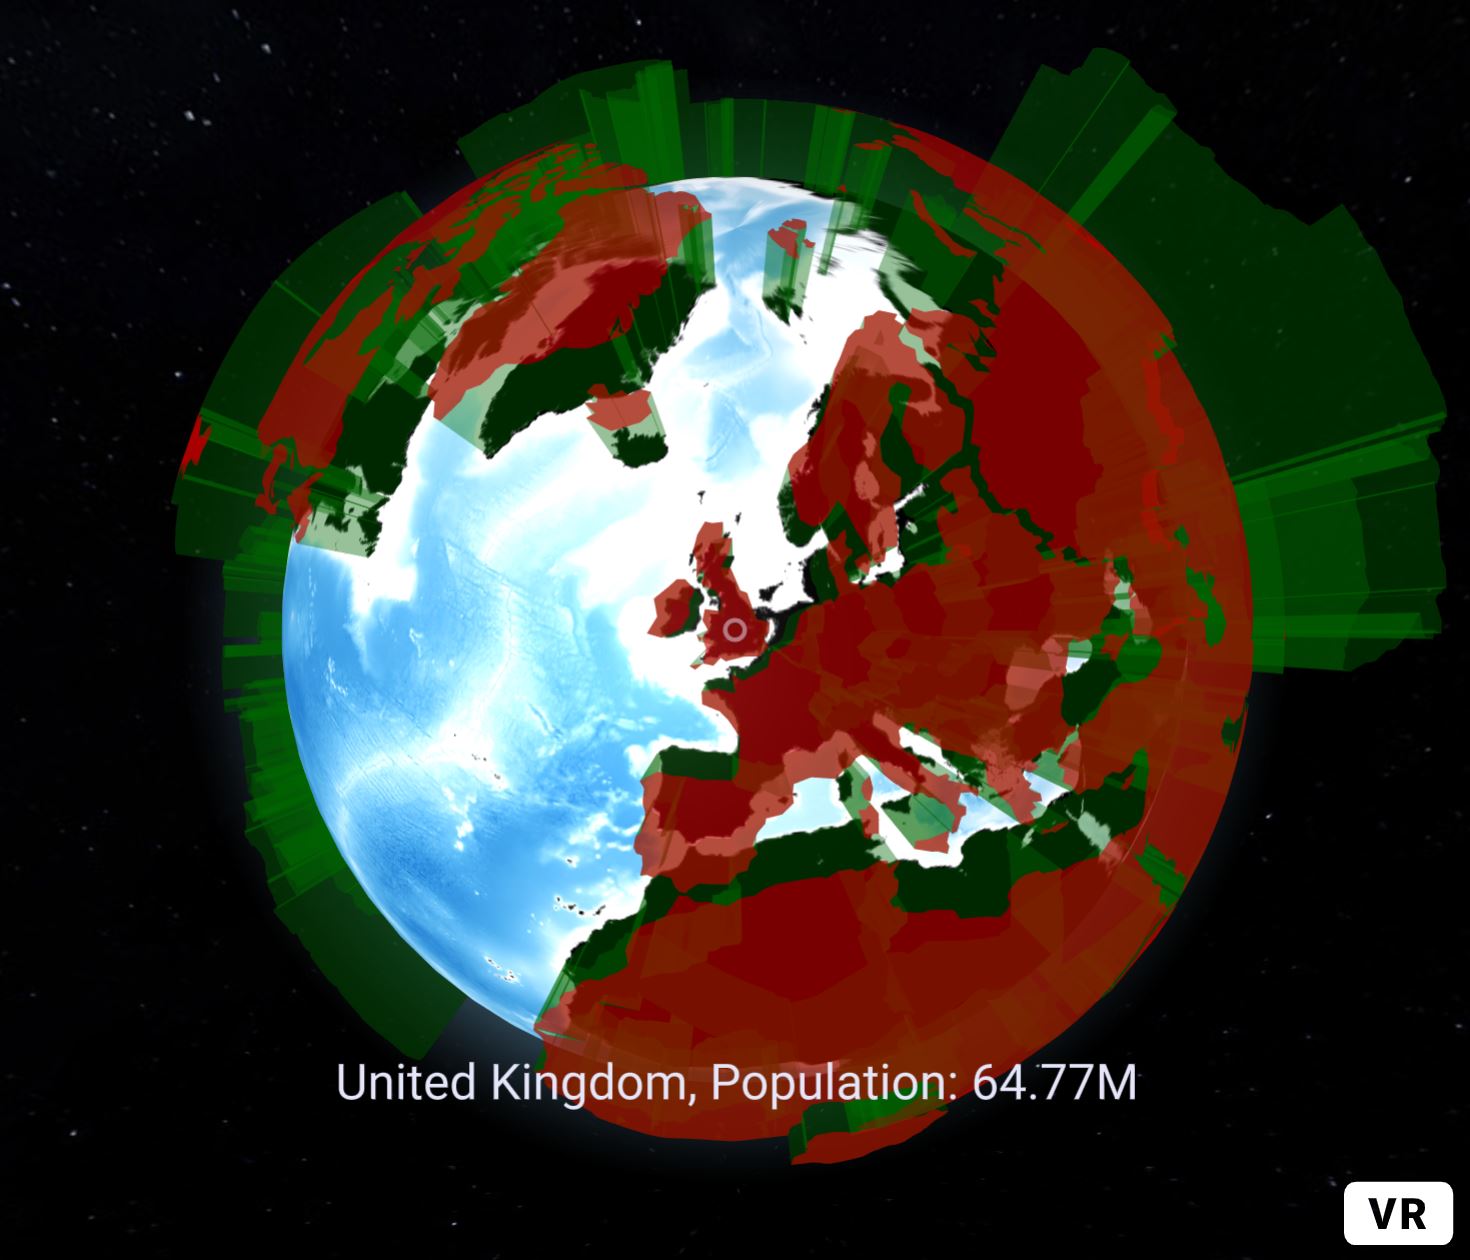
The dataset can be passed also as GeoJson. The ne_110m_admin_0_countries.geojson contains geometries as polygons
function getWorldPolygon() {
      d3.json("resources/ne_110m_admin_0_countries.geojson").then(function (data) {

        globeEntity.setAttribute('globe', 'polygonsData', data.features);

        setTimeout(() => globeEntity.setAttribute('globe', {
          polygonsTransitionDuration: 3000,
          polygonAltitude: feat => Math.max(0.1, Math.sqrt(+feat.properties.POP_EST) * 1e-5)
        }), 3000);

        globeEntity.setAttribute('globe', {
          polygonCapColor: () => 'rgba(200, 0, 0, 0.6)',
          polygonSideColor: () => 'rgba(0, 100, 0, 0.4)',
          polygonStrokeColor: () => '#111',
          label: ({ data: { properties: d } }) => `${d.ADMIN} (${d.ISO_A2})`,
          desc: ({ data: { properties: d } }) => `${d.ADMIN}, Population: ${Math.round(+d.POP_EST / 1e4) / 1e2}M`
        });
      });
    }
getWorldPolygon();
The function setTimeout is used to animate the extrusion of the polygon. The value 3000 of polygonsTransitionDuration define the time, in milliseconds, to complete the animation.
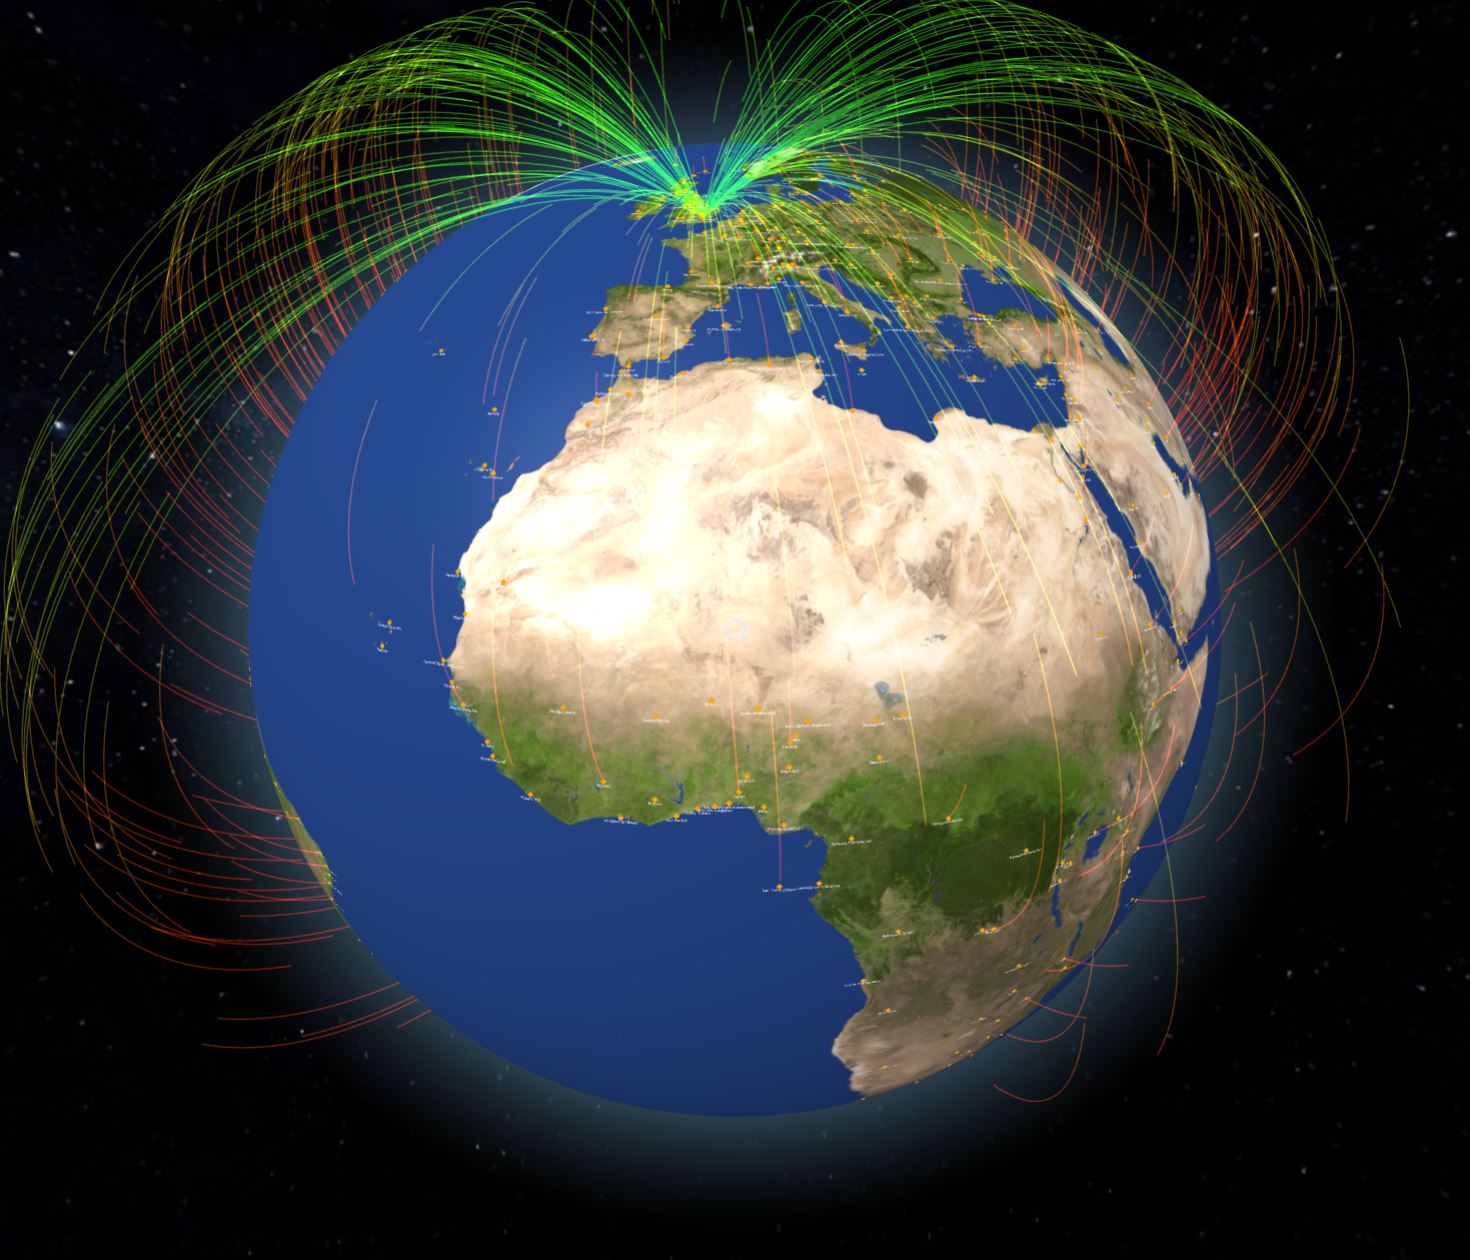
External sources can be used as well, the following example draws arc lines that connect London Heathrow Airport with other airports on the globe.
<a-entity id="globeID" class="collidable" scale="0.1 0.1 0.1"
      globe="
   globe-image-url: https://upload.wikimedia.org/wikipedia/commons/0/04/Solarsystemscope_texture_8k_earth_daymap.jpg;
   bump-image-url: https://upload.wikimedia.org/wikipedia/commons/f/fb/Solarsystemscope_texture_8k_earth_normal_map.tif;">
      <!--This second globe is used just to visualise data-->
      <a-entity id="globeID2" class="collidable" scale="1 1 1" globe="show-globe:false">
      </a-entity>
    </a-entity>
And a new const in the javascript
const globeEntity = document.getElementById('globeID');
const globeEntityB = document.getElementById('globeID2');
function getWorldAirport() {

      d3.json("https://raw.githubusercontent.com/nvkelso/natural-earth-vector/master/geojson/ne_10m_airports.geojson").then(function (data) {

        globeEntityB.setAttribute('globe', {
          labelsData: data.features,
          labelLat: d => d.geometry.coordinates[1],
          labelLng: d => d.geometry.coordinates[0],
          labelText: d => d.properties.name,
          labelDotOrientation: () => 'bottom',
          labelColor: () => 'rgba(255,255,255,1)',
          labelSize: 0.2,
          labelResolution: 1,
          labelIncludeDot: true,
        });


        globeEntity.setAttribute('globe', {
          //data.features represent the Array of the parsed GeoJson
          arcsData: data.features,
          //Lat and Lng of London
          arcStartLat: 51.509865,
          arcStartLng: -0.118092,
          //Lat and Lng of all the other Airports, d is the reference of data.features
          arcEndLat: d => d.geometry.coordinates[1],
          arcEndLng: d => d.geometry.coordinates[0],
          //Parameters of the arc visualisation
          arcDashLength: 0.25,
          arcDashGap: 1,
          arcDashInitialGap: () => Math.random(),
          arcDashAnimateTime: 4000,
          arcColor: () => [`rgba(0, 255, 0, 0.5)`, `rgba(255, 0, 0, 0.5)`],
          arcsTransitionDuration: 0,

          pointsData: data.features,
          pointLat: d => d.geometry.coordinates[1],
          pointLng: d => d.geometry.coordinates[0],
          pointColor: () => 'orange',
          pointAltitude: 0,
          pointRadius: 0.2,
          pointsMerge: true,
          pointResolution: 4,
        });
      });
    }
    getWorldAirport()