- Google Colab
- Edge Impulse
In the class we worked through a Colab which showed how to build a TensorFlow Lite model in Python and Keras. We then saw how the flat binary model can be incorporated into an Arduino sketch.
You are encouraged to work through the Colab in your own time if you struggled to follow it the first time.
You will have noticed the process is quite complicated. So we will now look at how Edge Impulse can simplify the process of deploying a model to an Edge device. This workshop assumes you already have some familiarity with Edge Impulse from the previous workshop (Workshop 3). If you have not worked Workshop 3 you will need to do so.
First we will configure the Arduino Nano BLE so that it can be used by Edge Impulse for data collection using the onboard sensors of the Arduino Nano BLE board.
We will use WebUSB to collect data from the Arduino Nano 33 BLE Sense as this seems the simplest method to configure.
Note that WebUSB is not supported by Safari or Firefox web browsers, so you will need to use Chrome or Edge.
The following link will guide you through the process:
https://docs.edgeimpulse.com/hardware/boards/arduino-nano-33-ble-sense#connecting-to-edge-impulse
but you only need to follow the two steps:
- Connect the development board to your computer
- Update the firmware
That's all. You don't need to install the Edge Impulse CLI to use WebUSB.
https://arduino.github.io/arduino-cli/0.21/installation/
Copy arduino-cli.exe to somewhere sensible and add the enclosing folder to your Path.
https://cdn.edgeimpulse.com/firmware/arduino-nano-33-ble-sense.zip
Unzip and run flash_windows.bat file
You will still be able to use your Arduino Nano in the normal way, but the updated firmware includes support for WebUSB.
First navigate to the Edge Impulse website at: https://www.edgeimpulse.com/
And login with your Edge impulse credentials. Next create and new empty project.
Connect your Arduino Nano BLE to your computer using a micro USB cable.
In the pop up window select your device.
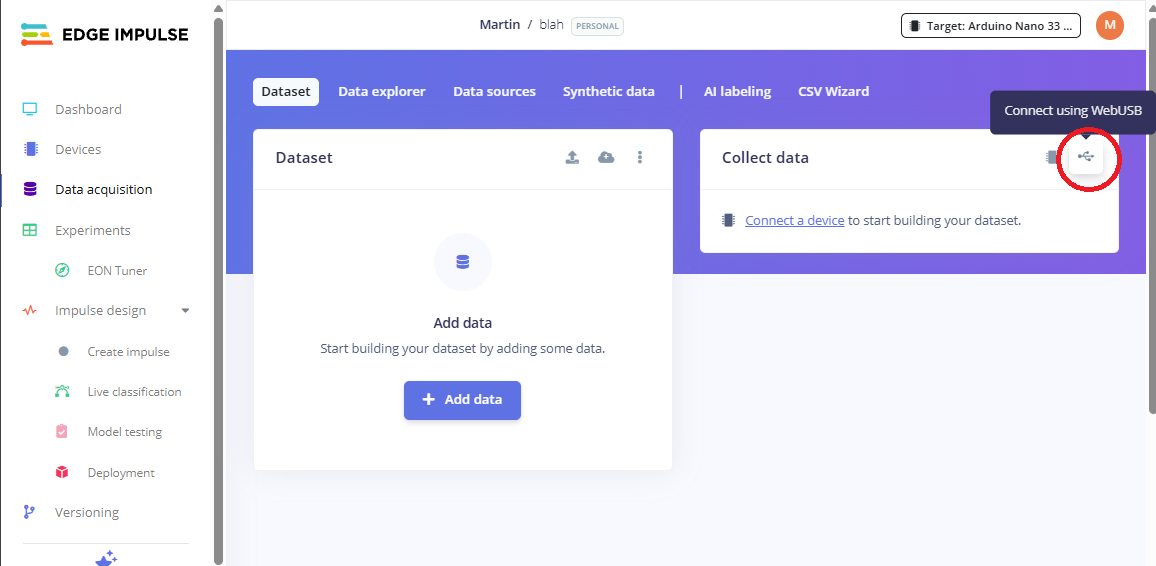
Now go to Data acquisition and select the Connect using WebUSB option as shown below.
We are going to create a Gesture Recognition project, so we need to record data from the onboard accelerometer so we select the following sensor option: Inertial (Accelerometer/Gyroscope/Magnetometer). We also need to choose a Label to represent this class of data. A sample length of 2 seconds (2000 ms) is a good starting point (see below).
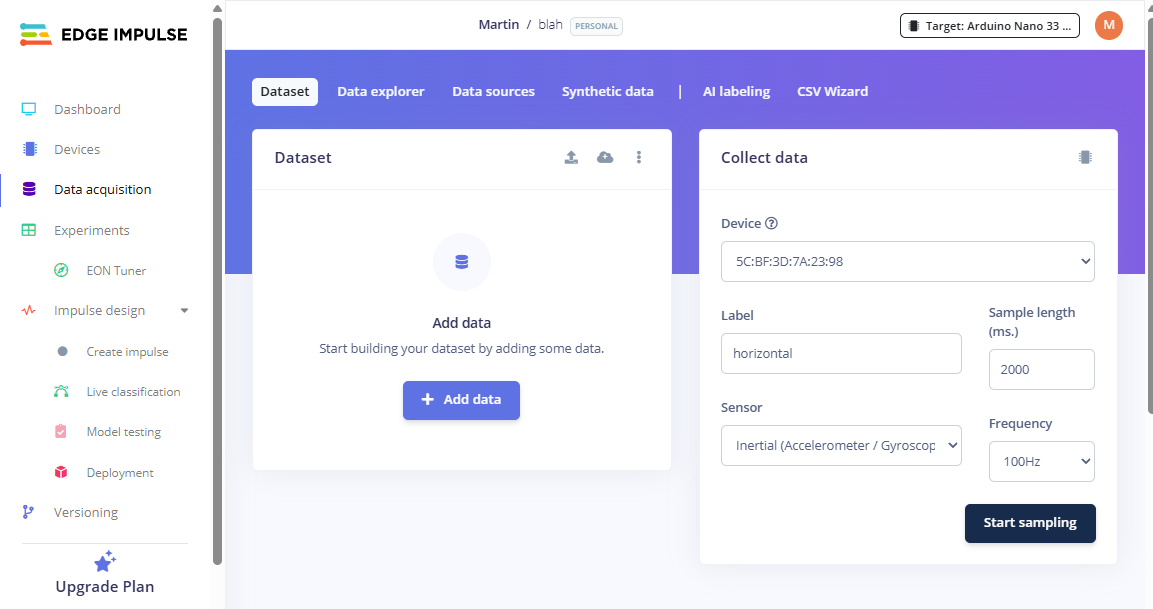
You are now ready to collect a sample so click Start sampling and prepare for your gesture. When the text changes to Sampling... perform your gesture.
If you don't capture the gesture accurately within the two second sampling window, then just delete that sample and try again. You will need to create two classes of gestures for a sensible classification test.
It is important to keep the orientation of the microcontroller board consistent to avoid confusing the accelorometer data.
You don't need a huge set of samples for an intial test, maybe 20 or 30 for each class. You can also move some of the samples into the Test dataset if you want.
Edge Impulse will provide a default Input block according to your data type. You will need to create a processing block - choose Spectral Analysis. By default this block processes 9 axes of data including a 3-axis gyroscope and magnetometer. To keep this example simple we will focus solely on the 3-axis accelerometer data so uncheck the Gyroscope and Magnetometer axes.
You will also need to add a learning block. Choose Classification for the learning block.
Your impulse should look something like this (see below).
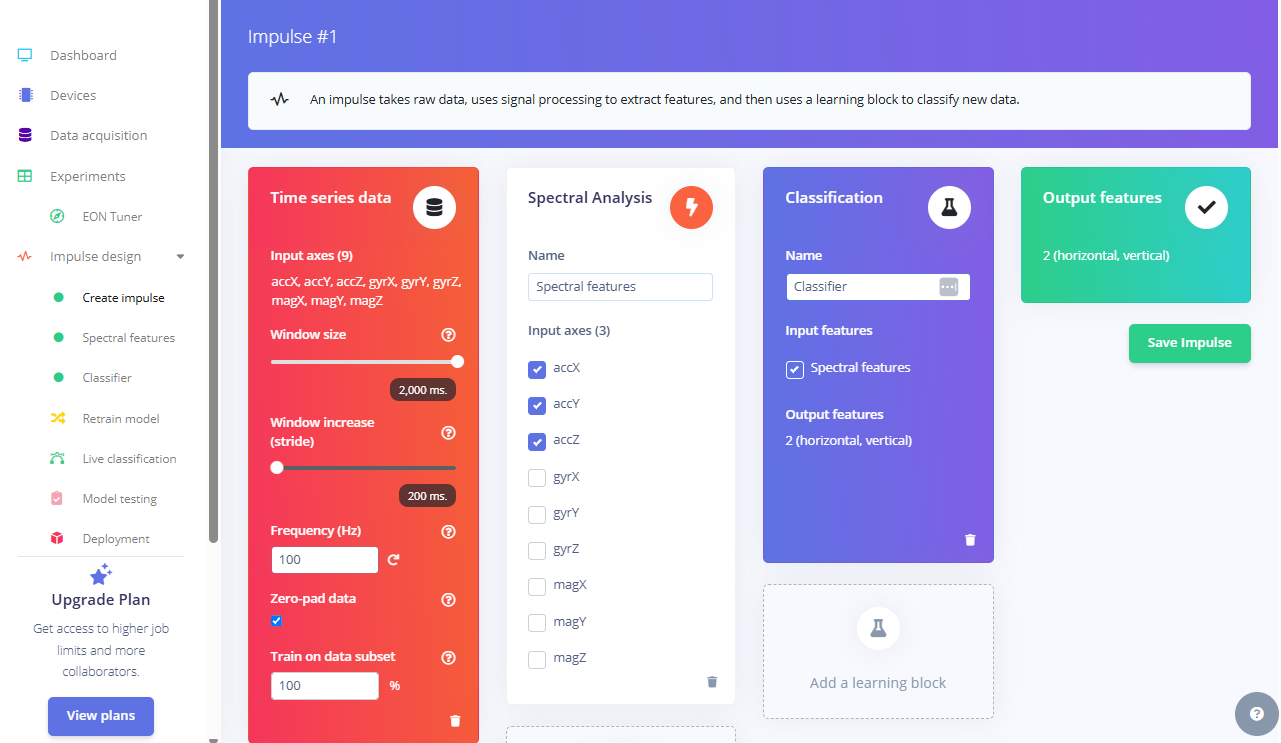
Save the impulse.
Now go to Spectral features under Impulse design. Accept the defaults by clicking Save parameters. Then click Generate features.
Now go to Classifier. Again the defaults are a good place to start so simply click Save & train.
Once training has finished you will see an indication of the model performance on the validation dataset.
If the accuracy is poor then maybe some more training data would help. But we are not looking for super accuracy in this workshop, we just want to explore the workflow.
If you created a Test dataset, you can use the Model testing option to evaluate the model against the unseen test dataset.
Alternatively, you can use the Live classification option and WebUSB to test the model against ‘live' data in a similar fashion to that used to gather the original training dataset.
We will now deploy the trained model to the Arduino Nano BLE microcontroller. Click the Deployment option.
Under Configure your deployment go to Deployment target and select the Arduino library option.
Now go to Inference engine and select TensorFlow Lite (the EON Compiler option is also a possibilty but we will stick with TensorFlow Lite in this tutorial). Your configuration should look like the image below.
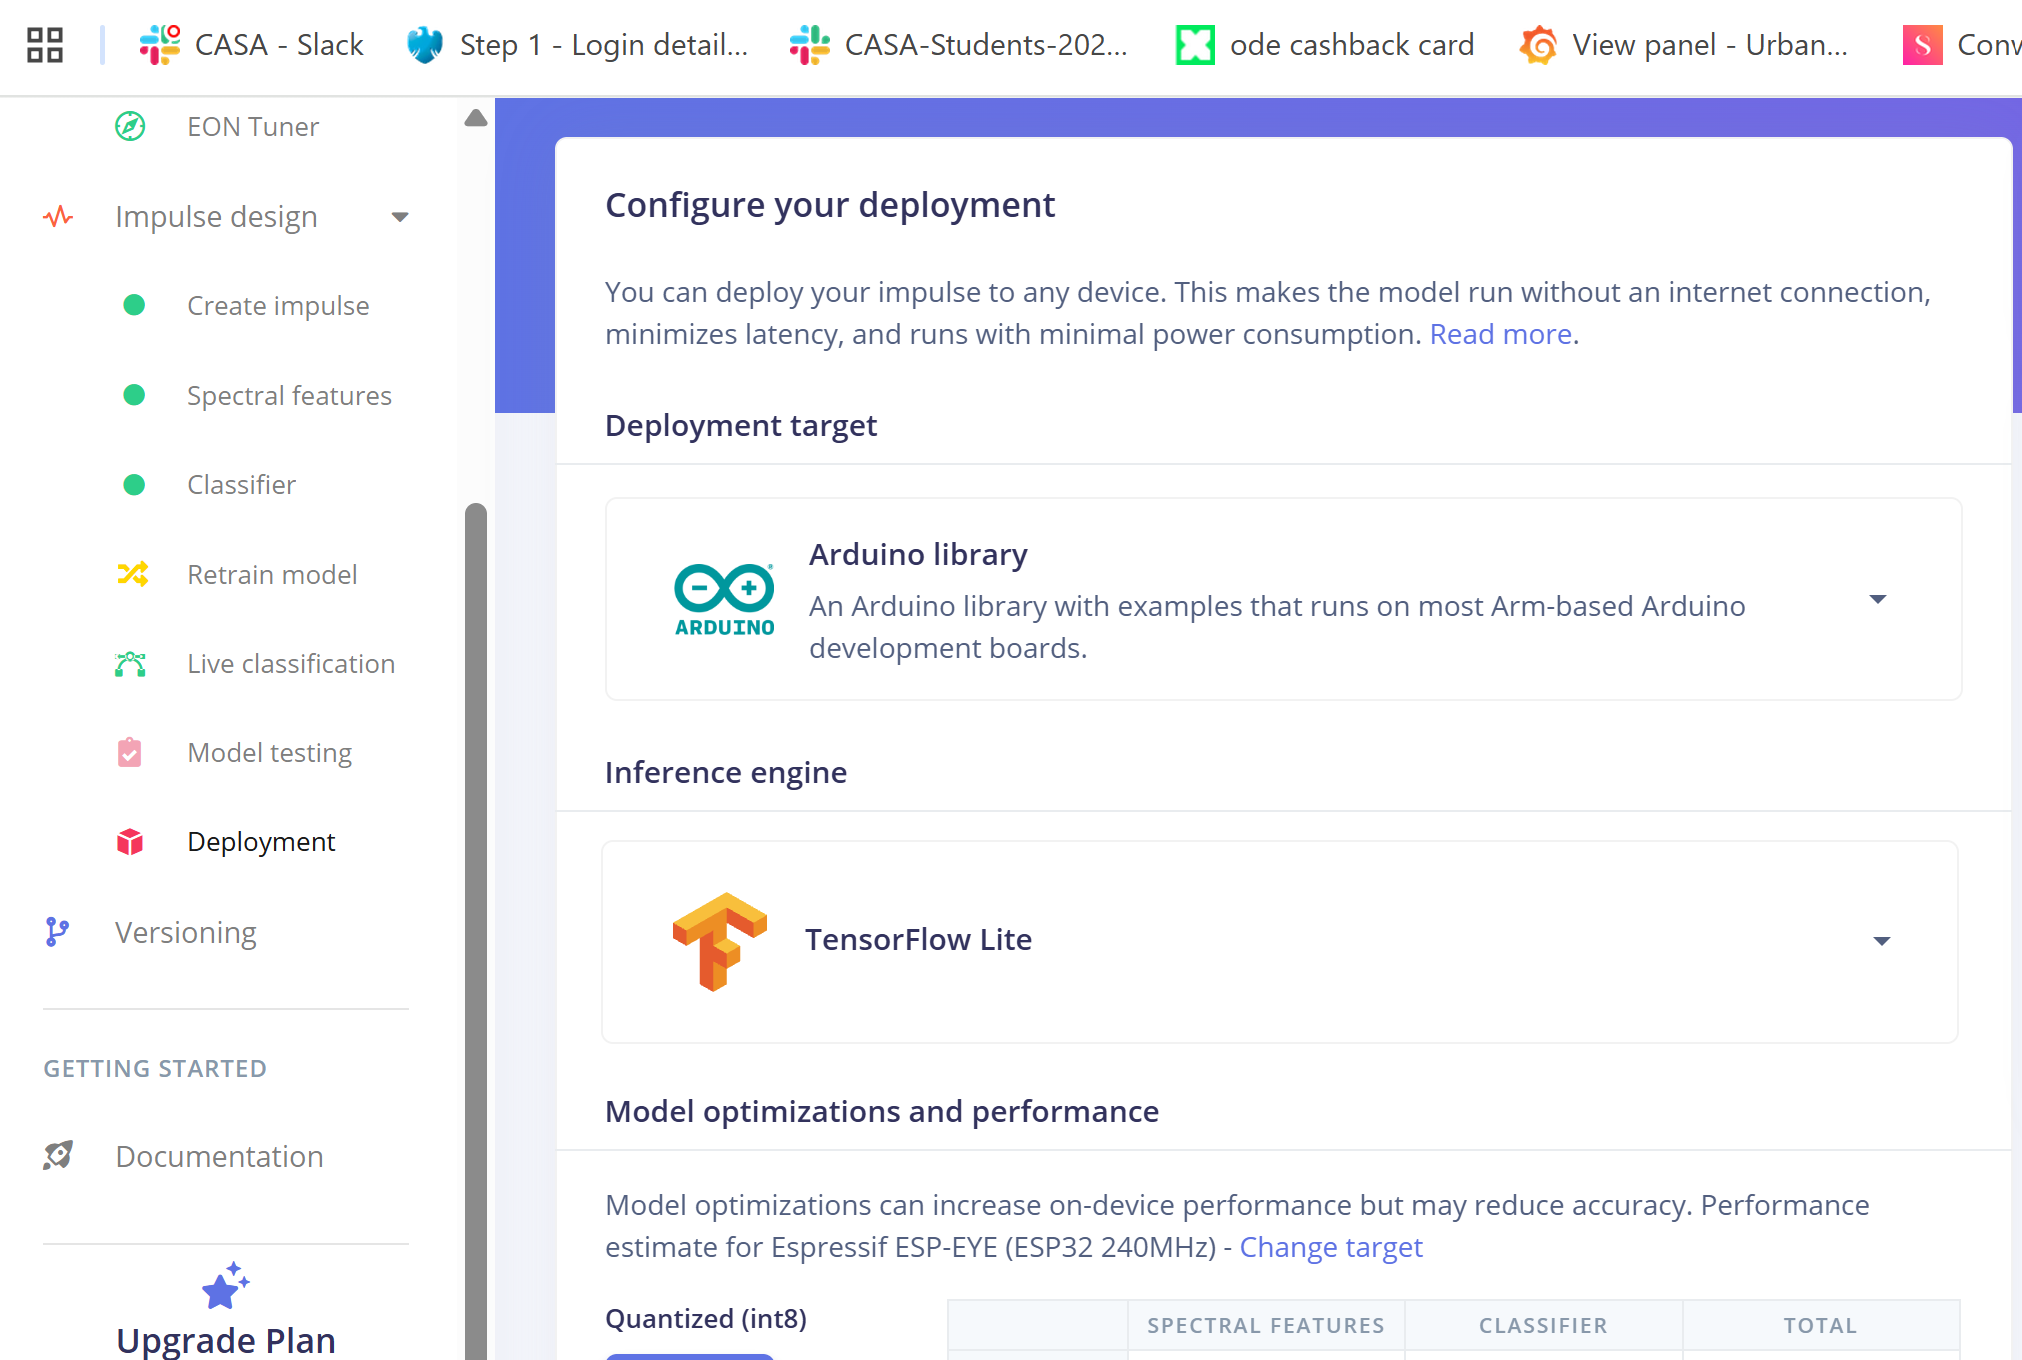
Now click the Build button. This will build the model into an Arduino library and download it as a zip file onto you computer in the Downloads folder.
Now open up your Arduino IDE. Add the library via the following menu options:Sketch > Include Library > Add .ZIP Library...
Once the library is installed navigate to the library examples File > Examples > <name of your project> > nano_BLE33_sense
Then choose one of the examples that senses the accelerometer e.g. nano_ble33_sense_accelerometer
Connect the microcontroller to your laptop and build and run the example. This might take a while when you first build the project, but should be quicker on subsequent builds.
Once the example sketch is running it will perform gesture classification and output the result over the serial port.
You might want to explore how you can modify the sketch to drive the RGB LED with the classsification result. If you modify the sketch you will need to save it under a different name as library examples are read only.