This workshop will show you how to:
- set up a Hello World scene with AFrame
- use and create custom AFrame components
- consume and visualise data from MQTT feed using WebSocket connection
To complete this workshop you will need:
- Visual Studio Code
- PiCloud Frame
- PiCloud Rpis
- 360 Panoramic image UCL Ce Lab
- Live Server for VS Code
- MQTT broker
Languages used:
- HTML
- JavaScript
AFrame is a HTML-based framework to develop virtual reality experiences and not only. Behind the scene, it is Three.js doing all the heavy lifting. A Hello World scene in AFrame requires just few HTML lines to run
Create a new index.html
<!DOCTYPE html>
<html>
  <head>
  <!--AFrame version 1.7.0-->
  <script src="https://aframe.io/releases/1.7.0/aframe.min.js"></script>
  </head>
    <body>
    <a-scene>
      <a-box position="-1 0.5 -3" rotation="0 45 0" color="#4CC3D9"></a-box>
      <a-entity geometry="primitive: box;  width: 1; height: 1; depth: 1"
          material="color: red; shader: standard;"
          rotation="0 45 0" position="-1 1.7 -3"></a-entity>
      <a-sphere position="0 1.25 -5" radius="1.25" color="#EF2D5E"></a-sphere>
      <a-cylinder position="1 0.75 -3" radius="0.5" height="1.5" color="#FFC65D"></a-cylinder>
      <a-plane position="0 0 -4" rotation="-90 0 0" width="4" height="4" color="#7BC8A4"></a-plane>
      <a-sky color="#ECECEC"></a-sky>
    </a-scene>
  </body>
</html>

At the top of the index.html file, the AFrame library is loaded. In the body of the page, the HTML tag a-scene defines the AFrame scene. AFrame is based on a entity-component system: the scene contains a series of objects, called entitiesa-entity, they could be generic or based on primitives (e.g. box, sphere, cylinder, plane and sky).
An a-entity by itself does not display anything. It is just a placeholder, a general-purpose object that needs one or more components to define:
- its appearance (e.g. geometry, position, rotation, colour)
- its behaviour (e.g. animation, event listeners), and/or other functionality
For example, the primitive a-box can be written also as a-entity geometry="primitive: box".
In addition to the standard console, it is possible to access an additional debug interface by pressing Ctrl+Alt+i on Windows or Ctrl+Option+i on MacOS. This custom interface can be used to control the scene, however, to save the values and update the code the external add-on aframe-watcher is needed.

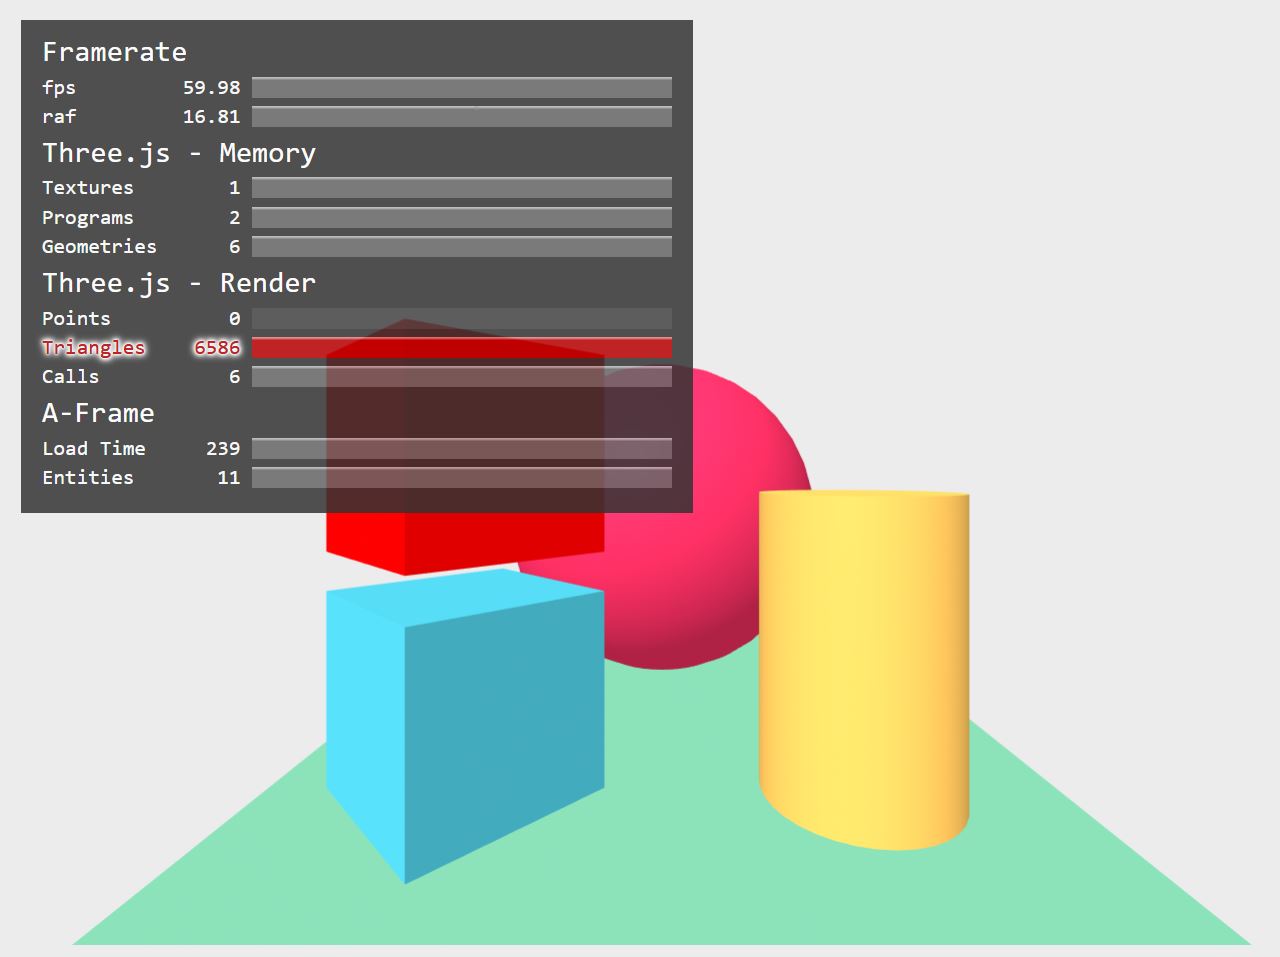
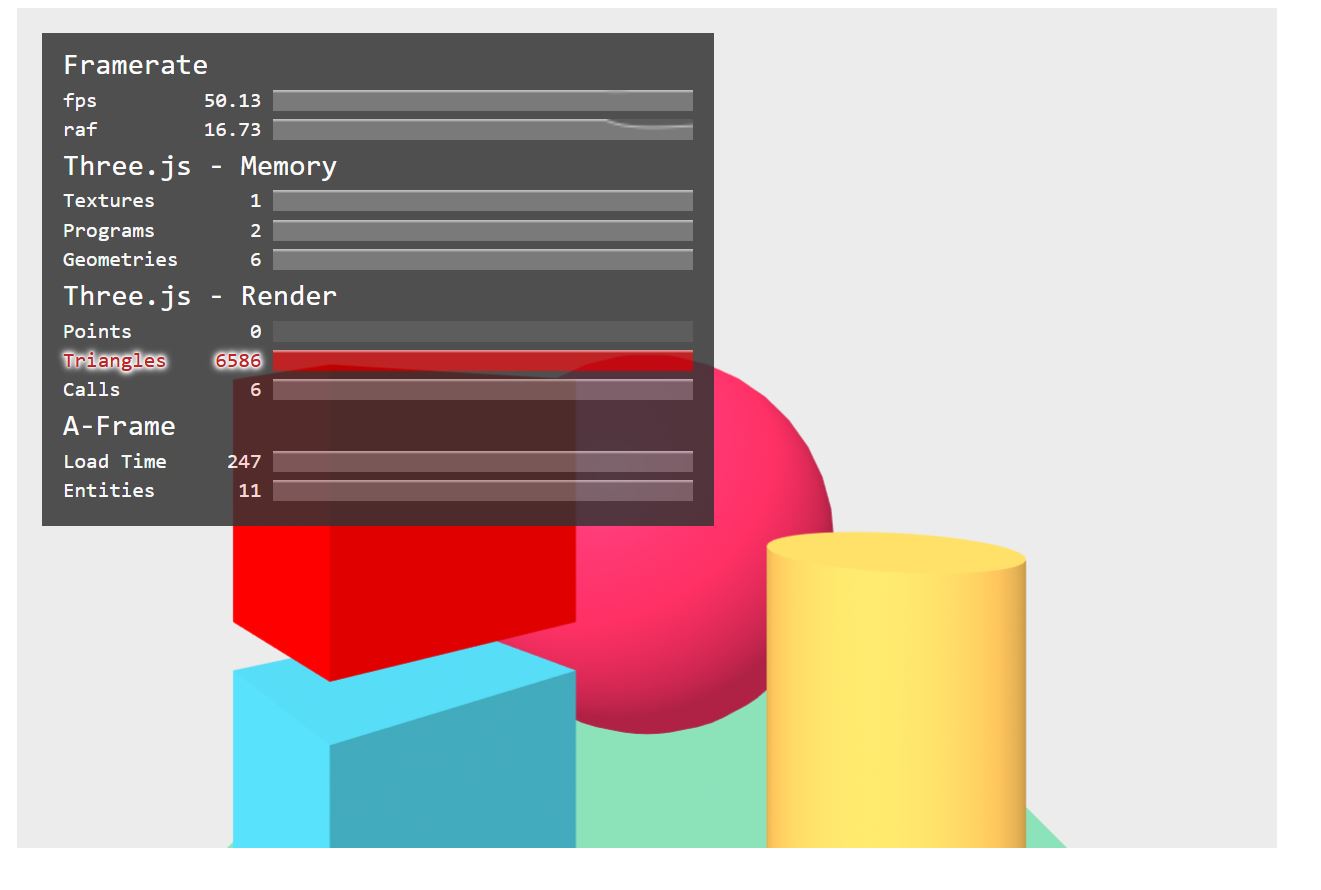
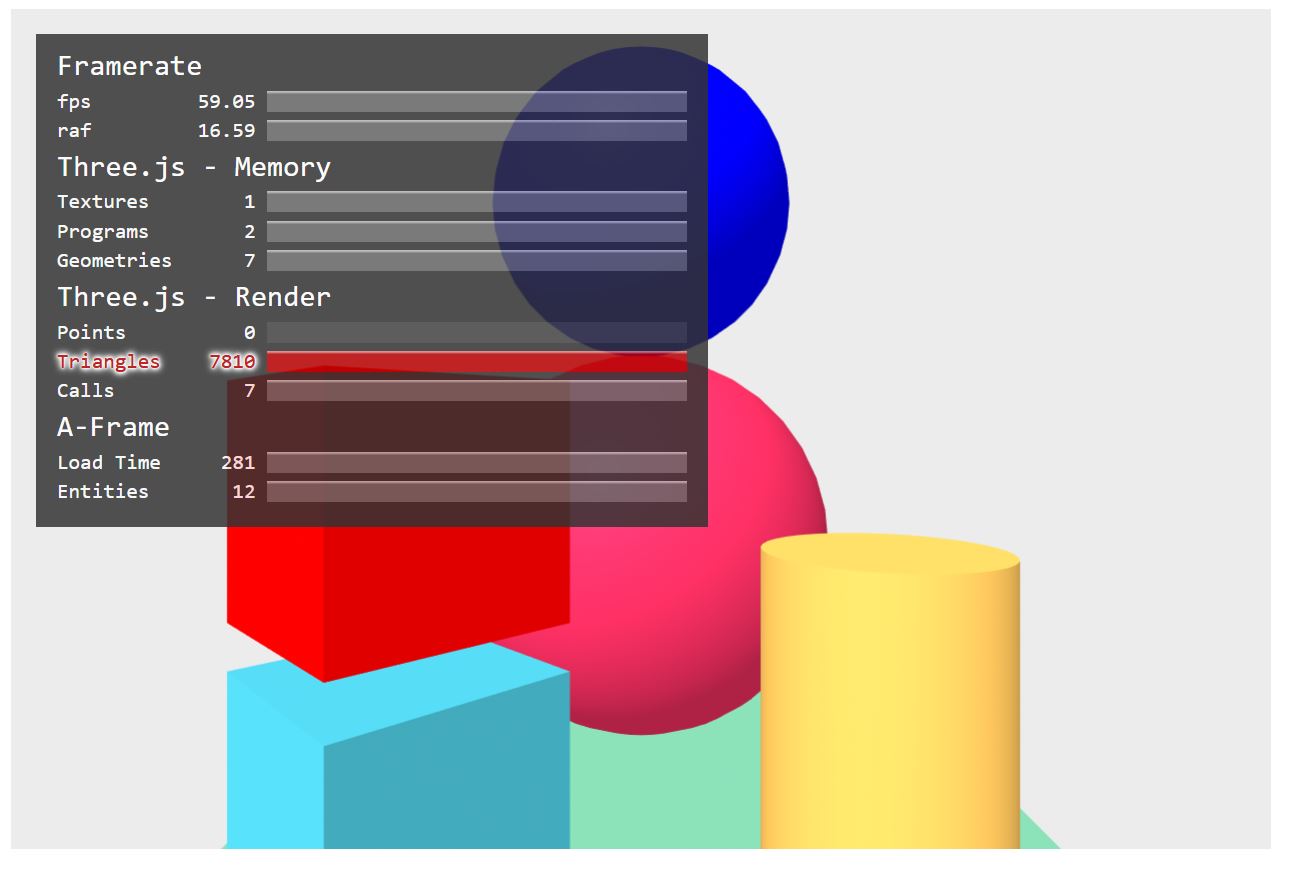
HTML attributes (or components in AFrame) are used to extend AFrame functionalities. For example, by adding the inbuilt component stats to the a-scene it is possible to overlay some useful information about the scene, such as frames per second, the number of textures and triangles and other performance values. The component xr-mode-ui="enabled: false" is used to disable the XR button on the bottom right corner of the scene.
<a-scene stats xr-mode-ui="enabled:false">
An AFrame scene does not need to be full screen. It can be embedded in any web page using the component embedded. We just need to set the size of the a-scene element in the CSS of the page (between the style element in the head of the page or in an external CSS)
<style>
  a-scene {
    height: 60vh;
    width: 50vw;
  }
</style>
The embedded component needs to be added to the a-scene. It is possible to wrap the entire a-scene in a DIV element if we need more control over the composition of the web page
<body>
  <div id="myEmbeddedScene">
    <a-scene embedded stats xr-mode-ui="enabled: false" >
    <!-- ... -->
    </a-scene>
  </div>
</body>
To control the FOV (field of view) and height of the point of view we need to define a a-camera element.
- Just before the end of the AFrame
a-sceneadd aa-camera - add the components
fov=60position="0 2 0
<!-- ... -->
<a-camera fov="60" position="0 2 0"></a-camera>
<!-- ... -->
Any AFrame scene can be modified just using HTML. To add a blue sphere on the top of the existing one:
- add a new
a-spherewithin thea-scene - add the components:
position="0 3.5 -5"radius="1"color="blue"
<a-scene embedded xr-mode-ui="enabled: false">
  <a-sphere
    position="0 3.5 -5"
    radius="1"
    color="blue">
  </a-sphere>
<a-box position="-1 0.5 -3" rotation="0 45 0" color="#4CC3D9"></a-box>
It is also possible to import external assets, like images and digital models. A good practice is to add the models to the Asset Management Systema-assets of the scene. The Asset Management System is used to preload 3D models, sounds, images, videos etc. that will be used in the scene. Download the panoramic image and place it in the project folder (e.g. ./resources/imgs/)
- remove the geometry entities within the
a-sceneelement - create the Asset Management System using
a-assetstag after thea-scenetag - add the image tag with an unique ID and the path to the image
img id="sky" src="./resources/imgs/celab.webp" - add an
a-skyentitya-sky radius="1.6" src="#sky", the radius must be the same height of the camera used to take the panorama image - add a
a-cameraentitya-camera position="0 0 1", by default AFrame set the camera height to 1.6
<a-scene>
  <a-asset>
    <img id="sky" src="./resources/imgs/celab.webp" />
  </a-asset>

  <a-sky radius="2" src="#sky"></a-sky>
  <a-camera wasd-controls-enabled="false" position="0.2 0 0"></a-camera>
</a-scene>

More complex geometries can be added to the scene using GLTF model
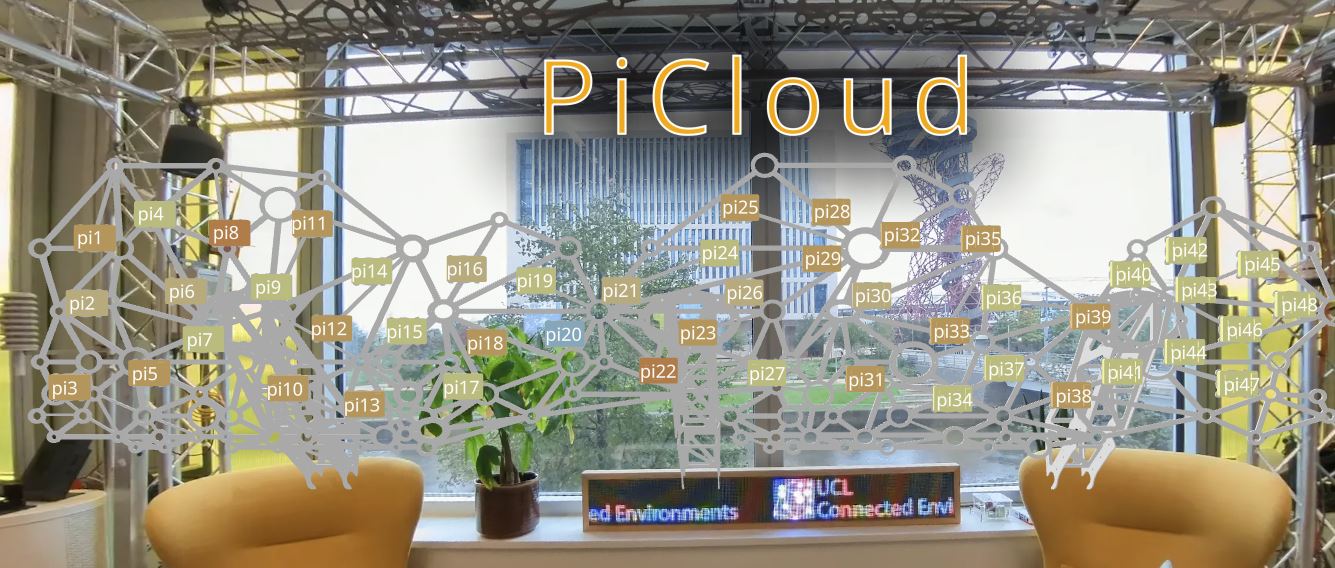
- download the two GLB models,
PiCloud FrameandPiCloud RPisto a folder of the project (e.g../resources/models/), and add them to the Asset Management Systema-asset
<a-asset>
  <img id="sky" src="./resources/imgs/celab.webp" />
  <a-asset-item id="PiFrame" src="resources/models/Picloud_FrameDraco.glb"> </a-asset-item>
  <a-asset-item id="PiRpis" src="resources/models/Picloud_RpisDraco.glb"> </a-asset-item>
</a-asset>
- add the three models to the
a-sceneusing an emptya-entityas an empty container, inside this entity create other twoa-entitywith attributegltf-modelpointing at the unique ID of glb file
<a-entity id="container" position="0 0 -0.03" rotation="0 90 180">

  <a-entity id="_piCloudFrame" gltf-model="#PiFrame" scale="0.2 0.2 0.2" rotation="90 0 0" position="0 0 0"></a-entity>

  <a-entity id="_piCloudRpis" gltf-model="#PiRpis" scale="0.2 0.2 0.2" rotation="90 0 0" position="0 0 0"></a-entity>

</a-entity>
It is possible to organise the a-entity tags using the HTML tree structure. To add some text to the scene we can use the a-troika-text entity within the a-entity with id="container".
<script src="https://unpkg.com/aframe-troika-text/dist/aframe-troika-text.min.js"></script>
The a-troika-text element can be added with multiple parameters to customise the appearance of the text
<a-entity id="container" position="0 0 0" rotation="0 90 0">
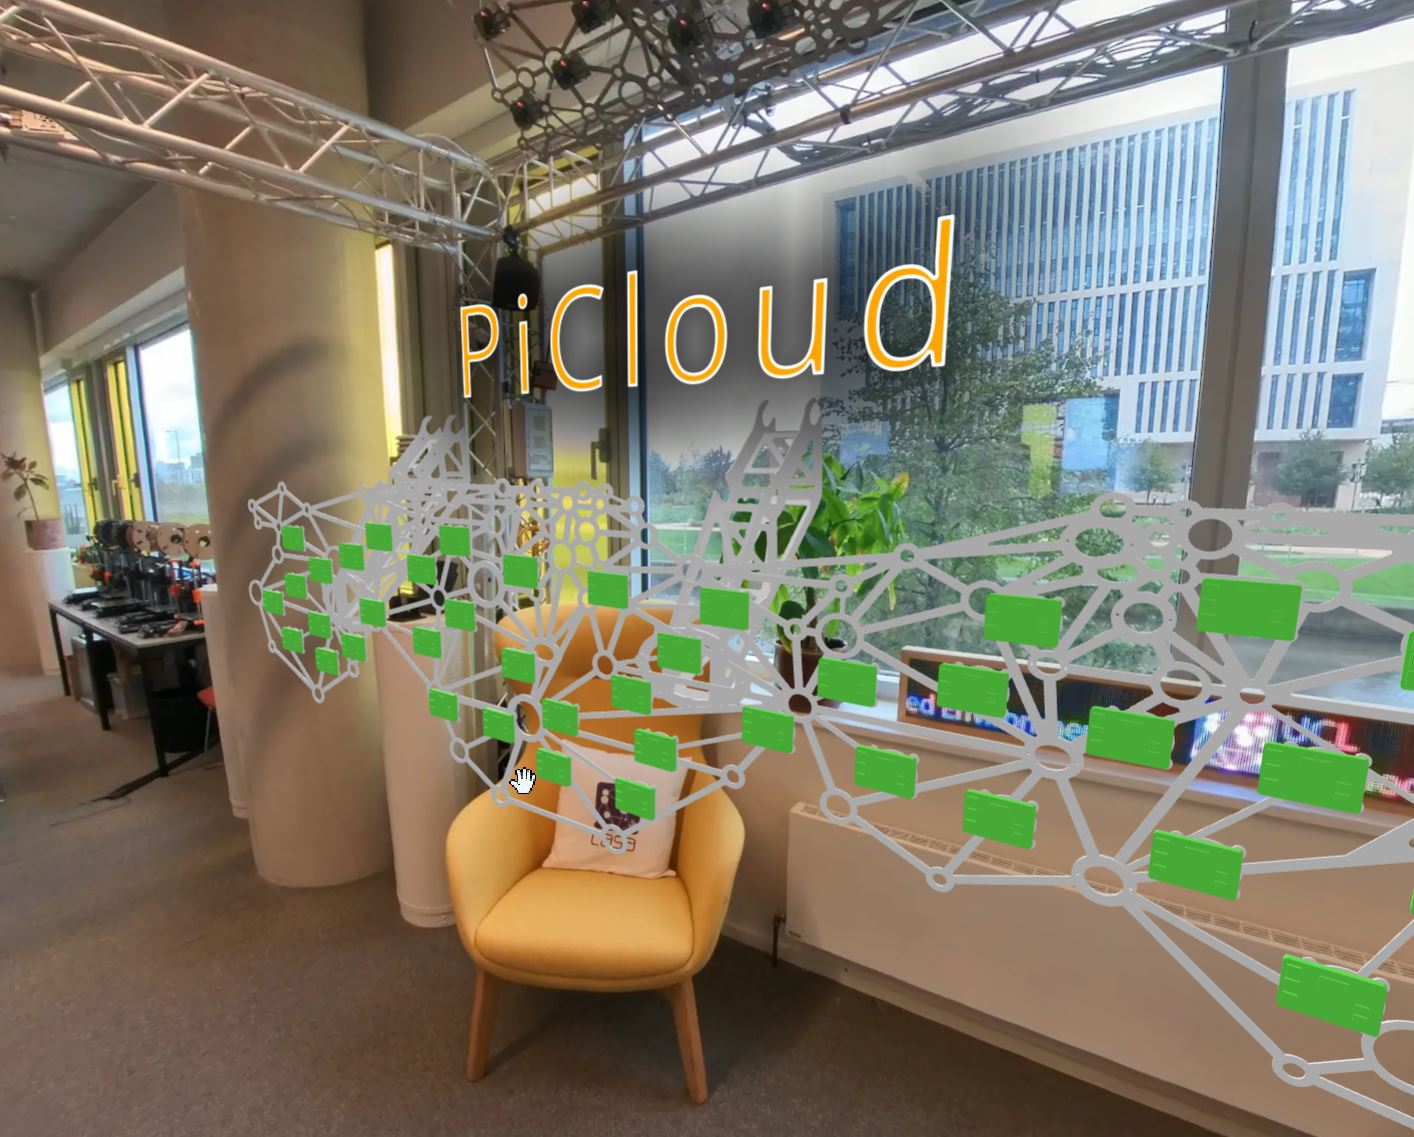
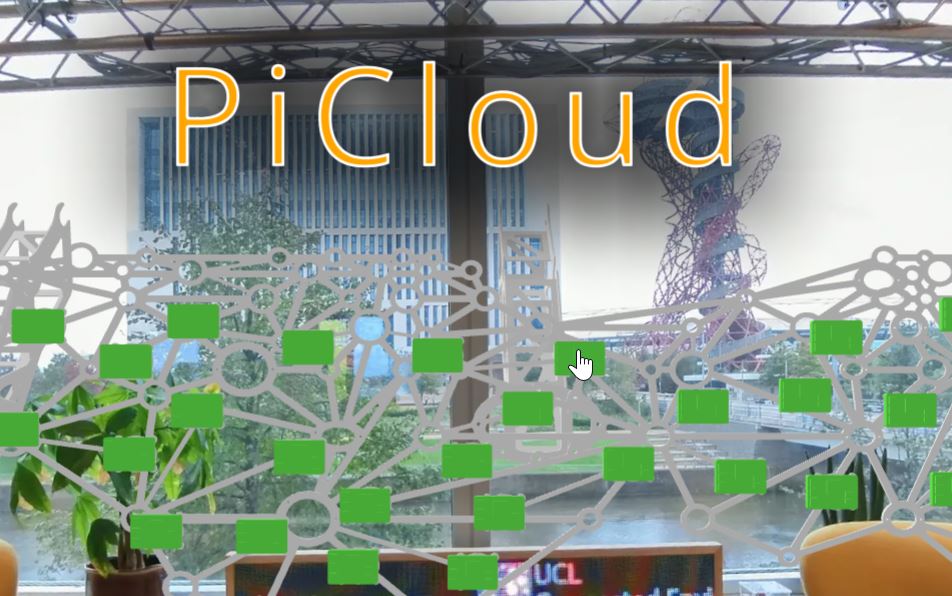
<a-troika-text id="title" value="PiCloud" color="orange" stroke-color="white"
stroke-width="0.001" font-size="0.05" outline-blur="0.05" letter-spacing="0.1" width="1" anchor="center" position="0 -0.12 0" rotation="0 0 180"></a-troika-text>
<a-entity id="_piCloudFrame" gltf-model="#PiFrame" scale="0.2 0.2 0.2" rotation="90 0 0" position="0 0 0"></a-entity>
<a-entity id="_piCloudRpis" gltf-model="#PiRpis" scale="0.2 0.2 0.2" rotation="90 0 0" position="0 0 0"></a-entity>
</a-entity>

a-scene has an attribute renderer that can be use to improve the final aspect of the scene, however, certain settings (e.g. antialias or physicallyCorrectLights) might be too demanding on older hardware
<a-scene
renderer="antialias: true;
        colorManagement: true;
        sortTransparentObjects: true;
        ">
The current camera does not allow us to properly see the added models, however, moving the camera to a new position will solve just half of the problem. A better solution is to use a different camera, like the ThreeJSOrbitControls. A ready-made component for AFrame can be used to add this camera in the scene aframe-orbit-controls. the full list of attribute is provided at https://www.npmjs.com/package/aframe-orbit-controls
- add the script after the AFrame library
<head>
  <!--AFrame version 1.7.0-->
  <script src="https://aframe.io/releases/1.7.0/aframe.min.js"></script>
  <!-- AFrame Troika Text -->
  <script src="https://unpkg.com/aframe-troika-text/dist/aframe-troika-text.min.js"></script>
  <!-- AFrame Orbit Control -->
    <script src="https://unpkg.com/aframe-orbit-controls@1.3.2/dist/aframe-orbit-controls.min.js"></script>
</head>
- remove the existing camera and add a new one with the component
orbit-controls
    <a-entity camera rotation="0 90 0" look-controls="enabled:false" orbit-controls="target: 0 0 0;
                    minDistance: 0.3;
                    maxDistance: 0.3;
                    initialPosition: 0 0 0.3;
                    dampingFactor:0.05;
                    minAzimuthAngle:-45;
                    maxAzimuthAngle:45;
                    minPolarAngle:30;
                    maxPolarAngle:120;
                    rotateSpeed:5"></a-entity>
While certain experiences can be fully created using A-Frame and WebXR, in most cases, we will need to blend traditional web UI design and HTML components with the immersive capabilities of WebGL.
In this case, we are going to add a side drawer that is used to display the real-time data gathered from MQTT. There are several ways of creating a drawer using various web technologies. In this example, we are using one solution that is based exclusively on CSS, pure-drawer.
The first step is to download the pure-drawer.css and create a new stylesheet named style.css, and place both of them in the head of the index.
The content of the style.css will be the following:
body{
    margin : 0px;
    overflow: hidden;
}
/* Pure Drawer mod */

.pure-drawer{
    width: 50%;
}

/*Menu Text*/

.container-content{
    overflow: auto;
    height: calc(100vh - 100px);
    margin-top: 100px;
  }
  .title-menu{
    margin: 0px 15px 0 15px;
    font-family: 'Inter';
    font-style: normal;
    font-weight: 700;
    font-size: 40px;
    line-height: 48px;
    color: #FFFFFF;
    text-shadow: 0px 4px 4px rgba(0, 0, 0, 0.25);
  }

  .red-text{
    color: rgb(241, 64, 64);
  }
  .white-text{
    color: white;
  }

  .subtitle-menu::first-line{

    line-height: 30px;
  }
  .subtitle-menu{
    margin: 0px 15px 0 15px;
    font-family: 'Inter';
    font-style: italic;
    font-weight: 400;
    font-size: 18px;
    line-height: 22px;
    color: #FFFFFF;
    text-shadow: 0px 4px 4px rgba(0, 0, 0, 0.25);
  }

  .content-menu{
    margin: 23px 15px 23px 15px;
    font-family: 'Inter';
    font-style: normal;
    font-weight: 400;
    font-size: 18px;
    line-height: 28px;
    color: #FFFFFF;
  }

  /* unvisited link */
a {
  text-decoration: none;
  color: #1FC08E;
  font-weight: 700;
}

/*  link red */
a:link {
  color: #1FC08E;
  font-weight: 700;
}

/* visited link green */
a:visited {
  color: #1FC08E;
}

/* mouse over link hotpink*/
a:hover {
  color: #1FC08E;
}

/* selected link blue */
a:active {
  color: #1FC08E;
}
<!-- Styles -->
  <link rel="stylesheet" type="text/css" href="resources/css/pure-drawer.css" />
  <link rel="stylesheet" type="text/css" href="resources/css/style.css" />
Next, we need to modify the HTML to accommodate the drawer, its content, and the A-Frame scene.
The basic structure for the drawer is as follows (as from he documentation)
<div class="pure-container" data-effect="pure-effect-slide">
    <input type="checkbox" id="pure-toggle-left" class="pure-toggle" data-toggle="left">
    <label class="pure-toggle-label" for="pure-toggle-left" data-toggle-label="left">
        <span class="pure-toggle-icon"></span>
    </label>

    <div class="pure-drawer" data-position="left">
        Put your off canvas content here
    </div>
    <div class="pure-pusher-container">
        <div class="pure-pusher">
            Put your site content here
        </div>
    </div>
    <label class="pure-overlay" for="pure-toggle-left" data-overlay="left"></label>
</div>
Our placeholder and the rest of the page will look like this
<body>
<div class="pure-container" data-effect="pure-effect-slide">
<input type="checkbox" id="pure-toggle-left" class="pure-toggle" data-toggle="left" />
<label class="pure-toggle-label" for="pure-toggle-left" data-toggle-label="left">
<span class="pure-toggle-icon"></span>
</label>
<nav class="pure-drawer" data-position="left">
<div class="container-content">
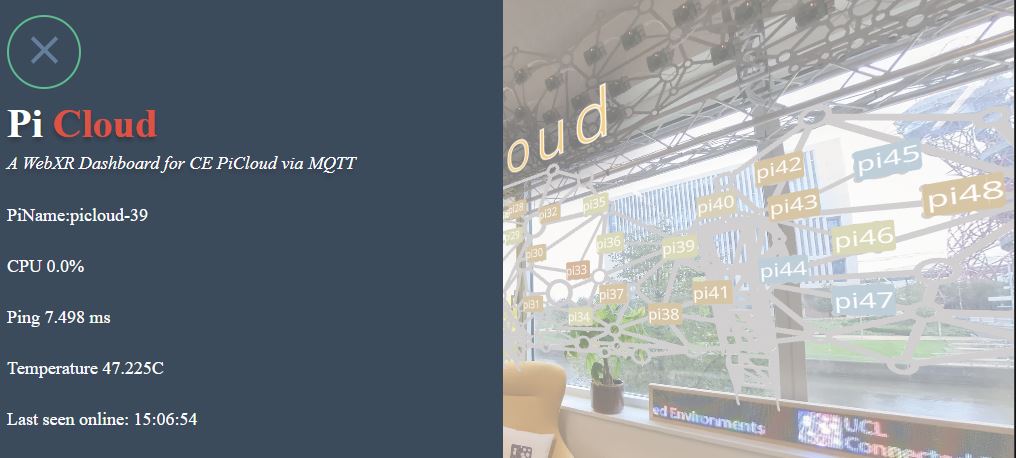
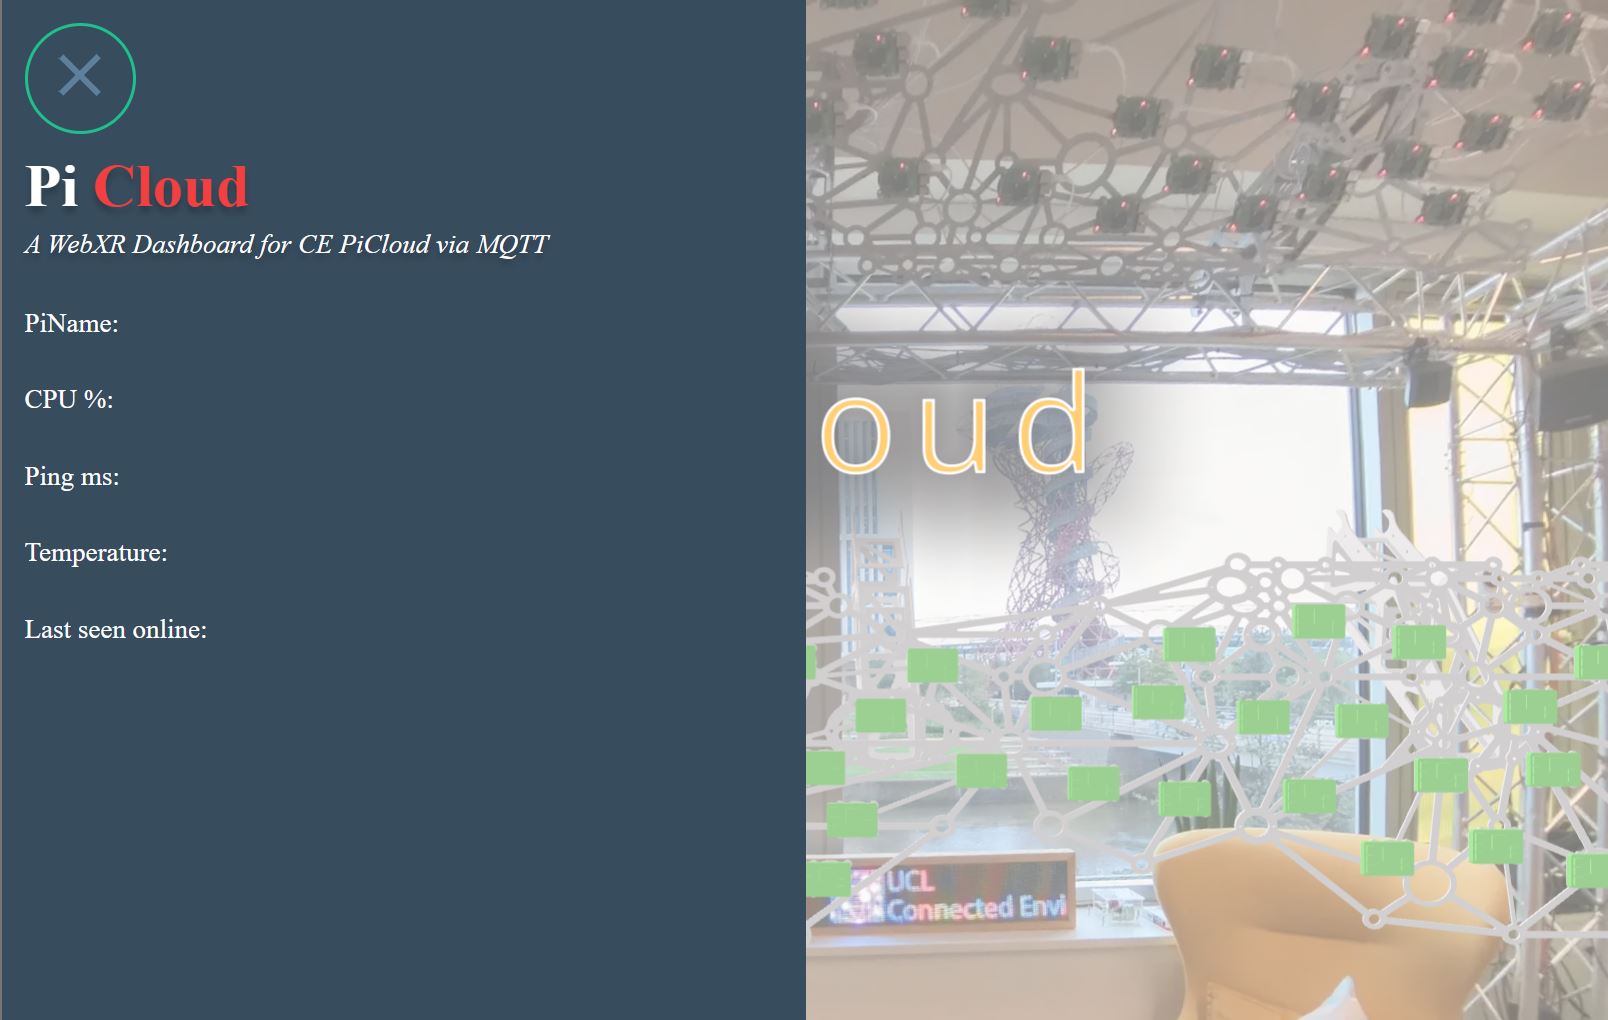
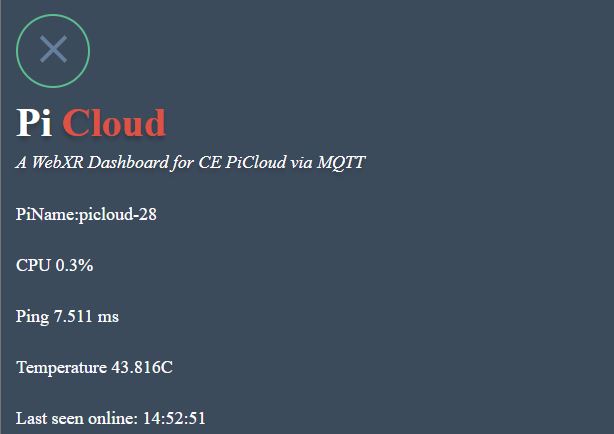
<p class="title-menu"> Pi<span class="red-text"> Cloud</span></p>
<p class="subtitle-menu">A WebXR Dashboard for CE PiCloud via MQTT </p>
<p class="content-menu">
<p id="ip_hostname" class="content-menu">PiName: </p>
<p id="cpu_percent" class="content-menu">CPU %: </p>
<p id="ping_ms" class="content-menu">Ping ms: </p>
<p id="temp" class="content-menu">Temperature: </p>
<p id="heartbeat" class="content-menu">Last seen online: </p>
<br />
</p>
</div>
</nav>
<div class="pure-pusher-container">
<div class="pure-pusher">
<a-scene cursor="rayOrigin: mouse" raycaster="objects: .collidable" renderer="antialias: true;
colorManagement: true;
sortTransparentObjects: true;
">
<a-asset>
<img id="sky" src="./resources/imgs/celab.webp" />
<a-asset-item id="PiFrame" src="resources/models/Picloud_FrameDraco.glb"> </a-asset-item>
<a-asset-item id="PiRpis" src="resources/models/Picloud_RpisDraco.glb"> </a-asset-item>
</a-asset>
<a-entity id="container" position="0 0 -0.03" rotation="0 90 180">
<a-troika-text id="title" value="PiCloud" color="orange" stroke-color="white"
stroke-width="0.001" font-size="0.05" outline-blur="0.05" letter-spacing="0.1" width="1"
anchor="center" position="0 -0.12 0" rotation="0 0 180"></a-troika-text>
<a-entity id="_piCloudFrame" gltf-model="#PiFrame" scale="0.2 0.2 0.2" rotation="90 0 0" position="0 0 0"></a-entity>
<a-entity id="_piCloudRpis" class="collidable" gltf-model="#PiRpis" scale="0.2 0.2 0.2"rotation="90 0 0" position="0 0 0"></a-entity>
</a-entity>
<a-sky radius="1.6" src="#sky"></a-sky>
<a-entity camera rotation="0 90 0" look-controls="enabled:false" orbit-controls="target: 0 0 0;
minDistance: 0.3;
maxDistance: 0.3;
initialPosition: 0 0 0.3;
dampingFactor:0.05;
minAzimuthAngle:-45;
maxAzimuthAngle:45;
minPolarAngle:30;
maxPolarAngle:120;
rotateSpeed:5"></a-entity>
</a-scene>
</div>
</div>
<label class="pure-overlay" for="pure-toggle-left" data-overlay="left"></label>
</div>
</body>
As we have seen, AFrame components are used to further extend the functionalities of the scene (e.g. orbit-controls). It is possible to create custom components in JavaScript. Before its use, a component needs to be registered using a specific syntax
AFRAME.registerComponent("name-of-the-component", {
  init: function () {
    myFunction;
  },
});
The custom component can be used to interact with the scene using the mouse cursor or touch gestures. For doing that We need to inform the a-scene that we are going to use the raycaster component only on the entities of class .collidable and with origin from the mouse cursor
<a-scene
  cursor="rayOrigin: mouse"
  raycaster="objects: .collidable"
  renderer="antialias: true;
    colorManagement: true;
    sortObjects: true;
    physicallyCorrectLights: true;
    "
></a-scene>
And add the same class to the a-entity id="_piCloudRpis"
Create a new file custom-components.js in the ./resources/js/ folder.
The first component we are going to create will automatically generate a label for each of the Rpi in the scene. While we could do this manually, it would be a long and tedious task. Since the 3D model has already been created with a different ID for each of the Rpi, we can reuse this information.
 AFRAME.registerComponent('label-meshes', {
    init: function () {
      const el = this.el;
      let i=0
      el.addEventListener('model-loaded', () => {
        const object3D = el.getObject3D('mesh');
        if (!object3D) return;
        object3D.traverse((node) => {
          if (node.isMesh) {
            i=i+1
            const textEl = document.createElement('a-entity');
            textEl.setAttribute('id','picloudLabel-'+(i).toString())
            textEl.setAttribute('troika-text', {
              value: node.name,
              color: 'white',
              fontSize: 0.04,
              align: 'center',
            });
            textEl.setAttribute('rotation', '270 0 180');
            textEl.object3D.position.copy(node.position);
            textEl.object3D.position.y += 0.01; // Adjust the height as needed
            el.appendChild(textEl);
          }
        });
      });
    }
  });
To activate the component, we need to add the script to the head of the index.html
<script src="./resources/js/custom-components.js"></script>
and to add the entity a-entity id="_piCloudRpis"
 <a-entity id="_piCloudRpis" label-meshes class="collidable" gltf-model="#PiRpis"
  scale="0.2 0.2 0.2" rotation="90 0 0" position="0 0 0"></a-entity>

The second component we are going to create will allow us to control the opening and closing of the drawer by clicking on the Rpis in the scene. Create a new AFrame.RegisterComponent in the custom-components.js file
AFRAME.registerComponent("click-handler", {
    init: function () {
      var el = this.el;
      var rayEl = document.querySelector("[raycaster]").components;
      var drawerOpen = false;

      el.addEventListener("click", function (evt) {
        let intersects = rayEl.raycaster.intersectionDetail.intersections;

        if (intersects.length > 0) {
          console.log(intersects);

          for (var interObj of intersects) {
              if (interObj.object.name.startsWith("pi")) {

                let name=interObj.object.name.slice(2);
                let piName=interObj.object.el.querySelector('#picloud-'+name)
                console.log(piName);


                var Chkinput = document.getElementById("pure-toggle-left");
                Chkinput.click();
                drawerOpen = true;
                break;
              }

          }
        }
      });

      //Event listener to close the drawer and stop updating
      document.getElementById("pure-toggle-left").addEventListener("click", function () {
        drawerOpen = !drawerOpen;
      });
    },
  });
Also this component is going to be added to the entity a-entity id="_piCloudRpis"
<a-entity id="_piCloudRpis" label-meshes click-handler class="collidable" gltf-model="#PiRpis"
  scale="0.2 0.2 0.2" rotation="90 0 0" position="0 0 0"></a-entity>
Now, the drawer will open every time one of the Rpi is clicked
A custom component can also be used to interface with other JavaScript libraries, for example MQTT.js.
To start, add the MQTT.js script in the head of the index.html
<!--AFrame version 1.7.0-->
<script src="https://aframe.io/releases/1.7.0/aframe.min.js"></script>
<!-- AFrame Troika Text -->
<script src="https://unpkg.com/aframe-troika-text/dist/aframe-troika-text.min.js"></script>
<!-- AFrame Orbit Control -->
<script src="https://unpkg.com/aframe-orbit-controls@1.3.2/dist/aframe-orbit-controls.min.js"></script>
<!--MQTT.js 4.3.7-->
    <script src="https://unpkg.com/mqtt@4.3.7/dist/mqtt.min.js"></script>
<script src="./resources/js/custom-components.js"></script>
Then, in the custom-components.js, create a new component pi-cloud-data, this will be one that connect to the mqtt broker and need to be added to the a-scene
AFRAME.registerComponent('pi-cloud-data', {
init: function () {
//Create a new client - client variable need to be create globally on top of the file
  client = mqtt.connect("ws://ADDRESS.TO.BROKER:8080");

  client.on("connect", () => {
  console.log("Connected");
});
client.on("error", (error) => {
  console.log(error);
});

const state = {}; //Object to store all data about the RPis

client.on('message', (topic, message) => {

// This part uses the .match() method to search for one or more digits (\d+) in a string. ? is the Optional Chaining used to safely access properties of an object that might be null or undefined. If the .match() method doesn't find any digits, it returns null, and the optional chaining operator prevents an error by stopping further evaluation. Finally, [0], if a match is found, it returns an array of matches.
const idRpi = topic.match(/\d+/)?.[0]

if(idRpi){
if (!state[idRpi]) {
  state[idRpi] = {
      temp: null,
      ip_hostname: null,
      ping_ms: null,
      cpu_percent: null
  };
}
let modelEl = document.querySelector('#picloud-'+idRpi.toString());

if(topic.includes('temp')){
  state[idRpi].temp=message.toString()
}

if(topic.includes('ip_hostname')){
  state[idRpi].ip_hostname=message.toString()
}
if(topic.includes('ping_ms')){
  state[idRpi].ping_ms=message.toString()
}
if(topic.includes('cpu_percent')){
  state[idRpi].cpu_percent=message.toString()
}
if(topic.includes('heartbeat')){
  state[idRpi].heartbeat=message.toString()
}

modelEl.setAttribute('mqtt-data',{
  temp_c:state[idRpi].temp,
  cpu_percent:state[idRpi].cpu_percent,
  ip_hostname:state[idRpi].ip_hostname,
  ping_ms:state[idRpi].ping_ms,
  heartbeat:state[idRpi].heartbeat
})
  }
})
}
});
In order to access the client and the data from other components, we are going to create two global variables at the very top of the custom-components.js:
let client;let mqttData;we will need this later
Components in AFrame can also be used to hold data that can be reused later. In this case, the component will have a schema defining the type of data it will hold.
AFRAME.registerComponent('mqtt-data', {
    schema: {
      temp_c: {type: 'string', default: ''},
      cpu_percent: {type: 'string', default: ''},
      ip_hostname: {type: 'string', default: ''},
      ping_ms: {type: 'string', default: ''},
      heartbeat: {type: 'string', default: ''}
    },
  });
Finally, we need to subscribe to the topics. Instead of doing this in the pi-cloud-data, we will create another component that will be attached automatically to each RPi label, using their id as input for the topic to subscribe.
AFRAME.registerComponent('mqtt-controller-pi', {

  init: function () {
    this.startMqtt(client); //if connected, subscribe to the topics
  },

  startMqtt: function (client) {
    let id=this.el.id
    console.log(id);
    client.subscribe(`student/PiCloud/${id}/temp_c`);
    client.subscribe(`student/PiCloud/${id}/cpu_percent`);
    client.subscribe(`student/PiCloud/${id}/ip_hostname`);
    client.subscribe(`student/PiCloud/${id}/ping_ms`);
    client.subscribe(`student/PiCloud/${id}/heartbeat`);
  },
  stopMqtt: function (client) {
      client.end(true);
      console.log('connection closed');
  }
});
To attach the mqtt-controller-pi and mqtt-data we are going to modify the label-mesh component by adding, at its end the following block of code
 el.appendChild(textEl);//already in the component
    const mqttControllerEl = document.createElement('a-entity');
    mqttControllerEl.setAttribute('id','picloud-'+(i).toString())
    mqttControllerEl.setAttribute('mqtt-controller-pi','')
    mqttControllerEl.setAttribute('mqtt-data','')

    el.appendChild(mqttControllerEl);
And to update the drawer we can now add, to the click-handler component, just before the break the following block of code
  mqttData=piName.getAttribute('mqtt-data') //this is a new variable to store globally the mqtt data received

  var Chkinput = document.getElementById("pure-toggle-left");
  Chkinput.click();
  drawerOpen = true;

//Start updating the text continuously
  updateText(interObj);

  document.getElementById("ip_hostname").innerText=`PiName:${mqttData.ip_hostname}`
  document.getElementById("cpu_percent").innerText=`CPU ${mqttData.cpu_percent}%`
  document.getElementById("ping_ms").innerText=`Ping ${mqttData.ping_ms} ms`
  document.getElementById("temp").innerText= `Temperature ${mqttData.temp_c}C`
  document.getElementById("heartbeat").innerText = `Last seen online: ${mqttData.heartbeat}`;

  break
the updateText(interObj) is a function that need to be declare outside the el.addEventListener("click", function (evt) {}
 function updateText(interObj) {
  if (drawerOpen) {

    document.getElementById("ip_hostname").innerText=`PiName:${mqttData.ip_hostname}`
    document.getElementById("cpu_percent").innerText=`CPU ${mqttData.cpu_percent}%`
    document.getElementById("ping_ms").innerText=`Ping ${mqttData.ping_ms} ms`
    document.getElementById("temp").innerText= `Temperature ${mqttData.temp_c}C`
    document.getElementById("heartbeat").innerText = `Last seen online: ${mqttData.heartbeat}`;

    // Request the next frame to keep updating
    requestAnimationFrame(() => updateText(interObj));
  }
}
//Event listener to close the drawer and stop updating
document.getElementById("pure-toggle-left").addEventListener("click", function () {
  drawerOpen = !drawerOpen;
});
The updated click-handler component will look like this
AFRAME.registerComponent("click-handler", {
    init: function () {
      var el = this.el;
      var rayEl = document.querySelector("[raycaster]").components;
      var drawerOpen = false;

      el.addEventListener("click", function (evt) {
        let intersects = rayEl.raycaster.intersectionDetail.intersections;

        if (intersects.length > 0) {
          console.log(intersects);

          for (var interObj of intersects) {
              if (interObj.object.name.startsWith("pi")) {

                let name=interObj.object.name.slice(2);
                let piName=interObj.object.el.querySelector('#picloud-'+name)
                console.log(piName);
                mqttData=piName.getAttribute('mqtt-data')

                var Chkinput = document.getElementById("pure-toggle-left");
                Chkinput.click();
                drawerOpen = true;

               //Start updating the text continuously
               updateText(interObj);

               document.getElementById("ip_hostname").innerText=`PiName:${mqttData.ip_hostname}`
               document.getElementById("cpu_percent").innerText=`CPU ${mqttData.cpu_percent}%`
               document.getElementById("ping_ms").innerText=`Ping ${mqttData.ping_ms} ms`
               document.getElementById("temp").innerText= `Temperature ${mqttData.temp_c}C`
               document.getElementById("heartbeat").innerText = `Last seen online: ${mqttData.heartbeat}`;
                break;
              }
          }
        }
      });

      function updateText(interObj) {
        if (drawerOpen) {
          document.getElementById("ip_hostname").innerText=`PiName:${mqttData.ip_hostname}`
          document.getElementById("cpu_percent").innerText=`CPU ${mqttData.cpu_percent}%`
          document.getElementById("ping_ms").innerText=`Ping ${mqttData.ping_ms} ms`
          document.getElementById("temp").innerText= `Temperature ${mqttData.temp_c}C`
          document.getElementById("heartbeat").innerText = `Last seen online: ${mqttData.heartbeat}`;

          // Request the next frame to keep updating
          requestAnimationFrame(() => updateText(interObj));
        }
      }

      //Event listener to close the drawer and stop updating
      document.getElementById("pure-toggle-left").addEventListener("click", function () {
        drawerOpen = !drawerOpen;
      });
    },
  });
To improve the legibility of the data, we can introduce the possibility to change the colour of the models depending on the incoming MQTT messages. We are going to create a new function colorScaleFunction, using the D3js Library.
Once again, the first step is to add the D3.js library to the head of index.html, just before the MQTT script.
one the D3js library
<!--D3.js-->
<script src="https://d3js.org/d3.v7.min.js"></script>
The new function will be added to the pi-cloud-data component, and specifically to the event client.on('message') when a message with topic Temperature is received. To the conditional function
 if(topic.includes('temp')){
    state[idRpi].temp=message.toString()

    const colorScaleFunction =
    d3
    .scaleThreshold()
    .domain([34, 37, 40, 43, 46, 49, 52])
    .range([
      [0 / 255, 0 / 255, 255 / 255],    // Cold color (blue) just below 35
      [102 / 255, 204 / 255, 255 / 255],// Light blue
      [255 / 255, 255 / 255, 102 / 255],// Yellow
      [255 / 255, 204 / 255, 102 / 255],// Light orange
      [255 / 255, 153 / 255, 51 / 255], // Orange
      [252 / 255, 98 / 255, 32 / 255],  // Dark orange
      [255 / 255, 0 / 255, 0 / 255]     // Warm color (red) just over 50
    ]);

  // Function to find an Object3D by name
let foundObject = null;
modelEl.parentNode.object3D.traverse((node) => {
  if (node.name.includes(idRpi)) {
    foundObject = node;
    foundObject.material = foundObject.material.clone(); //as the material is the same for all model, I need to create a new one before change the colour
    foundObject.material.color.fromArray(colorScaleFunction(parseInt(message)))
    }
  })
}