Welcome
Welcome to Workshop 2 of Web Architecture. Over the course of the next 3 workshops you are going to learn how JavaScript interacts with a HTML page and how you can turn a static webpage into an interactive tool to explore datasets. Today you're going to learn the basics of JavaScript, how to debug a JavaScript program and build an interactive map to explore the Flickr photo data we uploaded into the MySQL database. We've provided you with all the HTML and CSS files you need to make the interactive map but we've omitted some of the code so as you work through the sheet you'll enable some more features of the app and by the end of the workshop you'll be able to explore the data (which are photos and relevant metadata) which is stored in the database.
Download the project zip file and extract the contents into your user folder. In the zip file you'll find a single HTML file, some images inside the img folder, a style file in the css folder and a new folder called js. This folder is where the JavaScript code lives and for this exercise, I've already created a file inside this folder called mapStyle.js. This file contains some style code for the Google map, which we will use later within the workshop. Open these files (index.html, mapStyle.js and style.css) with your text editor.
Update your Web Server for Chrome to serve this folder just like the last workshop.
Open index.html in Chrome and then open up the Developer Tools Inspector, which can be found in the settings menu, More Tools -> Developer Tools (Windows Version of Chrome) and on the Mac version in the View Menu (View Menu->Developer->Developer Tools). A useful shortcut to remember is that you can also right click on a page and select "Inspect element" to open developer tools on any webpage. Make sure you select the Console tab inside Developer Tools.
You'll see that you have an empty page on your browser (if you look on the Console window you'll see the an error on line 31. We will fix this is a minute.
The console allows developers to directly type in JavaScript commands and test code out before they add these commands to a JavaScript or HTML file. Try typing into the console:
console.log("Hello World"); // If you copy and paste this, it will not work! Can you see why?
The console.log() function is useful for debugging code and having a look at what values variables contain. You can pass any JavaScript object into the command it will display the contents inside the console (just like the print() command in Python). Try creating a variable called number, which contains the value 5, and then display the contents inside the console.
Preparing the Libraries
In this web app we have a few elements that have already been created in the HTML DOM for you. There is a container for a map (with the id "_map-canvas_") and a div (with the id "_displayWrapper_") that will show some information about the data we fetch from the database. You'll find 2 functions in the HTML file that you will be editing today. As we discussed in the Lecture we need to load some helper libraries into our webpage so that we can take advantage of using some simpler code to interact with the DOM.
Locate the section of the html file where we load external JavaScript files and using the lecture notes as reference load the external jQuery library. (Task 2.1)
Also have a look at the online jQuery documentation at W3 schools and try some of the example and tutorials to see what you can do with the library and test out some of the samples inside your own console.
Step 1 - Displaying the map
The next task is getting the map to show on the screen. We're going to use the Google Maps JavaScript API https://developers.google.com/maps/documentation/javascript/tutorial to display an interactive map on the page and add markers to the map to show the position of where each photo was taken by a user from the Flickr dataset.
As mentioned in the lecture, JavaScript is an event driven language, and the Google Maps library we need to run some code to setup the map on the page once the DOM has loaded. The Google Maps library provides a function that runs once the page loads and then runs another function that initialises the map.
Find the line that looks like: (Task 3.1)
google.maps.event.addDomListener(window, 'load', functionName);
Look at the functions declared inside the script tags and edit the line above to run the function initialize when the page has loaded. Now inside the function called initialise we need to pass the DOM element we want the map to appear on our webpage. Find the line that looks like: (Task 3.2)
map = new google.maps.Map(document.getElementById('element ID'), mapOptions);
The function document.getElementByID() returns the container from the HTML that we want to appear. Edit the above line in your HTML file to draw the map into the map canvas.
If you have edited everything correctly then you should see a map of London on the page.
Play around with the mapOptions variable to change the centre position of the map, the zoom level etc. If you explore the mapStyles.js file, you'll see that I've provided some map styles for you to play with. You'll see 2 variables defined within this file.
To add a style to the map, edit the mapOptions variable (which is an object) to look like this:
    var mapOptions = {
          center: { lat: 51.5, lng: -0.00},
          zoom: 9,
          maxZoom:18,   // Don't forget the comma on this line
          styles: STYLEVARIABLE
    };
Go to SnazzyMaps.com and have a look at other styles that they have created. You'll be able to copy and paste these styles from here on any Google Map. Add the style to the mapStyle.js file and then change the style variable in the above object to enable the new map style.
N.B. If you want to experiment and make your own custom styles in the future (not in todays workshop) then you can use the Google Maps Style Wizard to create your own styles:
Step 2 - Fetching the data from the API
Congratulations, you now should have an interactive map on your page. Next we are going to fetch some data from an API that I've setup on the course server that fetches the data from our Flickr photo database and serves this data to the browser.
If you look at the API page I've given you some examples of how to call the API to get the data we need:
We have 2 API functions available to our app. The first API call allows us to fetch all the photos in a specified radius around a lat/lng pair – Look how the URL is configured. Click the example link and have a look at the data that's returned. This is JSON (or JavaScript Object Notation).
This JSON object is an array of all the results returned from an SQL query we have ran on our server and allows you search the database by changing the variables within the URL.
Edit the URL variable in the code so that the lat, lng and radius variables are passed into the URL – Have a look at the example as a reference. (Task 4.1). Use the Lecture notes on string concatenation to help you form the valid URL and use the console.log() function to debug and check the URL format is correct.
Next, we need to create a loop to iterate through the array and do something with each row that was returned from the database query. Look for the jQuery function inside our code: (Task 4.2)
    $.getJSON(url, function(data)){
         ....
    }
This function will fetch the JSON data from a provided URL and, if successful, will store the results in a variable called data. Using the notes from the lecture and the documentation page for the jQuery each command (https://api.jquery.com/jquery.each) create a loop that will iterate through all the items in JSON object and use the console.log command to look at the data as it is being processed inside the loop. When you find the lat and lng values inside the JSON object then use those values to create the lat/lng variables on line 68.
Hint: Remember you can inspect the variables in the each loop anytime you want using console.log()
For Example:
    $.each(theArray, function(k,v){
        // k will represent the key of the array [0,1,2,3], and v the value
        .....
    });
When you've created the loop, you should start to see the markers appear on the page when you move the map. If not, you've done something wrong so look for any errors on the console and check the line number that the error has been reported on.
Next, we want to change the icon of the markers so that the map looks nicer - Those default markers are big and intrusive and don't help the user understand to our dataset. If you look in the img folder there is a custom icon that you can use to display your marker. Have a look at the Google Maps JavaScript library documentation for icons, which will show you how to change the marker icon (https://developers.google.com/maps/documentation/javascript/examples/icon-simple). Change the marker icon that represents a photo that is displayed on the map.
Hint: Look at the line of code where the marker is defined and add a new attribute that defines the icon. The section of code you need to edit looks starts like this: Line 72
    var marker = new google.maps.Marker({
         .....
    });
Lastly, we need add some code that tells the users of our web app the number of photos that was returned and are currently displayed on the screen (Task 4.3). Look at the jQuery documentation for the command html that writes html into a div (https://api.jquery.com/html) and reference the lecture notes so that at the end of the loop we calculate the length of the data array and write that result into the photoNum element in the DOM.
Hint: Look at https://www.w3schools.com/jsref/jsref_length_array.asp if you're stuck.
At the end of the workshop, as a class, we will discuss what the rest of the code in this sample app does.
Step 3 - Finishing the App
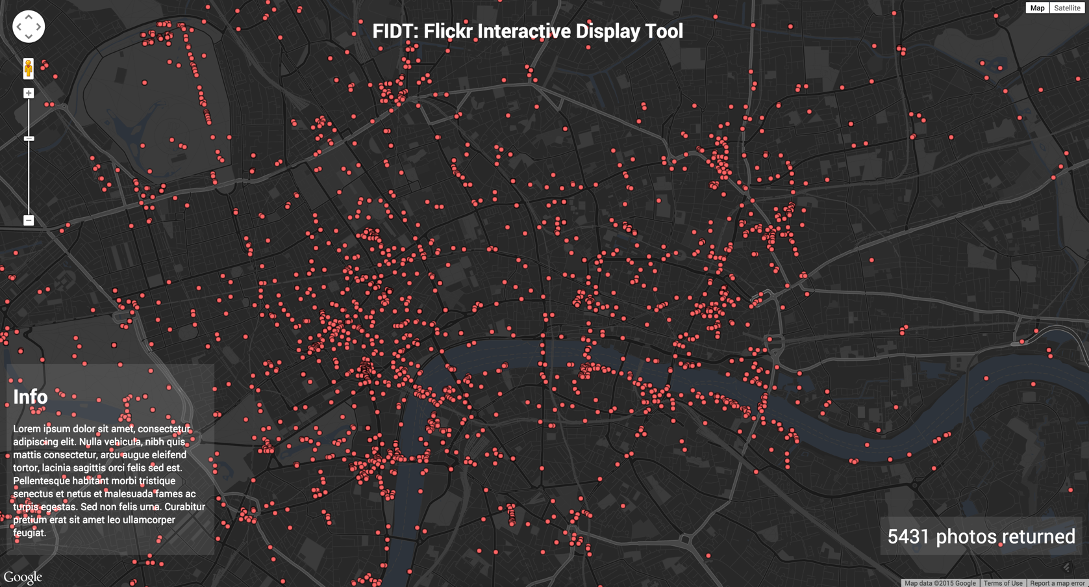
Our app is missing a few key components. Remember we need to tell a story about the data we are looking at, so we need to add a title to the page and some information about what the app is showing. Using the code you all ready have on the page, and the lecture notes from this week and last week, add a Title banner to the top of the map and a div on the left hand side of the screen that gives the user a bit more information about the app. It should look like the picture below when you're finished:
Notice how our markers don't load when the app starts when we load the page. You have to move to map to get the markers to display. How strange? Fix this in Task 6 to call the function when the map is ready and the page is fully loaded.
When you've got all the app finished try clicking on a marker and see what happens. Can you figure out in the code why this happens and where it happens? Use the Google Maps documentation as a reference if you don't understand what the code is doing.
We need to clean up our index.html file by taking out all the code inside the script tags and putting this code into a JavaScript file of its own. Create a new file inside your js folder and copy and paste the completed code into the file (don't include the script tags) and delete the code in index.html along with the script tags, make sure you save. Now reference this external file under the mapStyle.js file line in the HTML inside index.html, save the file and reload the page. The app should still work but now the index.html file is much cleaner.
That's us finished! Well done for getting to the end of this workshop!
Have a great weekend everybody!