Welcome
Welcome to Workshop 1 of Web Architecture. Today you're going to build a personal website which will allow you to share all your personal projects and visualisations. We've made sure you've got all the tools you need on the machines in the lab but if you're using your own personal machine make sure you have the Chrome browser installed and that you have a text editor that has syntax highlighting enabled. We'll be using VSCode - https://code.visualstudio.com/download - throughout the course which is available for Mac Windows and Linux but you can also use the following editors as well if you already use them. Notepad++ http://notepad-plus-plus.org on the Windows machines, if you have a Mac you can also use Atom https://atom.io, which is free, or Sublime Text http://www.sublimetext.com (paid but free to use for 30 days). At the start of the workshop we will cover the basics of each editor and how to use the tools to develop your website.
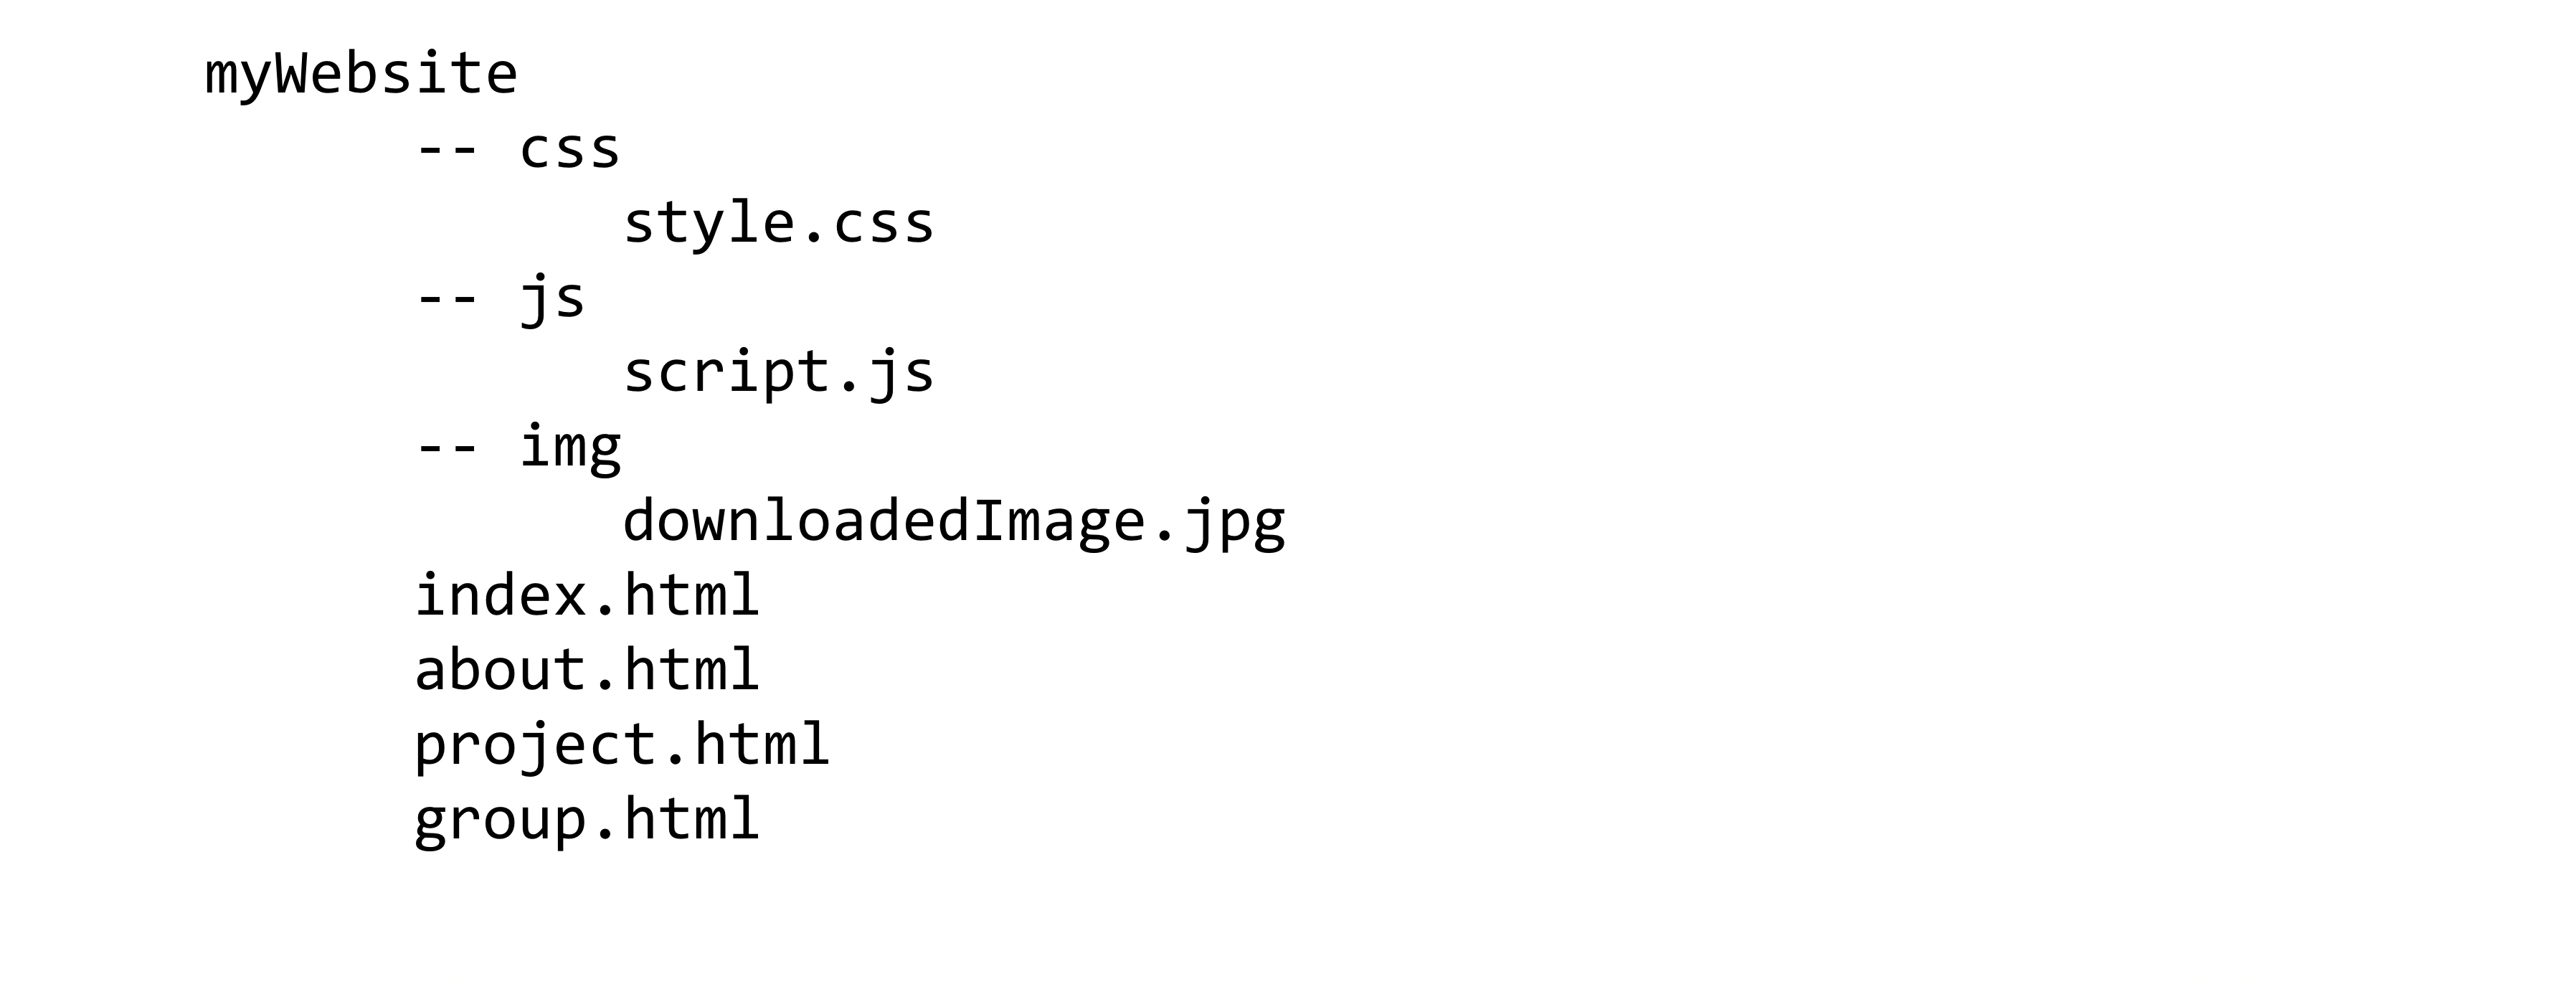
As I mentioned in the lecture, a website is just a group of files on a remote server that the browser requests and renders on the screen, phone or tablet. The basic structure of every website is the same: you have a folder for the style sheets, a folder for images and the individual html pages that contain the information you want to share with the world.
Create a folder somewhere in your local directory called "myWebsite" (this is called the site root) which has the following structure: (– represent folders, the rest are files – this is called a directory tree)
Once you have these files and folders created, download an image from the web and put it in the img folder. Open the new files in your text editor and start creating your website, a good place to start with is index.html. Grab a copy of the lecture slides to use as a reference and if you need any help with tags or attributes then have a look at http://www.w3schools.com to see if you can find what you're looking for before asking a question.
Also have a quick search on Google for the answer as well framing your question as:

Doing this will make you a better developer in the future and enhances skills in problem solving as it will train you to understanding what's happening within the process. Also try and avoid copying and pasting answers from other websites. Use the code samples given as a reference and type the text into the file. In programming, by typing the code you'll start to learn how structures are built and how they are referenced in other files. Ultimately, you'll learn faster. You will not learn anything from copying and pasting someone else's code! If you're really stuck then of course, ask away, that's what were here for.
The following sections give you an idea on how to design your page and feel free to either copy the design, use as a starting point or design your own page from scratch. If you are having difficulties translating this design into HTML, just take a pencil and start drawing boxes around the elements, making sure you start at the side of the page. This will help you break up the page into div elements.
Repeat the same design for the ABOUT, PROJECT and GROUP Pages and experiment with lists, tables, and the other elements you have been taught about today. Keep the top and bottom of each page constant to make your site consistent when the user clicks your links. Also try and embed your favourite YouTube video in your about page for extra practise. If you want to jump ahead, maybe try and add a Google Map if you're really adventurous (we will cover this is later weeks).
Install the Live Server Extension in VSCode
Live Server is particularly useful for web development, as it provides a local development server and allows us to see how our website will act when uploaded onto a web server.
To install the Live Server extension in Visual Studio Code (VSCode), you can follow these step-by-step instructions:
- Open Visual Studio Code: You should have installed this during the installation day in induction week.
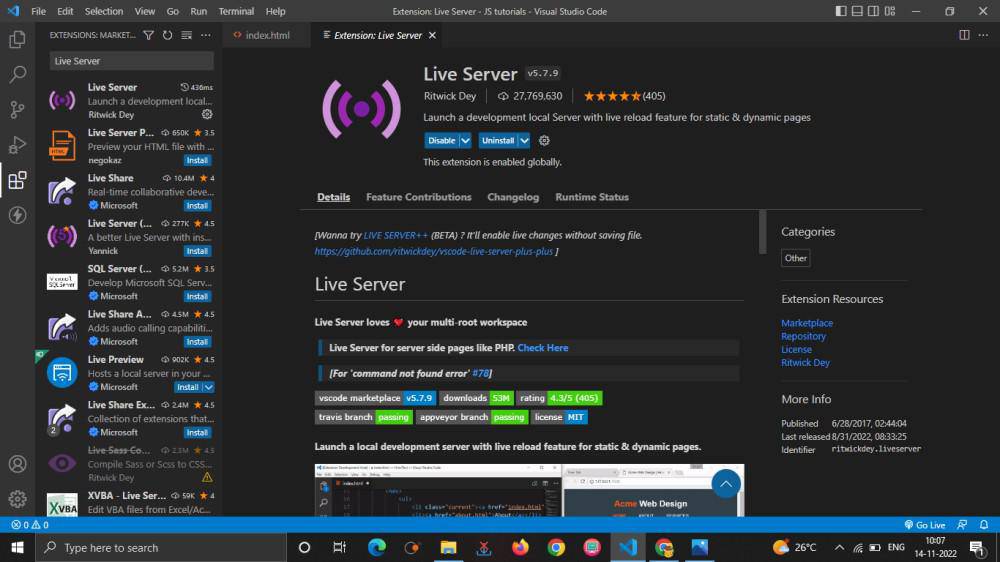
- Open VSCode Extensions: Launch VSCode, and on the left sidebar, you will find an icon that looks like a set of square puzzle pieces. This is the Extensions view. Click on it to open.
- Search for Live Server: In the Extensions view, you will see a search bar at the top. Type "Live Server" into the search bar and press Enter. - You can also install from the VSCode extensions web link as well https://marketplace.visualstudio.com/items?itemName=ritwickdey.LiveServer
- Install the Extension: Look for the "Live Server" extension in the search results. It should be the one developed by Ritwick Dey. Click on the "Install" button next to the extension name.
- Wait for Installation: VSCode will download and install the extension. You'll see a progress indicator during the installation process.
- Start a Project: Create or open a project folder where you have HTML, CSS, or JavaScript files.
- Open an HTML File: Inside your project folder, open an HTML file that you want to preview in your web browser using Live Server.
- Launch Live Server: With the HTML file open, look at the bottom corner of your VSCode window for the Go Live button and click to run the Live Server.

- Access the Live Preview: Your default web browser should automatically open, displaying your HTML file served by Live Server. If it doesn't, you can manually access the live preview by opening a web browser and navigating to the URL provided in the output of Live Server. Typically, it will be something like http://127.0.0.1:5500/your-file-name.html.
- Live Reload: As you make changes to your HTML, CSS, or JavaScript files and save them, Live Server will automatically refresh the browser to reflect the latest changes without the need to manually refresh the page.
That's it! You've successfully installed and used the Live Server extension in Visual Studio Code. It's a handy tool for web development as it simplifies the process of live previewing your web pages.
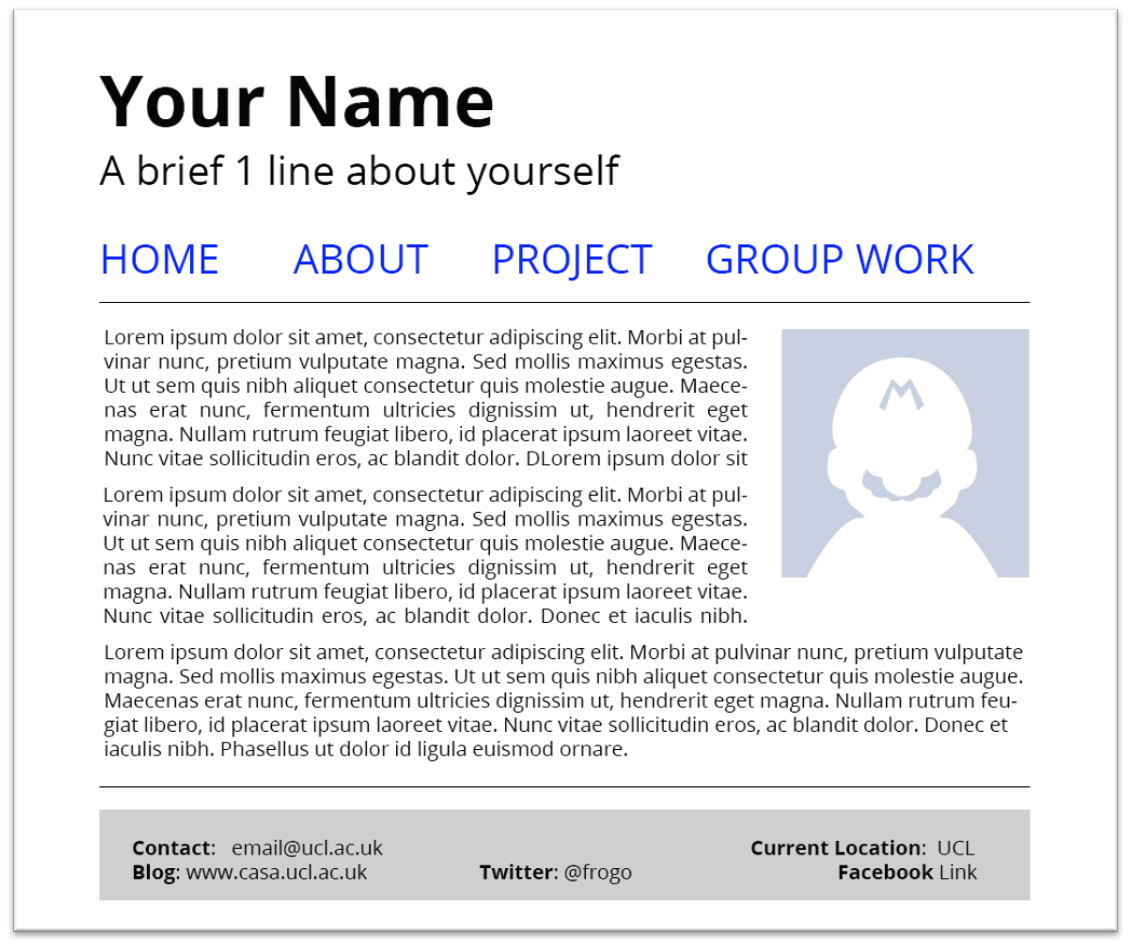
Home Page to create (index.html)
This the HTML page I'd like you to create. First sit down and work out the blocks you'll need to create and where they appear on the page. Take a piece of paper and draw the boxes (or divs) on the page and then, using the lecture notes, translate that into HTML. Think about using headings, paragraphs and identify how you'll create the spacing of the menubar at the top of the page.
If you need blocks of text to do the design then use Lorem Ipsum - https://www.lipsum.com to create random paragraphs of latin text quickly to copy and paste into the page.
Once you've got the element structures then move onto adding your CSS style rules.
When you start adding your CSS rules start with making small changes and build up the rules. F5 (shortcut to reload the current browser page) will be your best friend today. Once you've got your page all ready, copy and paste the files so that you create your ABOUT page, PROJECT page and GROUP WORK pages. Link them together using <a></a> tags and fill in the content about you.
Congrats, you have your own homepage.
Some Notes on Useful HTML tags
<!-- [Comment] -->
-- Used as a comment and wont be rendered by the browser
<hr />
-- Horizontal line which spans the whole page
<p></p>
-- Paragraph of Text (A div is not allowing inside a p tags, see span
<span></span> -- Inline element that allows positioning of individual text
elements inside a paragraph
Useful CSS Rules
// -- Comments in CSS
border: 1px solid black; // Use with a div to see the area rendered
margin: 0px 10px 0px 10px; // Shortcut to define margins – N W S E (T R B L)
border-radius: 4px 3px 6px 10px; // Gives a div round corners
margin: 0 auto; // Center a div or element automatically (need width)
font-family: Arial; // Only system fonts available.

// Why not have a look at Google Web Fonts: https://www.google.com/fonts/
What is GitHub?
We will be using GitHub a lot in this course across all modules, so if you've not signed up for GitHub yet, then now is a great time to do so!
GitHub is a website and service that allows developers to store, manage and collaborate on code. It also allows devs to track and control changes to their code bases over time using a tool called Git, which is an open-source version control system. You'll learn more about this in other modules, but for the moment, all you need to know is that GitHub is a place to view and host code.
Sign up for GitHub
To get started with GitHub.
- Sign up for a free GitHub Account if you don't already have one.
- When you've got an account, sign in and click on Your Profile in the top right-hand corner of the page.
- Click on Edit Profile on the side of your profile and add your name, Bio and links to your social media etc.
Creating your first repository
Now it's time to create your first repository in GitHub. We will create a special repository that is the same as our username and give our profile page a bit more personalisation.
- Click on the + drop-down menu, and select "New Repository".
- Use the Owner drop-down menu to select the account you want to own the repository. Make a note of your username, as you'll need it in a minute.
- For the Repository name, use the same name as your owner name. Make sure the spelling and case are identical!
- Choose "Public" to make sure the repository is publically available. This is needed to show the world your new personalisation.
- Select "Initialize this repository with a README"
- Click Create Repository
- Click on README.md inside your repository to open your README.md file
- Click on the little pencil icon to Edit this file
- Visit https://gprm.itsvg.in/ and fill out the fields to create your profile
- Copy and paste the code produced by this web app into your README.md file.
- Finally, Commit your changes to the repository. Add in a short title and description, and then press Commit Changes
As you get more skills and perfect more technologies, you can add badges to this profile to show off your skills to the rest of the world. Just rerun through the https://gprm.itsvg.in/ web app and copy and paste the code to your profile repository.
Create a GitHub.io Page to publish your profile HTML page
GitHub also allows you to publish HTML and Javascript code files to the web, and they'll host the website on their own GitHub.io domain. They host the files and serve them to users who request them. So we will create a newly hosted website for the profile page you created today.
Create a GitHub Pages site
- Click on the + drop-down menu, and select "New Repository".
- Use the Owner drop-down menu to select the account you want to own the repository. Make a note of your username, as you'll need it in a minute.
- Type in a name for your repository and an optional description. The name must be in the form
<user>.github.ioIf your username has any uppercase character, you must lowercase the letters - Choose "Public" to make sure the repository is publically available. This is needed to show the world your new personalisation.
- DeSelect "Initialize this repository with a README"
- Click Create Repository
Great you've now got a repository to store your site in. GitHub Pages will use this repository to store your website files. The system will look for an index.html file to display as the homepage of your new site. You'll now need to upload your HTML files and images into the repository so that they'll be accessible to the public web.
To upload your pages.
- Drag and drop your index.html file into your repository window
- Drag and drop your css folder into your repository window
- Drag and drop your img folder into your repository window
- Drag and drop your js folder into your repository window
- Finally, Commit your changes to the repository. Add in a short title and description, and then press Commit Changes
Once committed, the website should be ready to view. If you ever need to upload more HTML files or images etc., then just edit this repository, and your changes will appear on your website. However, it's best practice to edit locally and then commit changes to the public repo when you're happy with your changes.
Enable your GitHub Pages site
- Under your repository name, click on Settings.
- In the "Code and automation" section of the sidebar, click on Pages.
- To see your published site, under "GitHub Pages", click your site's URL.
Amazing! That's, you now got a personal website on the internet, and everyone in the world can see it!
See you at the next session!