To complete this workshop, you will need:
- Arduino MKR WAN 1310
- Antenna for MKR WAN 1310
- USB A to micro cable
- Breadboard
- DHT22 Sensor
- M-M jumper wires
- LoRa Gateway connected to Things Network
This workshop will enable you to set up an Arduino LoRa board (MKR WAN 1310 board) to upload data from some simple sensors to the Things Network over LoRaWAN (a low power, long range wireless protocol).
You will make use of the DHT22 Humidity and Temperature sensor which is a digital sensor.
What You'll Learn
- Setting up an Arduino MKR 1310 LoRa board
- LoRaWAN
- Digital sensors
- Uploading data to the Things Network
Wire up a circuit featuring the DHT22 humidity and temperature sensor as shown in the diagram below:
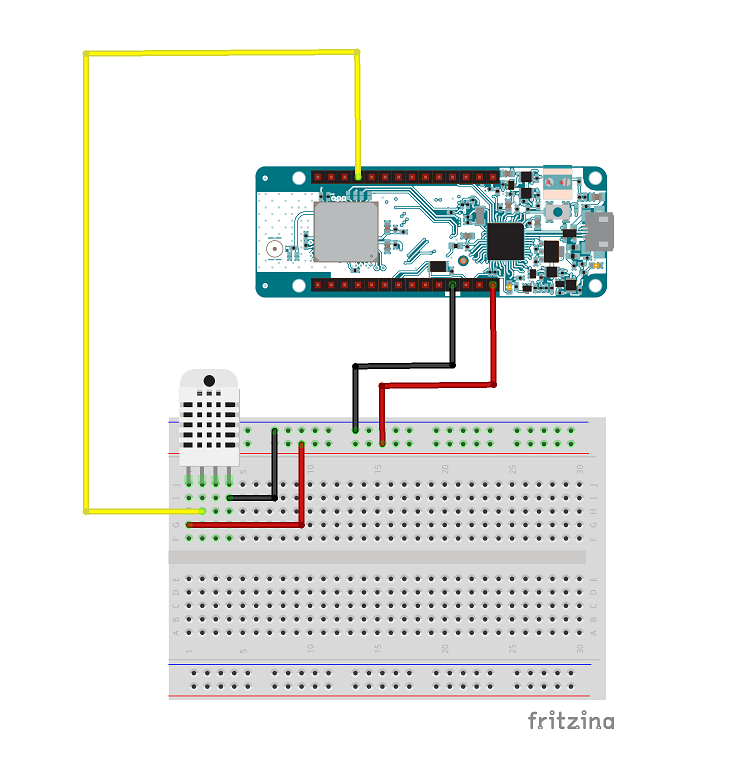
Note that the third pin of the DHT22 is unused.
The DHT22 is a combined Humidity and Temperature sensor producing a digital output. To read the DHT sensor from an Arduino sketch you need to include the DHT library.
From the Arduino IDE use the Board Manager to set the board to ‘Arduino MKR WAN 1310' from the list of Arduino SAMD Boards. Also check the Port is set to the port that the ‘Arduino MKR WAN 1310' is connected to.
From the Arduino IDE load the Library Manager:Sketch -> Include library -> Manage Libraries
Enter ‘DHT sensor library' in the search box and install the DHT sensor library by Adafruit.
Enter the following code in the sketch
// First install "DHT sensor library" via the Library Manager
#include <DHT.h>

#define debugSerial Serial
#define DHTPIN 2  //Digital Pin 2
#define DHTTYPE DHT22

DHT dht(DHTPIN, DHTTYPE);

void setup(){

  debugSerial.begin(9600);

  // Wait a maximum of 10s for Serial Monitor
  while (!debugSerial && millis() < 10000)
    ;

  //Initialise the DHT sensor
  dht.begin();

}


void loop(){
  debugSerial.println("-- LOOP");

  float humidity = dht.readHumidity(false);

  // false: Celsius (default)
  // true: Farenheit
  float temperature = dht.readTemperature(false);

  debugSerial.print("Temperature: ");
  debugSerial.println(temperature);
  debugSerial.print("Humidity: ");
  debugSerial.println(humidity);

  delay(30000);
}
Check the code has been entered correctly by compiling the code.
Once you have the code compiling sucessfully you can upload the sketch to the Arduino LoRa board. Now open the Serial Monitor, you should be able to see the values for humidity and temperature printed in the debug output.
Save the sketch.
Create an account on the Things Network
Add your username to the shared document so that we can add you as a collaborator to our Things Network application.
Now you will explore setting up the Arduino board as a LoRa device. First, ensure you have connected the antenna to the Arduino LoRa board.
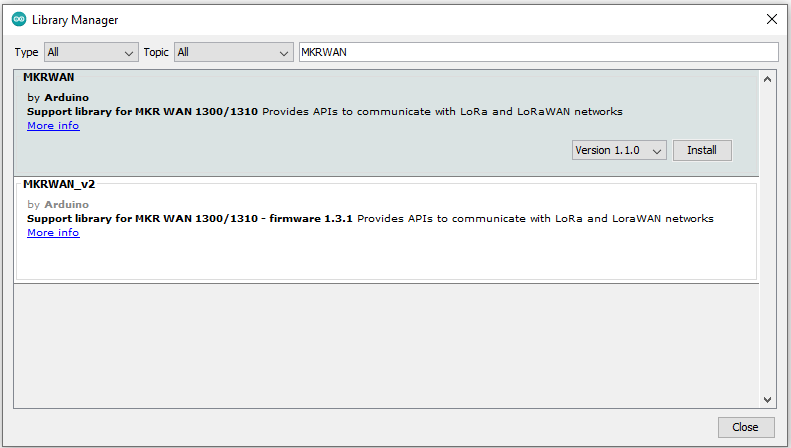
Now install the MKRWAN library using the Libary Manager:Sketch -> Include library -> Manage Libraries
Load the following sketch:File -> Examples -> MKRWAN -> FirstConfiguration
Upload the sketch to the Arduino MKR WAN 1310 board and open the Serial Monitor:Tools -> Serial Monitor
and copy the device EUI (DevEUI) value as shown below and paste into a simple text file (Notepad on Windows or Text Edit on a Mac) for future reference.

Open a browser and navigate to the the Application for this workshop on the Things Network.
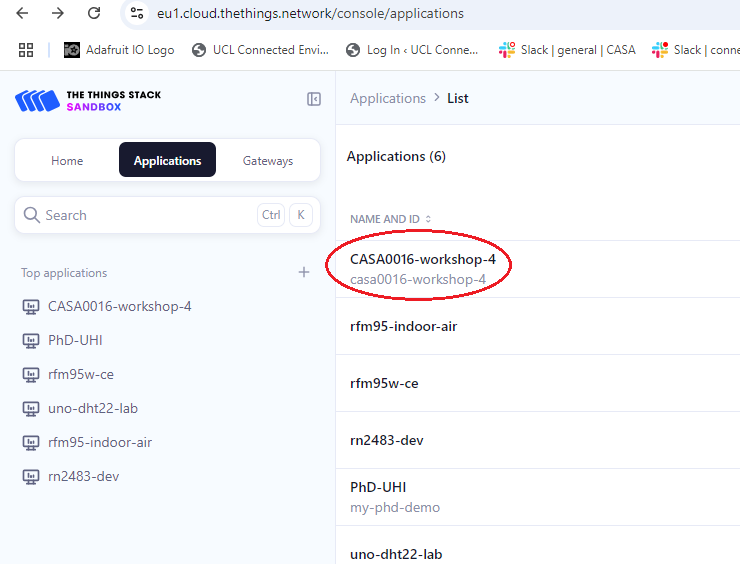
Click on the ‘CASA0016-workshop-4' to open the Application.
In the ‘End devices' section click on ‘Register end device'. Use the ‘the LoraWAN Device Repository' option to select the Arduino MKR WAN 1310 as shown in the screen shot below:
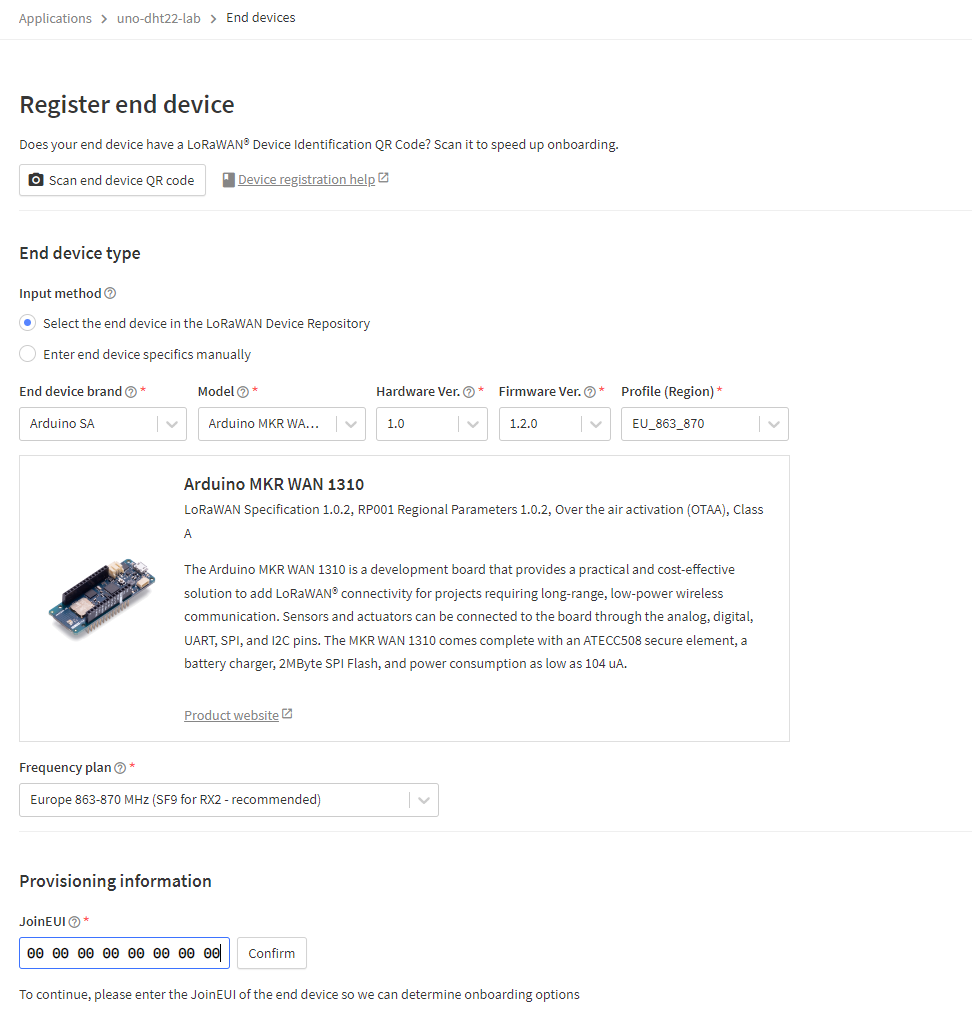
Use 00 00 00 00 00 00 00 00 for the JoinEUI and select ‘Confirm'
Then scroll down the page and enter the registration data as shown below:

You will need to paste in the DevEUI you copied earlier and stored in your text file. Finally you should generate the AppKey and click on the ‘Register end device' button.
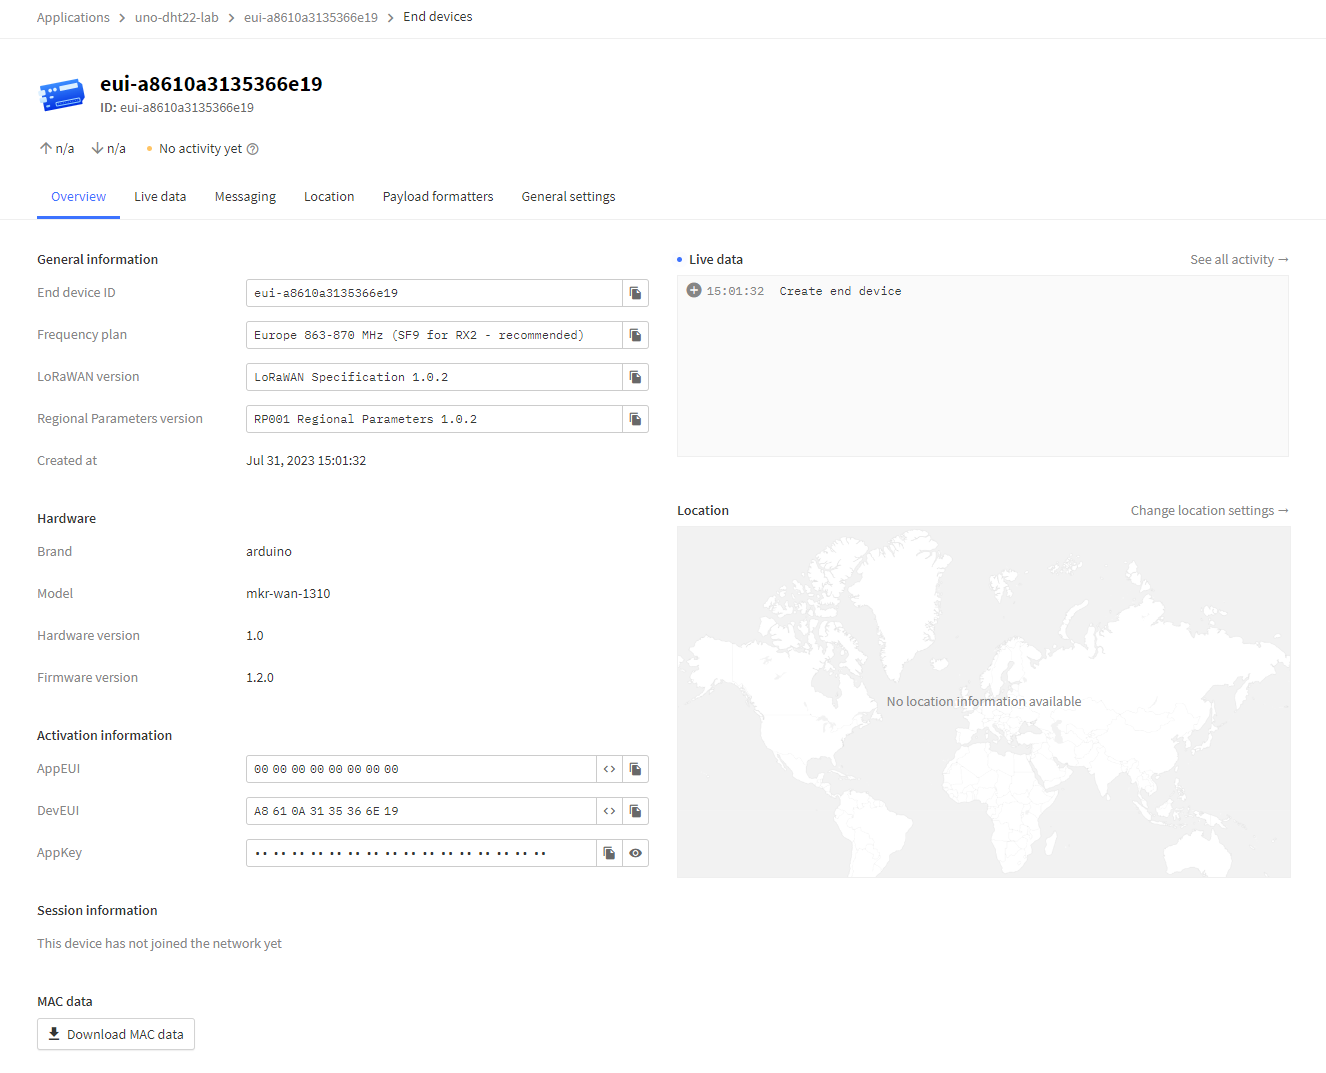
A new view is created showing information about the new device. Scroll down to the ‘Activation information' and copy the AppKey to the text file you created earlier (see below)
Finally, navigate to the top of the page and select the ‘Payload formatters' tab for the newly created device (see below)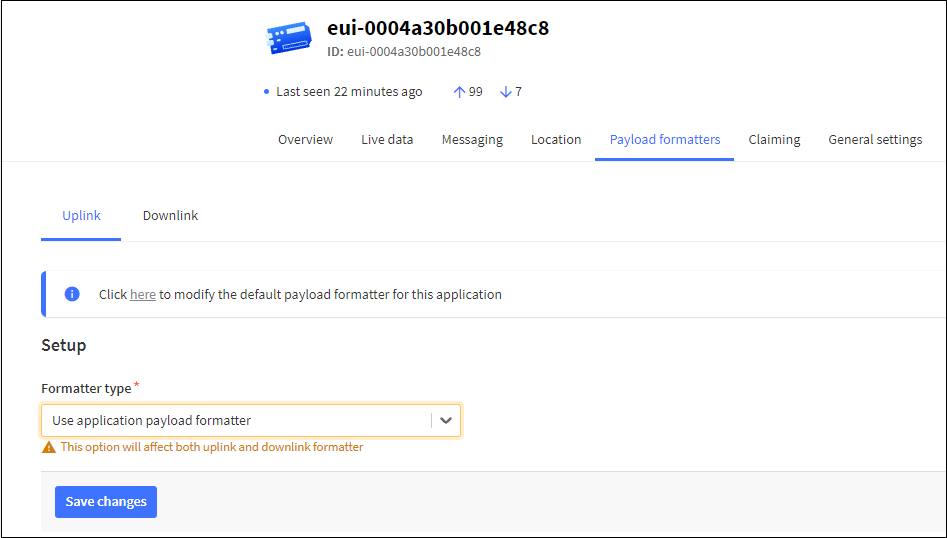
and select the ‘Use application payload formatter' option for the ‘Formatter type' and click ‘Save changes'
Return to the Arduino IDE and open DHT22 sketch you saved earlier.
At the very top of the sketch add the following line
#include <MKRWAN.h>
Find the line #include <DHT.h> and below it add add code:
// Set your AppEUI and AppKey
const char *appEui = "0000000000000000";
const char *appKey = "<APP_KEY>";
You will need to replace <APP_KEY> with the actual value of your App Key you stored earlier.
Below the line DHT dht(DHTPIN, DHTTYPE); add the following code to create a constructor to setup a TTN object:
LoRaModem modem;
In the setup() code find the line dht.begin(); and add the following code below it to establish a connection to the Lora Gateway:
  // change this to your regional band (eg. US915, AS923, ...)
  if (!modem.begin(EU868)) {
    Serial.println("Failed to start module");
  }

  Serial.print("Your device EUI is: ");
  Serial.println(modem.deviceEUI());

  int connected = modem.joinOTAA(appEui, appKey);
  if (!connected) {
    Serial.println("Something went wrong; are you indoor? Move near a window and retry");
  }
To minimise the size of the payload transmitted over LoRa, it is necessary to convert our sensor values to unsigned integers. To avoid loosing precision we multiply the sensor values by 100 (applying the reverse transformation at the Things Network backend).
Find the following line float humidity = dht.readHumidity(false); and change it to:
uint16_t humidity = 100*dht.readHumidity(false);
Similarly find the line float temperature = dht.readTemperature(false); and change it to:
uint16_t temperature = 100*dht.readTemperature(false);
Now will convert our sensor values to binary and upload them to the ThingsNetwork. Below the line uint16_t temperature = 100*dht.readTemperature(false); add the follwing:
  // Split both words (16 bits) into 2 bytes of 8
  byte payload[4];
  payload[0] = highByte(temperature);
  payload[1] = lowByte(temperature);
  payload[2] = highByte(humidity);
  payload[3] = lowByte(humidity);
And below this add the following lines to upload the data to the Things Network as shown below
  modem.beginPacket();
  modem.write(payload, sizeof(payload));
  int err = modem.endPacket(true);
  if (err > 0) {
    Serial.println("Message sent correctly!");
  } else {
    Serial.println("Error sending message");
  }
Your sketch should now look like this:
#include <MKRWAN.h>

// First install "DHT sensor library" via the Library Manager
#include <DHT.h>

// Set your AppEUI and AppKey
const char *appEui = "0000000000000000";
const char *appKey = "<YOUR-APP-KEY>";

#define debugSerial Serial
#define DHTPIN 2  //Digital Pin 2
#define DHTTYPE DHT22

DHT dht(DHTPIN, DHTTYPE);


LoRaModem modem;


void setup() {

  debugSerial.begin(9600);

  // Wait a maximum of 10s for Serial Monitor
  while (!debugSerial && millis() < 10000)
    ;

  //Initialise the DHT sensor
  dht.begin();

  // change this to your regional band (eg. US915, AS923, ...)
  if (!modem.begin(EU868)) {
    Serial.println("Failed to start module");
  }

  Serial.print("Your device EUI is: ");
  Serial.println(modem.deviceEUI());

  int connected = modem.joinOTAA(appEui, appKey);
  if (!connected) {
    Serial.println("Something went wrong; are you indoor? Move near a window and retry");
  }

}


void loop() {

  debugSerial.println("-- LOOP");

  uint16_t humidity = 100*dht.readHumidity(false);

  // false: Celsius (default)
  // true: Farenheit
  uint16_t temperature = 100*dht.readTemperature(false);

  debugSerial.print("Temperature: ");
  debugSerial.println(temperature);
  debugSerial.print("Humidity: ");
  debugSerial.println(humidity);

  byte payload[4];
  payload[0] = highByte(temperature);
  payload[1] = lowByte(temperature);
  payload[2] = highByte(humidity);
  payload[3] = lowByte(humidity);

  modem.beginPacket();
  modem.write(payload, sizeof(payload));
  int err = modem.endPacket(true);
  if (err > 0) {
    Serial.println("Message sent correctly!");
  } else {
    Serial.println("Error sending message");
  }

  delay(30000);
}
Compile the code and once you have the code compiling sucessfully you can upload the sketch to the Arduino MRK WAN 1310 LoRa board.
Now return to the Things Network console for the application and select the Live data option from the panel on the left (see below):
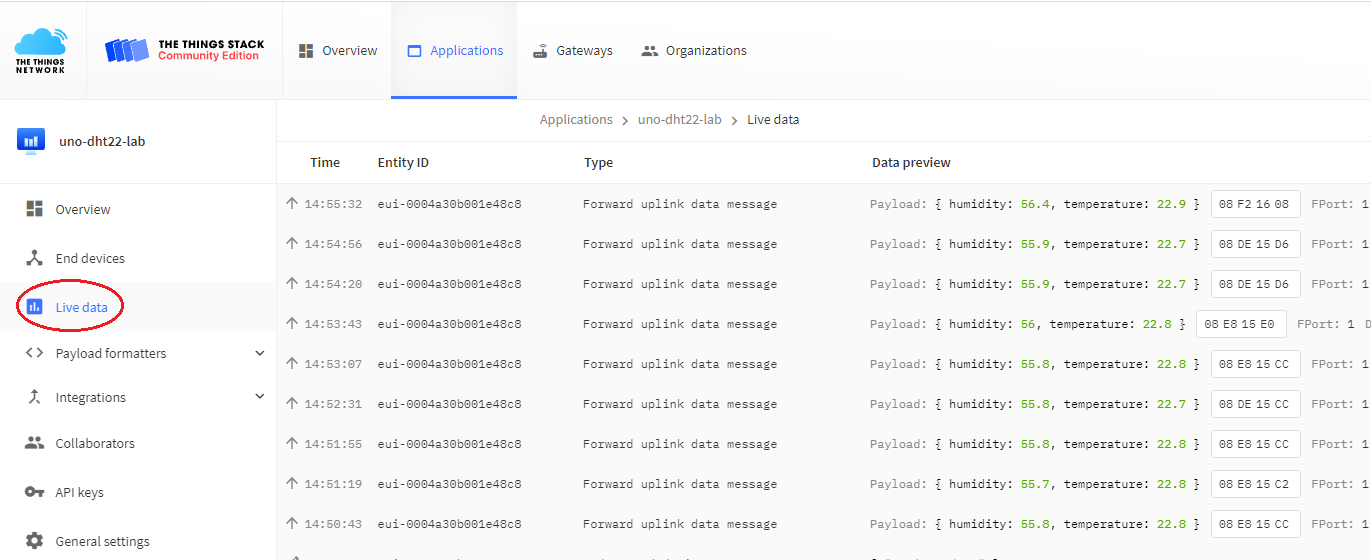
You should be able to see the data uploaded by your device.
Finally, please keep the Arduino MRK WAN 1310 board in your kit bag as you will need it in a later Workshop.